2001 LINCOLN TOWN CAR ignition
[x] Cancel search: ignitionPage 150 of 240
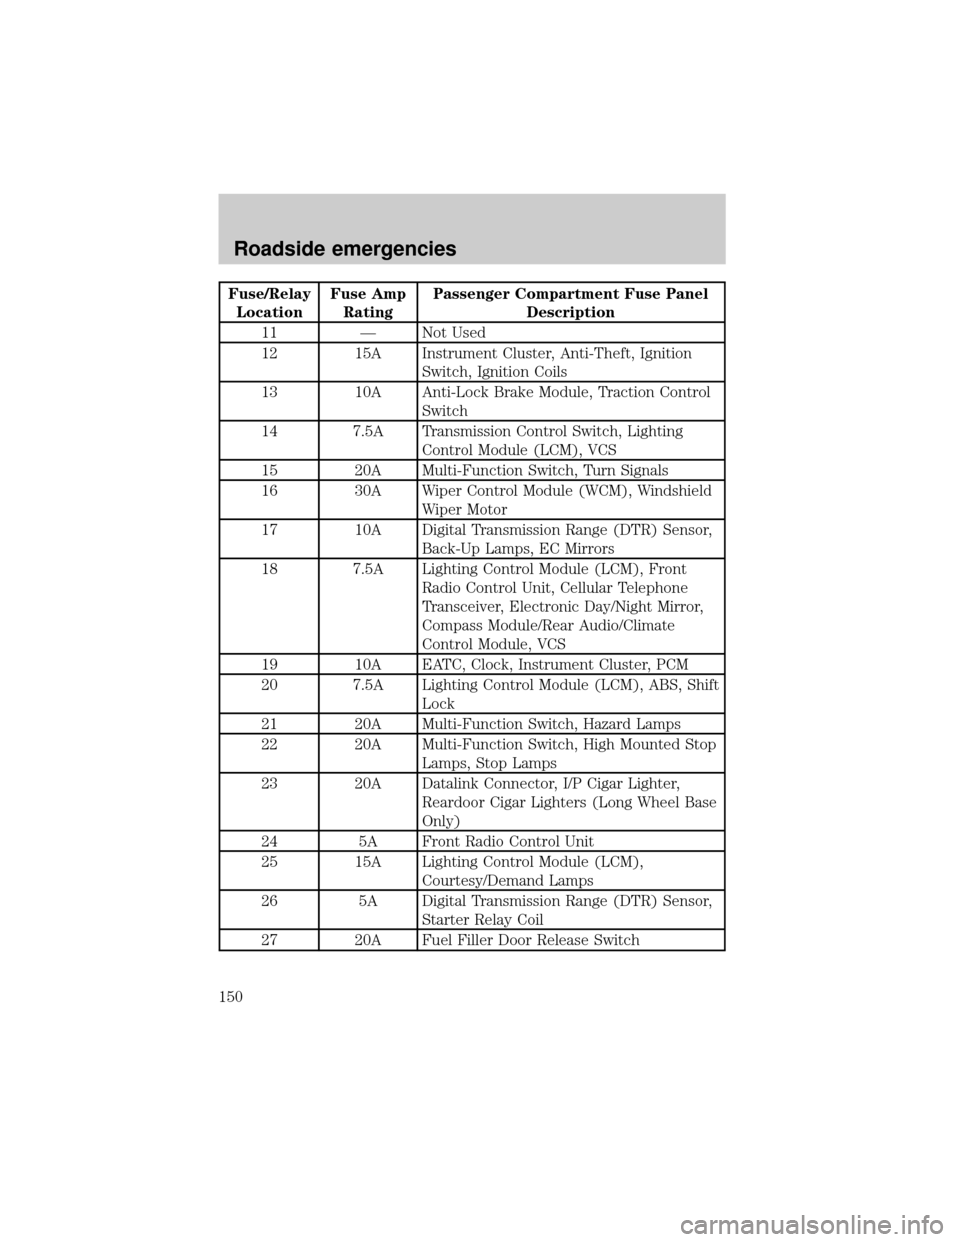
Fuse/Relay
LocationFuse Amp
RatingPassenger Compartment Fuse Panel
Description
11 Ð Not Used
12 15A Instrument Cluster, Anti-Theft, Ignition
Switch, Ignition Coils
13 10A Anti-Lock Brake Module, Traction Control
Switch
14 7.5A Transmission Control Switch, Lighting
Control Module (LCM), VCS
15 20A Multi-Function Switch, Turn Signals
16 30A Wiper Control Module (WCM), Windshield
Wiper Motor
17 10A Digital Transmission Range (DTR) Sensor,
Back-Up Lamps, EC Mirrors
18 7.5A Lighting Control Module (LCM), Front
Radio Control Unit, Cellular Telephone
Transceiver, Electronic Day/Night Mirror,
Compass Module/Rear Audio/Climate
Control Module, VCS
19 10A EATC, Clock, Instrument Cluster, PCM
20 7.5A Lighting Control Module (LCM), ABS, Shift
Lock
21 20A Multi-Function Switch, Hazard Lamps
22 20A Multi-Function Switch, High Mounted Stop
Lamps, Stop Lamps
23 20A Datalink Connector, I/P Cigar Lighter,
Reardoor Cigar Lighters (Long Wheel Base
Only)
24 5A Front Radio Control Unit
25 15A Lighting Control Module (LCM),
Courtesy/Demand Lamps
26 5A Digital Transmission Range (DTR) Sensor,
Starter Relay Coil
27 20A Fuel Filler Door Release Switch
Roadside emergencies
150
Page 152 of 240
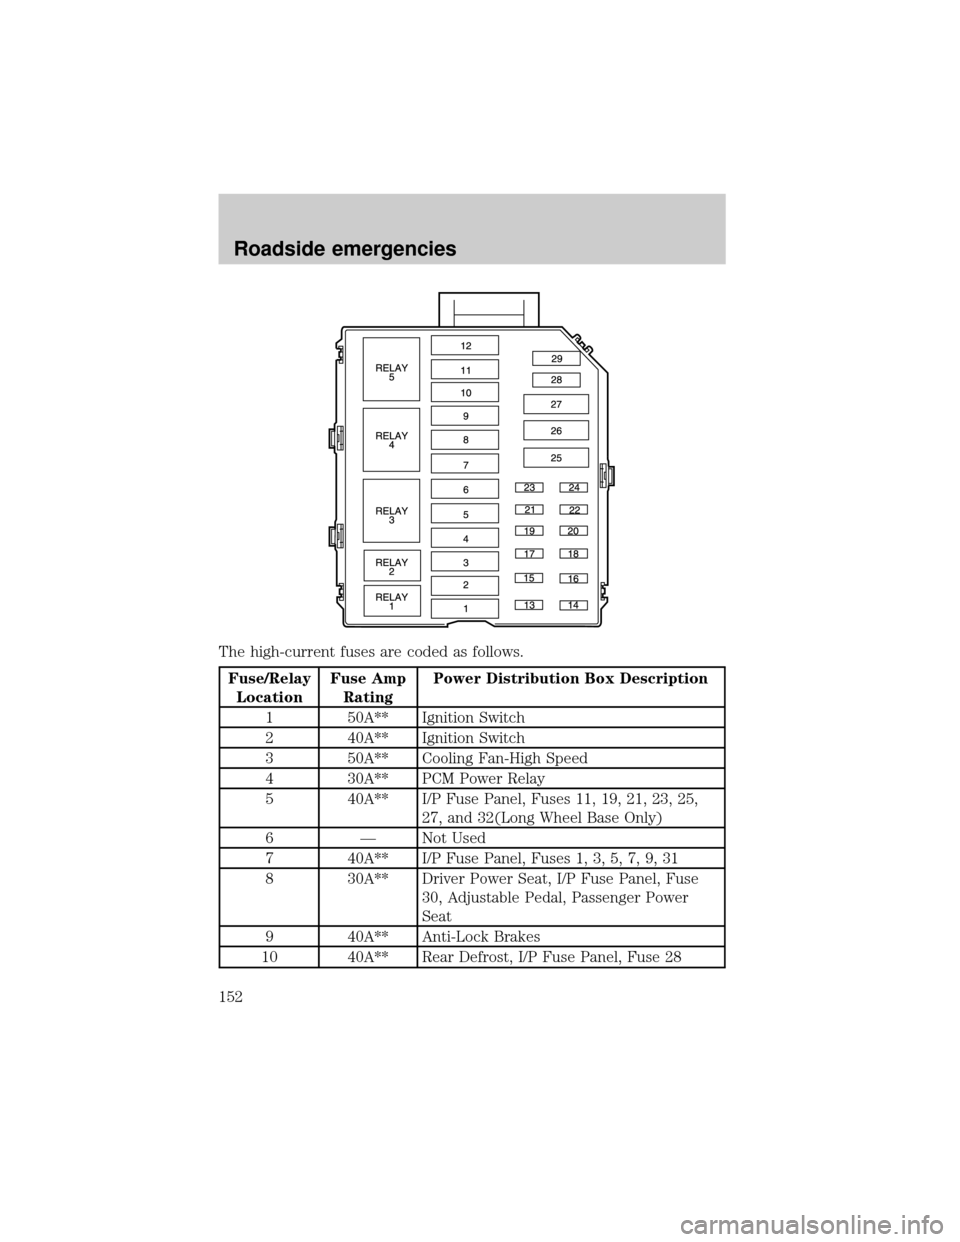
The high-current fuses are coded as follows.
Fuse/Relay
LocationFuse Amp
RatingPower Distribution Box Description
1 50A** Ignition Switch
2 40A** Ignition Switch
3 50A** Cooling Fan-High Speed
4 30A** PCM Power Relay
5 40A** I/P Fuse Panel, Fuses 11, 19, 21, 23, 25,
27, and 32(Long Wheel Base Only)
6 Ð Not Used
7 40A** I/P Fuse Panel, Fuses 1, 3, 5, 7, 9, 31
8 30A** Driver Power Seat, I/P Fuse Panel, Fuse
30, Adjustable Pedal, Passenger Power
Seat
9 40A** Anti-Lock Brakes
10 40A** Rear Defrost, I/P Fuse Panel, Fuse 28
Roadside emergencies
152
Page 184 of 240
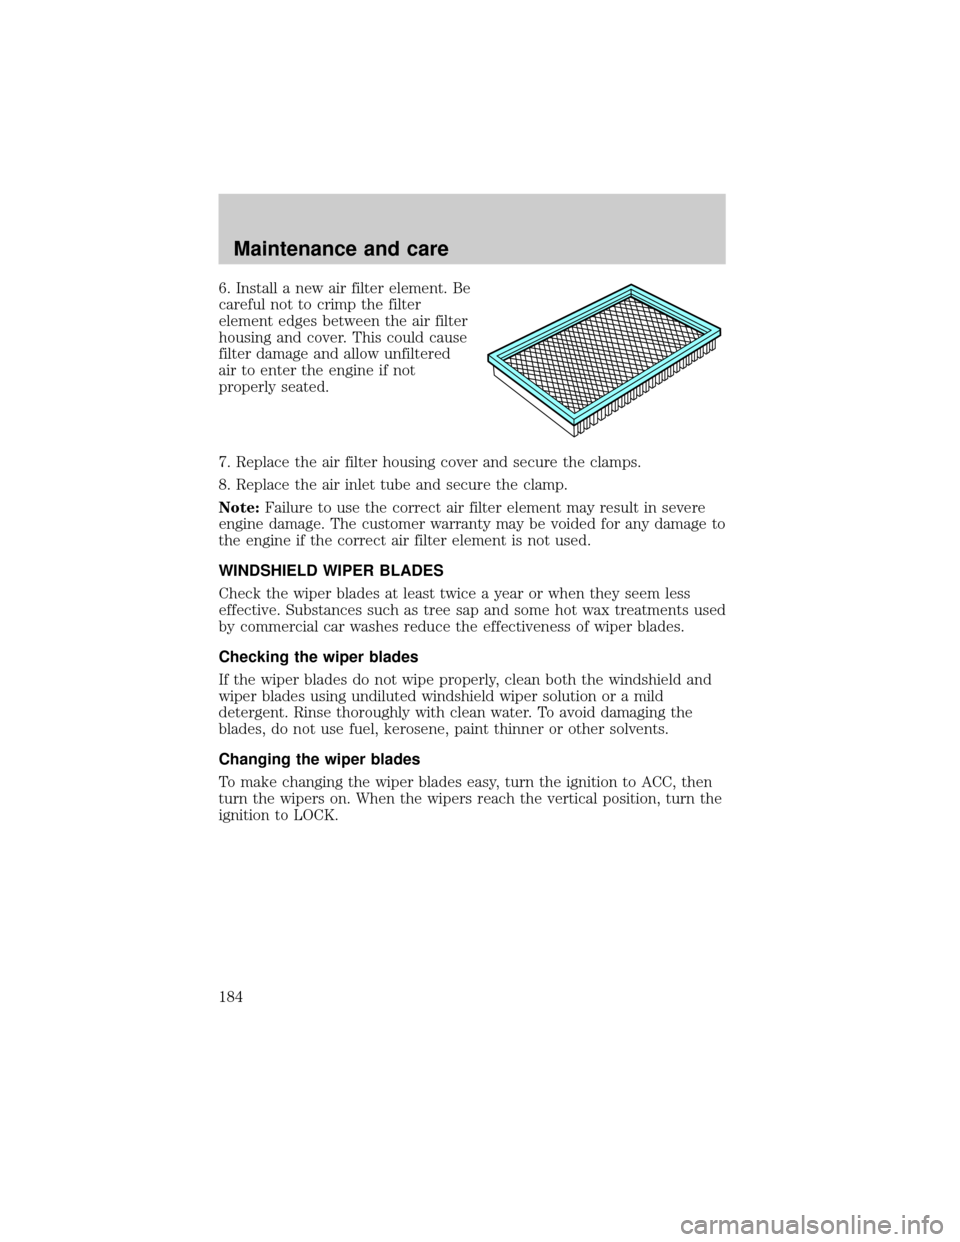
6. Install a new air filter element. Be
careful not to crimp the filter
element edges between the air filter
housing and cover. This could cause
filter damage and allow unfiltered
air to enter the engine if not
properly seated.
7. Replace the air filter housing cover and secure the clamps.
8. Replace the air inlet tube and secure the clamp.
Note:Failure to use the correct air filter element may result in severe
engine damage. The customer warranty may be voided for any damage to
the engine if the correct air filter element is not used.
WINDSHIELD WIPER BLADES
Check the wiper blades at least twice a year or when they seem less
effective. Substances such as tree sap and some hot wax treatments used
by commercial car washes reduce the effectiveness of wiper blades.
Checking the wiper blades
If the wiper blades do not wipe properly, clean both the windshield and
wiper blades using undiluted windshield wiper solution or a mild
detergent. Rinse thoroughly with clean water. To avoid damaging the
blades, do not use fuel, kerosene, paint thinner or other solvents.
Changing the wiper blades
To make changing the wiper blades easy, turn the ignition to ACC, then
turn the wipers on. When the wipers reach the vertical position, turn the
ignition to LOCK.
Maintenance and care
184
Page 191 of 240
When refueling always shut the engine off and never allow
sparks or open flames near the filler neck. Never smoke while
refueling. Fuel vapor is extremely hazardous under certain conditions.
Care should be taken to avoid inhaling excess fumes.
The flow of fuel through a fuel pump nozzle can produce static
electricity, which can cause a fire if fuel is pumped into an
ungrounded fuel container.
Use the following guidelines to avoid static build-up when filling an
ungrounded fuel container:
²Place approved fuel container on the ground.
²DO NOT fill a fuel container while it is in the vehicle (including the
cargo area).
²Keep the fuel pump nozzle in contact with the fuel container while
filling.
²DO NOT use a device that would hold the fuel pump handle in the fill
position.
Fuel Filler Cap
Your fuel tank filler cap has an indexed design with a 1/8 turn on/off
feature.
When fueling your vehicle:
1. Turn the engine off.
2.
Carefully turn the filler cap counterclockwise 1/8 of a turn until it stops.
3. Pull to remove the cap from the fuel filler pipe.
4. To install the cap, align the tabs on the cap with the notches on the
filler pipe.
5. Turn the filler cap clockwise 1/8 of a turn until it stops.
The ªCheck Fuel Capº (if equipped) light illuminates when the ignition is
turned to the ON position. It will also illuminate when the fuel filler cap
is not properly installed. Proper fuel filler cap installation is checked
automatically as the vehicle is driven, but not until after some fuel is
used (fuel guage drops below full). Once the fuel filler cap is properly
secured, the ªCheck Fuel Capº light will turn off after a short period of
driving.
Maintenance and care
191
Page 193 of 240
Fuel quality
If you are experiencing starting, rough idle or hesitation driveability
problems during a cold start, try a different brand of gasoline. ªPremiumº
unleaded gasoline should not be used (particularly in the United States)
if ªRegularº unleaded gasoline is recommended because it may cause
these problems to become more pronounced. If the problems persist, see
your dealer or a qualified service technician.
It should not be necessary to add any aftermarket products to your fuel
tank if you continue to use high quality fuel of the recommended octane
rating. Aftermarket products could cause damage to the fuel system.
Repairs to correct the effects of using an aftermarket product in your
fuel may not be covered by your warranty.
Many of the world's automakers
issued the World-wide Fuel Charter
that recommends gasoline
specifications to provide improved
performance and emission control
system protection for your vehicle.
Gasolines that meet the World-wide
Fuel Charter should be used when
available. Ask your fuel supplier
about gasolines that meet the
World-wide Fuel Charter. In Canada,
look for fuels that display theAuto Makers' Choiceylogo.
Cleaner air
Ford endorses the use of reformulated ªcleaner-burningº gasolines to
improve air quality.
Running out of fuel
Avoid running out of fuel because this situation may have an adverse
affect on powertrain components.
If you have run out of fuel:
²You may need to cycle the ignition from OFF to ON several times after
refueling, to allow the fuel system to pump the fuel from the tank to
the engine.
²Your ªService Engine Soonº indicator may come on. For more
information on the ªService Engine Soonº indicator, refer to the
Instrumentationchapter.
Maintenance and care
193
Page 194 of 240
Fuel Filter
For fuel filter replacement, see your dealer or a qualified service
technician. Refer to the scheduled maintenance guide for the appropriate
intervals for changing the fuel filter.
Replace the fuel filter with an authorized Motorcraft part. The
customer warranty may be void for any damage to the fuel system
if an authorized Motorcraft fuel filter is not used.
ESSENTIALS OF GOOD FUEL ECONOMY
Measuring techniques
Your best source of information about actual fuel economy is you, the
driver. You must gather information as accurately and consistently as
possible. Fuel expense, frequency of fillups or fuel gauge readings are
NOT accurate as a measure of fuel economy. We do not recommend
taking fuel economy measurements during the first 1 600 km
(1 000 miles) of driving (engine break-in period). You will
get a more accurate measurement after 3 000 km±5 000 km
(2 000 miles-3 000 miles).
Filling the tank
The advertised fuel capacity of the fuel tank on your vehicle is equal to
the rated refill capacity of the fuel tank as listed in theRefill capacities
section ofthe Capacities and specificationschapter.
The advertised capacity is the amount of the indicated capacity and the
empty reserve combined. Indicated capacity is the difference in the
amount of fuel in a full tank and a tank when the fuel gauge indicates
empty. Empty reserve is the small amount of fuel remaining in the fuel
tank after the fuel gauge indicates empty.
The amount of usable fuel in the empty reserve varies and should
not be relied upon to increase driving range. When refueling your
vehicle after the fuel gauge indicates empty, you might not be
able to refuel the full amount of the advertised capacity of the
fuel tank due to the empty reserve still present in the tank.
For consistent results when filling the fuel tank:
²Turn the engine/ignition switch to the off position prior to refueling,
an error in the reading will result if the engine is left running.
²Use the same filling rate setting (low Ð medium Ð high) each time
the tank is filled.
Maintenance and care
194
Page 197 of 240
²Fuel economy may decrease with lower temperatures during the first
12±16 km (8±10 miles) of driving.
²Driving on flat terrain offers improved fuel economy as compared to
driving on hilly terrain.
²Transmissions give their best fuel economy when operated in the top
cruise gear and with steady pressure on the gas pedal.
²Close windows for high speed driving.
EPA window sticker
Every new vehicle should have the EPA window sticker. Contact your
dealer if the window sticker is not supplied with your vehicle. The EPA
window sticker should be your guide for the fuel economy comparisons
with other vehicles.
It is important to note the box in the lower left corner of the window
sticker. These numbers represent the Range of L/100 km (MPG)
expected on the vehicle under optimum conditions. Your fuel economy
may vary depending upon the method of operation and conditions.
EMISSION CONTROL SYSTEM
Your vehicle is equipped with various emission control components and a
catalytic converter which will enable your vehicle to comply with
applicable exhaust emission standards. To make sure that the catalytic
converter and other emission control components continue to work
properly:
²Use only the specified fuel listed.
²Avoid running out of fuel.
²Do not turn off the ignition while your vehicle is moving, especially at
high speeds.
²Have the items listed in your scheduled maintenance guide performed
according to the specified schedule.
The scheduled maintenance items listed in the scheduled maintenance
guide are essential to the life and performance of your vehicle and to its
emissions system.
If other than Ford, Motorcraft or Ford-authorized parts are used for
maintenance replacements or for service of components affecting
emission control, such non-Ford parts should be equivalent to genuine
Ford Motor Company parts in performance and durability.
Maintenance and care
197
Page 215 of 240
Item Ford part
nameFord part
numberFord
specification
Rear Axle
Lubricant
2Motorcraft SAE
80W-90
Premium Rear
Axle LubricantXY-80W90-QL WSP-M2C197-A
Windshield
washer fluidUltra-clear
Windshield
Washer
ConcentrateC9AZ-19550-AC ESR-M17P5-A
1Use only brake fluids certified to meet Ford specifications. DOT 3 fluid
is recommended. However, if DOT 3 is not available, DOT 4 fluid can be
used.
2Add 118 ml (4 oz.) of Additive Friction Modifier C8AZ-19B546-A or
equivalent meeting Ford specification EST-M2C118-A for complete refill
of Traction-Lok rear axles.
For limousine, use 2.2±2.4L (4.75±5.0 pints) of Motorcraft Synthetic High
Performance Rear Axle Lubricant F1TZ-19780-B (75W-140) or equivalent
meeting Ford Specification WSL-M2C192-A for complete refill of rear
axles.
3Ensure the correct transmission fluid is used. Transmission fluid
requirements are indicated on the dipstick or the dipstick handle.
MERCONtand MERCONtV are not interchangeable. DO NOT mix
MERCONtand MERCONtV. Refer to your scheduled maintenance guide
to determine the correct service interval.
ENGINE DATA
Engine 4.6L SOHC V8 engine
Cubic inches 281
Required fuel 87 octane
Firing order 1-3-7-2-6-5-4-8
Spark plug gap 1.3-1.4 mm (0.052-0.056 inch)
Ignition system Coil on plug
Compression ratio 9.4:1
Capacities and specifications
215