2001 LINCOLN CONTINENTAL suspension
[x] Cancel search: suspensionPage 19 of 224

electrical loads as soon as possible. If the warning stays on or comes on
when the engine is operating at normal speeds, have the electrical
system checked as soon as possible.
LOW FUEL LEVEL.Displayed when you have approximately 80 km (50
miles) to empty.
LOW ENGINE COOLANT.Displayed when the engine coolant level is
low. Stop the vehicle as soon as safely possible, turn off the engine and
let it cool. Check the coolant and level. Refer toEngine coolantin the
Maintenance and carechapter.
LOW TIRE PRESSURE (if equipped).Displayed when the tire
pressure is low. Check the tire pressure. Refer toChecking the tire
pressurein theMaintenance and carechapter.
GEAR DISPLAY DATA ERR.Displayed when the data used to provide
the redundant gear selection display on the instrument cluster is missing
or invalid. In this case, the instrument cluster redundant gear selection
display is turned off. The driver should use the mechanical position
indication on the center console gear selector as temporary indication. If
this warning stays on, contact your dealer as soon as safely possible.
CHECK/TIGHTEN FUEL CAP.Displayed when the fuel filler cap is
not properly installed. Proper fuel filler cap installation is checked
automatically as the vehicle is driven but not until after some fuel is used
(fuel gauge drops below full). Once the fuel filler cap is properly
secured, the ªCHECK/TIGHTEN FUEL CAPº message will turn off after a
short period of driving. Refer toFuel Filler Capin theMaintenance
and carechapter.
BRAKE LAMP OUT.Displayed when the brake lamps are activated and
at least one is burned out. Check the lamps as soon as safely possible
and have the burned out lamp replaced. The center high-mount
brakelamp is not monitored.
CHECK TRACTION CONTROL.Displayed when the Traction
Controlysystem is not operating properly. If this message is displayed
on the message centerandthe amber T/C OFF light in the Traction
Controlyon/off switch isnotilluminated, the Traction Controlysystem
will be partially operable. If this warning stays on, contact your dealer for
service as soon as possible. For further information, refer toTraction
controlyin theDrivingchapter.
CHECK RIDE CONTROL.Displayed when the air suspension system is
not operating properly. If this message is displayed while driving, pull off
the road as soon as safely possible. The message may also be displayed if
Instrumentation
19
Page 20 of 224

the vehicle is loaded beyond the recommended maximum payload. This
is a normal condition if the vehicle is overloaded. To correct this
condition:
1. Remove or redistribute the payload per the recommended maximum
requirements.
2. Turn the ignition switch from ON to OFF to ON again.
If the message reappears:
1. Turn the air suspension switch (located in the trunk) OFF.
2. Contact your dealer for service as soon as safely possible.
For more information, refer toAir suspensionin theDrivingchapter.
TRUNK AJAR.Displayed when the trunk is not completely closed.
CHECK STEERING ASSIST.Displayed when the steering system is
not operating properly. If this message is displayed while driving, pull off
the road as soon as safely possible. If this warning stays on, contact your
dealer for service as soon as possible.
LOW WASHER FLUID.Indicates the washer fluid reservoir is less than
one quarter full. Check the washer fluid level. Refer toChecking and
adding washer fluidin theMaintenance and carechapter.
AIR LEVELING DISABLED.Displayed when the air suspension switch
is in the OFF position.
TAIL LAMP OUT.Displayed when the tail lamps are activated and at
least one is burned out. Check the lamps as soon as possible and have
the burned out lamp replaced.
CHECK FRT TURN LAMPS.Displayed when the turn signals are
activated and at least one is burned out. Check the lamps as soon as
safely possible and have the burned out lamp replaced.
TURN ON HEADLAMPS.Displayed when the headlamps are activated
by the autolamp sensor.
E/M (if equipped)
Press this control to switch the
odometer and display readouts from
metric (kilometers) to English
(miles) units.
E/M
Instrumentation
20
Page 120 of 224

²Do not operate the vehicle with a low power steering pump fluid level
(below the MIN mark on the reservoir).
If the power steering system breaks down (or if the engine is turned
off), you can steer the vehicle manually, but it takes more effort.
If the steering wanders or pulls, the condition could be caused by any of
the following:
²underinflated tire(s) on any wheel(s)
²uneven vehicle loading
²high crown in center of road
²high crosswinds
²wheels out of alignment
²loose or worn suspension components
Speed sensitive steering
The steering in your vehicle is speed sensitive. At high speeds, steering
assist will decrease to improve steering feel. At lower speeds,
maneuverability will be increased.
SeeElectronic Message Centerin theInstrumentationchapter for
personalized adjustment.
If the amount of effort required to steer your vehicle changes at a
constant vehicle speed, have the power steering system checked by your
dealer or a qualified service technician.
AIR SUSPENSION SYSTEM
The air suspension system is designed to improve ride, handling and
general vehicle performance during:
²certain road conditions
²steering maneuvers
²braking
²accelerations
This system keeps the rear of your vehicle at a constant level by
automatically adding air or releasing air from the springs.
If you exceed the load limit, the rear air suspension may not operate and
the system warning CHECK RIDE CONTROL may appear on the message
center.
Driving
120
Page 121 of 224

The air suspension shut-off switch is
located on the left side of the trunk.
If this switch is in the OFF position,
the rear air suspension will not
operate.
On vehicles equipped with
Air Suspension, turn OFF
the Air Suspension switch prior to
jacking, hoisting or towing your
vehicle.
Normal vehicle operation does not
require any action by the driver.
AUTOMATIC TRANSAXLE OPERATION
Brake-shift interlock
This vehicle is equipped with a brake-shift interlock feature that prevents
the gearshift lever from being moved from P (Park) unless the brake
pedal is pressed.
If you cannot move the gearshift lever out of P (Park) with the brake
pedal depressed:
1. Apply the parking brake, turn ignition key to LOCK, then remove the
key.
2. Insert the key and turn it to OFF. Apply the brake pedal and shift to N
(Neutral).
3. Start the vehicle.
If it is necessary to use the above procedure to move the gearshift, it is
possible that a fuse has blown or the vehicle's brakelamps are not
operating properly. Refer toFuses and relaysin theRoadside
emergencieschapter.
Do not drive your vehicle until you verify that the brakelamps
are working.
If your vehicle gets stuck in mud or snow it may be rocked out by
shifting from forward and reverse gears in a steady pattern. Press lightly
OFF
Driving
121
Page 128 of 224

Always ensure that the weight of passengers, cargo and equipment being
carried is within the weight limitations that have been established for
your vehicle including both gross vehicle weight and Front and rear
gross axle weight rating limits. Under no circumstance should these
limitations be exceeded. Exceeding any vehicle weight rating limitation
could result in serious damage to the vehicle and/or personal injury.
TRAILER TOWING
Your vehicle is classified as a light duty towing vehicle. Refer to the
following chart for towing limits:
Towing classLight duty
Maximum gross trailer weight - kg (lbs.)454 (1 000)*
Maximum tongue load - kg (lbs.)45/68 (100/150)
Engine4.6L
Hitch designLoad carrying type
Trailer-tow package optionNot required
* Vehicle speed should not exceed 72 km/h (45 mph) when towing on
grades. Limit maximum gross trailer weight to 454 kg (1 000 lbs.) and
maximum tongue load to 45/68 kg (100/150 lbs.): (1) when you are
towing a trailer on steep hills or on moderate hills for distances longer
than 8 km (5 miles) or more and; (2) on very hot days (when the
temperature is above 38ÉC [100ÉF])
Your vehicle does not come from the factory fully equipped to tow.
However, you can contact your local Lincoln dealer to get the proper
towing equipment. Do not tow a trailer until your vehicle has been
driven at least 3 200 km (2 000 miles).
Towing a trailer places an additional load on your vehicle's engine,
transmission, brakes, tires and suspension. Inspect these components
carefully after towing.
Do not tow a trailer when using a temporary spare tire.
Do not exceed the GVWR or the GAWR specified on the
certification label.
Driving
128
Page 139 of 224

Power distribution box
The power distribution box is located in the engine compartment. The
power distribution box contains high-current fuses that protect your
vehicle's main electrical systems from overloads.
Always disconnect the battery before servicing high current
fuses.
Always replace the cover to the Power Distribution Box before
reconnecting the battery or refilling fluid reservoirs.
If the battery has been disconnected and reconnected, refer to the
Batterysection of theMaintenance and carechapter.
The high-current fuses are coded as follows:
Fuse/Relay
LocationFuse Amp
RatingPower Distribution Box Description
1 Ð A/C Diode
2 Ð PCM Diode
1 30A* PCM
2 20A* ALT SENSE
3 30A* Right Rear Passenger Window
4 30A* Air Suspension
5 Ð Not Used
6 20A* Horns
MEGA
175A
PCM
PWR
RELAY
12 3 4
8
7
6 5
12
4 3
5
7
9
1110
12
14 136
8NOT USED
7BLOWER
MOTOR
RELAY6A/C
CLUTCH
RELAY4NOT
USED2
HORN
RELAY3HIGH
BEAM1STARTER
SOL
RELAY5
12
Roadside emergencies
139
Page 142 of 224

5. Loosen each wheel lug nut
one-half turn counterclockwise but
do not remove them until the wheel
is raised off the ground. Refer to
Anti-theft lug nutsfor information
on removing anti-theft lug nuts.
On vehicles equipped with
Air Suspension, turn OFF
the Air Suspension switch prior to
jacking, hoisting or towing your
vehicle.
Refer toAir suspension systemin
theDrivingchapter for more
information.
6. Put the jack in the jack notch
next to the door closest to the tire
you are changing. Turn the jack
handle clockwise until the wheel is
completely off the ground.
OFF
Roadside emergencies
142
Page 143 of 224

To lessen the risk of personal injury, do not put any part of your
body under the vehicle while changing a tire. Do not start the
engine when your vehicle is on the jack. The jack is only meant for
changing the tire.
7. Remove the lug nuts with the lug wrench. Replace the flat tire with
the spare tire, making sure the valve stem is facing outward. Reinstall lug
nuts until the wheel is snug against the hub. Do not fully tighten the lug
nuts until the wheel has been lowered.
8. Lower the wheel by turning the jack handle counterclockwise.
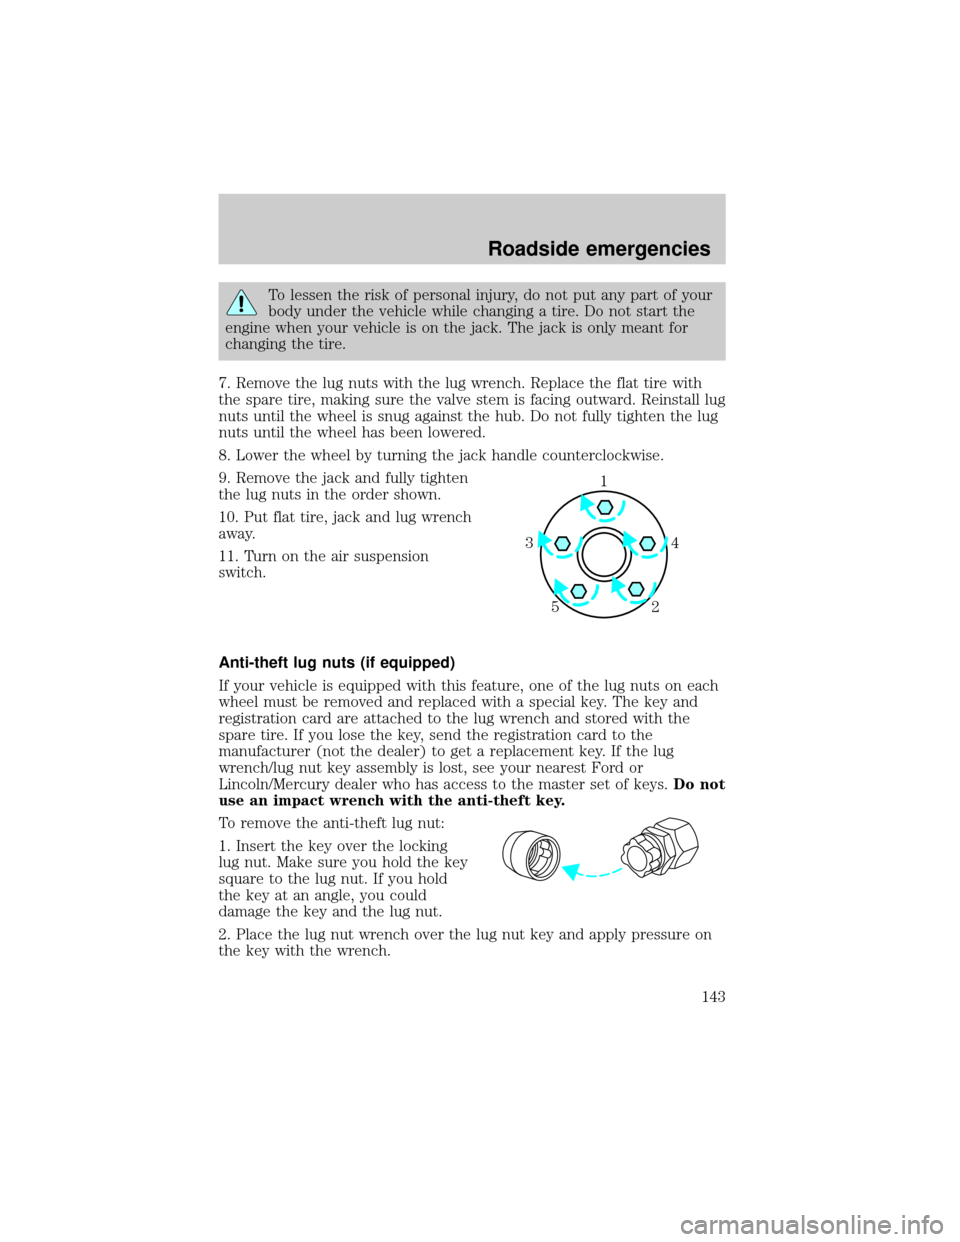
9. Remove the jack and fully tighten
the lug nuts in the order shown.
10. Put flat tire, jack and lug wrench
away.
11. Turn on the air suspension
switch.
Anti-theft lug nuts (if equipped)
If your vehicle is equipped with this feature, one of the lug nuts on each
wheel must be removed and replaced with a special key. The key and
registration card are attached to the lug wrench and stored with the
spare tire. If you lose the key, send the registration card to the
manufacturer (not the dealer) to get a replacement key. If the lug
wrench/lug nut key assembly is lost, see your nearest Ford or
Lincoln/Mercury dealer who has access to the master set of keys.Do not
use an impact wrench with the anti-theft key.
To remove the anti-theft lug nut:
1. Insert the key over the locking
lug nut. Make sure you hold the key
square to the lug nut. If you hold
the key at an angle, you could
damage the key and the lug nut.
2. Place the lug nut wrench over the lug nut key and apply pressure on
the key with the wrench.
1
4 3
2 5
Roadside emergencies
143