Page 67 of 301
 INTERIOR EQUIPMENT
54
GLOVE BOX
SS14012
� 1Unlock 2Open 3Lock
To open the glove box door, pull the lever. To lock the
glove box door, insert the master key and turn it
clockwise.
With the tail li")
INTERIOR EQUIPMENT
54
GLOVE BOX
SS14012
� 1Unlock 2Open 3Lock
To open the glove box door, pull the lever. To lock the
glove box door, insert the master key and turn it
clockwise.
With the tail lights on, the glove box light will come on when the
glove box door is open.
CAUTION
To reduce the chance of injury in case of an accident or
a sudden stop, always keep the glove box door closed
while driving.
GARAGE DOOR OPENER
The garage door opener is manufactured under license
from HomeLink� and can be programmed to operate
garage doors, estate gates, security lighting, etc.
(a) Programming HomeLink�
SV14007
� 1Buttons 2Indicator light
The HomeLink� has 3 buttons and can be programmed
to operate 3 separate devices.
Prepare the HomeLink
� for programming by erasing all
codes or the memorized data programmed by the former
owner. Follow the procedure in º(c) Erasing the garage
door opener memoryº.
1. Decide which one of the 3 buttons you want to program.
Push and hold down the button for about 20 seconds until the
indicator light begins to flash. While holding this button, follow
steps º2º and º3º.
Page 77 of 301
EXTERIOR EQUIPMENT
64
CAUTION
�Keep the trunk lid closed while driving. This not only
keeps the luggage from being thrown out, but also
prevents exhaust gases from entering the vehicle.
� Always lock the trunk lid and all doors, and keep
away the vehicle keys out of children's reaches.
� Never leave children unattended in the vehicle.
Unsupervised children may lock themselves in the
vehicle or trunk and suffer serious injuries or death.
Lock release lever
SS15006
To open the trunk lid from the driver's seat, pull up on the
lock release lever.
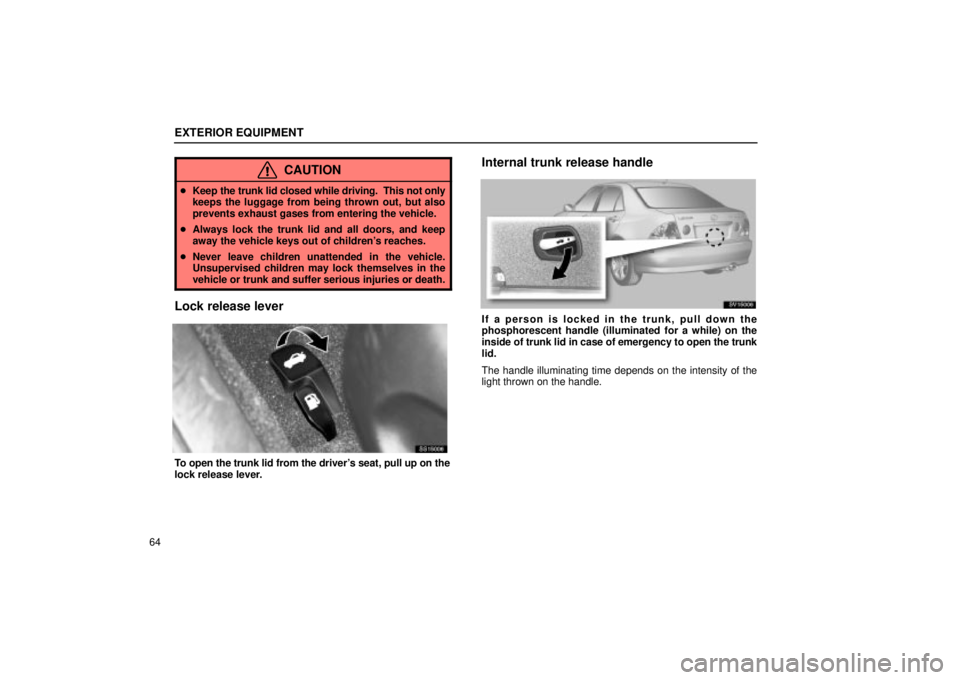
Internal trunk release handle
SV15006
If a person is locked in the trunk, pull down the
phosphorescent handle (illuminated for a while) on the
inside of trunk lid in case of emergency to open the trunk
lid.
The handle illuminating time depends on the intensity of the
light thrown on the handle.
Page 78 of 301
EXTERIOR EQUIPMENT
65
Luggage security system
SS15013
After closing the trunk lid, insert the master key and turn
it counterclockwise to deactivate the lock release lever.
At this time, the trunk lid can be opened only by the
phosphorescent handle lever inside the trunk.
FUEL TANK CAP
SS15008
1. To open the fuel filler door, pull the lever up.
When refueling, turn off the engine.
CAUTION
�Do not smoke, cause sparks or allow open flames
when refueling. The fumes are flammable.
� When opening the cap, do not remove the cap
quickly. In hot weather, fuel under pressure could
cause injury by spraying out of the filler neck if the
cap is suddenly removed.
Page 80 of 301
 EXTERIOR EQUIPMENT
67
MOON ROOF
SV15003
� 1Open 2Close
To slide open the moon roof, push the switch on the rear
side briefly. The moon roof will open and stop partway 30
mm (1.2 in.) from the fully")
EXTERIOR EQUIPMENT
67
MOON ROOF
SV15003
� 1Open 2Close
To slide open the moon roof, push the switch on the rear
side briefly. The moon roof will open and stop partway 30
mm (1.2 in.) from the fully opened position. When you
push the switch again, the moon roof will open fully. To
stop partway, push the same switch or ºTILTº switch
briefly while the moon roof is moving.
As driving with the moon roof opened fully will cause wind
throbs, we recommend you to drive with the moon roof partway
30 mm (1.2 in.) from the fully opened position.
To operate the moon roof, the ignition key must be in the ºONº
position.
The sun shade can be opened or closed manually. However,
if you open the moon roof, the sun shade will be opened with
the moon roof. To close the moon roof, push the switch on the front side.
The moon roof will fully close. To stop partway, push the
same switch or ºTILTº switch.
SS15012
� 1Tilt up 2Lower
To tilt up the rear end of the moon roof fully, push the
switch on the rear side or on the front side to lower it.
To operate the moon roof, the ignition key must be in the ºONº
position.
Key off operation:
Even if the ignition key is turned to the
ºACCº or ºLOCKº position, the moon roof can be operated until
either of the front doors is opened (or for about 45 seconds).
Page 83 of 301
 COMFORT ADJUSTMENT
70
FRONT SEATS
(MANUAL TYPE)
Front seat precautions
CAUTION
The side airbags are installed in the driver and front
passenger seats. Observe the following precautions.
� Do not lean")
COMFORT ADJUSTMENT
70
FRONT SEATS
(MANUAL TYPE)
Front seat precautions
CAUTION
The side airbags are installed in the driver and front
passenger seats. Observe the following precautions.
� Do not lean over the front door when the vehicle is in
use. The side airbag inflates with considerable speed
and force; you may be killed or severely injured.
� Do not modify or replace the seats or the surface of
the seats with side airbags. Such changes may
disable the system, or cause the side airbags to
inflate, resulting in death or serious injury. Consult
your Lexus dealer.
� Do not use accessories for the seats which cover the
parts where the side airbags should inflate. Such
accessories may prevent the side airbags from
activating correctly, causing death or serious injury.
Seat adjustment precautions
Adjust the driver's seat so that the foot pedals, steering wheel
and instrument panel controls are within easy reach of the
driver.
CAUTION
�Do not adjust the seat while the vehicle is moving as
the seat may unexpectedly move and cause the
driver to lose control of the vehicle.
� Be careful not to hit the seat against a passenger,
luggage or the rear seat.
� After adjusting the seat position, try sliding it forward
and backward to make sure it is locked in position.
� After adjusting the seatback, exert body pressure to
make sure it is locked in position.
� Do not put objects under the seats. The objects may
interfere with the seat±lock mechanism or
unexpectedly push up the seat position adjusting
lever; the seat may suddenly move, causing the
driver to lose control of the vehicle.
� While adjusting the seat, do not put your hands under
the seat or near the moving parts. You may catch and
injure your hands of fingers.
Page 95 of 301
 COMFORT ADJUSTMENT
82Injured person. Lexus recommends the use of a seat belt.
Depending on the injury, first check with your doctor for specific
recommendations.
CAUTION
Persons should ride in their")
COMFORT ADJUSTMENT
82Injured person. Lexus recommends the use of a seat belt.
Depending on the injury, first check with your doctor for specific
recommendations.
CAUTION
Persons should ride in their seats properly wearing
their seat belts whenever the vehicle is moving.
Otherwise, they are much more likely to suffer serious
bodily injury or death in the event of sudden braking or
a collision.
When using the seat belts, observe the following:
�
Use the belt for only one person at a time. Do not use
a single belt for two or more people ± even children.
� Avoid reclining the seatbacks too much. The seat
belts provide maximum protection when the
seatbacks are in the upright position. (See
ºAdjusting seatback angleº on page 72.)
� Be careful not to damage the belt webbing or
hardware. Take care that they do not get caught or
pinched in the seat or doors.
� Inspect the belt system periodically. Check for cuts,
fraying, and loose parts. Damaged parts should be
replaced. Do not disassemble or modify the system.
�Keep the belts clean and dry. If they need cleaning,
use a mild soap solution or lukewarm water. Never
use bleach, dye, or abrasive cleaners ± they may
severely weaken the belts. (See ºCleaning the
interiorº on page 282 for instructions.)
� Replace the belt assembly (including bolts) if it has
been used in a severe impact. The entire assembly
should be replaced even if damage is not obvious.
Fastening front and rear seat belts
SV16013
Adjust the seat as needed and sit up straight and well back
in the seat. To fasten your belt, pull it out of the retractor
and insert the tab into the buckle.
You will hear a click when the tab locks into the buckle.
The seat belt length automatically adjusts to your size and the
seat position.
Page 100 of 301
 COMFORT ADJUSTMENT
87
SV16061
This indicator comes on when the ignition key is turned to
the ºACCº or ºONº position. It goes off after about 6
seconds. This means the front seat belt pretensione")
COMFORT ADJUSTMENT
87
SV16061
This indicator comes on when the ignition key is turned to
the ºACCº or ºONº position. It goes off after about 6
seconds. This means the front seat belt pretensioners are
operating properly.
The warning light system monitors the airbag sensor
assembly, front airbag sensors, side airbag sensors, door side
airbag sensors, front seat belt pretensioner assemblies,
inflators, warning light, interconnecting wiring and power
sources. (For details, see ºService reminder indicators and
warning buzzersº on page 38.)
SV16068
� 1Front airbag sensors
2Seat belt pretensioner assemblies
3SRS warning light
4Airbag sensor assembly
The front seat belt pretensioner system consists mainly of the
above components and their locations are shown in the
illustration.
The front seat belt pretensioners are controlled by the airbag
sensor assembly. The airbag sensor assembly consists of a
safing sensor and airbag sensor.
When the front seat belt pretensioners are activated, an
operating noise may be heard and a small amount of
smoke±like gas may be released. This gas is harmless and
does not indicate that a fire is occurring.
Once the front seat belt pretensioners have been activated, the
seat belt retractors remain locked.
Page 123 of 301
 COMFORT ADJUSTMENT
11 0
SV16055
�Move seat fully back
�A forward±facing child restraint system should be
allowed to be put on the front seat only when it is
unavoidable. Always move the seat as far")
COMFORT ADJUSTMENT
11 0
SV16055
�Move seat fully back
�A forward±facing child restraint system should be
allowed to be put on the front seat only when it is
unavoidable. Always move the seat as far back as
possible, because the force of a deploying airbag
could cause death or serious injury to the child. Do
not allow the child to lean over the front door or
around the front door even if the child is seated in a
child restraint system. It is dangerous if the side
airbag inflates, and the impact could cause death or
serious injury to the child.
SV16039
1. Run the lap and shoulder belt through or around the
convertible seat following the instructions provided by its
manufacturer and inserting the tab into the buckle taking care
not to twist the belt. Keep the lap portion of the belt tight.
CAUTION
�After inserting the tab, make sure the tab and buckle
are locked and that the lap and shoulder portions of
the belt are not twisted.
� Do not insert coins, clips, etc. in the buckle as this
may prevent you from properly latching the tab and
buckle.
� If the seat belt does not function normally,
immediately contact your Lexus dealer. Do not use
the seat until the seat belt is fixed. It cannot protect
your child from injury.
 EXTERIOR EQUIPMENT
65
Luggage security system
SS15013
After closing the trunk lid, insert the master key and turn
it counterclockwise to deactivate the lock release lever.
At this time, the trunk lid")