Page 37 of 301
SWITCHES
24
HEADLIGHT DIMMER AND TURNSIGNAL SWITCH
SV12010
For high beam, push the lever forward. Pull it back for low
beam. For the headlight flasher, pull it further back.
A blue light in the instrument cluster indicates high beam or
headlight flasher is on.
The headlight flasher works even when the headlight switch is
off.
SV12011
For signaling turns, move the lever up or down in the
conventional manner.
The ignition key must be in the ºONº position.
The turn signal is self±cancelling after a turn, but after a lane
change, you may have to cancel it by hand. You can also signal
a lane change by moving the turn signal lever partway and
holding it there.
If the green light in the instrument cluster flashes faster than
normal, it indicates that the front or rear turn signal bulb has
burned out. If this indicator light does not come on, the fuse
or the indicator light itself has probably failed.
Page 66 of 301
INTERIOR EQUIPMENT
53
POWER OUTLET
SV14004
The power outlet is designed for power supply for car
accessories.
The ignition key must be in the ºACCº or ºONº position for t\
he
power outlet to be used.
NOTICE
�To prevent the fuse from being blown, do not use theelectricity over the total vehicle capacity of 12V 3.5A.
�To prevent the battery from being discharged, do notuse the power outlet longer than necessary when theengine is not running.
�Close the power outlet lid when the power outlet isnot in use. Inserting a foreign object other than theappropriate plug that fits the outlet, or allowing anyliquid into the outlet may cause electrical failure orshort circuits.
Page 136 of 301
SV21006
AIR CONDITIONING
123
1Automatic air flow control position
2Air flow control dial
3Air intake control button
4Temperature control dial
5Automatic fan speed control position
6Air conditioning on±off button
7Fan speed control dial
�Air flow selection
(a) Climate control
SETTING OPERATION ± automatic control
SS21005
1. Set the air flow control dial and the fan speed control
dial to ºAUTOº positions.
An indicator light will illuminate to show that the automatic
operation mode has been selected.
Air flow quantity and switching of the diffusers are
automatically adjusted.
When one of the manual control dials is turned while operating
in automatic mode, the operation corresponding to the dial
turned is set. Other conditions continue to be adjusted
automatically.
When the fan speed control dial is turned to ºOFFº, the fan is
turned off.
Page 154 of 301
 AUDIO
141
(b) Presetting a station
SV22029
1. Tune in the desired station.
2. Push
one of the station selector buttons ( 1±6 ) and hold
it until a beep is heard. This sets the station to the button")
AUDIO
141
(b) Presetting a station
SV22029
1. Tune in the desired station.
2. Push
one of the station selector buttons ( 1±6 ) and hold
it until a beep is heard. This sets the station to the button
and the button number ( 1±6 ) appears on the display.
Each button can store one AM station and two FM stations. To
change the preset station to a different one, follow the same
procedure.
The preset station memory is cancelled when the power
source is interrupted by battery disconnection or a blown fuse. (c) Selecting a station
Your Lexus has an electronic tuning radio (ETR). Tune in the
desired station using one of the following methods.
SV22009
Preset
tuning: Push the button ( 1±6 ) for the station you want.
The button number ( 1±6 ) and station frequency appear on the
display.
Manual tuning: Turn the ºAUDIO CONTROLº knob clockwise
to step up the frequency. Turn the knob counterclockwise to
step down the frequency. (See page 140.)
Seek tuning: Push the ºSEEKº button. The radio will begin
seeking up or down for a station of the nearest frequency and
will stop on reception. Each time you push the button, the
stations will be searched out one after another.
Page 239 of 301
INTRODUCTION
227
ENGINE COMPARTMENT OVERVIEW
1Battery
2Fuse box
3Engine oil filler cap
4Engine oil leveldipstick
5Brake fluid reservoir
6Washer fluid tank
7Power steering fluidreservoir
8Engine coolantreservoir
SV61005
Page 242 of 301
INTRODUCTION
230
Checking brake fluid
Parts (if level is low):
�FMVSS No. 116 DOT 3 or SAE J1703 brake fluid
Tools:
� Funnel (only for adding fluid)
Checking power steering fluid
Parts (if level is low):
�Automatic transmission fluid DEXRON
�II or III
Tools:
� Rag or paper towel
� Funnel (only for adding fluid)
Checking battery condition
Tools:
�Warm water
� Baking soda
� Grease
� Conventional wrench (for terminal clamp bolts)
Checking and replacing the blade type fuses
Parts (if replacement is necessary):
�Fuse with same amperage rating as original
Checking the cartridge type fuses
Parts (if replacement is necessary):
�Genuine Lexus fuse or equivalent with same amperage
rating as original
Adding washer fluid
Parts:
�Water
� Washer fluid containing antifreeze (for winter use)
Tools:
� Funnel
Page 273 of 301
SECTION 6 ± 4
261
SERVICE PROCEDURES AND
SPECIFICATIONS
Electrical components
Specifications262
. . . . . . . . . . . . . . . . . . . . . . . . . . . . . . . . . . . . .\
. . . . . .
Checking battery condition 266
. . . . . . . . . . . . . . . . . . . . . . . . . . . . . . . .
Battery recharging precautions 268
. . . . . . . . . . . . . . . . . . . . . . . . . . . .
Checking and replacing the blade type fuses 269
. . . . . . . . . . . . . . . .
Checking the cartridge type fuses 271
. . . . . . . . . . . . . . . . . . . . . . . . . .
Adding washer fluid 272
. . . . . . . . . . . . . . . . . . . . . . . . . . . . . . . . . . . . .\
.
Checking the headlight aim 273
. . . . . . . . . . . . . . . . . . . . . . . . . . . . . . . .
Replacing light bulbs 274
. . . . . . . . . . . . . . . . . . . . . . . . . . . . . . . . . . . . .\
Page 274 of 301
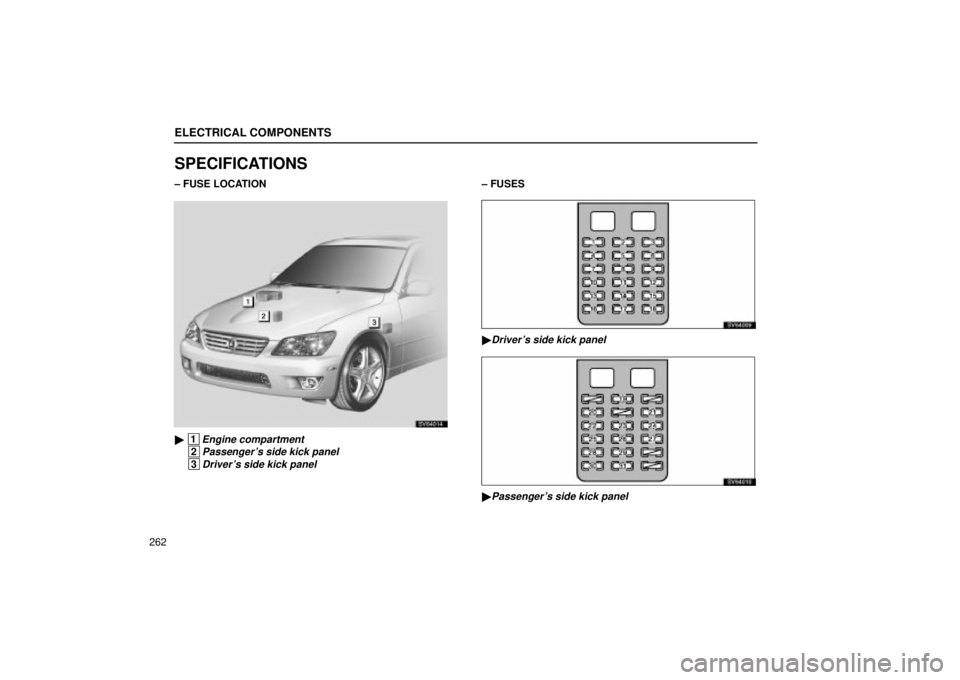
ELECTRICAL COMPONENTS
262
SPECIFICATIONS
± FUSE LOCATION
SV64014
� 1Engine compartment
2Passenger's side kick panel
3Driver's side kick panel
± FUSES
SV64009
�Driver's side kick panel
SV64010
�Passenger's side kick panel
 SWITCHES
24
HEADLIGHT DIMMER AND TURNSIGNAL SWITCH
SV12010
For high beam, push the lever forward. Pull it back for low
beam. For the headlight flasher, pull it further back.
A blue light in the inst")
 INTERIOR EQUIPMENT
53
POWER OUTLET
SV14004
The power outlet is designed for power supply for car
accessories.
The ignition key must be in the ºACCº or ºONº position for t\
he
power outlet to be us")
 SV21006
AIR CONDITIONING
123
1Automatic air flow control position
2Air flow control dial
3Air intake control button
4Temperature control dial
5Automatic fan speed control position
6Air condition")
 INTRODUCTION
227
ENGINE COMPARTMENT OVERVIEW
1Battery
2Fuse box
3Engine oil filler cap
4Engine oil leveldipstick
5Brake fluid reservoir
6Washer fluid tank
7Power steering fluidreservoir
8Engin")

 SECTION 6 ± 4
261
SERVICE PROCEDURES AND
SPECIFICATIONS
Electrical components
Specifications262
. . . . . . . . . . . . . . . . . . . . . . . . . . . . . . . . . . . . .\
. . . . . .
Checking bat")