2001 HONDA CR-V clock
[x] Cancel search: clockPage 252 of 326
Light
s
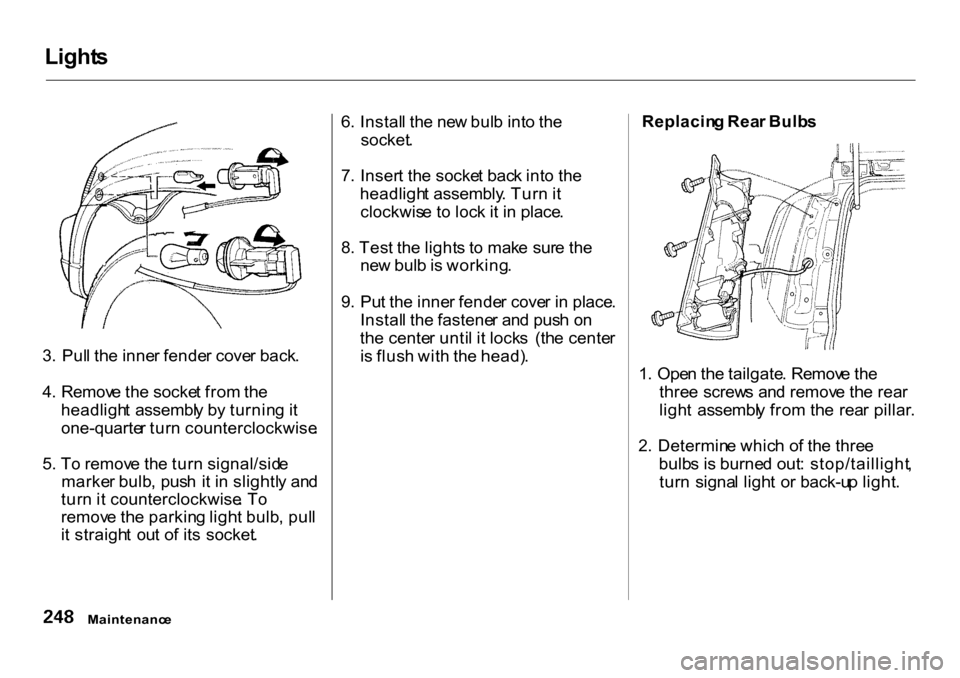
3 . Pul l th e inne r fende r cove r back .
4 . Remov e th e socke t fro m th e
headligh t assembl y b y turnin g it
one-quarte r tur n counterclockwise .
5 . T o remov e th e tur n signal/sid e
marke r bulb , pus h i t i n slightl y an d
tur n it counterclockwise . T o
remov e th e parkin g ligh t bulb , pul l
i t straigh t ou t o f it s socket . 6
. Instal l th e ne w bul b int o th e
socket .
7 . Inser t th e socke t bac k int o th e
headligh t assembly . Tur n it
clockwis e t o loc k i t i n place .
8 . Tes t th e light s t o mak e sur e th e
ne w bul b is working .
9 . Pu t th e inne r fende r cove r i n place .
Instal l th e fastene r an d pus h o n
th e cente r unti l i t lock s (th e cente r
i s flus h wit h th e head) . Replacin
g Rea r Bulb s
1 . Ope n th e tailgate . Remov e th e
thre e screw s an d remov e th e rea r
ligh t assembl y fro m th e rea r pillar .
2 . Determin e whic h o f th e thre e
bulb s i s burne d out : stop/taillight ,
tur n signa l ligh t o r back-u p light .
Maintenanc e
Page 253 of 326
Light
s
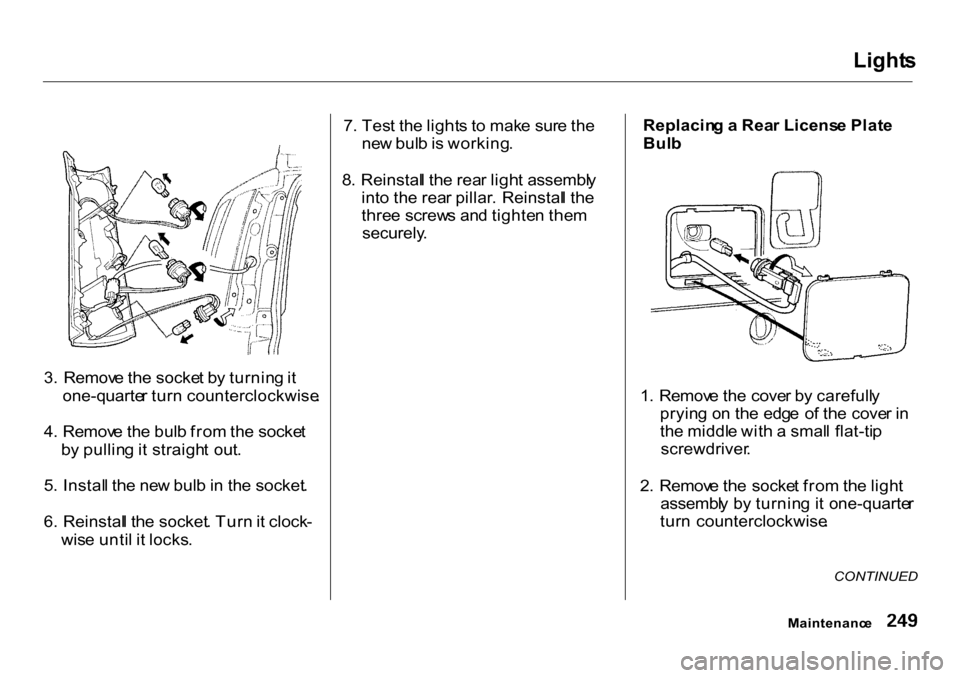
3 . Remov e th e socke t b y turnin g it
one-quarte r tur n counterclockwise .
4 . Remov e th e bul b fro m th e socke t
b y pullin g it straigh t out .
5 . Instal l th e ne w bul b in th e socket .
6 . Reinstal l th e socket . Tur n it clock -
wis e unti l i t locks . 7
. Tes t th e light s t o mak e sur e th e
ne w bul b is working .
8 . Reinstal l th e rea r ligh t assembl y
int o th e rea r pillar . Reinstal l th e
thre e screw s an d tighte n the m
securely .
Replacin
g a Rea r Licens e Plat e
Bul b
1 . Remov e th e cove r b y carefull y
pryin g o n th e edg e o f th e cove r i n
th e middl e wit h a smal l flat-ti p
screwdriver .
2 . Remov e th e socke t fro m th e ligh t
assembl y b y turnin g i t one-quarte r
tur n counterclockwise .
CONTINUED
Maintenanc e
Page 254 of 326
Light
s
3 . Pul l th e bul b straigh t ou t o f it s
socket . Pus h th e ne w bul b in unti l
i t bottom s i n th e socket .
4 . Tur n o n th e parkin g light s an d
chec k tha t th e ne w bul b is
working .
5 . Reinstal l th e socket . Sna p th e
cove r bac k i n place . Replacin
g a Rea r Sid e Marke r
Ligh t Bul b
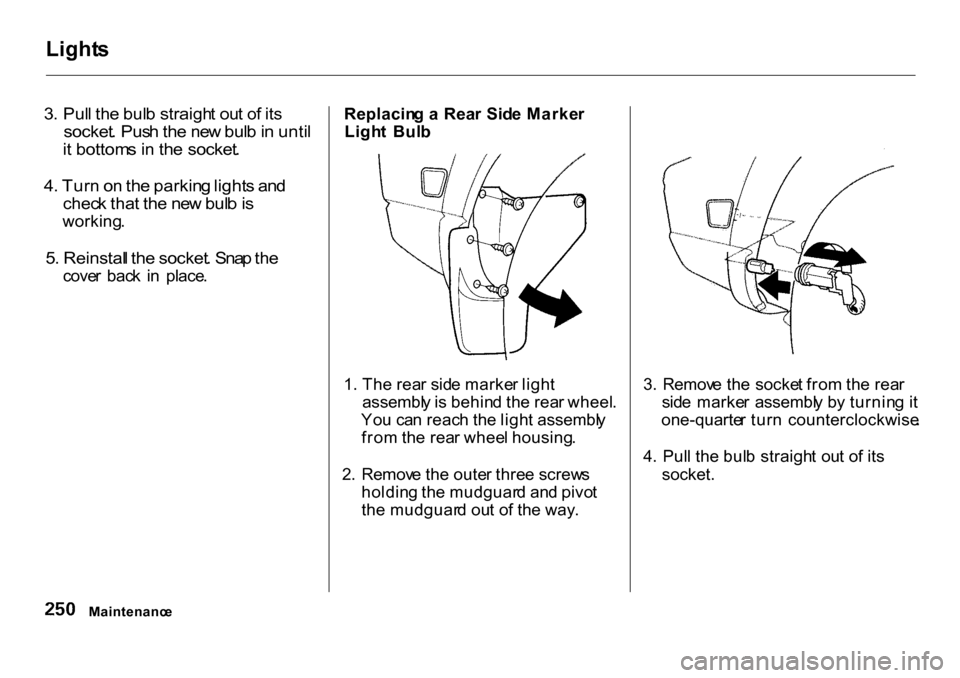
1 . Th e rea r sid e marke r ligh t
assembl y is behin d th e rea r wheel .
Yo u ca n reac h th e ligh t assembl y
fro m th e rea r whee l housing .
2 . Remov e th e oute r thre e screw s
holdin g th e mudguar d an d pivo t
th e mudguar d ou t o f th e way . 3
. Remov e th e socke t fro m th e rea r
sid e marke r assembl y b y turnin g it
one-quarte r tur n counterclockwise .
4 . Pul l th e bul b straigh t ou t o f it s
socket.
Maintenanc e
Page 255 of 326
Light
s
5 . Instal l th e ne w bul b in th e socket.
6 . Inser t th e socke t bac k int o th e
rea r sid e marke r ligh t assembly .
Tur n it clockwis e t o loc k i t i n place .
7 . Tes t th e light s t o mak e sur e th e
ne w bul b is working .
8 . Pu t th e mudguar d bac k in plac e
an d secur e i t wit h th e thre e
screws .
Replacin
g a High-moun t Brak e
Ligh t Bul b
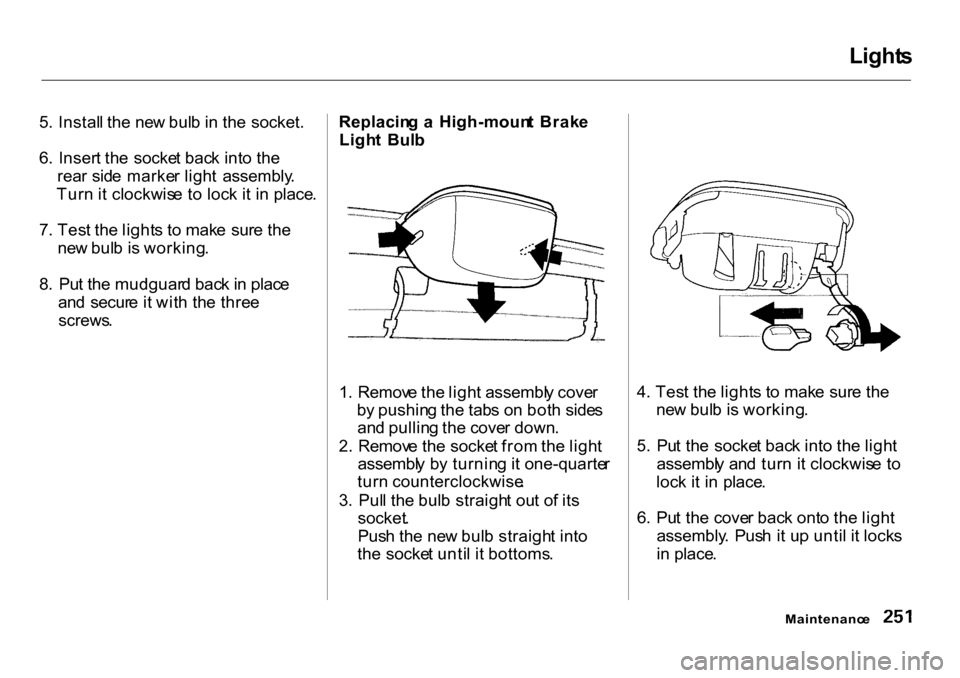
1 . Remov e th e ligh t assembl y cove r
b y pushin g th e tab s o n bot h side s
an d pullin g th e cove r down .
2 . Remov e th e socke t fro m th e ligh t
assembl y b y turnin g it one-quarte r
tur n counterclockwise .
3 . Pul l th e bul b straigh t ou t o f it s
socket .
Pus h th e ne w bul b straigh t int o
th e socke t unti l i t bottoms . 4
. Tes t th e light s t o mak e sur e th e
ne w bul b is working .
5 . Pu t th e socke t bac k int o th e ligh t
assembl y an d tur n i t clockwis e t o
loc k i t i n place .
6 . Pu t th e cove r bac k ont o th e ligh t
assembly . Pus h i t u p unti l i t lock s
i n place .
Maintenanc e
Page 271 of 326
Changin
g a Fla t Tir e
CLIP S
STOP
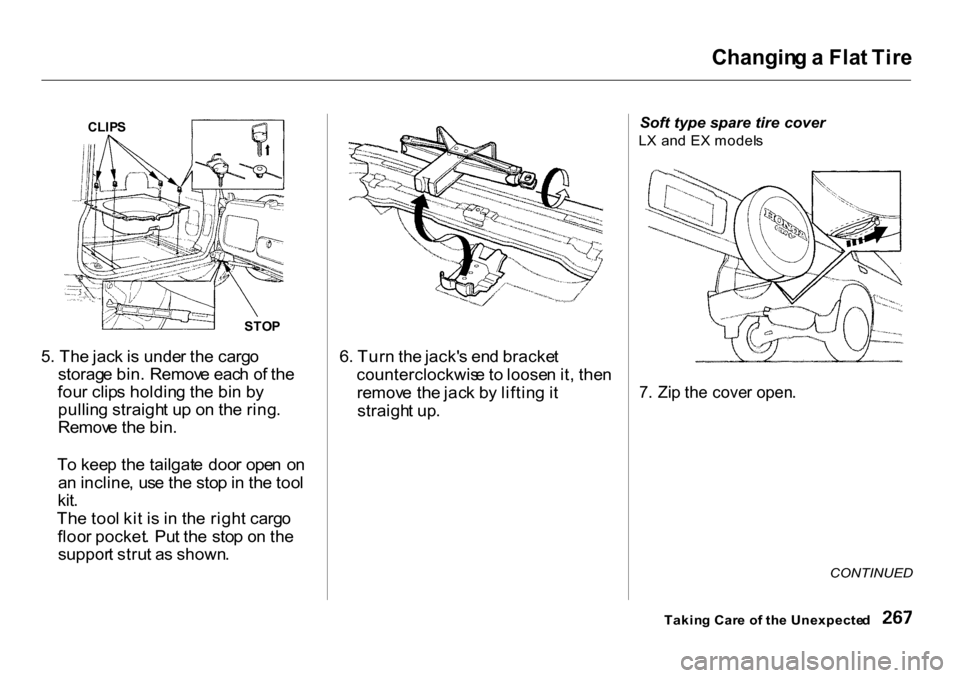
5 . Th e jac k is unde r th e carg o
storag e bin . Remov e eac h o f th e
fou r clip s holdin g th e bi n b y
pullin g straigh t u p o n th e ring .
Remov e th e bin .
T o kee p th e tailgat e doo r ope n o n
a n incline , us e th e sto p in th e too l
kit .
Th e too l ki t i s i n th e righ t carg o
floo r pocket . Pu t th e sto p o n th e
suppor t stru t a s shown . 6
. Tur n th e jack' s en d bracke t
counterclockwis e t o loose n it , the n
remov e th e jac k b y liftin g it
straigh t up . Soft
type spare tire cover
L X an d E X model s
7 . Zi p th e cove r open .
CONTINUED
Takin g Car e o f th e Unexpecte d
Page 273 of 326
Changin
g a Fla t Tir e
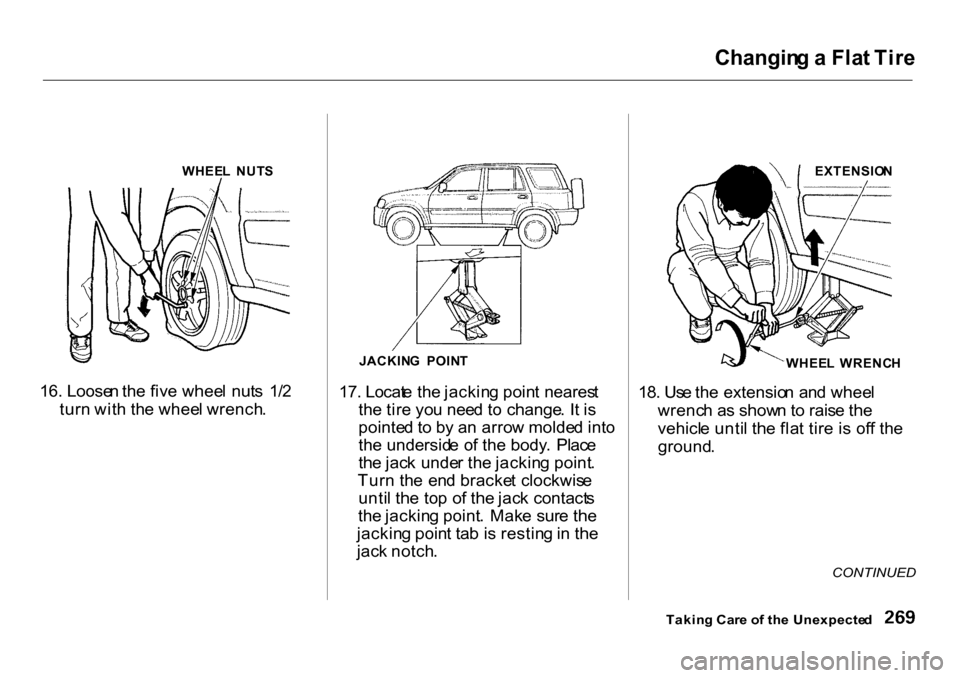
16. Loose n th e fiv e whee l nut s 1/ 2
tur n wit h th e whee l wrench . JACKIN
G POIN T
17. Locat e th e jackin g poin t neares t
th e tir e yo u nee d t o change . I t i s
pointe d t o b y a n arro w molde d int o
th e undersid e o f th e body . Plac e
th e jac k unde r th e jackin g point .
Tur n th e en d bracke t clockwis e
unti l th e to p o f th e jac k contact s
th e jackin g point . Mak e sur e th e
jackin g poin t ta b i s restin g in th e
jac k notch . EXTENSIO
N
WHEE L WRENC H
18. Us e th e extensio n an d whee l
wrenc h a s show n to rais e th e
vehicl e unti l th e fla t tir e i s of f th e
ground .
CONTINUED
Takin g Car e o f th e Unexpecte d
WHEE
L NUT S
Page 284 of 326
I
f You r Engin e Overheat s
6 . Loo k fo r an y obviou s coolan t leaks ,
suc h a s a spli t radiato r hose .
Everythin g i s stil l extremel y hot ,
s o us e caution . I f yo u fin d a leak , i t
mus t b e repaire d befor e yo u
continu e drivin g (se e Emergenc y
Towin g o n pag e 29 0).
7 . I f yo u don' t fin d a n obviou s leak ,
chec k th e coolan t leve l i n th e
radiato r reserv e tan k (se e pag e
144 ). I f th e leve l i s belo w th e
MI N mark , ad d coolan t t o halfwa y
betwee n th e MI N an d MA X marks .
8 . I f ther e wa s n o coolan t i n th e
reserv e tank , yo u ma y als o hav e t o
ad d coolan t t o th e radiator . Le t th e
engin e coo l dow n unti l th e pointe r
reache s th e middl e o f th e tempera -
tur e gauge , o r lower , befor e check -
in g th e radiator . 9
. Usin g glove s o r a larg e heav y
cloth , tur n th e radiato r ca p
counterclockwise , withou t pushin g
down , t o th e firs t stop . Thi s
release s an y remainin g pressur e i n
th e coolin g system . Afte r th e
pressur e releases , pus h dow n o n
th e ca p an d tur n it unti l i t come s
off .
10
. Star t th e engin e an d se t th e
temperatur e contro l dia l t o
maximum . Ad d coolan t t o th e
radiato r u p t o th e bas e o f th e fille r
neck . I f yo u d o no t hav e th e
prope r coolan t mixtur e available ,
yo u ca n ad d plai n water .
Remembe r t o hav e th e coolin g
syste m draine d an d refille d wit h
th e prope r mixtur e a s soo n a s yo u
can .
11 . Pu t th e radiato r ca p bac k o n
tightly . Ru n th e engin e an d watc h
th e temperatur e gauge . I f i t goe s
bac k t o th e re d mark , th e engin e
need s repair . (Se e Emergenc y
Towin g o n pag e 29 0.)
12.I f th e temperatur e stay s normal ,
chec k th e coolan t leve l i n th e
radiato r reserv e tank . I f i t ha s
gon e down , ad d coolan t t o th e
MA X mark . Pu t th e ca p bac k o n
tightly .
Takin g Car e o f th e Unexpecte d
Removin
g th e radiato r ca p
whil e th e engin e i s ho t ca n
caus e th e coolan t t o spra y out ,
seriousl y scaldin g you .
Alway s le t th e engin e an d
radiato r coo l dow n befor e
removin g th e radiato r cap .
Page 318 of 326

Inde
x
Bul b Replacemen t
Spotlight..................................... . 252
Tur n Signa l Lights.................... . 247
Bulbs , Halogen.............................. . 246
Capacitie s Chart............................ . 294
Carbo n Monoxid e Hazard............. . 49
Carg o Are a Light............................ . 95
Carg o Floo r Pockets....................... . 92
Carg o Hooks.................................... . 93
Carryin g Cargo............................. . 160
Cassett e Playe r
Car e.......................................... 136
Operation................. ... 112 , 133, 148
CAUTION , Explanatio n
of .............
. i i
C D Changer.......................... . 115 ,
129
C D Player...................... . 115 ,
127, 144
Cente r Pocket................................. .
9
1
Cente r Table.................................... . 87
Certificatio n Label........................ . 292
Chains............................................ . 241
Chang e Oil..................................... . 213
Ho w to........................................ . 213
Whe n to...................................... . 202
Changin
g a Fla t Tir e .................... . 266
Changin g Engin e Coolant............ . 217
Chargin g Syste m Indicato r ... . 54 , 282
Checklist , Befor e Driving............ . 151
Childproo f Doo r Locks.................. . 75
Chil d Safety..................................... . 21
Chil d Seats....................................... . 21
Tethe r Anchorag e Points.......... . 40
Cleaner , Air.................................. . 226
Cleanin g
Aluminu m Wheels.................... . 257
Carpeting................................... .. 259
Exterior...................................... ... 256
Fabric......................................... ... 260
Interior....................................... . 259
Sea t Belts................................... . 261
Vinyl........................................... . 260
Windows.................................... ... 260
Clock , Settin g th e ........................... 87
Clutc h Fluid................................... 224
C O in th e Exhaust........................ . 300
Col d Weather , Startin g in............ . 167
Consume r Information*................ 306
Controls , Instrument s and............. . 51
Coolan t
Adding........................................ . 215
Checking....................................
. 156
Prope r Solution......................... . 215
Replacing................................... . 217
Temperatur e Gauge................... . 57
Corrosio n Protection.................... . 262
Crankcas e Emissio n Contro l
System........................................ . 300
Cruis e Contro l Operation.............. . 66
Custome r Relation s Office.......... . 306
DANGER , Explanatio n of................ . ii
Dashboard....................................... . 52
Daytim e Runnin g Lights................ . 60
Defects , Reportin g Safety............ . 310
Defo g an d Defrost........................ . 103
Defogger , Rea r Window................ . 63
Defrostin g th e Windows.............. . 103
Dimensions.................................... . 294
Dimmin g th e Headlight s ............... . 60
Dipstic k
Automati c Transmission.......... . 221
Engin e Oil.................................. . 155
Directiona l Signals.......................... . 61
Dis c Brak e Wea r Indicators........ . 176