Page 102 of 323
To apply the parking brake, pull the
lever up f ully. To release it, pull up
slightly, push the button, and lower
the lever. The parking brake light on
the instrument panel should go out
when the parking brake is f ully
released (see page ).
The outside mirrors are heated to re-
move fog and frost. With the ignition
switchON(II),turnontheheaters
by pressing the button. The light in
the button comes on as a reminder.
Press the button again to turn the
heaters off.
62On Canadian LX model
Inst rument s and Cont rols
Mirrors, Parking Brake
Parking Brake
99
P P
A
A R
RKKIINNG G B
BRRAA K
KEE L
LEE V
V E
ER
R
Driving the car with the parking brake
applied can damage the rear brakes
and axles.
Page 122 of 323

You can use the instrument panel
brightness control dial to adjust the il-
lumination of the audio system (see
page ). The audio system
illuminates when the parking lights
are on, even if the radio is turned of f .
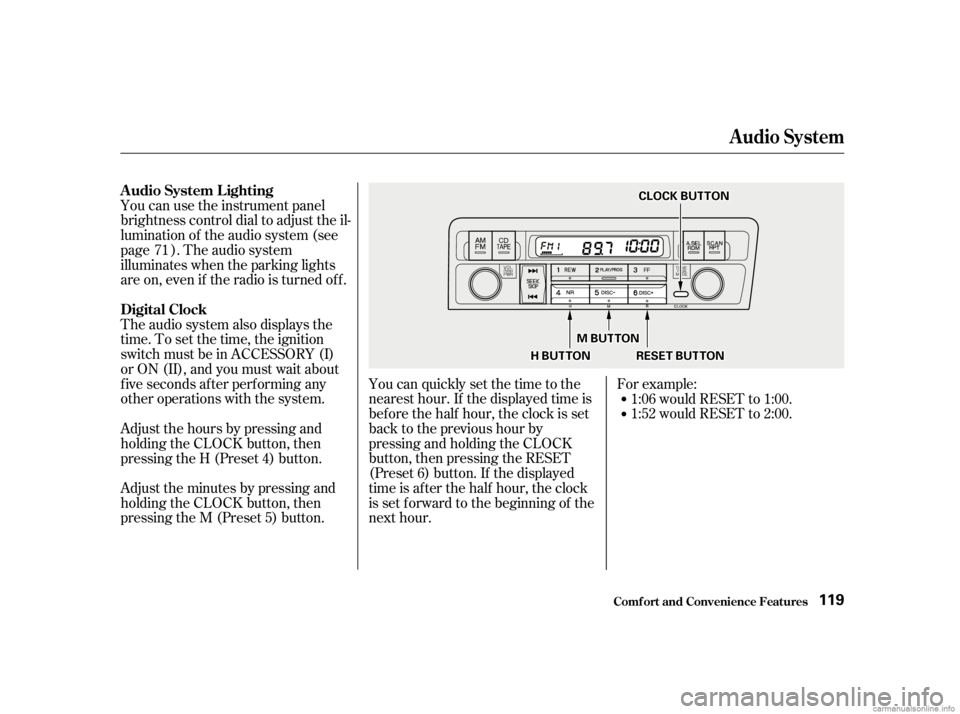
Theaudiosystemalsodisplaysthe
time. To set the time, the ignition
switch must be in ACCESSORY (I)
or ON (II), and you must wait about
f ive seconds af ter perf orming any
other operations with the system.You can quickly set the time to the
nearest hour. If the displayed time is
bef ore the half hour, the clock is set
back to the previous hour by
pressing and holding the CLOCK
button, then pressing the RESET
(Preset 6) button. If the displayed
time is af ter the half hour, the clock
is set forward to the beginning of the
next hour.For example:
1:06 would RESET to 1:00.
1:52 would RESET to 2:00.
Adjust the minutes by pressing and
holding the CLOCK button, then
pressing the M (Preset 5) button. Adjust the hours by pressing and
holding the CLOCK button, then
pressing the H (Preset 4) button. 71
Audio System
Comf ort and Convenience Feat ures
A udio System L ighting
Digital Clock
119
C CL
LOOC CKK B
BUUT TT
TO
ON N
R
RE ES
SE ET
T B
BUUT TT
TO
ON N
M
M
B
BUUT TT
TO
ON N
H
H B
BUUT TT
TO
ON N
Page 134 of 323

You can use the instrument panel
brightness control dial to adjust the il-
lumination of the audio system (see
page ). The audio system
illuminates when the parking lights
are on, even if the radio is turned of f .
The audio system usually shows the
time when the ignition switch is in
ACCESSORY (I) or ON (II). It
shows the operation mode of the
radio, cassette player, or optional CD
changer when you operate them,
then goes back to the time display
af ter f ive seconds.Adjust the hours by pressing and
holding the CLOCK button, then
pressing the H (Preset 4) button.
Adjust the minutes by pressing and
holding the CLOCK button, then
pressing the M (Preset 5) button. You can set the time only when the
clock is displayed.
If an error occurs while operating
the optional CD player or changer,
the display will keep showing the
error code and will not switch to the
time display until the error is
corrected (see pages and ).
71
151 152
CONT INUED
Audio System
Comf ort and Convenience Feat ures
A udio System L ighting
Digital Clock
131
C CLLOOC CKK B
BUUT TT
TO
ON N
R
RE ES
SE ET
T B
BUUT TT
TO
ON N
M
M B
BUUT TT
TO
ON N
H
H
B
BUUT TT
TO
ON N
Page 146 of 323

You can use the instrument panel
brightness control dial to adjust the il-
lumination of the audio system (see
page ). The audio system
illuminates when the parking lights
are on, even if the radio is turned of f .
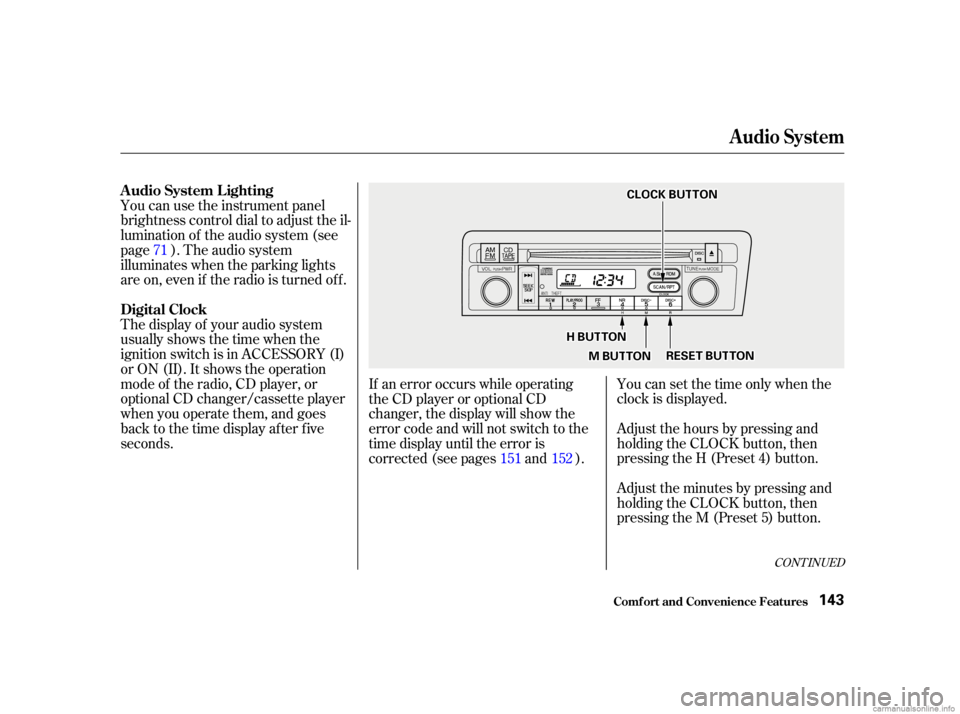
The display of your audio system
usually shows the time when the
ignition switch is in ACCESSORY (I)
or ON (II). It shows the operation
mode of the radio, CD player, or
optional CD changer/cassette player
when you operate them, and goes
back to the time display after five
seconds.You can set the time only when the
clock is displayed.
Adjust the hours by pressing and
holding the CLOCK button, then
pressing the H (Preset 4) button.
Adjust the minutes by pressing and
holding the CLOCK button, then
pressing the M (Preset 5) button.
If an error occurs while operating
the CD player or optional CD
changer, the display will show the
error code and will not switch to the
time display until the error is
corrected (see pages and ).
71
151 152
CONT INUED
A udio System L ighting
Digital Clock
Audio System
Comf ort and Convenience Feat ures143
C CLLOOC CKK B
BUUT TT
TO
ON N
H
H B
BUUT TT
TO
ON N
M
M B
BUUT TT
TO
ON N R
RE
ES
SE ET
T B
BUUT TT
TO
ON N
Page 163 of 323

During this period:Avoid full-throttle starts and rapid
acceleration.
Avoidhardbraking.Newbrakes
need to be broken-in by moderate
use f or the f irst 200 miles (300
km). Your Honda is designed to operate
on unleaded gasoline with a pump
octane number of 86 or higher. Use
of a lower octane gasoline can cause
a persistent, heavy metallic rapping
noise in the engine that can lead to
mechanical damage.
We recommend gasolines containing
detergent additives that help prevent
f uel system and engine deposits.
In Canada, some gasolines contain
an octane-enhancing additive called
MMT. If you use such gasolines,
your emission control system
perf ormance may deteriorate and
the Malfunction Indicator Lamp on
your instrument panel may turn on.
If this happens, contact your
authorized Honda dealer f or service.
Help assure your car’s f uture
reliability and perf ormance by paying
extra attention to how you drive
during the f irst 600 miles (1,000 km).
Using gasoline containing lead will
damage your car’s emissions
controls. This contributes to air
pollution.
Youshouldfollowthesesamere-
commendations with an overhauled
or exchanged engine, or when the
brakes are relined. Do not change the oil until the
recommended time or mileage
intervalshowninthemaintenance
schedule.
Break-in Period, Gasoline
Bef ore Driving
Break-in Period
Gasoline
160
Page 177 of 323

Make sure all windows, mirrors,
and outside lights are clean and
unobstructed. Remove f rost, snow,
or ice.
Check that the hood and trunk are
f ully closed.Make sure the doors are securely
closed and locked. Check that any items you may be
carrying with you inside are stored
properly or f astened down
securely.
Visually check the tires. If a tire
looks low, use a gauge to check its
pressure. Check the adjustment of the seat
(see page ).
Check the adjustment of the
inside and outside mirrors (see
page ).
Check the adjustment of the
steering wheel (see page ).Turn the ignition switch ON (II).
Check the indicator lights in the
instrument panel.
Start the engine (see page ).
Check the gauges and indicator
lights in the instrument panel (see
page ). Fasten your seat belt. Check that
your passengers have f astened
their seat belts (see page ).
Youshoulddothefollowingchecks
and adjustments every day bef ore
you drive your car.
1.
2.
3. 4.
9.
10.
8. 7. 6. 5. 11.
12.
98 90
75 16
175
59
Preparing to Drive
Driving174
Page 181 of 323
Your Honda’s transmission has f our
f orward speeds, and is electronically
controlled f or smoother shif ting. It
also has a ‘‘lock-up’’ torque converter
forbetterfueleconomy.Youmay
f eel what seems like another shif t
when the converter locks.This indicator on the instrument
panel shows which position the shif t
lever is in.The ‘‘D’’ indicator comes on f or a
f ew seconds when you turn the
ignition switch ON (II). If it f lashes
while driving (in any shif t position),
it indicates a possible problem in the
transmission. Avoid rapid acceler-
ation and have the transmission
checkedbyanauthorizedHonda
dealer as soon as possible.
Automatic Transmission
Driving
Shif t L ever Position Indicator
178
E E
X
X a
ann d
d L
LXX
D
DX
X
Page 186 of 323

�µMake sure the moonroof and the
windows are closed.
Make sure the parking brake is f ully
released bef ore driving away.
Driving with the parking brake
partially set can overheat or damage
the rear brakes. Turn of f the lights.
Place any packages, valuables, etc.,
in the trunk or take them with you.
Lockthedoorswiththekeyorthe
remote transmitter.
Never park over dry leaves, tall
grass, or other f lammable
materials. The three way catalytic
converter gets very hot, and could
cause these materials to catch on
fire.
Always use the parking brake when
you park your car. The indicator on
the instrument panel shows that the
parking brake is not f ully released; it
does not indicate that the parking
brakeisfirmlyset.Makesurethe
parking brake is set f irmly or your
car may roll if it is parked on an
incline.
If your car has an automatic
transmission, set the parking brake
bef ore you put the transmission in
Park.Thiskeepsthecarfrom
moving and putting pressure on the
parking mechanism in the
transmission making it easier to
move the shift lever out of Park
when you want to drive away. If the car is f acing uphill, turn the
f ront wheels away f rom the curb. If
you have a manual transmission, put
it in f irst gear.
If the car is f acing downhill, turn the
f ront wheels toward the curb. If you
have a manual transmission, put it in
reverse gear.
Parking
Parking T ips
Driving183