Page 97 of 323
To release the seat-back from inside
the trunk, pull the release under the
trunk panel. Push the seat-back
down, then let go of the release.
To lock the seat-back upright, push it
f irmly against the trunk panel. Make
sure it is latched in place by pulling
on the top of the seat.Make sure all rear shoulder belts are
positioned in f ront of the rear seat-
back whenever the seat-back is in its
upright position.
Do not put any heavy items on the
seat-back when it is folded.
Make sure all items in the trunk, or
items extending through the opening
into the back seat, are secured.
Looseitemscanflyforwardand
cause injury if you have to brake
hard. See
on page
.
Never drive with the seat-back
f olded down and the trunk lid open.
See on
page . 169
54
Folding Rear Seat
Inst rument s and Cont rols
Carrying Cargo
Carbon Monoxide Hazard
94
R RE EL
LEE A
A S
SEE
Page 126 of 323
 �µ
�µ�´
�´
A trunk-mounted Compact Disc
changer is available through your
dealer. It holds up to six discs,
providing several hours of
continuous entertainment. You
operate the CD changer with the")
�µ
�µ�´
�´
A trunk-mounted Compact Disc
changer is available through your
dealer. It holds up to six discs,
providing several hours of
continuous entertainment. You
operate the CD changer with the
same controls used f or the radio.
Your dealer also has an accessory in-
dash single CD player available that
is operated by the radio controls. To
operate this unit, use the instructions
(except f or those relating to multiple
discs) in this section.
To operate the CD changer or player,
the ignition must be in ACCESSORY
(I) or ON (II) and the audio system
must be on.
CONT INUED
Operating the Optional CD
Player/Changer
Audio System
Comf ort and Convenience Feat ures123
R RAA N
ND DO
OM M I
INND DI
ICCA A T
TO
OR R
D
D I
ISSC C B
BUUT TT
TO
ON N
A
A
M
M /
/F
FM M B
BUUT TT
TO
ON N R
REEP
PE
EA
A T
T I
INND DI
ICCA A T
TO
OR R R
REEP
PE
EA
A T
T B
BUUT TT
TO
ON N
R
RA
A N
ND DO
OM M B
BUUT TT
TO
ON N
C
CD D /
/T
T A
A P
PE
E B
BUUT TT
TO
ON N
P
P W
WR R//V
V O
OL L K
KNNO OBB
D
DI
ISSC C B
BUUT TT
TO
ON N
S
SE EE
EK
K/ /S
SK KIIPP B
BAA R
R
Page 138 of 323
 �µ
�µ�´
�´
CONT INUED
Your dealer also has an accessory in-
dash single CD player available that
is operated by the radio controls. To
operate this unit, use the instructions
(except f or those re")
�µ
�µ�´
�´
CONT INUED
Your dealer also has an accessory in-
dash single CD player available that
is operated by the radio controls. To
operate this unit, use the instructions
(except f or those relating to multiple
discs) in this section. A trunk-mounted Compact Disc
changer is available f or your dealer.
It holds up to six discs, providing
several hours of continuous
entertainment. You operate the CD
changer with the same controls used
f or the radio and cassette player.
To operate the CD changer or player,
the ignition must be in ACCESSORY
(I) or ON (II) and the audio system
must be on.
Audio System
Comf ort and Convenience Feat ures
Operating the Optional CD
Player/Changer
135
R RA
A N
ND DO
OM M I
INND DI
ICCA A T
TO
OR R
A
A M
M /
/F
FM M B
BUUT TT
TO
ON N
R
REEP
PE
EA
A T
T I
INND DI
ICCA A T
TO
OR R
P
P W
WR R//V
V O
OL L K
KNNO OBB R
RA
A N
ND DO
OM M
B
BU UT TT
TO
ON N
R
RE EP
PE
EA
A T
T
B
BU UT TT
TO
ON N
C
CD
D /
/T
T A
A P
PE
E B
BUUT TT
TO
ON N
S
SE EE
EK
K/ /S
SK KIIPP B
BAA R
R D
D
I
ISSC C B
BUUT TT
TO
ON N
D
D
I
ISSC C B
BUUT TT
TO
ON N
Page 152 of 323
 �´�µ�´
�µ
Load the desired CDs in the
magazine and load the magazine in
the changer according to the
instructions that came with the unit.
Play only standard round discs. Odd-
shaped CDs may jam i")
�´�µ�´
�µ
Load the desired CDs in the
magazine and load the magazine in
the changer according to the
instructions that came with the unit.
Play only standard round discs. Odd-
shaped CDs may jam in the drive or
cause other problems.
To select the CD changer, press the
CD button. The disc and track
numbers will be displayed. To select a dif f erent disc, press the
DISC (Preset 6) or DISC
(Preset 5) button. The next disc in
the changer is loaded and played
when you press the DISC button.
DISC loads and plays the previous
disc. If you select an empty slot in
the magazine, the changer will, af ter
f inding that slot empty, try to load
the CD in the next slot. This
continues until it f inds a CD to load
and play.
If you eject the in-dash CD while it is
playing, the system will automatically
switch to the CD changer and begin
play where it lef t of f . If there are no
CDs in the changer, the display will
flash. You will have to select another
mode (AM or FM) with the button.
When you switch back to CD mode,
the system selects the same unit (in-
dash or changer) that was playing
when you switched out of CD mode.
To use the SKIP, REPEAT, and
RANDOM f unctions, ref er to the in-
dash player operating instructions.
A trunk-mounted Compact Disc
changer is available f or your vehicle.
It holds up to six discs, providing
several hours of continuous
entertainment. You operate this CD
changer with the same controls used
f or the in-dash CD player.
If you load a CD in the in-dash player
while the changer is playing a CD,
the system will stop the changer and
begin playing the in-dash CD. To
select the changer again, press the
CD button. Play will begin where it
left off. Use the CD button to switch
between the player and the changer.
Audio System
Comf ort and Convenience Feat ures
Operating the CD Changer
(Optional)
149
Page 172 of 323
�Î
�Î
�Î �Î
�Î
�Î
�Î
�Î
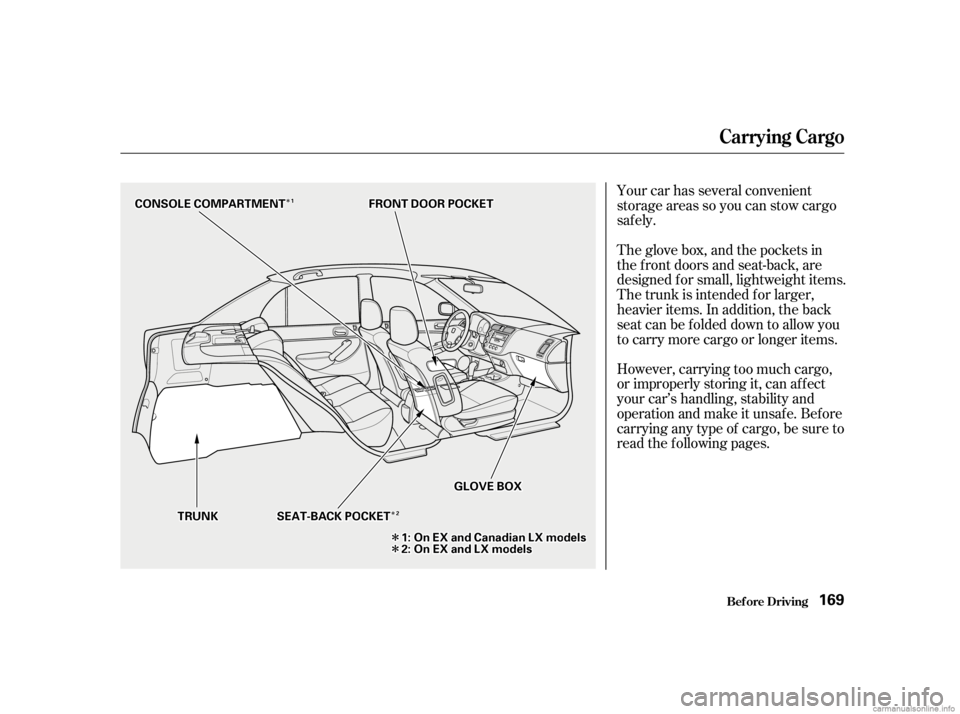
Your car has several convenient
storage areas so you can stow cargo
saf ely.
However, carrying too much cargo,
or improperly storing it, can af f ect
your car’s handling, stability and
operation and make it unsafe. Before
carrying any type of cargo, be sure to
read the f ollowing pages. The glove box, and the pockets in
the front doors and seat-back, are
designed f or small, lightweight items.
The trunk is intended f or larger,
heavier items. In addition, the back
seatcanbefoldeddowntoallowyou
to carry more cargo or longer items.
Carrying Cargo
Bef ore Driving169
F FR
RO ON NTT D
DO
OO ORR P
PO
OC CKKEET
T
G
GL LOOV VE
E B
BOOX X
T
T R
RU UN NKK
1
1::O
On n E
EX
X a
ann d
d C
Caann a
add i
iaan n L
LXX m
mo
od
de
ellss
2
2: :O
On n E
EX
X a
ann d
d L
LXX m
mo
od
de
ellss
S
SE
EA
A T
T-
-B
BA A C
CKK P
PO
OC CKKEET
T
C
CO
ON NSSOOL LEE C
COOM M P
PA
A R
RTTM
M E
EN
NT T
2
2
1
1
Page 173 of 323
 Store or secure all items that could
be thrown around and hurt
someone during a crash.
Besureitemsplacedonthefloor
behind the f ront seats cannot roll
under the seats and interf ere with
the driver’")
Store or secure all items that could
be thrown around and hurt
someone during a crash.
Besureitemsplacedonthefloor
behind the f ront seats cannot roll
under the seats and interf ere with
the driver’s ability to operate the
pedals, or with the proper
operation of the seats.
Keep the glove box closed while
driving. If the lid is open, a
passenger could injure their knees
during a crash or sudden stop.
This f igure includes the total weight
of all occupants, cargo, and
accessories.
To f igure out how much cargo you
can carry:
Add up the weight of all occupants.
The f inal number is the total weight
of cargo you can carry. The maximum load for your car is
850 lbs (395 kg).
Subtract the total f rom 850 lbs
(395 kg). Do not put any items on top of the
trunk panel. They can block your
viewandbethrownaroundthecar
during a crash.
Carrying Items in the Passenger
Compartment
Load Limit
Carrying Cargo
Bef ore Driving170
Overloading or improper
loading can affect handling and
stability and cause a crash in
which you can be hurt or killed.
Follow all load limits and other
loading guidelines in this
manual.
Page 174 of 323
Distribute cargo evenly on the
f loor of the trunk, placing the
heaviest items on the bottom and
as far forward as possible.
If youfolddownthebackseat,tie
down items that could be thrown
about the car during a crash or
sudden stop.If you can carry any items on a
roof rack,besurethetotalweight
of the rack and the items does not
exceed the maximum allowable
weight. Please contact your Honda
dealer f or f urther inf ormation.
If you carry large items that
prevent you f rom closing the trunk
lid, exhaust gas can enter the
passenger area. To avoid the
possibility of , f ollow the instructions
on page . 54
Carrying Cargo in the Trunk or on
a Roof Rack
carbon monoxide
poisoning
Carrying Cargo
Bef ore Driving171
Page 177 of 323
 Make sure all windows, mirrors,
and outside lights are clean and
unobstructed. Remove f rost, snow,
or ice.
Check that the hood and trunk are
f ully closed.Make sure the doors are securely
closed and")
Make sure all windows, mirrors,
and outside lights are clean and
unobstructed. Remove f rost, snow,
or ice.
Check that the hood and trunk are
f ully closed.Make sure the doors are securely
closed and locked. Check that any items you may be
carrying with you inside are stored
properly or f astened down
securely.
Visually check the tires. If a tire
looks low, use a gauge to check its
pressure. Check the adjustment of the seat
(see page ).
Check the adjustment of the
inside and outside mirrors (see
page ).
Check the adjustment of the
steering wheel (see page ).Turn the ignition switch ON (II).
Check the indicator lights in the
instrument panel.
Start the engine (see page ).
Check the gauges and indicator
lights in the instrument panel (see
page ). Fasten your seat belt. Check that
your passengers have f astened
their seat belts (see page ).
Youshoulddothefollowingchecks
and adjustments every day bef ore
you drive your car.
1.
2.
3. 4.
9.
10.
8. 7. 6. 5. 11.
12.
98 90
75 16
175
59
Preparing to Drive
Driving174
 To release the seat-back from inside
the trunk, pull the release under the
trunk panel. Push the seat-back
down, then let go of the release.
To lock the seat-back upright, push it
f irmly against the")
 Distribute cargo evenly on the
f loor of the trunk, placing the
heaviest items on the bottom and
as far forward as possible.
If youfolddownthebackseat,tie
down items that could be thrown
about the car")