Page 200 of 323

�µ�µ
�Ø
�Ø
�Ø
�Ø
�Ø
�Ø
�Ø
�Ø
�Ø
�Ø
�Ø
�Ø
�Ø
�Ø
�Ø
�Ø
�Ø
�Ø
�Ø
�Ø
�Ø
�Ø
�Ø
�Ì
�Ì
�Î
�Ì
�Î
�Ì
Maint enance197
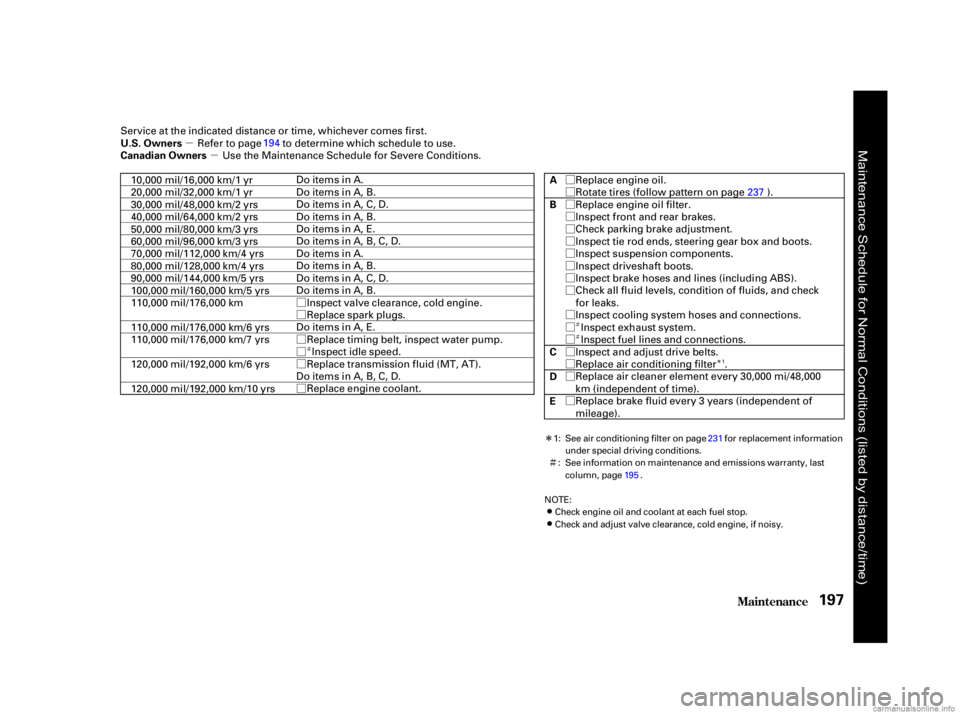
U.S. Owners
Canadian Owners A
B
C
D
E
Service at the indicated distance or time, whichever comes first.
Refer to page to determine which schedule to use.Use the Maintenance Schedule for Severe Conditions.
10,000 mil/16,000 km/1 yr
20,000 mil/32,000 km/1 yr
30,000 mil/48,000 km/2 yrs
40,000 mil/64,000 km/2 yrs
50,000 mil/80,000 km/3 yrs
60,000 mil/96,000 km/3 yrs
70,000 mil/112,000 km/4 yrs
80,000 mil/128,000 km/4 yrs
90,000 mil/144,000 km/5 yrs
100,000 mil/160,000 km/5 yrs
110,000 mil/176,000 km
110,000 mil/176,000 km/6 yrs
110,000 mil/176,000 km/7 yrs
120,000 mil/192,000 km/6 yrs
120,000 mil/192,000 km/10 yrs Replace engine oil.
Rotate tires (follow pattern on page
237).
Replace engine oil filter.
Inspect front and rear brakes.
Check parking brake adjustment.
Inspect tie rod ends, steering gear box and boots.
Inspect suspension components.
Inspect driveshaft boots.
Inspect brake hoses and lines (including ABS).
Check all fluid levels, condition of fluids, and check
for leaks.
Inspect cooling system hoses and connections. Inspect exhaust system.
Inspect fuel lines and connections.
Inspect and adjust drive belts.
Replace air conditioning filter .
Replace air cleaner element every 30,000 mi/48,000
km (independent of time).
Replace brake fluid every 3 years (independent of
mileage).
Do items in A.
Do items in A, B.
DoitemsinA,C,D.
Do items in A, B.
Do items in A, E.
DoitemsinA,B,C,D.
Do items in A.
Do items in A, B.
DoitemsinA,C,D.
Do items in A, B.
Inspect valve clearance, cold engine.
Replace spark plugs.
Do items in A, E. Replace timing belt, inspect water pump.Inspect idle speed.
Replace transmission fluid (MT, AT).
DoitemsinA,B,C,D. Replace engine coolant.
194
1
See information on maintenance and emissions warranty, last
column, page . See air conditioning filter on page for replacement information
under special driving conditions.
Check engine oil and coolant at each fuel stop.
Check and adjust valve clearance, cold engine, if noisy.
NOTE: 1:
: 231
195
Maintenance Schedule for Normal Conditions (listed by distance/time)
Page 201 of 323

�µ
�Î
�Î
�Ì
�Ì�Ì�Î
�Ì�Î
�Ì
Maint enance198
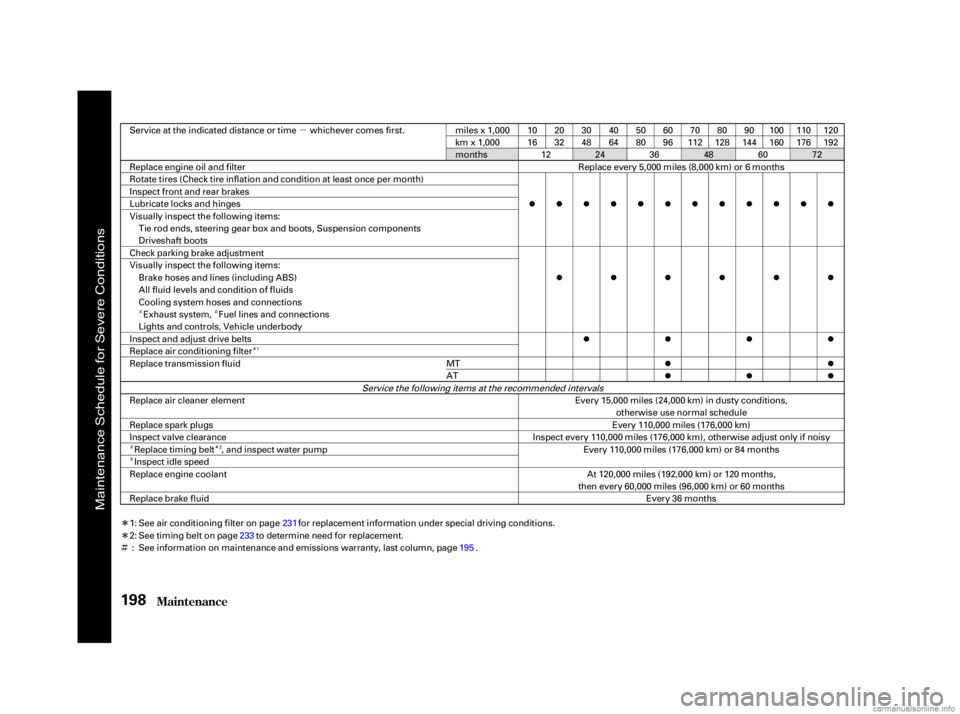
Service at the indicated distance or time whichever comes first. miles x 1,000
km x 1,000
months Replace every 5,000 miles (8,000 km) or 6 months
Service the following items at the recommended intervals
Every 36 months
At 120,000 miles (192,000 km) or 120 months,
then every 60,000 miles (96,000 km) or 60 months Every 110,000 miles (176,000 km) or 84 months
Inspect every 110,000 miles (176,000 km), otherwise adjust only if noisy Every 110,000 miles (176,000 km)
Every 15,000 miles (24,000 km) in dusty conditions,
otherwise use normal schedule
10
16
20
3230
4840
6450
8060
9670
112 80
128 90
144 100
160110
176120
192
See information on maintenance and emissions warranty, last column, page . See air conditioning filter on page for replacement information under special driving conditions.
See timing belt on page to determine need for replacement.
Replace engine oil and filter
Rotate tires (Check tire inflation and condition at least once per month)
Inspect front and rear brakes
Lubricate locks and hinges
Visually inspect the following items:
Tie rod ends, steering gear box and boots, Suspension components
Driveshaft boots
Check parking brake adjustment
Visually inspect the following items: Brake hoses and lines (including ABS)
All fluid levels and condition of fluids
Cooling system hoses and connectionsExhaust system, Fuel lines and connections
Lights and controls, Vehicle underbody
Inspect and adjust drive belts
Replace air conditioning filter
Replace transmission fluid
Replace air cleaner element
Replace spark plugs
Inspect valve clearance Replace timing belt , and inspect water pump
Inspect idle speed
Replace engine coolant
Replace brake fluid 24
4872
12 3660
MT
AT
1:
2: : 231
233 195
1
2
Maintenance Schedule for Severe Conditions
Page 202 of 323

�µ�µ
�Ø
�Ø �Ø
�Ø
�Ø
�Ø
�Ø
�Ø
�Ø
�Ø
�Ø
�Ø
�Ø
�Ø
�Ø
�Ø
�Ø
�Ø
�Ø
�Ø
�Ø
�Ì
�Ì
�Î
CONT INUED
Maint enance199
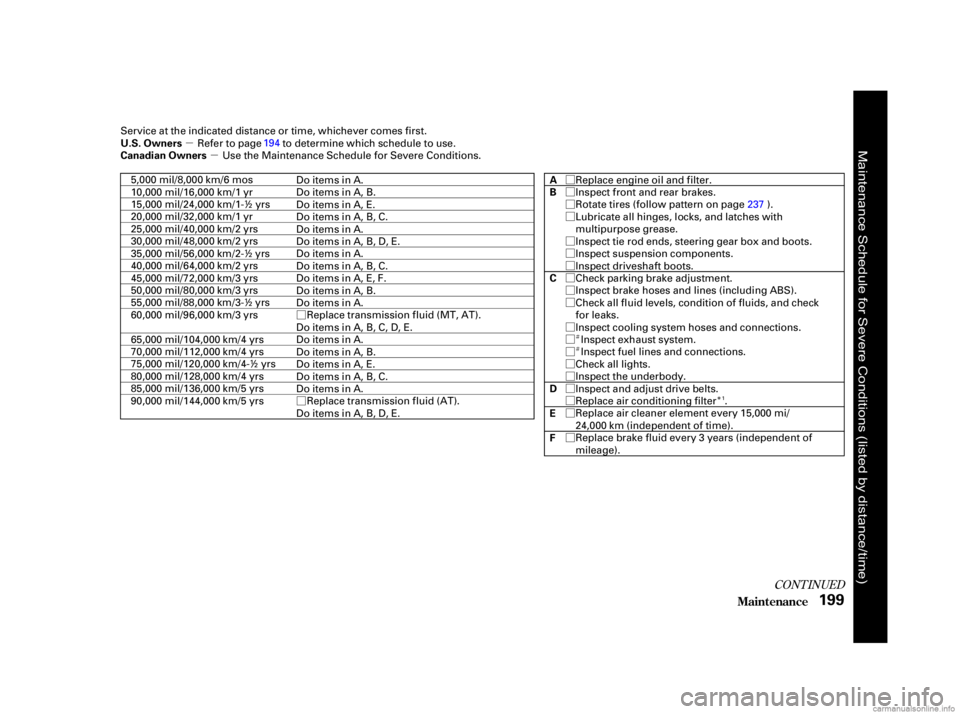
U.S. Owners
Canadian Owners A
B
C
D
E
F
Service at the indicated distance or time, whichever comes first.
Refer to page to determine which schedule to use.Use the Maintenance Schedule for Severe Conditions.
Do items in A.
Do items in A, B.
Do items in A, E.
DoitemsinA,B,C.
Do items in A.
DoitemsinA,B,D,E.
Do items in A.
DoitemsinA,B,C.
DoitemsinA,E,F.
Do items in A, B.
Do items in A.Replace transmission fluid (MT, AT).
DoitemsinA,B,C,D,E.
Do items in A.
Do items in A, B.
Do items in A, E.
DoitemsinA,B,C.
Do items in A. Replace transmission fluid (AT).
DoitemsinA,B,D,E. Replace engine oil and filter.
Inspect front and rear brakes.
Rotate tires (follow pattern on page
237).
Lubricate all hinges, locks, and latches with
multipurpose grease.
Inspect tie rod ends, steering gear box and boots.
Inspect suspension components.
Inspect driveshaft boots.
Check parking brake adjustment.
Inspect brake hoses and lines (including ABS).
Check all fluid levels, condition of fluids, and check
for leaks.
Inspect cooling system hoses and connections. Inspect exhaust system.
Inspect fuel lines and connections.
Check all lights.
Inspect the underbody.
Inspect and adjust drive belts.
Replace air conditioning filter .
Replace air cleaner element every 15,000 mi/
24,000 km (independent of time).
Replace brake fluid every 3 years (independent of
mileage).
5,000 mil/8,000 km/6 mos
10,000 mil/16,000 km/1 yr
15,000 mil/24,000 km/1-½ yrs
20,000 mil/32,000 km/1 yr
25,000 mil/40,000 km/2 yrs
30,000 mil/48,000 km/2 yrs
35,000 mil/56,000 km/2-½ yrs
40,000 mil/64,000 km/2 yrs
45,000 mil/72,000 km/3 yrs
50,000 mil/80,000 km/3 yrs
55,000 mil/88,000 km/3-½ yrs
60,000 mil/96,000 km/3 yrs
65,000 mil/104,000 km/4 yrs
70,000 mil/112,000 km/4 yrs
75,000 mil/120,000 km/4-½ yrs
80,000 mil/128,000 km/4 yrs
85,000 mil/136,000 km/5 yrs
90,000 mil/144,000 km/5 yrs
194
1
Maintenance Schedule for Severe Conditions (listed by distance/time)
Page 232 of 323
Remove the blade f rom its holder
by grasping the tabbed end of the
blade. Pull f irmly until the tabs
come out of the holder.Examine the new wiper blades. If
they have no plastic or metal rein-
f orcement along the back edge,
remove the metal reinf orcement
strips f rom the old wiper blade and
install them in the slots along the
edge of the new blade.Slide the new wiper blade into the
holder until the tabs lock.
Slide the wiper blade assembly
onto the wiper arm. Make sure it
locks in place.
Lower the wiper arm down against
the windshield.
3. 4. 5.
6.
7.
Wiper Blades
Maint enance229
B BL
LAA D
DE
E B
BL
LAA D
DE
E
R
RE EI
INNF FOOR RCCEEM
M E
EN
NT T
Page 234 of 323
The air conditioning f ilter removes
pollen and dust that is brought in
f rom the outside through the heating
andcoolingsystem.To replace it:
This f ilter should be replaced every
30,000 miles (48,000 km) under
normal conditions. It should be
replaced every 15,000 miles (24,000
km) if you drive primarily in urban
areas that have high concentrations
of soot in the air f rom industry and
diesel-powered vehicles. Replace it
more of ten if air f low f rom the
heating and cooling system becomes
less than usual.
The air conditioning f ilter is located
behind the glove box.
Open the glove box. Remove the
hooks on the side panels by pulling
out on the tabs. Pivot the glove
box out of the way. Remove the air conditioning f ilter
cover by pushing in on the lock tab,
then pulling the cover toward you.
1. 2.
CONT INUED
On U.S. EX and LX models
Maint enance
Replacement
A ir Condit ioning Filt er
231
H H
O
OO OKKSS
T
TA
A B
B
C
CO
OV VE
ER
R
Page 241 of 323

The tires that came with your car
were selected to match the perform-
ance capabilities of the car while
providing the best combination of
handling, ride comf ort, and long lif e.
Youshouldreplacethemwithradial
tires of the same size, load range,
speed rating, and maximum cold tire
pressure rating (as shown on the
tire’s sidewall). Mixing radial and
bias-ply tires on your car can reduce
its braking ability, traction, and
steering accuracy.It is best to replace all f our tires at
thesametime.If thatisnotpossible
or necessary, then replace the two
f ront tires or the two rear tires as a
pair. Replacing just one tire can
seriously af f ect your car’s handling. TheABSworksbycomparingthe
speed of the wheels. When replacing
tires, use the same size originally
supplied with the car. Tire size and
construction can af f ect wheel speed
and may cause the system to work
inconsistently.
If you ever need to replace a wheel,
make sure the wheel’s specif ications
match those of the original wheel
that came on your car. Replacement
wheels are available at your Honda
dealer.
Replacing T ires and Wheels
Tires
Maint enance238
Installing improper tires on your
car can affect handling and
stability. This can cause a crash
in which you can be seriously
hurt or killed.
Always use the size and type of
tires recommended in this
owner’s manual.
Page 247 of 323

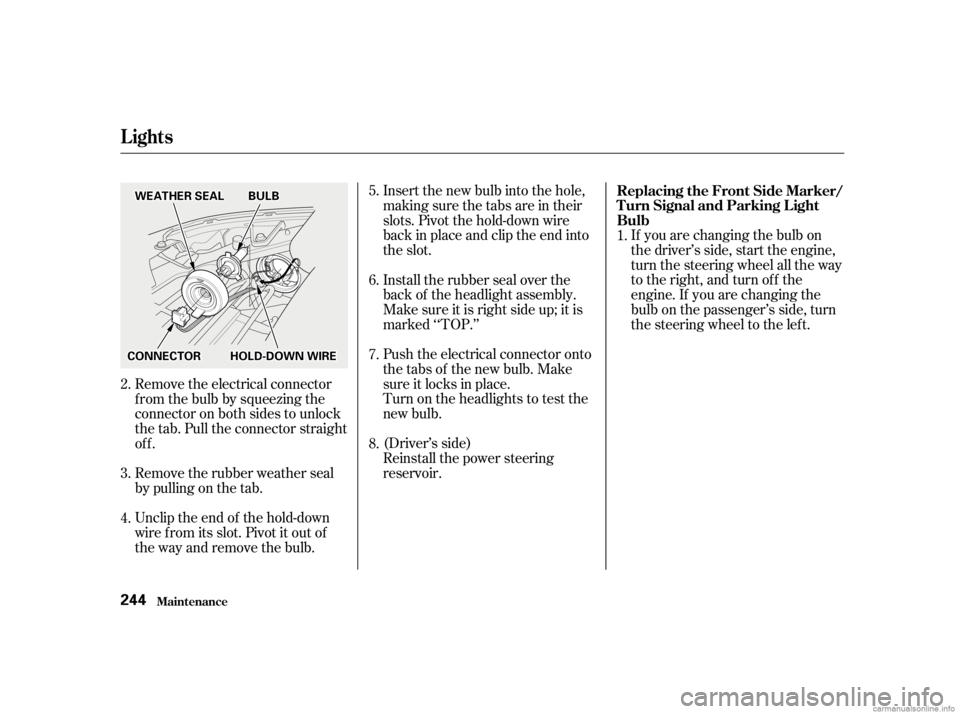
If you are changing the bulb on
the driver’s side, start the engine,
turn the steering wheel all the way
to the right, and turn off the
engine. If you are changing the
bulb on the passenger’s side, turn
the steering wheel to the left.
Reinstall the power steering
reservoir. (Driver’s side) Push the electrical connector onto
the tabs of the new bulb. Make
sure it locks in place.
Turn on the headlights to test the
new bulb. Insert the new bulb into the hole,
making sure the tabs are in their
slots. Pivot the hold-down wire
back in place and clip the end into
the slot.
Install the rubber seal over the
back of the headlight assembly.
Make sure it is right side up; it is
marked ‘‘TOP.’’
Unclip the end of the hold-down
wire f rom its slot. Pivot it out of
the way and remove the bulb. Remove the rubber weather seal
by pulling on the tab. Remove the electrical connector
f rom the bulb by squeezing the
connector on both sides to unlock
the tab. Pull the connector straight
off.
3.
4. 5.
6.
7.
8.
1.
2. Replacing the Front Side Marker/
Turn Signal and Parking L ight
Bulb
Lights
Maint enance244
W WE
EA
A T
TH
H E
ER
R S
SEEA
A L
L B
BUUL LBB
C
CO ON NNNEEC
CT TO
OR R H
HO
OL LDD -
-D
D O
OW WN N W
WIIRRE E
Page 251 of 323
Turn on the parking lights and
check that the new bulb is
working.
Reinstall the socket. Turn it
clockwise until it locks. Make sure
the new bulb is working.
Remove the socket f rom the light
assembly by squeezing the tabs on
both sides of the socket.
Pull the bulb straight out of its
socket. Push the new bulb in until
it bottoms in the socket.Reinstall the socket back in place
by pushing it in until it latches.
2. 1. 3.
4.
3.
Lights
Maint enance
Replacing a Rear License Bulb
248