Page 56 of 319

This section gives inf ormation about
the controls and displays that
contribute to the daily operation of
your Honda. All the essential
controls are within easy reach............................
Control Locations . 58
...............................
Indicator Lights . 59 .............................................
Gauges . 66
...............................
Speedometer . 66
.................................
Tachometer . 66
.....................................
Odometer . 66
...................................
Trip Meter . 67
..................................
Fuel Gauge . 67
...................
Temperature Gauge . 68
Controls Near the Steering .......................................
Wheel . 69
...................................
Headlights . 70
............
Daytime Running Lights . 71
....
Instrument Panel Brightness . 71
................................
Turn Signals . 72
.....................
Windshield Wipers . 72
..................
Windshield Washers . 73
..........................
Hazard Warning . 74
.............
Rear Window Def ogger . 74
......
Steering Wheel Adjustment . 75
...............
Steering Wheel Controls . 76
.............................
Cruise Control . 76
...............................
Keys and Locks . 79
..............................................
Keys . 79
....................
Immobilizer System . 80
............................
Ignition Switch . 82
..................................
Door Locks . 83
......................
Power Door Locks . 84 ...................
Remote Transmitter . 85
..............
Childproof Door Locks . 88
...........................................
Trunk . 88
..................
Inside Trunk Opener . 89
............................
Seat Adjustments . 90
.............
Front Seat Adjustments . 90
Driver’s Seat Height
..............................
Adjustment . 91
................
Driver’s Seat Armrest . 91
..........................
Head Restraints . 92
...........................
Folding Rear Seat . 93
..............................
Power Windows . 95
.........................................
Moonroof . 97
.............................................
Mirrors . 98
....
Adjusting the Power Mirrors . 98
.................................
Parking Brake . 99
......................................
Glove Box . 100
...........................
Beverage Holder . 101
.................
Console Compartment . 101
........................................
Coin Box . 102
...............................
Center Pocket . 102
.............
Accessory Power Socket . 102
...............................
Interior Lights . 103
..............................
Ceiling Light . 103
...................................
Spotlights . 104
........................
Courtesy Lights . 104
Instruments and Controls
Inst rument s and Cont rols 57
Page 60 of 319
. It is a
reminder to you and your passeng")
The instrument panel has many
indicators to give you important
inf ormation about your car.
This indicator lights when you turn
the ignition switch ON (II). It is a
reminder to you and your passengers
to protect yourselves by f astening
the seat belts. A beeper also sounds
if you have not fastened your seat
belt.
If you do not f asten your seat belt,
the beeper will stop af ter a f ew
seconds but the light stays on until
you do. Both the light and the beeper
stay of f if you f asten your seat belt
bef ore turning on the ignition.This indicator lights when you turn
the ignition switch ON (II). If it
comes on at any other time, it
indicates that the passenger’s side
airbag has automatically shut off.
For complete inf ormation, see page
.
This indicator lights when you turn
the ignition switch ON (II). If it
comes on at any other time, it
indicates a potential problem with
your f ront airbags or automatic seat
belt tensioners. On models equipped
with side airbags, this light will also
alert you to a potential problem with
your side airbags or passenger’s side
airbag automatic cutoff system. For
complete inf ormation, see page .
5152
CONT INUED
Only on models equipped with side
airbags
Indicator L ights
Inst rument s and Cont rols
Seat Belt Reminder L ight
Side A irbag Indicator
Supplemental Restraint
System Indicator
61
Page 62 of 319

This light comes on with the high
beam headlights. See page for
inf ormation on the headlight
controls.
This lights when you set the cruise
control. See page f or inf ormation
on operating the cruise control.
On Canadian models, this indicator
comes on with reduced brightness
when the Daytime Running Lights
(DRL) are on (see page ).
See page .
The lef t or right turn signal light
blinks when you signal a lane change
or turn. If the light does not blink or
blinks rapidly, it usually means one
of the turn signal bulbs is burned out
(see page ). Replace the bulb as
soon as possible, since other drivers
cannot see that you are signalling. This light comes on if the trunk lid is
not closed tightly.
This light comes on as a reminder
that you must ref uel soon.
WhenyouturnontheHazard
Warning switch, both turn signal
lights blink. All turn signals on the
outside of the car should f lash. This light comes on when the
washer f luid level is low. Add washer
f luid when you see this light come on
(see page ).
277
244 70
71
76 215
Only on models equipped with Cruise
Control System Canadian models only
High Beam Indicator
Cruise Control Indicator
Malf unction Indicator
Lamp
Turn Signal and
Hazard Warning
Indicators Low Fuel Indicator
Washer Level Indicator
Trunk-open Indicator
Indicator L ights
Inst rument s and Cont rols
63
Page 68 of 319
�Î
�Î�Î
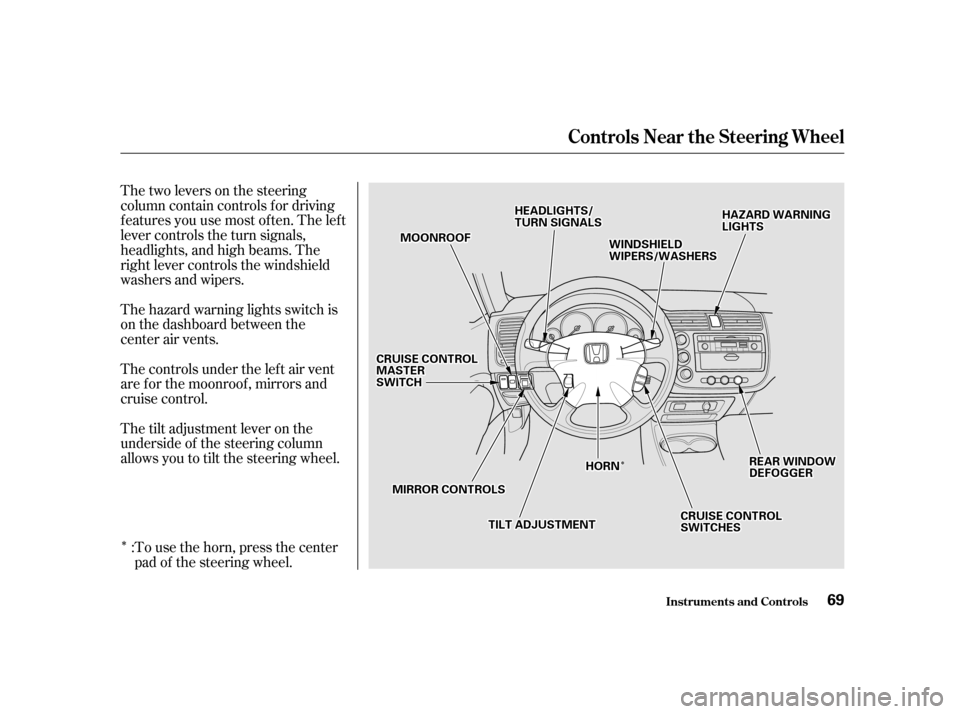
Thetwoleversonthesteering
column contain controls f or driving
f eatures you use most of ten. The lef t
lever controls the turn signals,
headlights, and high beams. The
right lever controls the windshield
washers and wipers.
The hazard warning lights switch is
on the dashboard between the
center air vents.
The controls under the lef t air vent
are f or the moonroof , mirrors and
cruise control.
The tilt adjustment lever on the
underside of the steering column
allows you to tilt the steering wheel.
To use the horn, press the center
pad of the steering wheel.
:
Controls Near the Steering Wheel
Inst rument s and Cont rols
69
HHAAZZAARRDDWWAARRNNIINNGGLLIIGGHHTTSSMMOOOONNRROOOOFF
TTIILLTTAADDJJUUSSTTMMEENNTT
WWIINNDDSSHHIIEELLDDWWIIPPEERRSS//WWAASSHHEERRSS
MMIIRRRROORRCCOONNTTRROOLLSS
RREEAARRWWIINNDDOOWWDDEEFFOOGGGGEERR
HHEEAADDLLIIGGHHTTSS//TTUURRNNSSIIGGNNAALLSS
CCRRUUIISSEECCOONNTTRROOLLSSWWIITTCCHHEESS
CCRRUUIISSEECCOONNTTRROOLLMMAASSTTEERRSSWWIITTCCHH
HHOORRNN
Page 69 of 319
The rotating switch on the lef t lever
controls the lights. Turning this
switch to the ‘‘ ’’ position turns
on the parking lights, taillights,
instrument panel lights, side-marker
lights, and rear license plate lights.
Turning the switch to the ‘‘ ’’
position turns on the headlights.To change f rom low beams to high
beams, push the turn signal lever
f orward until you hear a click. The
blue high beam indicator will light
(see page ). To return to low
beams, pull the turn signal lever
back.
If you leave the lights on with the
ignition switch in ACCESSORY (I)
or LOCK (0), you will hear a
reminder tone when you open the
driver’s door.
To f lash the high beams, pull the
turn signal lever back lightly, then
release it. The high beams will come
on and go of f . The high beams will
stay on f or as long as you hold the
lever back, no matter what position
the headlight switch is in.
63
Headlights
Controls Near the Steering Wheel
Inst rument s and Cont rols
70
Page 70 of 319
Canadian models only
With the headlight switch off, the
high beam headlights come on with
reduced brightness when you turn
the ignition switch to ON (II) and
release the parking brake. They
remain on until you turn the ignition
of f , even if you set the parking brake.
The headlights revert to normal
operation when you turn them on
with the switch.Turntheknobontheleftsideof the
instrument panel to adjust the
brightness of the instrument panel
lights.
Instrument Panel Brightness
Daytime Running L ights
Controls Near the Steering Wheel
Inst rument s and Cont rols 71
Page 73 of 319

Make sure the rear window is clear
and you have good visibility bef ore
starting to drive.
The def ogger and antenna wires on
the inside of the rear window can be
accidentally damaged. When
cleaning the glass, always wipe side
to side.
Push the button between the center
vents to turn on the hazard warning
lights (f our-way f lashers). This
causes all f our outside turn signals
and both indicators in the instrument
panel to f lash. Use the hazard
warning lights if you need to park in
a dangerous area near heavy traffic,
or if your car is disabled. The rear window def ogger will clear
fog, frost, and thin ice from the
window. Push the def ogger button to
turn it on and of f . The light in the
button lights to show the def ogger is
on. If you do not turn it of f , the
def ogger will shut itself of f af ter
about15minutes.Italsoshutsoff
when you turn of f the ignition. You
have to turn it on again when you
restart the car.
Controls Near the Steering Wheel
Inst rument s and Cont rolsRear Window Def ogger
Hazard Warning 74
Page 74 of 319
Push the lever up to lock the
steering wheel in that position.
Make sure you have securely
locked the steering wheel in place
by trying to move it up and down.
Move the steering wheel to the
desired position, making sure the
wheel points toward your chest,
not toward your f ace. Make sure
you can see the instrument panel
gauges and the indicator lights.
Push the lever under the steering
column all the way down.
To adjust the steering wheel upward
or downward:
Make any steering wheel adjustment
bef ore you start driving.
1.4.
3.
2.
See page f or important saf ety inf ormation about how to properlyposition the steering wheel. 17
Inst rument s and Cont rols
Controls Near the Steering Wheel
Steering Wheel A djustment
75
Adjusting the steering wheel
position while driving may
cause you to lose control of the
car and be seriously injured in acrash.
Adjust the steering wheel only
when the car is stopped.

 and
release the parking brake. They
remain on")
