Page 210 of 319
CONT INUED
Remove the radiator cap.
Turn the ignition ON (II). Turn
the temperature control dial to
maximum heat. Turn of f the
ignition. Open the hood. Make
sure the engine and radiator are
cool to the touch.
Loosen the drain plug on the
bottom of the radiator. The
coolant will drain through the
splash guard. Remove the drain
bolt and washer f rom the engine
block.
Draining the coolant requires access
to the underside of the car. Unless
you have the tools and knowledge,
you should have this maintenance
done by a skilled mechanic.
Thecoolingsystemshouldbe
completely drained and ref illed with
new coolant according to the time
and distance recommendations in
the maintenance schedule. Only use
Honda All Season Antif reeze/
Coolant Type 2.
1.3.
2.
Replacing Engine Coolant
Cooling Syst em
Maint enance
211
Page 216 of 319

If Honda MTF is not available, you
may use an API service SG, SH or SJ
grade motor oil with a viscosity of
SAE 10W-30 or 10W-40 as a
temporary replacement. An SG
grade is pref erred, but an SH or SJ
grade may be used if SG is not
available. However, motor oil does
not contain the proper additives and
continued use can cause stif f er
shif ting. Replace as soon as it is
convenient.
The transmission should be drained
and ref illed with new f luid according
to the time and distance recommen-
dations in the maintenance schedule.
Check the f luid level with the
transmission at normal operating
temperature and the car sitting on
level ground. Remove the
transmission f iller bolt and caref ully
f eel inside the bolt hole with your
f inger. The f luid level should be up
to the edge of the bolt hole. If it is
not, add genuine Honda Manual
Transmission Fluid (MTF) until it
starts to run out of the hole. Reinstall
the f iller bolt and tighten it securely.
Insert the dipstick all the way back
into the transmission securely as
shown in the illustration.
The transmission should be drained
and ref illed with new f luid according
to the time and distance recommen-
dations in the maintenance schedule.
6.
T ransmission Fluid
Maint enance
5-speed Manual Transmission
217
FFIILLLLEERRBBOOLLTT
CCoorrrreeccttLLeevveell
Page 220 of 319
The air cleaner element should be
replaced according to the time and
distance recommendations in the
maintenance schedule.Caref ully clean the inside of the
air cleaner housing with a damp
rag.
Place the new air cleaner element
in the air cleaner housing.
The air cleaner element is inside the
air cleaner housing in the engine
compartment.
To replace it:Loosen the seven bolts and
remove the air cleaner housing
cover.
Remove the old air cleaner
element. Reinstall the air cleaner housing cover, tighten the seven bolts.
1.
3.
2. 4. 5.
Replacement
Maint enance
A ir Cleaner Element
221
AAIIRRCCLLEEAANNEERREELLEEMMEENNTT
BBOOLLTTSS
BBOOLLTTSS
Page 221 of 319
Clean the hood latch assembly with a
mild cleaner, then lubricate it with a
multipurpose grease. Lubricate all
the moving parts, including the pivot.
Follow the time and distance
recommendations in the
Maintenance Schedule. If you are
not sure how to clean and grease the
latch, contact your Honda dealer.Maint enance
Hood L at ch
222
PPIIVVOOTTSS
Page 222 of 319
The spark plugs in your car should
be replaced according to the time
and distance recommendations in
the maintenance schedule.Disconnect the wire connector
f rom the ignition coil by pushing
on the lock tab and pulling on the
connector. Pull on the plastic
connector, not the wires.
Remove the cover by turning the
two clips one quarter turn
counterclockwise.
Clean up any dirt and oil that have
collected around the ignition coils.
1. 2.
3.
CONT INUED
Maint enance
Spark Plugs
Replacement
223
CCLLIIPPSS
Page 226 of 319
 cable f")
�µ
If the terminals are severely cor-
roded, clean them with baking soda
and water. Then use a wrench to
loosen and remove the cables f rom
the terminals. Always disconnect the
negative ( ) cable f irst and recon-
nect it last. Clean the battery termi-
nals with a terminal cleaning tool or
wire brush. Reconnect and tighten
the cables, then coat the terminals
with grease. If you need to connect the battery to
a charger, disconnect both cables to
prevent damage to the car’s
electrical system.
If your car’s battery is disconnected
or goes dead, the audio system will
disableitself.Thenexttimeyouturn
on the radio you will see ‘‘ ’’
in the f requency display. Use the
Preset buttons to enter the five-digit
code (see page ).157
On EX and Canadian LX models
Battery
Maint enance227
The battery gives off explosive
hydrogen gas during normaloperation.
A spark or flame can cause the
battery to explode with enough
force to kill or seriously hurt you.
Wear protective clothing and a
face shield, or have a skilled
mechanic do the batterymaintenance.
Charging the battery with the cables
connected can seriously damage your
car’s electronic controls. Detach the
battery cables bef ore connecting the
battery to a charger.
Page 229 of 319

Periodically check the engine’s
radiator and air conditioning
condenser f or leaves, insects, and
dirt stuck to the f ront surf ace. These
block the air f low and reduce cooling
ef f iciency. Use a light spray f rom a
hose or a sof t brush to remove them.If the air conditioning does not get as
cold as before, have your dealer
check the system. Recharge the
system with Ref rigerant HFC-134a
(R-134a). (See Specif ications on page
.)
Run the air conditioning at least once
a week during the cold weather
months. Run it f or at least ten
minutes while you are driving at a
steady speed with the engine at
normal operating temperature. This
circulates the lubricating oil con-
tained in the ref rigerant.
Your car’s air conditioning is a sealed
system. Any major maintenance,
such as recharging, should be done
by a qualif ied mechanic. You can do
a couple of things to make sure the
air conditioning works ef f iciently.
293Optional for Canadian DX, LX, models
A ir Condit ioning Syst em
Maint enance
230
AAIIRRCCOONNDDIITTIIOONNIINNGGCCOONNDDEENNSSEERR Whenever you have the air conditioning
system serviced, make sure the service
f acility uses a ref rigerant recycling
system. This system captures the
ref rigerant f or reuse. Releasing
ref rigerant into the atmosphere can
damage the environment.
The condenser and radiator f ins bend
easily. Only use a low-pressure spray
or sof t-bristle brush to clean them.
Page 232 of 319
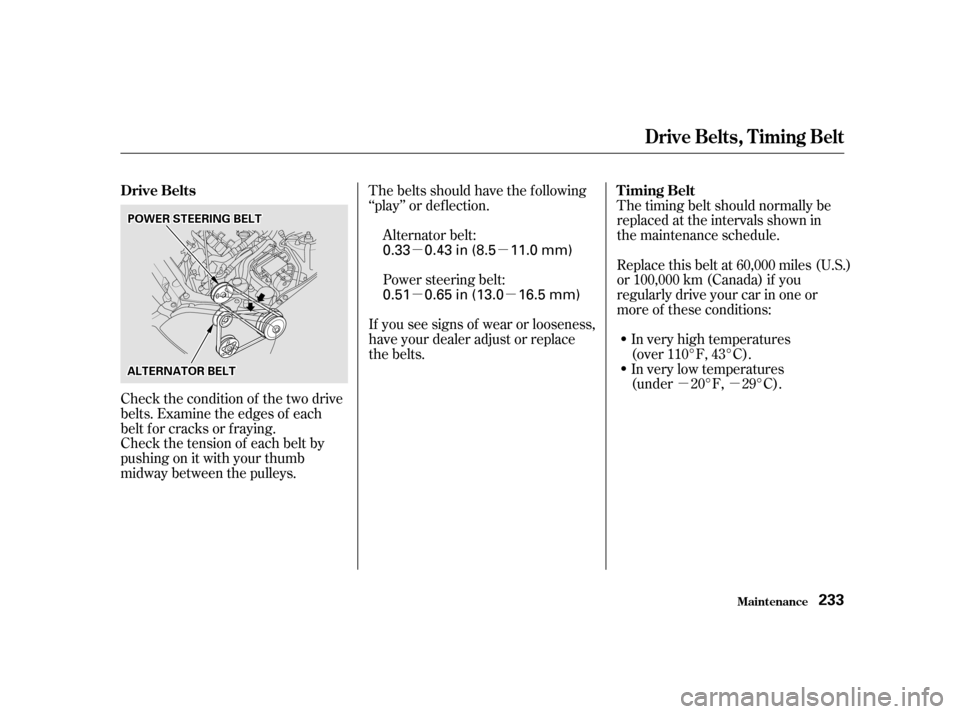
�µ�µ
�µ�µ
�µ�µ
Check the tension of each belt by
pushingonitwithyourthumb
midway between the pulleys. The belts should have the f ollowing
‘‘play’’ or def lection. The timing belt should normally be
replaced at the intervals shown in
the maintenance schedule.
In very high temperatures
(over 110°F, 43°C).
In very low temperatures
(under 20°F, 29°C).
Replace this belt at 60,000 miles (U.S.)
or 100,000 km (Canada) if you
regularly drive your car in one or
more of these conditions:
Power steering belt:
Alternator belt:
Check the condition of the two drive
belts. Examine the edges of each
belt f or cracks or f raying. If you see signs of wear or looseness,
have your dealer adjust or replace
the belts.
Drive Belts
T iming Belt
Drive Belts, Timing Belt
Maint enance233
AALLTTEERRNNAATTOORRBBEELLTT
PPOOWWEERRSSTTEEEERRIINNGGBBEELLTT
0.51 0.65 in (13.0 16.5 mm)
0.33 0.43 in (8.5 11.0 mm)
. Turn
the temperature control dial to
maximum heat. Turn of f the
ignition. Open the hood. Make
sure the engine and radiator are
cool to")