Page 205 of 319
The SAE number tells you the oil’s
viscosity or weight. Select the oil f or
your vehicle according to this chart.You may use a synthetic motor oil if
it meets the same requirements
given f or a conventional motor oil: it
displays the API Certif ication Seal,
and it is the proper weight as shown
on the chart. When using synthetic
oil, you must f ollow the oil and f ilter
change intervals given in the
maintenance schedule.
Your Honda does not require any oil
additives. Additives may adversely
af f ect your engine’s or transmission’s
perf ormance and durability.
5W-20 oil is f ormulated f or year-
round protection of your Honda, to
improve cold weather starting, and
to help your engine use less f uel.
If 5W-20 oil is not available, a 5W-30
oil may be used. However, it should
be replaced with 5W-20 at the next
oil change.
Engine Oil
Maint enance Synthetic Oil
A dditives
206
AAmmbbiieennttTTeemmppeerraattuurree
Page 206 of 319
 is required to
remove the f ilter.
Install a new oil f ilter according to
instructions th")
Remove the oil f ilter and let the
remaining oil drain. A special
wrench (available from your
Honda dealer) is required to
remove the f ilter.
Install a new oil f ilter according to
instructions that come with it.
Run the engine until it reaches
normal operating temperature,
then shut it off.
Open the hood and remove the
engine oil f ill cap. Remove the oil
drain bolt and washer f rom the
bottom of the engine. Drain the oil
into an appropriate container.
Always change the oil and f ilter
accordingtothetimeanddistance
(miles/kilometers) recommenda-
tions in the maintenance schedule.
The oil and f ilter collect contami-
nants that can damage your engine if
they are not removed regularly.
Changing the oil and f ilter requires
special tools and access f rom
underneath the car. The car should
be raised on a service station-type
hydraulic lif t f or this service. Unless
you have the knowledge and proper
equipment, you should have this
maintenance done by a skilled
mechanic.
1. 2.
4.
3.
CONT INUED
Changing the Oil and Filter
Engine Oil
Maint enance
207
WWAASSHHEERROOIILLFFIILLTTEERRDDRRAAIINNBBOOLLTT
Page 210 of 319
CONT INUED
Remove the radiator cap.
Turn the ignition ON (II). Turn
the temperature control dial to
maximum heat. Turn of f the
ignition. Open the hood. Make
sure the engine and radiator are
cool to the touch.
Loosen the drain plug on the
bottom of the radiator. The
coolant will drain through the
splash guard. Remove the drain
bolt and washer f rom the engine
block.
Draining the coolant requires access
to the underside of the car. Unless
you have the tools and knowledge,
you should have this maintenance
done by a skilled mechanic.
Thecoolingsystemshouldbe
completely drained and ref illed with
new coolant according to the time
and distance recommendations in
the maintenance schedule. Only use
Honda All Season Antif reeze/
Coolant Type 2.
1.3.
2.
Replacing Engine Coolant
Cooling Syst em
Maint enance
211
Page 216 of 319

If Honda MTF is not available, you
may use an API service SG, SH or SJ
grade motor oil with a viscosity of
SAE 10W-30 or 10W-40 as a
temporary replacement. An SG
grade is pref erred, but an SH or SJ
grade may be used if SG is not
available. However, motor oil does
not contain the proper additives and
continued use can cause stif f er
shif ting. Replace as soon as it is
convenient.
The transmission should be drained
and ref illed with new f luid according
to the time and distance recommen-
dations in the maintenance schedule.
Check the f luid level with the
transmission at normal operating
temperature and the car sitting on
level ground. Remove the
transmission f iller bolt and caref ully
f eel inside the bolt hole with your
f inger. The f luid level should be up
to the edge of the bolt hole. If it is
not, add genuine Honda Manual
Transmission Fluid (MTF) until it
starts to run out of the hole. Reinstall
the f iller bolt and tighten it securely.
Insert the dipstick all the way back
into the transmission securely as
shown in the illustration.
The transmission should be drained
and ref illed with new f luid according
to the time and distance recommen-
dations in the maintenance schedule.
6.
T ransmission Fluid
Maint enance
5-speed Manual Transmission
217
FFIILLLLEERRBBOOLLTT
CCoorrrreeccttLLeevveell
Page 220 of 319
The air cleaner element should be
replaced according to the time and
distance recommendations in the
maintenance schedule.Caref ully clean the inside of the
air cleaner housing with a damp
rag.
Place the new air cleaner element
in the air cleaner housing.
The air cleaner element is inside the
air cleaner housing in the engine
compartment.
To replace it:Loosen the seven bolts and
remove the air cleaner housing
cover.
Remove the old air cleaner
element. Reinstall the air cleaner housing cover, tighten the seven bolts.
1.
3.
2. 4. 5.
Replacement
Maint enance
A ir Cleaner Element
221
AAIIRRCCLLEEAANNEERREELLEEMMEENNTT
BBOOLLTTSS
BBOOLLTTSS
Page 221 of 319
Clean the hood latch assembly with a
mild cleaner, then lubricate it with a
multipurpose grease. Lubricate all
the moving parts, including the pivot.
Follow the time and distance
recommendations in the
Maintenance Schedule. If you are
not sure how to clean and grease the
latch, contact your Honda dealer.Maint enance
Hood L at ch
222
PPIIVVOOTTSS
Page 222 of 319
The spark plugs in your car should
be replaced according to the time
and distance recommendations in
the maintenance schedule.Disconnect the wire connector
f rom the ignition coil by pushing
on the lock tab and pulling on the
connector. Pull on the plastic
connector, not the wires.
Remove the cover by turning the
two clips one quarter turn
counterclockwise.
Clean up any dirt and oil that have
collected around the ignition coils.
1. 2.
3.
CONT INUED
Maint enance
Spark Plugs
Replacement
223
CCLLIIPPSS
Page 232 of 319
�µ�µ
�µ�µ
�µ�µ
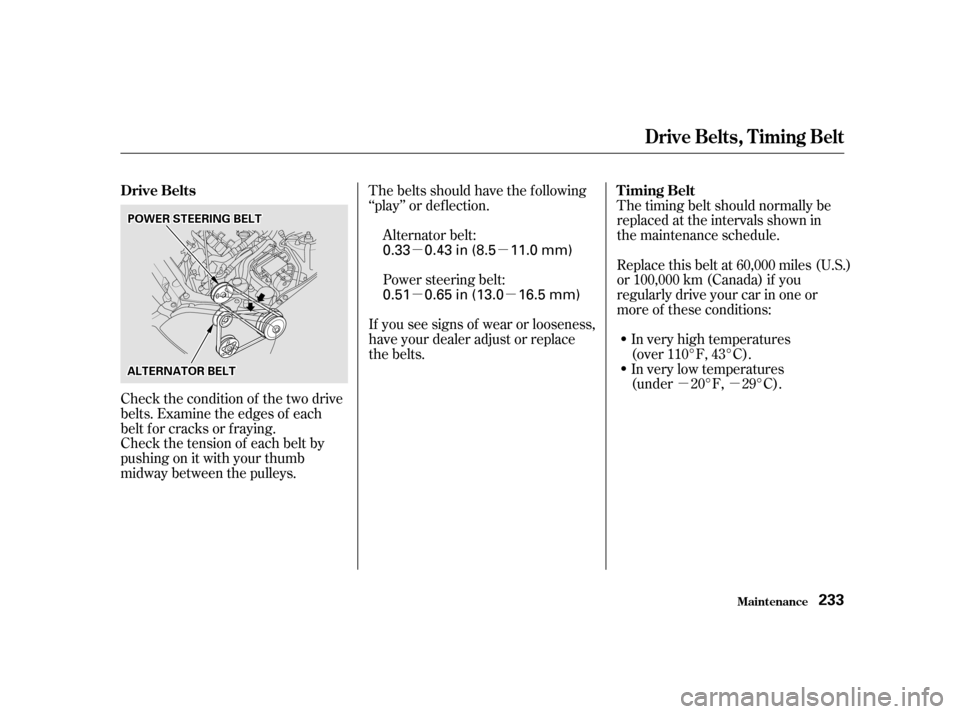
Check the tension of each belt by
pushingonitwithyourthumb
midway between the pulleys. The belts should have the f ollowing
‘‘play’’ or def lection. The timing belt should normally be
replaced at the intervals shown in
the maintenance schedule.
In very high temperatures
(over 110°F, 43°C).
In very low temperatures
(under 20°F, 29°C).
Replace this belt at 60,000 miles (U.S.)
or 100,000 km (Canada) if you
regularly drive your car in one or
more of these conditions:
Power steering belt:
Alternator belt:
Check the condition of the two drive
belts. Examine the edges of each
belt f or cracks or f raying. If you see signs of wear or looseness,
have your dealer adjust or replace
the belts.
Drive Belts
T iming Belt
Drive Belts, Timing Belt
Maint enance233
AALLTTEERRNNAATTOORRBBEELLTT
PPOOWWEERRSSTTEEEERRIINNGGBBEELLTT
0.51 0.65 in (13.0 16.5 mm)
0.33 0.43 in (8.5 11.0 mm)

. Turn
the temperature control dial to
maximum heat. Turn of f the
ignition. Open the hood. Make
sure the engine and radiator are
cool to")