Page 136 of 325

You can use the instrument panel
brightness control dial to adjust the il-
lumination of the audio system (see
page ). The audio system
illuminates when the parking lights
are on, even if the radio is turned of f .
The audio system usually shows the
time when the ignition switch is in
ACCESSORY (I) or ON (II). It
shows the operation mode of the
radio, cassette player, or optional CD
changer when you operate them,
then goes back to the time display
af ter f ive seconds.Adjust the hours by pressing and
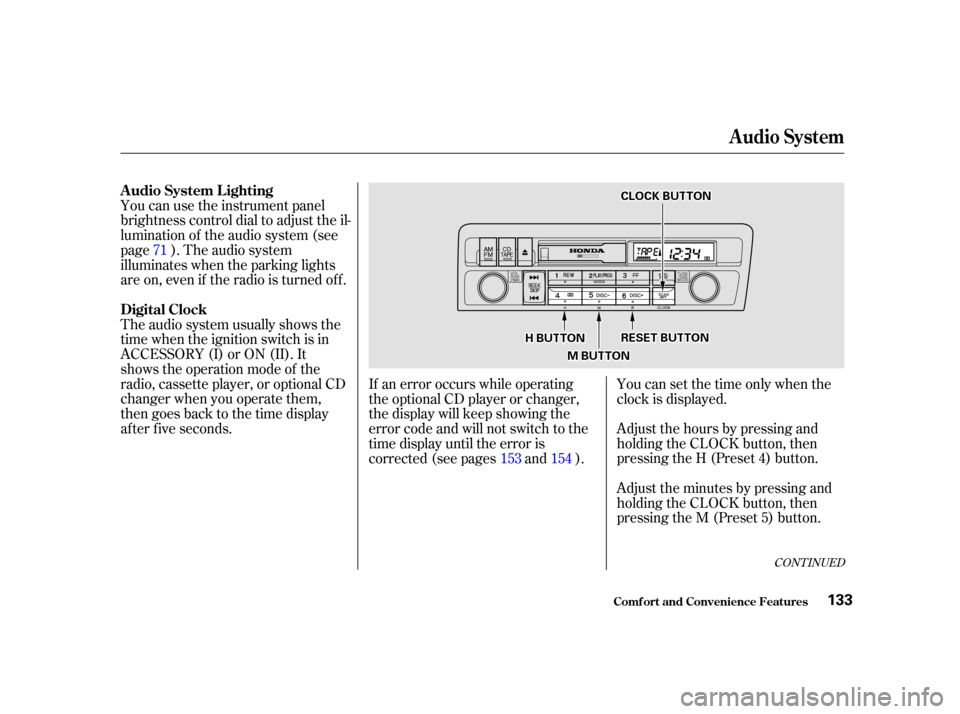
holding the CLOCK button, then
pressing the H (Preset 4) button.
Adjust the minutes by pressing and
holding the CLOCK button, then
pressing the M (Preset 5) button. You can set the time only when the
clock is displayed.
If an error occurs while operating
the optional CD player or changer,
the display will keep showing the
error code and will not switch to the
time display until the error is
corrected (see pages and ).
71
154
153
CONT INUED
Audio System
Comf ort and Convenience Feat ures
A udio System L ighting
Digital Clock
133
C CL LOOC CKK B
BUUT TT
TO
ON N
R
RE ES
SE ET
T B
BUUT TT
TO
ON N
M
M B
BUUT TT
TO
ON N
H
H
B
BUUT TT
TO
ON N
Page 137 of 325

�Û
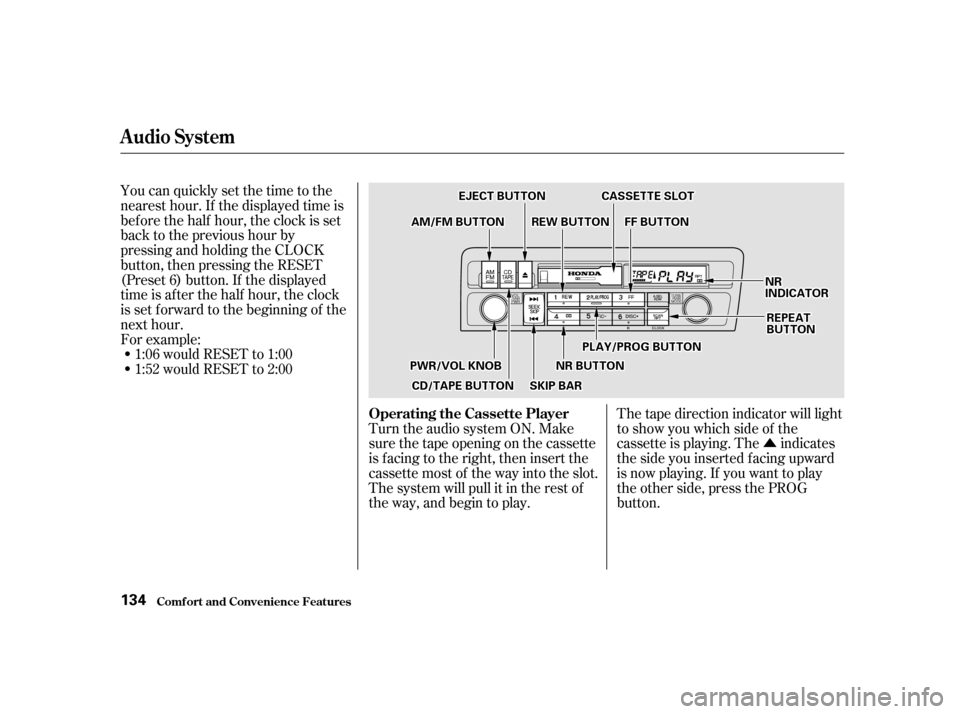
Turn the audio system ON. Make
sure the tape opening on the cassette
is f acing to the right, then insert the
cassette most of the way into the slot.
The system will pull it in the rest of
the way, and begin to play. The tape direction indicator will light
to show you which side of the
cassette is playing. The indicates
thesideyouinsertedfacingupward
is now playing. If you want to play
the other side, press the PROG
button.
You can quickly set the time to the
nearest hour. If the displayed time is
bef ore the half hour, the clock is set
back to the previous hour by
pressing and holding the CLOCK
button, then pressing the RESET
(Preset 6) button. If the displayed
time is af ter the half hour, the clock
is set forward to the beginning of the
next hour.
1:06 would RESET to 1:00
1:52 would RESET to 2:00
For example:
Operating the Cassette Player
Audio System
Comf ort and Convenience Feat ures134
R REEW
W B
BUUT TT
TO
ON N
E
E
J
JEE C
CT T B
BUUT TT
TO
ON N
A
A M
M /
/F
FM M B
BUUT TT
TO
ON N
R
REEP
PE
EA
A T
T
B
BU UT TT
TO
ON N
C
CA
A S
SSSEET
TT
TE
E S
SLLOOT T
N
NRR
I
IN ND DI
ICCA A T
TO
OR R
P
P L
LAA Y
Y//P
P R
RO OG G B
BUUT TT
TO
ON N
C
CD D /
/T
T A
A P
PE
E B
BUUT TT
TO
ON N
P
P
W
WR R//V
V O
OL L K
KNNO OBB
S
SKKIIPP B
BAA R
R
N
NR
R B
BUUT TT
TO
ON NF
FF
F B
BUUT TT
TO
ON N
Page 148 of 325

You can use the instrument panel
brightness control dial to adjust the il-
lumination of the audio system (see
page ). The audio system
illuminates when the parking lights
are on, even if the radio is turned of f .
The display of your audio system
usually shows the time when the
ignition switch is in ACCESSORY (I)
or ON (II). It shows the operation
mode of the radio, CD player, or
optional CD changer/cassette player
when you operate them, and goes
back to the time display after five
seconds.You can set the time only when the
clock is displayed.
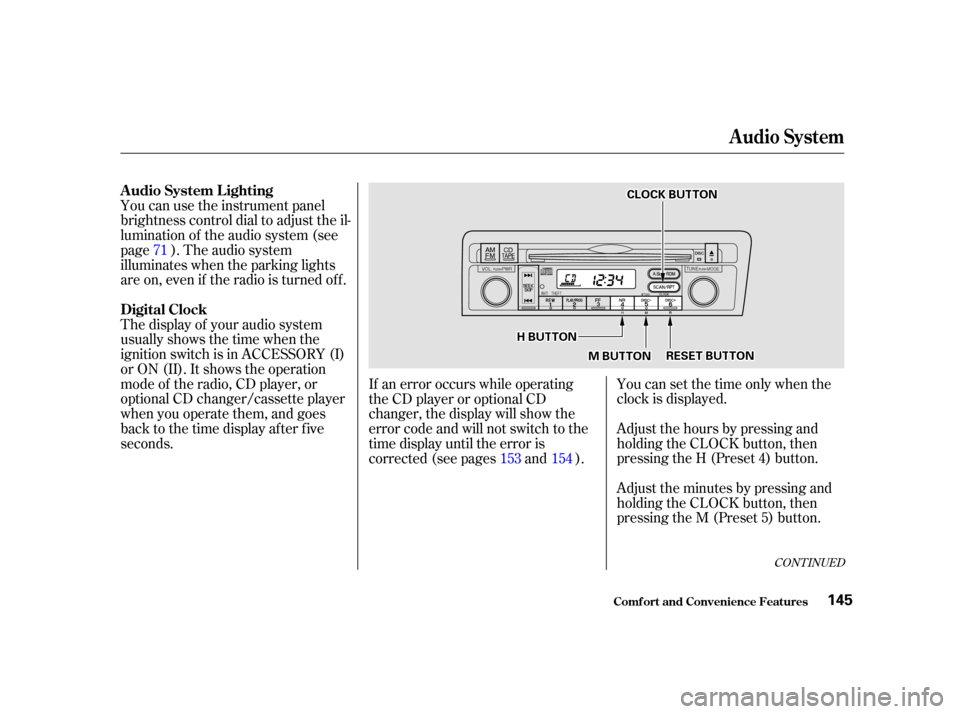
Adjust the hours by pressing and
holding the CLOCK button, then
pressing the H (Preset 4) button.
Adjust the minutes by pressing and
holding the CLOCK button, then
pressing the M (Preset 5) button.
If an error occurs while operating
the CD player or optional CD
changer, the display will show the
error code and will not switch to the
time display until the error is
corrected (see pages and ).
71
153 154
CONT INUED
A udio System L ighting
Digital Clock
Audio System
Comf ort and Convenience Feat ures145
C CLLOOC CKK B
BUUT TT
TO
ON N
M
M B
BUUT TT
TO
ON N R
RE
ES
SE ET
T B
BUUT TT
TO
ON N
H
H
B
BUUT TT
TO
ON N
Page 155 of 325
When a CD is not being played, store
it in its case to protect it f rom dust
and other contamination. To prevent
warpage, keep CDs out of direct
sunlight and extreme heat.
To clean a disc, use a clean sof t cloth.
Wipe across the disc f rom the center
to the outside edge.AnewCDmayberoughonthe
inner and outer edges. The small
plastic pieces causing this roughness
can f lake of f and f all on the re-
cording surf ace of the disc, causing
skipping or other problems. Remove
these pieces by rubbing the inner
and outer edges with the side of a
pencil or pen.
Never try to insert f oreign objects in
the CD player or the magazine.
Handle a CD by its edges; never
touch either surf ace. Contamination
f rom f ingerprints, liquids, f elt-tip
pens, and labels can cause the CD to
not play properly, or possibly jam in
the drive. Protecting Compact Discs
Audio System
Comf ort and Convenience Feat ures152
Page 159 of 325

�Û�µ
The tape direction indicator will light
to show you which side of the
cassette is playing. The indicates
thesideyouinsertedfacingupward
is now playing. If you want to play
the other side, press the PROG
button.
Dolby noise reduction turns on when
you insert a cassette. If the tape was
not recorded with Dolby noise
reduction, turn it of f by pressing the
NR button. With a cassette playing, you can use
the FF, REW, SKIP, or REPEAT
f unction to f ind a desired program.
Dolby remains of f until you turn it on
by pressing the button again. If you turn the system of f while a
tape is playing, either with the PWR/
VOL knob or by turning of f the
ignition, the cassette will remain in
the drive. When you turn the system
back on, the cassette player will be in
pause mode. To begin playing, press
the PLAY button.
To switch to the radio or CD player
while a tape is playing, press the
AM/FM, or CD button. To change
back to the cassette player, push the
CD button.
When the system reaches the end of
the tape, it will automatically reverse
direction and play the other side. If
you want to remove the cassette
f rom the drive, press the EJECT
button on the cassette player. Fast Forward and Re-
wind move the tape rapidly. To re-
wind the tape, push the REW button.
You will see REW in the display. To
f ast f orward the tape, push the FF
button. You will see FF displayed.
Press the PLAY button to take the
system out of rewind or f ast f orward.
If the system reaches the end of the
tape while in f ast f orward or rewind,
it automatically stops that function,
reverses direction, and begins to play.
Audio System
Comf ort and Convenience Feat ures
T ape Search Functions
FF/REW
156
Page 161 of 325

If you do not clean the cassette
player regularly, it may eventually
become impossible to remove the
contamination with a normal
cleaning kit.
Use 100-minute or shorter cassettes.
Cassettes longer than that use
thinner tape that may break or jam
the drive.Look at the cassette before you
insert it. If the tape is loose, tighten
it by turning a hub with a pencil or
your f inger.
The cassette player picks up dirt and
oxides f rom the tape. This contami-
nation builds up over time and
causes the sound quality to degrade.
To prevent this, you should clean the
player af ter every 30 hours of use.
Your dealer has a cleaning kit
available.
Never try to insert f oreign objects
into the cassette player. When they are not in use, store
cassettes in their cases to protect
them f rom dust and moisture. Never
place cassettes where they will be
exposed to direct sunlight, high heat,
or high humidity. If a cassette is
exposed to extreme heat or cold, let
it reach a moderate temperature
bef ore inserting it in the player. If the label is peeling of f , remove it
from the cassette or it could cause
the cassette to jam in the player.
Never try to insert a warped or
damaged cassette in the player.If you see the error indication
‘‘ ’’ on the display, press
the EJECT button and remove the
cassette from the unit. Make sure
the tape is not damaged. If the
cassette will not eject or the error
indication stays on after the cassette
ejects, take the car to your Honda
dealer.
Audio System
Comf ort and Convenience Feat ures
Caring f or the Cassette Player
158
Page 167 of 325
Shift to Park or Neutral and set
the parking brake. Pull the hood
release handle located under the
lower lef t corner of the dashboard.
The hood will pop up slightly.Standing in f ront of the car, put
your f ingers under the f ront edge
of the hood to the right of center.
Slide your hand to the lef t until
you f eel the hood latch handle.
Push this handle up until it
releases the hood. Lif t the hood.
Screw the f uel f ill cap back on,
tighten it until it clicks several
times. If you do not properly
tighten the cap, the Malfunction
Indicator Lamp may come on (see
page ).
Push the f uel f ill door closed until
it latches.
1. 2.
5.
6.
280
Service Station Procedures
Bef ore Driving
Opening the Hood
164
H H
O
OO ODD
R
RE EL
LEE A
A S
SEE
H
H A
AN
ND DL
LEE L
LA
A T
TC
CH H
Page 168 of 325
If you can open the hood without
lifting the hood latch handle, or the
hood latch handle moves stif f ly or
does not spring back as bef ore, the
mechanism should be cleaned and
lubricated (see page ).Pull the support rod out of its clip
and insert the end into the hole on
theleftsideof thehood.Afterclosingthehood,makesureit
is securely latched.
To close the hood, lif t it up slightly to
remove the support rod f rom the
hole. Put the support rod back into
its holding clip. Lower the hood to
about a f oot (30 cm) above the
fender,thenletitdrop. 3.
226
CONT INUED
Service Station Procedures
Bef ore Driving165
S SU
UP PP
PO
OR RTT R
ROOD D