Page 223 of 325
Check the f luid level with the engine
at normal operating temperature.Remove the dipstick (yellow loop)
f rom the transmission and wipe it
with a clean cloth.
Insert the dipstick all the way into
the transmission securely as
shown in the illustration.Remove the dipstick and check
the f luid level. It should be
between the upper and lower
marks.
Park the car on level ground. Shut
of f the engine. For accurate
results, wait at least 60 seconds,
andnomorethan90seconds,
af ter shutting of f the engine to
check the f luid level. 3. 4.
1. 2.
Automatic Transmission
T ransmission Fluid
Maint enance220
D D
I
IPP S
ST TI
ICCK K U
UP
PP
PE
ER
R
M
M A
AR
RKK
L
LO OW WE ER
R
M
M A
AR
RKK U
UP
PP
PE
ER
R
M
M A
AR
RKK
L
LO OW WE ER
R
M
M A
AR
RKK
D
D
I
IPP S
ST TI
ICCK K (
(C
CV V T
T)
)
C
CVV T
T
Page 224 of 325
Insert the dipstick all the way back
into the transmission securely as
shown in the illustration.
The transmission should be drained
and ref illed with new f luid according
to the time and distance recommen-
dations in the maintenance schedule.
If the level is below the lower
mark, add f luid into the f iller hole
to bring it to the upper mark.
Always use Honda ATF-Z1
(Automatic Transmission Fluid). If
it is not available, you may use a
DEXRON
III automatic
transmission f luid as a temporary
replacement. However, continued
use can affect shift quality. Have
the transmission f lushed and
ref illed with Honda ATF-Z1 as
soon as it is convenient.
To thoroughly f lush the transmission,
the technician should drain and ref ill
it with Honda ATF-Z1 (Automatic
Transmission Fluid), then drive the
vehicle a short distance. Do this
three times. Then drain and ref ill the
transmission a f inal time. 5. 6.
T ransmission Fluid
Maint enance221
Page 225 of 325

If Honda MTF is not available, you
may use an API service SG, SH or SJ
grade motor oil with a viscosity of
SAE 10W-30 or 10W-40 as a
temporary replacement. An SG
grade is pref erred, but an SH or SJ
grade may be used if SG is not
available. However, motor oil does
not contain the proper additives and
continued use can cause stif f er
shif ting. Replace as soon as it is
convenient.
The transmission should be drained
and ref illed with new f luid according
to the time and distance recommen-
dations in the maintenance schedule.Check the f luid level in the reser-
voirs monthly. There are up to two
reservoirs, depending on the model.
They are:
The brake f luid should be replaced
accordingtothetimeanddistance
recommendations in the mainte-
nance schedule.
Brake f luid reservoir (all models)
Clutch f luid reservoir
(manual transmission only)
Check the f luid level with the
transmission at normal operating
temperature and the car sitting on
level ground. Remove the
transmission f iller bolt and caref ully
f eel inside the bolt hole with your
f inger. The f luid level should be up
to the edge of the bolt hole. If it is
not, add Honda Manual Transmis-
sion Fluid (MTF) until it starts to
run out of the hole. Reinstall the
f iller bolt and tighten it securely. 5-speed Manual Transmission
T ransmission Fluid
Maint enance222
F FI ILLL LEE R
R B
BOOL LTT
C
Co or
rrreec ctt L
Leevveell
Page 263 of 325
Clean the windows, inside and out,
with a commercially-available glass
cleaner. You can also use a mixture
of one part white vinegar to ten parts
water. This will remove the haze that
builds up on the inside of the
windows. Use a sof t cloth or paper
towels to clean all glass and clear
plastic surf aces.If you use a liquid air f reshener,
make sure you f asten it securely so it
does not spill as you drive. If you want to use an air f reshener/
deodorizer in the interior of your car,
it is best to use a solid type. Some
liquid air f resheners contain chemi-
cals that may cause parts of the
interior trim and fabric to crack or
discolor.
Windows
A ir Fresheners
Interior Care
Appearance Care260
The rear window def ogger and
antenna wires are bonded to the inside
of the glass. Wiping vigorously up-and-
down can dislodge and break these
wires. When cleaning the rear window,
use gentle pressure and wipe side-to-
side.
Page 272 of 325
Tighten the wheel nuts securely in
the same crisscross pattern. Have
the wheel nut torque checked at
the nearest automotive service
f acility.
Tighten the wheel nuts to:Place the flat tire face down in the
sparetirewell.
Remove the spacer cone f rom the
wing bolt, turn it over, and put it
back on the bolt.
Securetheflattirebyscrewing
the wing bolt back into its hole.
Remove the center cap before
storing the f lat tire in the trunk
well.
15.
16. 17.
18.
19.
CONT INUED
On HX model in the U.S., Si model in Canada
Changing a Flat T ire
T aking Care of t he Unexpect ed269
W WI INNG G B
BOOL LTT S
SP
PA
A C
CEER
R
C
CO ON NEE
80 lbf·ft (108 N·m , 11 kgf·m)
Page 273 of 325
Store the jack in the trunk with the
end bracket on the lef t side. Turn
the jack’s end bracket to lock it in
place. Store the tool kit.
Store the wheel cover in the trunk.
Make sure it does not get
scratched or damaged.
Lower the trunk f loor, then close
the trunk lid.
20.
21.
22.
Changing a Flat T ire
T aking Care of t he Unexpect ed270
Loose items can fly around the
interior in a crash and could
seriously injure the occupants.
Store the wheel, jack and tools
securely before driving.
Page 290 of 325
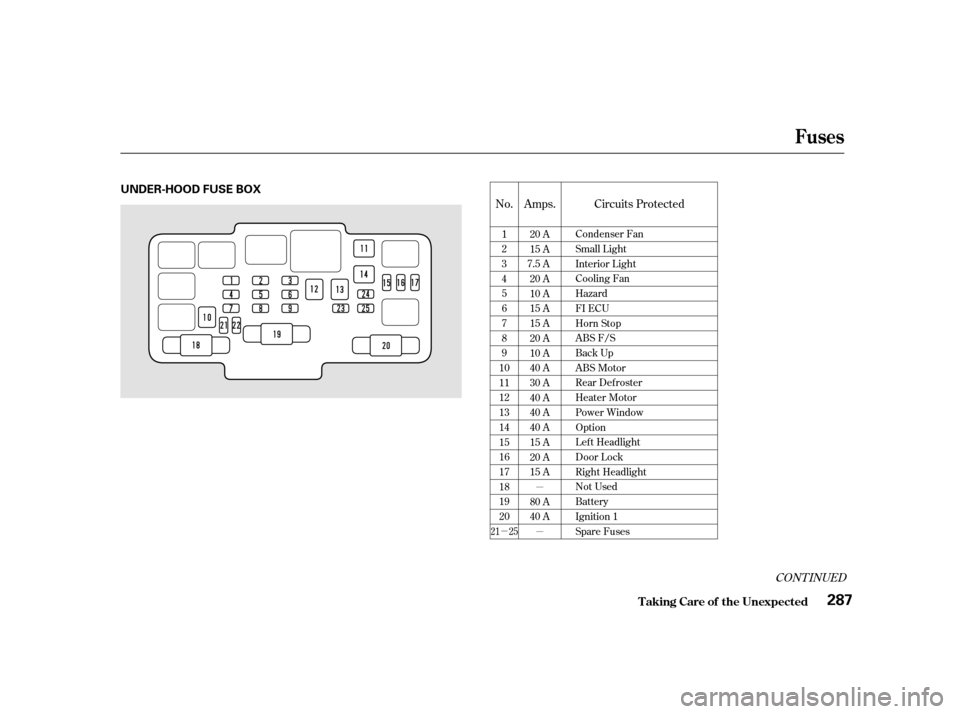
�µ
�µ
�µ
Amps.
No. Circuits Protected
CONT INUED
20 A
15 A
7.5 A 20 A
10 A
15 A
15 A
20 A
10 A
40 A
30 A
40 A
40 A
40 A
15 A
20 A
15 A
80 A
40 A
1
2
3
4
5
6
7
8
9
10
11
12
13
14
15
16
17
18
19
20 Condenser Fan
Small Light
Interior Light
Cooling Fan
Hazard
FI ECU
Horn Stop
ABS F/S
Back Up
ABS Motor
Rear Defroster
Heater Motor
Power Window
Option
Lef t Headlight
Door Lock
Right Headlight
Not Used
Battery
Ignition 1
Spare Fuses
21 25
Fuses
T aking Care of t he Unexpect ed287
UNDER-HOOD FUSE BOX
Page 311 of 325
Canada Zone Of f ice Map
Warrant y and Cust omer Relat ions308
Honda Canada Inc.
National OfficeCUSTOMER RELATIONS
RELATIONS AVEC LA CLIENTÈLE
Honda Canada Inc.
715 Milner Avenue
Toronto, ON
M1B 2K8
Tel: 1-888-9-HONDA-9
Fax: Toll-free 1-877-939-0909
Toronto (416) 287-4776

f rom the transmission and wipe it
with a clean cloth.
Insert the dipstick all the way into
the")