Page 14 of 355

CONT INUED
Position the lap part of the belt as
low as possible across your hips,
then pull up on the shoulder part of
the belt so the lap part f its snugly.
This lets your strong pelvic bones
take the force of a crash and reduces
the chance of internal injuries.
If necessary, pull up on the belt again
to remove any slack from the
shoulder part, then check that the
belt rests across the center of your
chest and over your shoulder. Thisspreads the f orces of a crash over
the strongest bones in your upper
body.
If the seat belt touches or crosses
your neck, or if it crosses your arm
instead of your shoulder, you need to
adjust the seat belt anchor height.
To adjust the height of a f ront seat
belt anchor, squeeze the two release
buttons and slide the anchor up or
down as needed (it has f our
positions).
This could cause
very serious injuries in a crash.
Driver and Passenger Saf ety
Protecting Adults
Never place t he shoulder port ion of alap/shoulder belt under your arm orbehind your back.
15
Improperly positioning the seat
belts can cause serious injury
or death in a crash.
Make sure all seat belts are
properly positioned beforedriving.
Page 59 of 355

af ter the Maintenance Required
Indicator is reset, it will come o")
�µ
Ref er to the Maintenance Schedules
f or Normal and Severe Driving
Conditions on pages .
For the f irst 6,000 miles (9,600 km)
af ter the Maintenance Required
Indicator is reset, it will come on f or
two seconds when you turn the
ignition switch ON (II). Between 6,000 miles (9,600 km) and
7,500 miles (12,000 km) this
indicator will light f or two seconds
when you f irst turn the ignition
switch ON (II), and then f lash f or
ten seconds.
If you exceed 7,500 miles (12,000
km) without having the scheduled
maintenance perf ormed, this
indicator will remain on as a constant
reminder.Your dealer will reset this indicator
af ter completing the scheduled
maintenance. If this maintenance is
done by someone other than your
Honda dealer, reset the indicator as
f ollows.
Turn of f the engine.
Press and hold the select/reset
buttonintheinstrumentpanel,
then turn the ignition switch ON
(II).
Hold the buttons for about ten sec-
onds, until the indicator resets.
This indicator reminds you that it is
time to take your car in for
scheduled maintenance. 1. 2. 3.
224 228
Gauges
Maintenance Required Indicator
Inst rument s and Cont rols
60
MMAAIINNTTEENNAANNCCEERREEQQUUIIRREEDDIINNDDIICCAATTOORR
SSEELLEECCTT//RREESSEETTBBUUTTTTOONN
Page 69 of 355

Youcancancelthecruisecontrolin
any of these ways:Tap the brake or clutch pedal.
Push the CANCEL button on the
steering wheel.
Press the Cruise Control Master
Switch.
When you push the CANCEL button,
or tap the brake or clutch pedal, the
CRUISE CONTROL light on the
instrument panel will go out and the
car will begin to slow down. You can
use the accelerator pedal in the
normal way.
The system remembers the
previously-set cruising speed. To
return to that speed, accelerate to
above25mph(40km/h)andthen
press and release the RESUME/
accel button. The CRUISE CONTROL light comes on. The car
will accelerate to the same cruising
speed as bef ore.
Pressing the Cruise Control Master
Switch turns the system completely
of f and erases the previous cruising
speed f rom memory. To use the
system again, ref er to
.
These buttons let you control some
f unctions of the audio system with-
out removing your hands f rom the
wheel. Ref er to page f or a com-
plete explanation.173
On EX model with leather interior and
EX-V6 models
Steering Wheel Controls
Inst rument s and Cont rols
Cancelling t he Cruise Cont rol
Using t he
Cruise Cont rolRemote Audio Controls
70
AAUUDDIIOO//CCHHBBUUTTTTOONN
Page 83 of 355

�µIf you just took
delivery of your vehicle and have not
trained any of the buttons in the
HomeLink transmitter bef ore, you
should erase any previously learned
codes bef ore training the f irst button.
Todothis,pressandholdthetwo
outside buttons on the HomeLink
transmitter for about 20 seconds
until the red light f lashes. Release
the buttons, then proceed to Step 1.
If you are training the second or
third buttons, go directly to Step 1.
Unplug the garage door opener
motor f rom the house current.
Holdtheendof thegaragedoor
opener remote control 2 to 5
inches f rom the HomeLink
transmitter. Make sure you are
not blocking your view of the red
light in the transmitter.
Bef ore you can use the HomeLink
Universal Transmitter to operate
devices around your home, it must
‘‘learn’’ the proper codes. For
example, to train the transmitter to
open and close the garage door:
Press the button on the remote
control and the button on the
transmitter at the same time. Hold
down both buttons.
Select the transmitter button you
want to train.
2. 3. 4.
1.
T raining the T ransmitterBef ore you begin
Inst rument s and Cont rols
HomeL ink Universal T ransmitter
84
Page 84 of 355

Canadian Owners:
The remote control you are training
from may stop transmitting after two
seconds. This is not long enough f or
the HomeLink transmitter to learn
thecode.Releaseandpressthe
button on the remote control every
two seconds until the transmitter has
learned the code.The red light in the transmitter
should begin f lashing. It will f lash
slowly at first, then rapidly.
When the red light f lashes rapidly,
release both buttons. The
transmitter should have learned
the code f rom the remote control.
Plug in the garage door opener
motor, then test the transmitter
button by pushing it. It should
operate the garage door.
If the button does not work, repeat
this procedure to train it again. If it still does not work, you may have a
variable or rolling code garage
door opener. Test this by pressing
and holding the HomeLink
transmitter button you just trained.
If the red light blinks f or two
seconds,thenstayson,youhavea
rolling code garage door opener.
You may be able to verify this with
the manufacturer’s documentation.
Go to ‘‘Training With a Rolling
Code System.’’
Repeat these steps to train the
other two transmitter buttons to
operate any other remotely-
controlled devices around your
home (lighting, automatic gate,
security system, etc.).
For security purposes, newer garage
door opening systems use a ‘‘rolling’’
or variable code. Inf ormation f rom
the remote control and the garage
door opener are needed bef ore the
HomeLink transmitter can operate
the garage door opener.
The‘‘Training the Transmitter’’
procedure trains the HomeLink
transmitter to the proper garage
door opener code. The f ollowing
procedure synchronizes the
HomeLink transmitter to the garage
door opener so they send and
receive the correct codes.
5. 6.
8.
7.
CONT INUED
T raining With a Rolling Code
System
Inst rument s and Cont rols
HomeL ink Universal T ransmitter
85
Page 86 of 355
 This devicemay not cause harmf ul interf erence, and(2) this device")
As required by the FCC:This device complies with Part 15 of theFCC rules. Operation is subject to thef ollowing two conditions: (1) This devicemay not cause harmf ul interf erence, and(2) this device must accept anyinterf erence received, includinginterf erence that may cause undesired
operation.
Changes or modif ications not expresslyapproved by the party responsible f orcompliance could void the user’sauthority to operate the equipment.
This device complies with IndustryCanada Standard RSS-210.Operation is subject to the f ollowing twoconditions: (1) this device may not causeinterf erence, and (2) this device mustaccept any interf erence that may causeundesired operation of the device.
Totrainanalreadyprogrammed
transmitter button to operate a new
device:
Select the transmitter button you
want to train.
Press and hold the transmitter
button until the red light begins to
f lash slowly (approximately 20
seconds).
While continuing to hold the
transmitter button, place the
remotecontrolforthedevice2to
5 inches f rom the HomeLink
transmitter.
Press and hold the button on the
remote control. Hold both buttons
until the red light begins to f lash
rapidly. Release both buttons. The
transmitter should now be trained
to operate the device.
Toerasethecodesstoredinallthree
buttons, press and hold the two
outside buttons until the red light
begins to f lash, then release the
buttons.
Youshoulderaseallthreecodes
bef ore selling the car.
1. 2. 3. 4. 5.
Retraining a Button
Erasing Codes
HomeL ink Universal T ransmitter
Inst rument s and Cont rols87
Page 110 of 355
Use the MODE buttons to select the
vents the air flows from. Some air
will f low f rom the dashboard corner
vents in all modes.Air f lows f rom the f loor
vents. Air f low is divided between
the vents in the dashboard and the
f loor vents. Air flows from the center
and corner vents in the dashboard.
Air f lows f rom the def roster
vents at the base of the windshield. Air f low is divided between
the f loor vents and the def roster
vents at the base of the windshield.
When you select or ,
the system automatically switches to
Fresh Air mode and turns on the
A/C.
Heating and Cooling
Comf ort and Convenience Feat ures
Mode Buttons
111
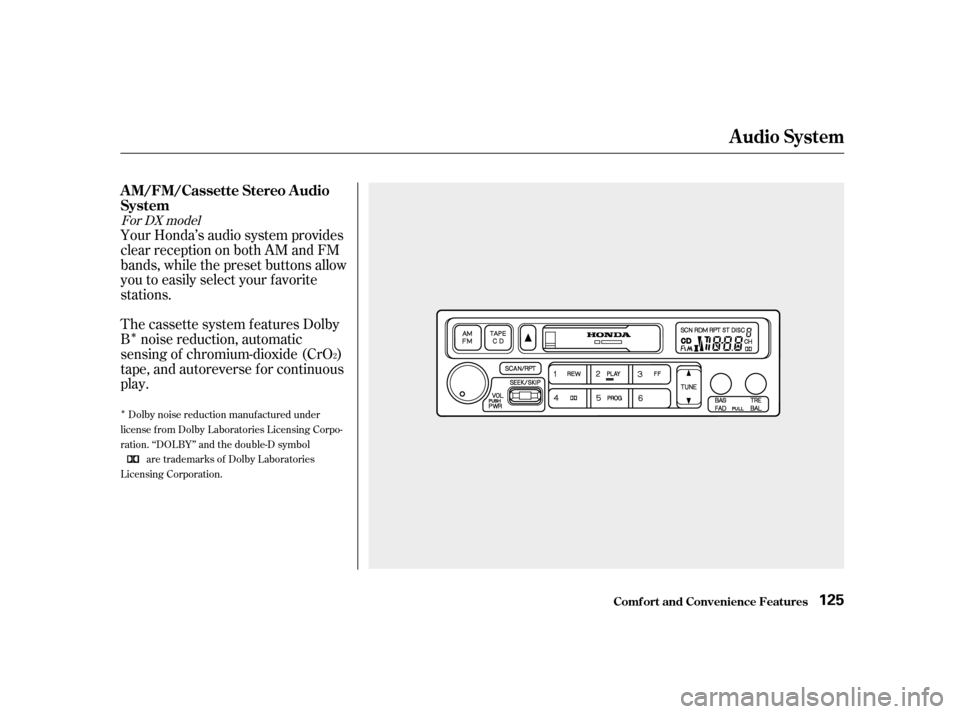
Page 124 of 355
�Î�Î
Your Honda’s audio system provides
clear reception on both AM and FM
bands, while the preset buttons allow
you to easily select your f avorite
stations.
The cassette system f eatures Dolby
B noise reduction, automatic
sensing of chromium-dioxide (CrO )
tape, and autoreverse f or continuous
play.
Dolby noise reduction manuf actured under
license from Dolby Laboratories Licensing Corpo-
ration. ‘‘DOLBY’’ and the double-D symbol are trademarks of Dolby Laboratories
Licensing Corporation. 2
For DX model
Audio System
Comf ort and Convenience Feat ures
A M/FM/Cassette Stereo A udio
System
125