Page 292 of 394

6-4
Be sure the posted octane is at least 87. If the octane is
less than 87, you may get a heavy knocking noise when
you drive. If it's bad enough, it can damage your engine.
If you're using fuel rated at 87 octane or higher and
you hear heavy knocking, your engine needs service.
But don't worry if you hear a little pinging noise when
you're accelerating or driving up a hill. That's normal,
and you don't have to buy a higher octane fuel to get rid
of pinging. It's the heavy, constant knock that means
you have a problem.
If your vehicle is certified to meet California Emission
Standards (indicated on the underhood emission control
label), it is designed to operate on fuels that meet
California specifications. If such fuels are not available
in states adopting California emissions standards, your
vehicle will operate satisfactorily on fuels meeting
federal specifications, but emission control system
performance may be affected. The malfunction indicator
lamp on your instrument panel may turn on and/or your
vehicle may fail a smog
-check test. See ªMalfunction
Indicator Lampº in the Index. If this occurs, return to
your authorized GMC dealer for diagnosis to determine
the cause of failure. In the event it is determined that the
cause of the condition is the type of fuels used, repairs
may not be covered by your warranty.Some gasolines that are not reformulated for low
emissions may contain an octane
-enhancing additive
called methylcyclopentadienyl manganese tricarbonyl
(MMT); ask your service station operator whether or
not the fuel contains MMT. General Motors does not
recommend the use of such gasolines. If fuels containing
MMT are used, spark plug life may be reduced and your
emission control system performance may be affected.
The malfunction indicator lamp on your instrument
panel may turn on. If this occurs, return to your
authorized GMC dealer for service.
To provide cleaner air, all gasolines in the United States
are now required to contain additives that will help
prevent deposits from forming in your engine and fuel
system, allowing your emission control system to
function properly. Therefore, you should not have to add
anything to the fuel. In addition, gasolines containing
oxygenates, such as ethers and ethanol, and
reformulated gasolines may be available in your area to
contribute to clean air. General Motors recommends that
you use these gasolines, particularly if they comply with
the specifications described earlier.
Page 296 of 394
6-8
Checking Things Under the Hood
CAUTION:
Things that burn can get on hot engine parts and
start a fire. These include liquids like fuel, oil,
coolant, brake fluid, windshield washer and other
fluids, and plastic or rubber. You or others could
be burned. Be careful not to drop or spill things
that will burn onto a hot engine.
Hood Release
To open the hood, first pull
the handle inside the vehicle
located under and to the left
of the steering wheel.Then go to the front of the vehicle and pull up on
the secondary hood release located near the center of
the grill.
Lift the hood.
Before closing the hood, be sure all filler caps are on
properly. Pull down the hood and close it firmly.
Page 298 of 394
6-10
Engine Oil
If the CHECK ENG OIL
LEVEL appears on the
instrument panel, it means
you need to check your
engine oil level right away.
For more information, see CHECK ENG OIL LEVEL in
the Index.
You should check your engine oil level regularly; this is
an added reminder.
Checking Engine Oil
It's a good idea to check your engine oil every time you
get fuel. In order to get an accurate reading, the oil must
be warm and the vehicle must be on level ground.
The engine oil dipstick has
a yellow loop and is located
in the engine compartment
on the passenger's side of
the vehicle. See ªEngine
Compartment Overviewº
in the Index for more
information on location.
Turn off the engine and give the oil several minutes to
drain back into the oil pan. If you don't, the oil dipstick
might not show the actual level.
Pull out the dipstick and clean it with a paper towel or
cloth, then push it back in all the way. Remove it again,
keeping the tip down, and check the level.
Page 303 of 394
6-15
Engine Air Cleaner/Filter
The air cleaner assembly
has an indicator that lets
you know when the engine
air cleaner/filter is dirty
and needs to be serviced.
The indicator is located
on the air cleaner cover.
See ªOwner Checks and Servicesº in the Index to
determine when to check the indicator.
If the area inside the clear section of the indicator is not
completely yellow, no engine air cleaner/filter service
is required. When the area inside the indicator is
completely yellow, past the red band, the words
ªCHANGE FILTERº will be highlighted. After
changing the engine air cleaner/filter, press the top
button on the indicator to reset it.
Your engine air cleaner/filter is located in the air filter
housing near the front corner of the engine compartment
on the passenger's side of the vehicle. See ªEngine
Compartment Overviewº in the Index for more
information on location.
Page 304 of 394

6-16
1. To remove the engine air cleaner/filter, loosen the
screws on the cover.
2. Lift the cover upward and remove the engine air
cleaner/filter out of the air cleaner housing. Care
should be taken to dislodge as little dirt as possible.
3. Clean filter sealing surface and the housing.
4. Install the new engine air cleaner/filter.
5. Install the cover and tighten the screws.Refer to the Maintenance Schedule to determine when to
replace the engine air cleaner/filter. See ªOwner Checks
and Servicesº in the Index.
CAUTION:
Operating the engine with the air cleaner/filter
off can cause you or others to be burned. The air
cleaner not only cleans the air, it stops flame if
the engine backfires. If it isn't there, and the
engine backfires, you could be burned. Don't
drive with it off, and be careful working on the
engine with the air cleaner/filter off.
NOTICE:
If the air cleaner/filter is off, a backfire can
cause a damaging engine fire. And, dirt can easily
get into your engine, which will damage it.
Always have the air cleaner/filter in place when
you're driving.
Page 305 of 394

6-17
Passenger Compartment Air Filter
The filter is located under the instrument panel below
the glove compartment.
To replace the passenger compartment air filter do
the following:
1. Remove the bolts on the access panel and set the
panel aside. Because this operation can be a little
difficult, you may choose to have it done at your
dealer's service department.
2. Reach under the
instrument panel
towards the front of
the vehicle and pull
down on the filter
retaining bracket.
3. Remove the air filter by pulling down on the
element. Remove the second portion of the air filter
by sliding it towards the rear of the vehicle and then
pulling downward.4. Install the new filter by reversing the steps listed
previously. Be sure to follow any instructions that
may be included in the replacement filter package.
Refer to the Maintenance Schedule to determine when
to replace the passenger compartment air filter. See
ªScheduled Maintenanceº in the Index.
Automatic Transmission Fluid
When to Check and Change
A good time to check your automatic transmission fluid
level is when the engine oil is changed.
Change both the fluid and filter every 50,000 miles
(83 000 km) if the vehicle is mainly driven under one
or more of these conditions:
�In heavy city traffic where the outside temperature
regularly reaches 90�F (32�C) or higher.
�In hilly or mountainous terrain.
�When doing frequent trailer towing.
�Uses such as found in taxi, police or delivery service.
If you do not use your vehicle under any of
these conditions, change the fluid and filter
every 100,000 miles (166 000 km).
See ªScheduled Maintenance Servicesº in the Index.
Page 306 of 394

6-18 How to Check
Because this operation can be a little difficult, you may
choose to have this done at the dealership service department.
If you do it yourself, be sure to follow all the instructions
here, or you could get a false reading on the dipstick.
NOTICE:
Too much or too little fluid can damage your
transmission. Too much can mean that some of
the fluid could come out and fall on hot engine
parts or exhaust system parts, starting a fire. Be
sure to get an accurate reading if you check your
transmission fluid.
Wait at least 30 minutes before checking the
transmission fluid level if you have been driving:
�When outside temperatures are above 90�F (32�C).
�At high speed for quite a while.
�In heavy traffic
-- especially in hot weather.
�While pulling a trailer.To get the right reading, the fluid should be at
normal operating temperature, which is 180�F
to 200�F (82�C to 93�C).
Get the vehicle warmed up by driving about 15 miles
(24 km) when outside temperatures are above 50�F
(10�C). If it's colder than 50�F (10�C), drive the
vehicle in THIRD (3) until the engine temperature gage
moves and then remains steady for 10 minutes.
A cold fluid check can be made after the vehicle has
been sitting for eight hours or more with the engine off,
but this is used only as a reference. Let the engine run at
idle for five minutes if outside temperatures are 50�F
(10�C) or more. If it's colder than 50�F (10�C), you
may have to idle the engine longer. Should the fluid
level be low during this cold check, you must check the
fluid hot before adding fluid. Checking the fluid hot will
give you a more accurate reading of the fluid level.
Page 307 of 394
6-19
Checking the Fluid Level
Prepare your vehicle as follows:
�Park your vehicle on a level place. Keep the
engine running.
�With the parking brake applied, place the shift lever
in PARK (P).
�With your foot on the brake pedal, move the shift
lever through each gear range, pausing for about
three seconds in each range. Then, position the shift
lever in PARK (P).
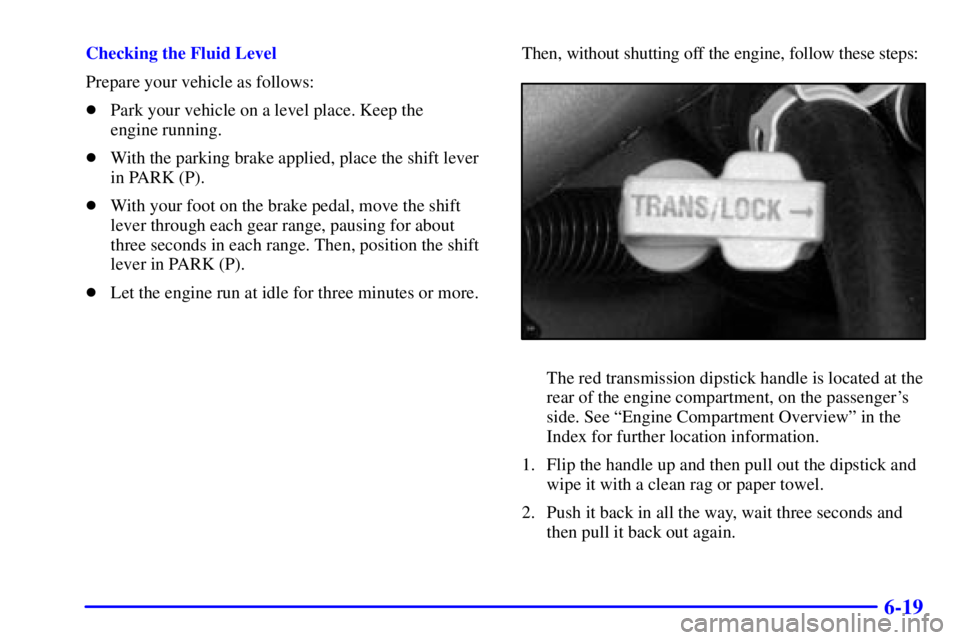
�Let the engine run at idle for three minutes or more.Then, without shutting off the engine, follow these steps:
The red transmission dipstick handle is located at the
rear of the engine compartment, on the passenger's
side. See ªEngine Compartment Overviewº in the
Index for further location information.
1. Flip the handle up and then pull out the dipstick and
wipe it with a clean rag or paper towel.
2. Push it back in all the way, wait three seconds and
then pull it back out again.