Page 305 of 394

6-17
Passenger Compartment Air Filter
The filter is located under the instrument panel below
the glove compartment.
To replace the passenger compartment air filter do
the following:
1. Remove the bolts on the access panel and set the
panel aside. Because this operation can be a little
difficult, you may choose to have it done at your
dealer's service department.
2. Reach under the
instrument panel
towards the front of
the vehicle and pull
down on the filter
retaining bracket.
3. Remove the air filter by pulling down on the
element. Remove the second portion of the air filter
by sliding it towards the rear of the vehicle and then
pulling downward.4. Install the new filter by reversing the steps listed
previously. Be sure to follow any instructions that
may be included in the replacement filter package.
Refer to the Maintenance Schedule to determine when
to replace the passenger compartment air filter. See
ªScheduled Maintenanceº in the Index.
Automatic Transmission Fluid
When to Check and Change
A good time to check your automatic transmission fluid
level is when the engine oil is changed.
Change both the fluid and filter every 50,000 miles
(83 000 km) if the vehicle is mainly driven under one
or more of these conditions:
�In heavy city traffic where the outside temperature
regularly reaches 90�F (32�C) or higher.
�In hilly or mountainous terrain.
�When doing frequent trailer towing.
�Uses such as found in taxi, police or delivery service.
If you do not use your vehicle under any of
these conditions, change the fluid and filter
every 100,000 miles (166 000 km).
See ªScheduled Maintenance Servicesº in the Index.
Page 306 of 394

6-18 How to Check
Because this operation can be a little difficult, you may
choose to have this done at the dealership service department.
If you do it yourself, be sure to follow all the instructions
here, or you could get a false reading on the dipstick.
NOTICE:
Too much or too little fluid can damage your
transmission. Too much can mean that some of
the fluid could come out and fall on hot engine
parts or exhaust system parts, starting a fire. Be
sure to get an accurate reading if you check your
transmission fluid.
Wait at least 30 minutes before checking the
transmission fluid level if you have been driving:
�When outside temperatures are above 90�F (32�C).
�At high speed for quite a while.
�In heavy traffic
-- especially in hot weather.
�While pulling a trailer.To get the right reading, the fluid should be at
normal operating temperature, which is 180�F
to 200�F (82�C to 93�C).
Get the vehicle warmed up by driving about 15 miles
(24 km) when outside temperatures are above 50�F
(10�C). If it's colder than 50�F (10�C), drive the
vehicle in THIRD (3) until the engine temperature gage
moves and then remains steady for 10 minutes.
A cold fluid check can be made after the vehicle has
been sitting for eight hours or more with the engine off,
but this is used only as a reference. Let the engine run at
idle for five minutes if outside temperatures are 50�F
(10�C) or more. If it's colder than 50�F (10�C), you
may have to idle the engine longer. Should the fluid
level be low during this cold check, you must check the
fluid hot before adding fluid. Checking the fluid hot will
give you a more accurate reading of the fluid level.
Page 307 of 394
6-19
Checking the Fluid Level
Prepare your vehicle as follows:
�Park your vehicle on a level place. Keep the
engine running.
�With the parking brake applied, place the shift lever
in PARK (P).
�With your foot on the brake pedal, move the shift
lever through each gear range, pausing for about
three seconds in each range. Then, position the shift
lever in PARK (P).
�Let the engine run at idle for three minutes or more.Then, without shutting off the engine, follow these steps:
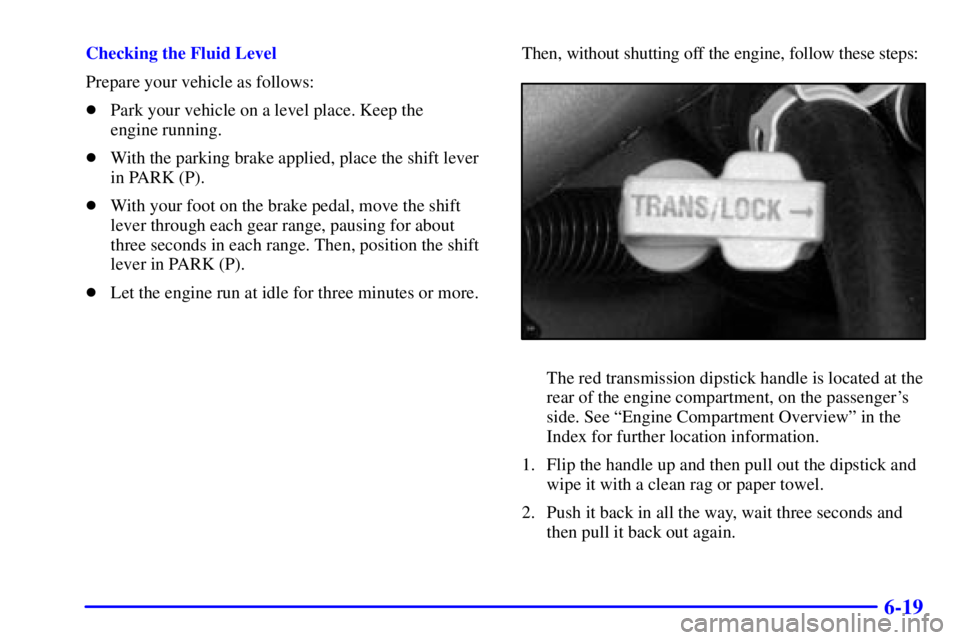
The red transmission dipstick handle is located at the
rear of the engine compartment, on the passenger's
side. See ªEngine Compartment Overviewº in the
Index for further location information.
1. Flip the handle up and then pull out the dipstick and
wipe it with a clean rag or paper towel.
2. Push it back in all the way, wait three seconds and
then pull it back out again.
Page 312 of 394
, whichever")
6-24
Engine Coolant
The cooling system in your vehicle is filled with
DEX
-COOL� engine coolant. This coolant is designed
to remain in your vehicle for 5 years or 150,000 miles
(240 000 km), whichever occurs first, if you add only
DEX
-COOL� extended life coolant.
The following explains your cooling system and how
to add coolant when it is low. If you have a problem
with engine overheating, see ªEngine Overheatingº in
the Index.
A 50/50 mixture of clean, drinkable water and
DEX
-COOL� coolant will:
�Give freezing protection down to
-34�F (-37�C).
�Give boiling protection up to 265�F (129�C).
�Protect against rust and corrosion.
�Help keep the proper engine temperature.
�Let the warning lights and gages work as
they should.
NOTICE:
When adding coolant, it is important that you use
only DEX
-COOL� (silicate-free) coolant.
If coolant other than DEX-COOL is added to the
system, premature engine, heater core or
radiator corrosion may result. In addition, the
engine coolant will require change sooner
-- at
30,000 miles (50 000 km) or 24 months,
whichever occurs first. Damage caused by the use
of coolant other than DEX
-COOL� is not
covered by your new vehicle warranty.
Page 313 of 394

6-25 What to Use
Use a mixture of one-half clean, drinkable water and
one
-half DEX-COOL� coolant which won't damage
aluminum parts. If you use this coolant mixture, you
don't need to add anything else.
CAUTION:
Adding only plain water to your cooling system
can be dangerous. Plain water, or some other
liquid like alcohol, can boil before the proper
coolant mixture will. Your vehicle's coolant
warning system is set for the proper coolant
mixture. With plain water or the wrong mixture,
your engine could get too hot but you wouldn't
get the overheat warning. Your engine could
catch fire and you or others could be burned.
Use a 50/50 mixture of clean, drinkable water
and DEX
-COOL� coolant.
NOTICE:
If you use an improper coolant mixture, your
engine could overheat and be badly damaged.
The repair cost wouldn't be covered by your
warranty. Too much water in the mixture can
freeze and crack the engine, radiator, heater core
and other parts.
If you have to add coolant more than four times a year,
have your dealer check your cooling system.
NOTICE:
If you use the proper coolant, you don't have to
add extra inhibitors or additives which claim to
improve the system. These can be harmful.
Page 314 of 394
6-26 Checking Coolant
The coolant surge tank is
located in the engine
compartment on the
passenger's side of
the vehicle.
See ªEngine Compartment Overviewº in the Index for
more information on location.CAUTION:
Turning the surge tank pressure cap when the
engine and radiator are hot can allow steam and
scalding liquids to blow out and burn you badly.
Never turn the surge tank pressure cap
-- even a
little
-- when the engine and radiator are hot.
The vehicle must be on a level surface. When your
engine is cold, the coolant level should be at the
FILL COLD mark.
If the LOW COOLANT
message comes on and
stays on, it means you're
low on engine coolant.
See ªLow Coolantº in the Index.
Page 315 of 394
6-27
Adding Coolant
If you need more coolant, add the proper DEX
-COOL�
coolant mixture at the surge tank, but only when the
engine is cool.
CAUTION:
You can be burned if you spill coolant on hot
engine parts. Coolant contains ethylene glycol,
and it will burn if the engine parts are hot
enough. Don't spill coolant on a hot engine.
When replacing the pressure cap, make sure it
is hand
-tight.
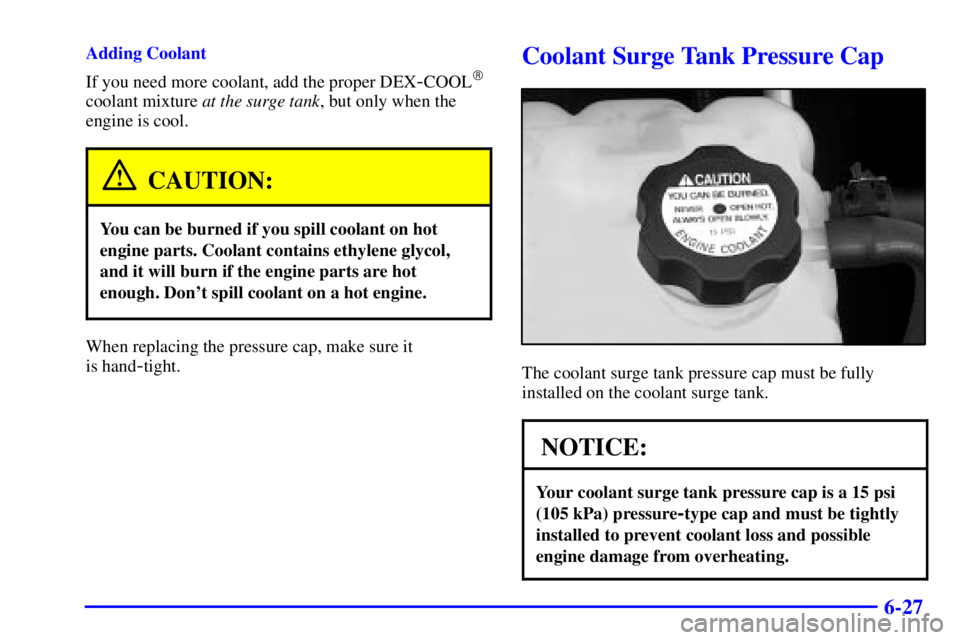
Coolant Surge Tank Pressure Cap
The coolant surge tank pressure cap must be fully
installed on the coolant surge tank.
NOTICE:
Your coolant surge tank pressure cap is a 15 psi
(105 kPa) pressure
-type cap and must be tightly
installed to prevent coolant loss and possible
engine damage from overheating.
Page 316 of 394
6-28
Power Steering FluidWhen to Check Power Steering Fluid
It is not necessary to regularly check power steering
fluid unless you suspect there is a leak in the system or
you hear an unusual noise. A fluid loss in this system
could indicate a problem. Have the system inspected
and repaired.
The power steering fluid reservoir is located on the
driver's side of the engine compartment toward the
front. See ªEngine Compartment Overviewº in the
Index for more information on location.
How to Check Power Steering Fluid
Turn the key off, let the engine compartment cool down,
wipe the cap and the top of the reservoir clean, then
unscrew the cap and wipe the dipstick with a clean rag.
Replace the cap and completely tighten it. Then remove
the cap again and look at the fluid level on the dipstick.
The level should be at the FULL COLD mark. If
necessary, add only enough fluid to bring the level up to
the mark.