Page 264 of 407

5-31 Rocking Your Vehicle To Get It Out
First, turn your steering wheel left and right. That will
clear the area around your front wheels. If you have a
four
-wheel drive vehicle, shift into 4HI. Then shift back
and forth between REVERSE (R) and a forward gear
(or with a manual transmission, between FIRST (1) or
SECOND (2) and REVERSE (R)), spinning the wheels
as little as possible. Release the accelerator pedal while
you shift, and press lightly on the accelerator pedal
when the transmission is in gear. By slowly spinning
your wheels in the forward and reverse directions, you
will cause a rocking motion that may free your vehicle.
If that doesn't get you out after a few tries, you may
need to be towed out. Or, you can use your recovery
hooks if your vehicle has them. If you do need to be
towed out, see ªTowing Your Vehicleº in the Index.
Using the Recovery Hooks
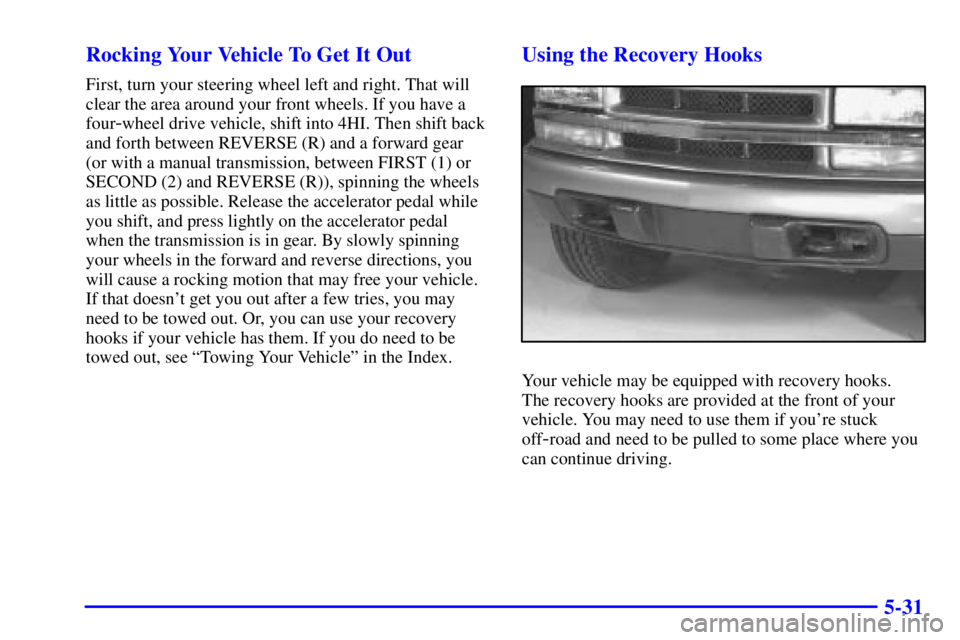
Your vehicle may be equipped with recovery hooks.
The recovery hooks are provided at the front of your
vehicle. You may need to use them if you're stuck
off
-road and need to be pulled to some place where you
can continue driving.
Page 266 of 407

6-
6-1
Section 6 Service and Appearance Care
Here you will find information about the care of your vehicle. This section begins with service and fuel information,
and then it shows how to check important fluid and lubricant levels. There is also technical information about your
vehicle, and a part devoted to its appearance care.
6
-2 Service
6
-3 Fuel (Gasoline)
6
-5 Fuel E-85 (85% Ethanol)
6
-7 Fuels in Foreign Countries
6
-7 Filling Your Tank
6
-9 Filling a Portable Fuel Container
6
-10 Checking Things Under the Hood
6
-13 Engine Oil
6
-18 Engine Air Cleaner/Filter
6
-19 Automatic Transmission Fluid
6
-23 Manual Transmission Fluid
6
-24 Hydraulic Clutch
6
-25 Rear Axle
6
-26 Four-Wheel Drive
6
-27 Engine Coolant
6
-31 Radiator Pressure Cap
6
-31 Power Steering Fluid6
-32 Windshield Washer Fluid
6
-33 Brakes
6
-37 Battery
6
-38 Bulb Replacement
6
-44 Windshield Wiper Blade Replacement
6
-46 Tires
6
-55 Appearance Care
6
-55 Cleaning the Inside of Your Vehicle
6
-57 Care of Safety Belts
6
-58 Cleaning the Outside of Your Vehicle
6
-62 GM Vehicle Care/Appearance Materials Chart
6
-63 Vehicle Identification Number (VIN)
6
-63 Service Parts Identification Label
6
-64 Electrical System
6
-69 Replacement Bulbs
6
-70 Capacities and Specifications
6
-72 Normal Maintenance Replacement Parts
Page 282 of 407

6-17
Driving under these conditions causes engine oil to
break down sooner. If any one of these is true for your
vehicle, then you need to change your oil and filter
every 3,000 miles (5 000 km) or 3 months
-- whichever
occurs first.
If none of them is true, use the long trip/highway
maintenance schedule. Change the oil and filter every
7,500 miles (12 500 km) or 12 months
-- whichever
occurs first. Driving a vehicle with a fully warmed
engine under highway conditions causes engine oil to
break down slower.
Remote Oil Filter (Four
-Wheel Drive)
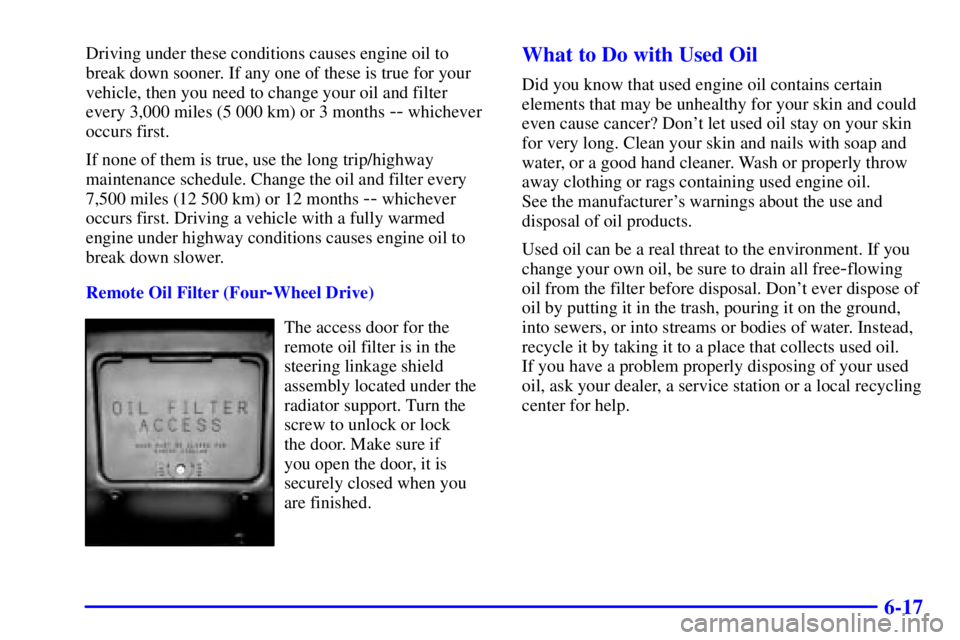
The access door for the
remote oil filter is in the
steering linkage shield
assembly located under the
radiator support. Turn the
screw to unlock or lock
the door. Make sure if
you open the door, it is
securely closed when you
are finished.
What to Do with Used Oil
Did you know that used engine oil contains certain
elements that may be unhealthy for your skin and could
even cause cancer? Don't let used oil stay on your skin
for very long. Clean your skin and nails with soap and
water, or a good hand cleaner. Wash or properly throw
away clothing or rags containing used engine oil.
See the manufacturer's warnings about the use and
disposal of oil products.
Used oil can be a real threat to the environment. If you
change your own oil, be sure to drain all free
-flowing
oil from the filter before disposal. Don't ever dispose of
oil by putting it in the trash, pouring it on the ground,
into sewers, or into streams or bodies of water. Instead,
recycle it by taking it to a place that collects used oil.
If you have a problem properly disposing of your used
oil, ask your dealer, a service station or a local recycling
center for help.
Page 291 of 407
6-26
Four-Wheel Drive
Most lubricant checks in this section also apply to
four
-wheel-drive vehicles. However, they have
two additional systems that need lubrication.
Transfer Case
When to Check Lubricant
Refer to the Maintenance Schedule to determine how
often to check the lubricant. See ªPeriodic Maintenance
Inspectionsº in the Index.How to Check Lubricant
If the level is below the bottom of the filler plug hole,
you'll need to add some lubricant. Add enough lubricant
to raise the level to the bottom of the filler plug hole.
Use care not to overtighten plug.
What to Use
Refer to the Maintenance Schedule to determine what
kind of lubricant to use. See ªRecommended Fluids and
Lubricantsº in the Index.
Page 301 of 407

6-36 Brake Wear
If you have four-wheel drive, your vehicle has
four
-wheel disc brakes. If not, your vehicle has front
disc brakes and rear drum brakes.
Disc brake pads have built
-in wear indicators that make a
high
-pitched warning sound when the brake pads are worn
and new pads are needed. The sound may come and go or
be heard all the time your vehicle is moving (except when
you are pushing on the brake pedal firmly).
CAUTION:
The brake wear warning sound means that soon
your brakes won't work well. That could lead to
an accident. When you hear the brake wear
warning sound, have your vehicle serviced.
NOTICE:
Continuing to drive with worn-out brake pads
could result in costly brake repair.
Some driving conditions or climates may cause a brake
squeal when the brakes are first applied or lightly
applied. This does not mean something is wrong with
your brakes.
Properly torqued wheel nuts are necessary to help
prevent brake pulsation. When tires are rotated, inspect
brake pads for wear and evenly tighten wheel nuts in the
proper sequence to GM torque specifications.
If you have rear drum brakes, they don't have wear
indicators, but if you ever hear a rear brake rubbing
noise, have the rear brake linings inspected immediately.
Also, the rear brake drums should be removed and
inspected each time the tires are removed for rotation or
changing. When you have the front brake pads replaced,
have the rear brakes inspected, too.
Brake linings should always be replaced as complete
axle sets.
See ªBrake System Inspectionº in Section 7
of this manual under Part C ªPeriodic
Maintenance Inspections.º
Brake Pedal Travel
See your dealer if the brake pedal does not return to
normal height, or if there is a rapid increase in pedal
travel. This could be a sign of brake trouble.
Page 302 of 407

6-37 Brake Adjustment
Every time you make a brake stop, your disc brakes
adjust for wear.
If you don't have four
-wheel drive and your brake pedal
goes down farther than normal, your rear drum brakes
may need adjustment. Adjust them by backing up and
firmly applying the brakes a few times.
Replacing Brake System Parts
The braking system on a vehicle is complex. Its many
parts have to be of top quality and work well together if
the vehicle is to have really good braking. Your vehicle
was designed and tested with top
-quality GM brake
parts. When you replace parts of your braking
system
-- for example, when your brake linings wear
down and you have to have new ones put in
-- be sure
you get new approved GM replacement parts. If you
don't, your brakes may no longer work properly. For
example, if someone puts in brake linings that are wrong
for your vehicle, the balance between your front and
rear brakes can change
-- for the worse. The braking
performance you've come to expect can change in many
other ways if someone puts in the wrong replacement
brake parts.
Battery
Your new vehicle comes with a maintenance free
ACDelco� battery. When it's time for a new battery,
get one that has the replacement number shown on the
original battery's label. We recommend an ACDelco
battery. See ªEngine Compartment Overviewº in the
Index for battery location.
WARNING: Battery posts, terminals and related
accessories contain lead and lead compounds, chemicals
known to the State of California to cause cancer and
reproductive harm. Wash hands after handling.
Page 319 of 407

6-54 Tire Chains
NOTICE:
If your vehicle has P235/75R15, P235/70R15,
P235/55R16 or 31x10.50R15LT/C size tires,
don't use tire chains. They can damage your
vehicle because there's not enough clearance.
Use another type of traction device only if its
manufacturer recommends it for use on your
vehicle and tire size combination and road
conditions. Follow that manufacturer's
instructions. To help avoid damage to your
vehicle, drive slowly, readjust or remove the
device if it's contacting your vehicle, and don't
spin your wheels.
NOTICE: (Continued)
NOTICE: (Continued)
If you do find traction devices that will fit,
install them on the rear tires.
If you have other size tires, use tire chains only
where legal and only when you must. Use only
SAE Class ªSº type chains that are the proper
size for your tires. Install them on the drive axle
tires (four
-wheel-drive vehicles can use chains on
both axles) and tighten them as tightly as possible
with the ends securely fastened. Drive slowly and
follow the chain manufacturer's instructions.
If you can hear the chains contacting your
vehicle, stop and retighten them. If the contact
continues, slow down until it stops. Driving too
fast or spinning the wheels with chains on will
damage your vehicle.
Page 333 of 407

6-68
Name Usage
LT TRN Left Turn Signal Rear
RT TRN Right Turn Signal Rear
RR PRK Right Rear Parking Lamps
TRL PRK Not Used
LT HDLP Left Headlamp
RT HDLP Right Headlamp
FR PRK Front Parking Lamps
INT BAT I/P Fuse Block Feed
ENG I Engine Sensors/Solenoids, MAF,
CAM, PURGE, VENT
ECM B Engine Control Module, Fuel
Pump Module, Oil Pressure
ABS Anti
-Lock Brake System
ECM I Engine Control Module Injectors
BTSI Automatic Transmission Shift
Lock Control System
B/U LP Back
-Up Lamps
A/C Air Conditioning
W/W PMP Not Used
HORN Horn
IGN B Column Feed, IGN 2, 3, 4
RAP Retained Accessory Power
LD LEV Not UsedName Usage
OXYSEN Oxygen Sensor
IGN E Engine
MIR/LKS Mirrors, Door Locks
FOG LP Fog Lamps
IGN A Starting and Charging IGN 1
STUD #2 Accessory Feeds, Electric Brake
PARKLP Parking Lamps
LR PRK Left Rear Parking Lamps
IGN C Starter Solenoid,
Fuel Pump, PRNDL
HTDSEAT Not Used
HVAC HVAC System
TRCHMSL Not Used
RRDFOG Not Used
TBC Truck Body Computer
CRANK Clutch Switch, NSBU Switch
HAZLP Hazard Lamps
VECHMSL Vehicle Center
High
-Mounted Stoplamp
HTDMIR Heated Outside Mirrors
ATC Transfer Case (Four
-Wheel Drive)
STOPLP Stoplamps
RR W/W Not Used