Page 238 of 412

5-4
1. Check the other vehicle. It must have a 12-volt
battery with a negative ground system.
NOTICE:
If the other system isn't a 12-volt system with a
negative ground, both vehicles can be damaged.
If you have a diesel engine vehicle with two batteries
(or more) you should know before you begin that,
especially in cold weather, you may not be able to
get enough power from a single battery in another
vehicle to start your diesel engine.
If your vehicle has more than one battery, use the
battery that is under the hood of the vehicle. This
will reduce the electrical resistance.2. Get the vehicles close enough so the jumper cables
can reach, but be sure the vehicles aren't touching
each other. If they are, it could cause a ground
connection you don't want. You wouldn't be able to
start your vehicle, and the bad grounding could
damage the electrical systems.
To avoid the possibility of the vehicles rolling, set
the parking brake firmly on both vehicles involved in
the jump start procedure. Put an automatic
transmission in PARK (P) and a manual transmission
in NEUTRAL.
3. Turn off the ignition on both vehicles. Turn off all
lamps that aren't needed, and radios. This will avoid
sparks and help save both batteries, and could save
your radio.
Page 253 of 412

5-19
Engine Fan Noise
Your vehicle has a clutched engine cooling fan. When
the clutch is engaged, the fan spins faster to provide
more air to cool the engine. In most everyday driving
conditions, the fan is spinning slower and the clutch is
not fully engaged. This improves fuel economy and
reduces fan noise. Under heavy vehicle loading, trailer
towing and/or high outside temperatures, the fan speed
increases as the clutch more fully engages. So you
may hear an increase in fan noise. This is normal and
should not be mistaken as the transmission slipping or
making extra shifts. It is merely the cooling system
functioning properly. The fan will slow down when
additional cooling is not required and the clutch
partially disengages.
You may also hear this fan noise when you start
the engine. It will go away as the fan clutch
partially disengages.
If a Tire Goes Flat
It's unusual for a tire to ªblow outº while you're driving,
especially if you maintain your tires properly. If air goes
out of a tire, it's much more likely to leak out slowly.
But if you should ever have a ªblowout,º here are a few
tips about what to expect and what to do:
If a front tire fails, the flat tire will create a drag that
pulls the vehicle toward that side. Take your foot off the
accelerator pedal and grip the steering wheel firmly.
Steer to maintain lane position, and then gently brake to
a stop well out of the traffic lane.
A rear blowout, particularly on a curve, acts much like a
skid and may require the same correction you'd use in a
skid. In any rear blowout, remove your foot from the
accelerator pedal. Get the vehicle under control by
steering the way you want the vehicle to go. It may be
very bumpy and noisy, but you can still steer. Gently
brake to a stop
-- well off the road if possible.
If a tire goes flat, the next part shows how to use your
jacking equipment to change a flat tire safely.
Page 269 of 412

5-35
If You're Stuck: In Sand, Mud,
Ice or Snow
In order to free your vehicle when it is stuck, you will
need to spin the wheels, but you don't want to spin
your wheels too fast. The method known as ªrockingº
can help you get out when you're stuck, but you must
use caution.
CAUTION:
If you let your tires spin at high speed, they can
explode, and you or others could be injured. And,
the transmission or other parts of the vehicle can
overheat. That could cause an engine
compartment fire or other damage. When you're
stuck, spin the wheels as little as possible. Don't
spin the wheels above 35 mph (55 km/h) as shown
on the speedometer.
NOTICE:
Spinning your wheels can destroy parts of your
vehicle as well as the tires. If you spin the wheels
too fast while shifting your transmission back
and forth, you can destroy your transmission.
For information about using tire chains on your vehicle,
see ªTire Chainsº in the Index.
Rocking Your Vehicle To Get It Out
First, turn your steering wheel left and right. That will
clear the area around your front wheels. Then shift back
and forth between REVERSE (R) and a forward gear,
spinning the wheels as little as possible. Release the
accelerator pedal while you shift, and press lightly on
the accelerator pedal when the transmission is in gear.
By slowly spinning your wheels in the forward and
reverse directions, you will cause a rocking motion that
may free your vehicle. If that doesn't get you out
after a few tries, you may need to be towed out. If you
do need to be towed out, see ªTowing Your Vehicleº in
the Index.
Page 270 of 412

6-
6-1
Section 6 Service and Appearance Care
Here you will find information about the care of your vehicle. This section begins with service and fuel information,
and then it shows how to check important fluid and lubricant levels. There is also technical information about your
vehicle, and a part devoted to its appearance care.
6
-2 Service
6
-3 Fuel (Gasoline Engine)
6
-5 Fuels in Foreign Countries (Gasoline Engines)
6
-5 Filling Your Tank (Gasoline Engine)
6
-7 Filling a Portable Fuel Container
6
-8 Checking Things Under the Hood
6
-11 Noise Control System
6
-12 Engine Oil (Gasoline Engine)
6
-16 Engine Air Cleaner/Filter (Gasoline Engines)
6
-18 Automatic Transmission Fluid
6
-22 Rear Axle
6
-22 Engine Coolant
6
-26 Radiator Pressure Cap
6
-26 Power Steering Fluid
6
-27 Windshield Washer Fluid
6
-28 Brakes
6
-32 Battery6
-33 Bulb Replacement
6
-40 Windshield Wiper Blade Replacement
6
-41 Tires
6
-50 Appearance Care
6
-51 Cleaning the Inside of Your Vehicle
6
-54 Cleaning the Outside of Your Vehicle
6
-56 Cleaning Aluminum Wheels (If Equipped)
6
-56 Cleaning Tires
6
-56 Sheet Metal Damage
6
-57 Finish Damage
6
-58 GM Vehicle Care/Appearance Materials
6
-59 Vehicle Identification Number (VIN)
6
-60 Electrical System
6
-66 Replacement Bulbs
6
-67 Capacities and Specifications
6
-70 Normal Maintenance Replacement Parts
Page 279 of 412
6-10 Engine Compartment Overview
When you lift the hood, you'll see these items:
A. Battery
B. Coolant Recovery Tank
C. Engine Oil DipstickD. Engine Oil Fill
E. Transmission Dipstick
F. Engine Air Cleaner/FilterG. Power Steering Reservoir
H. Brake Master Cylinder
I. Windshield Washer Fluid
Page 287 of 412

6-18
CAUTION:
Operating the engine with the air cleaner/filter
off can cause you or others to be burned. The air
cleaner not only cleans the air, it stops flame if
the engine backfires. If it isn't there, and the
engine backfires, you could be burned. Don't
drive with it off, and be careful working on the
engine with the air cleaner/filter off.
NOTICE:
If the air cleaner/filter is off, a backfire can
cause a damaging engine fire. And, dirt can
easily get into your engine, which will damage it.
Always have the air cleaner/filter in place when
you're driving.
Automatic Transmission Fluid
If your vehicle has a diesel engine, see ªAutomatic
Transmission Fluidº in the Diesel Supplement.
When to Check and Change
A good time to check your automatic transmission fluid
level is when the engine oil is changed.
Change both the fluid and filter every 50,000 miles
(83 000 km) if the vehicle's GVWR is over 8,600 or
if the vehicle is mainly driven under one or more of
these conditions:
�In heavy city traffic where the outside temperature
regularly reaches 90�F (32�C) or higher.
�In hilly or mountainous terrain.
�When doing frequent trailer towing.
�Uses such as found in taxi, police or delivery service.
If your vehicle's GVWR is not over 8,600 and you do not
use your vehicle under any of these conditions, change the
fluid and filter every 100,000 miles (166 000 km).
See ªScheduled Maintenance Servicesº in the Index.
Page 288 of 412

6-19 How to Check
Because this operation can be a little difficult,
you may choose to have this done at the dealership
service department.
If you do it yourself, be sure to follow all the
instructions here, or you could get a false reading
on the dipstick.
NOTICE:
Too much or too little fluid can damage your
transmission. Too much can mean that some of
the fluid could come out and fall on hot engine
parts or exhaust system parts, starting a fire.
Be sure to get an accurate reading if you check
your transmission fluid.
Wait at least 30 minutes before checking the
transmission fluid level if you have been driving:
�When outside temperatures are above 90�F (32�C).
�At high speed for quite a while.
�In heavy traffic
-- especially in hot weather.
�While pulling a trailer.To get the right reading, the fluid should be at
normal operating temperature, which
is 180�F to 200�F (82�C to 93�C).
Get the vehicle warmed up by driving about
15 miles (24 km) when outside temperatures are above
50�F (10�C). If it's colder than 50�F (10�C), drive
the vehicle in DRIVE (D) until the engine temperature
gage moves and then remains steady for 10 minutes.
A cold fluid check can be made after the vehicle has
been sitting for eight hours or more with the engine off,
but this is used only as a reference. Let the engine run at
idle for five minutes if outside temperatures are 50�F
(10�C) or more. If it's colder than 50�F (10�C), you
may have to idle the engine longer. Should the fluid
level be low during this cold check, you must check the
fluid hot before adding fluid. Checking the fluid hot will
give you a more accurate reading of the fluid level.
Page 289 of 412
6-20
Checking the Fluid Level
Prepare your vehicle as follows:
�Park your vehicle on a level place. Keep the
engine running.
�With the parking brake applied, place the shift
lever in PARK (P).
�With your foot on the brake pedal, move the shift
lever through each gear range, pausing for about
three seconds in each range. Then, position the shift
lever in PARK (P).
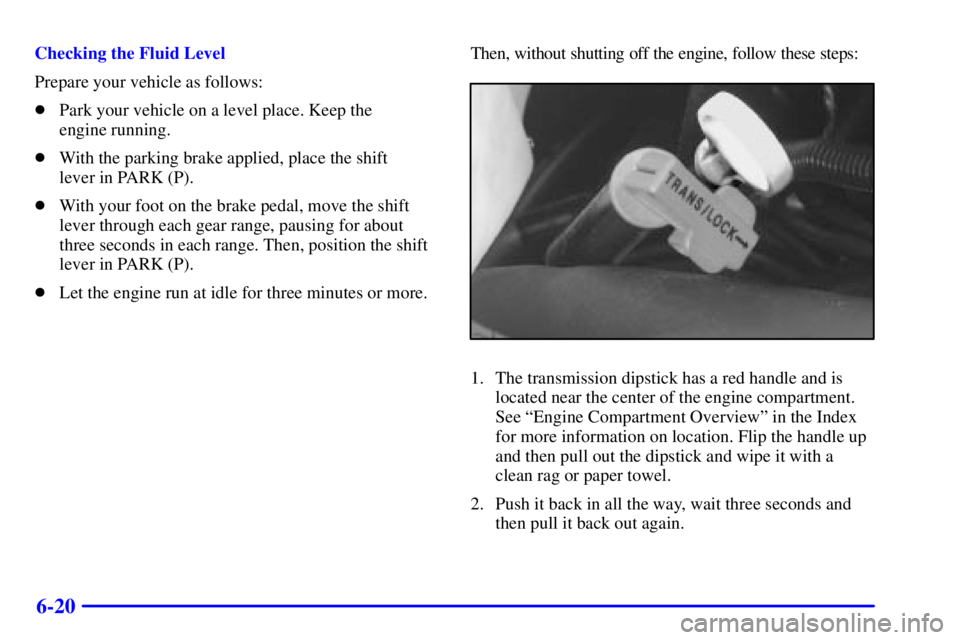
�Let the engine run at idle for three minutes or more.Then, without shutting off the engine, follow these steps:
1. The transmission dipstick has a red handle and is
located near the center of the engine compartment.
See ªEngine Compartment Overviewº in the Index
for more information on location. Flip the handle up
and then pull out the dipstick and wipe it with a
clean rag or paper towel.
2. Push it back in all the way, wait three seconds and
then pull it back out again.