Page 6 of 412
iv
Fuel
Checking Fluids and Lubricants
Engine Air Cleaner/Filter
Brakes
Bulb Replacement
Windshield Wiper Blade ReplacementTires and Wheels
Appearance Care
Electrical System/Fuses and Circuit Breakers
Capacities and Specifications
Normal Maintenance Replacement Parts
Table of Contents (cont'd)
Maintenance Schedule Service and Appearance Care
Section
7
Section
6
Scheduled Maintenance
Owner Checks and Services
Periodic Maintenance InspectionsRecommended Fluids and Lubricants
Maintenance Records
Page 270 of 412

6-
6-1
Section 6 Service and Appearance Care
Here you will find information about the care of your vehicle. This section begins with service and fuel information,
and then it shows how to check important fluid and lubricant levels. There is also technical information about your
vehicle, and a part devoted to its appearance care.
6
-2 Service
6
-3 Fuel (Gasoline Engine)
6
-5 Fuels in Foreign Countries (Gasoline Engines)
6
-5 Filling Your Tank (Gasoline Engine)
6
-7 Filling a Portable Fuel Container
6
-8 Checking Things Under the Hood
6
-11 Noise Control System
6
-12 Engine Oil (Gasoline Engine)
6
-16 Engine Air Cleaner/Filter (Gasoline Engines)
6
-18 Automatic Transmission Fluid
6
-22 Rear Axle
6
-22 Engine Coolant
6
-26 Radiator Pressure Cap
6
-26 Power Steering Fluid
6
-27 Windshield Washer Fluid
6
-28 Brakes
6
-32 Battery6
-33 Bulb Replacement
6
-40 Windshield Wiper Blade Replacement
6
-41 Tires
6
-50 Appearance Care
6
-51 Cleaning the Inside of Your Vehicle
6
-54 Cleaning the Outside of Your Vehicle
6
-56 Cleaning Aluminum Wheels (If Equipped)
6
-56 Cleaning Tires
6
-56 Sheet Metal Damage
6
-57 Finish Damage
6
-58 GM Vehicle Care/Appearance Materials
6
-59 Vehicle Identification Number (VIN)
6
-60 Electrical System
6
-66 Replacement Bulbs
6
-67 Capacities and Specifications
6
-70 Normal Maintenance Replacement Parts
Page 279 of 412
6-10 Engine Compartment Overview
When you lift the hood, you'll see these items:
A. Battery
B. Coolant Recovery Tank
C. Engine Oil DipstickD. Engine Oil Fill
E. Transmission Dipstick
F. Engine Air Cleaner/FilterG. Power Steering Reservoir
H. Brake Master Cylinder
I. Windshield Washer Fluid
Page 282 of 412

6-13
Turn off the engine and give the oil several minutes to
drain back into the oil pan. If you don't, the oil dipstick
might not show the actual level.
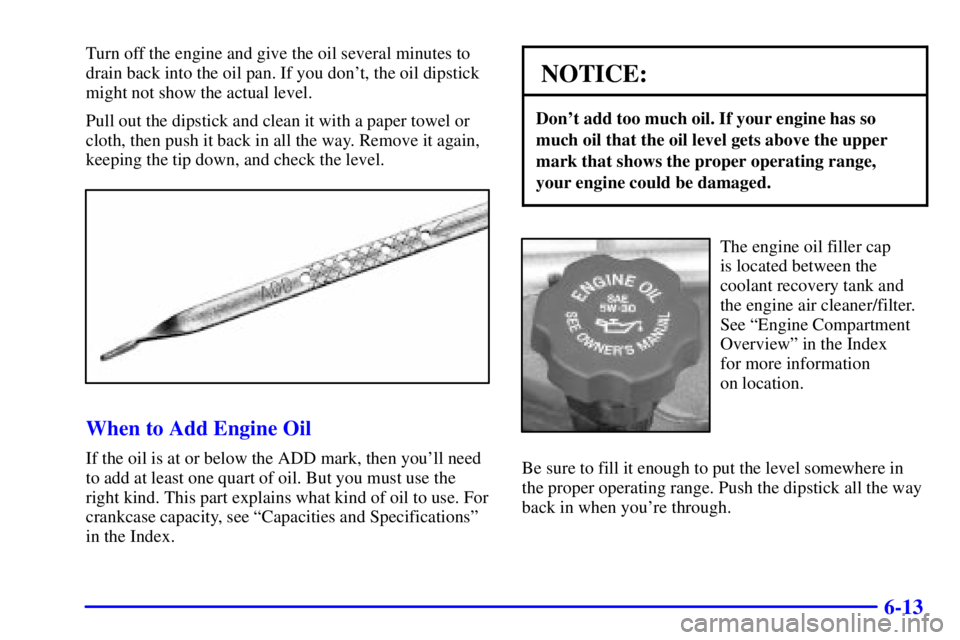
Pull out the dipstick and clean it with a paper towel or
cloth, then push it back in all the way. Remove it again,
keeping the tip down, and check the level.
When to Add Engine Oil
If the oil is at or below the ADD mark, then you'll need
to add at least one quart of oil. But you must use the
right kind. This part explains what kind of oil to use. For
crankcase capacity, see ªCapacities and Specificationsº
in the Index.
NOTICE:
Don't add too much oil. If your engine has so
much oil that the oil level gets above the upper
mark that shows the proper operating range,
your engine could be damaged.
The engine oil filler cap
is located between the
coolant recovery tank and
the engine air cleaner/filter.
See ªEngine Compartment
Overviewº in the Index
for more information
on location.
Be sure to fill it enough to put the level somewhere in
the proper operating range. Push the dipstick all the way
back in when you're through.
Page 285 of 412

6-16
If none of them is true, use the long trip/highway
maintenance schedule. Change the oil and filter every
7,500 miles (12 500 km) or 12 months
-- whichever
occurs first. Driving a vehicle with a fully warmed
engine under highway conditions causes engine oil to
break down slower.
What to Do with Used Oil
Did you know that used engine oil contains certain
elements that may be unhealthy for your skin and could
even cause cancer? Don't let used oil stay on your skin
for very long. Clean your skin and nails with soap and
water, or a good hand cleaner. Wash or properly throw
away clothing or rags containing used engine oil. See
the manufacturer's warnings about the use and disposal
of oil products.
Used oil can be a real threat to the environment. If you
change your own oil, be sure to drain all free
-flowing oil
from the filter before disposal. Don't ever dispose of oil
by putting it in the trash, pouring it on the ground, into
sewers, or into streams or bodies of water. Instead,
recycle it by taking it to a place that collects used oil. If
you have a problem properly disposing of your used oil,
ask your dealer, a service station or a local recycling
center for help.
Engine Air Cleaner/Filter
(Gasoline Engines)
The engine air cleaner/filter
assembly has an indicator
that lets you know when the
air filter is dirty and needs
to be serviced. See ªOwner
Checks and Servicesº in the
Index to determine when to
check the indicator.
If the area inside the clear section of the indicator is
green, no air filter service is required. When the area
inside the indicator is orange and CHANGE AIR
FILTER appears, the filter should be replaced.
Page 286 of 412

6-17
The engine air cleaner/filter is located near the center
of the engine compartment. See ªEngine
Compartment Overviewº in the Index for more
information on location.To change the engine air cleaner/filter, do the following:
1. Unhook the retainer clips and remove the cover.
2. Lift the filter out of the engine air cleaner/filter
housing. Care should be taken to dislodge as little
dirt as possible.
3. Clean the engine air cleaner/filter housing.
4. Install the new engine air cleaner/filter into the
engine air cleaner/filter housing. Make sure that it
fits properly into the housing.
5. Install the cover and fasten the retaining clips.
6. After the engine air cleaner/filter is properly
serviced, the indicator should be reset. Push the
button on the top of the indicator to reset it to the
green (clean) filter zone.
See ªNormal Replacement Partsº for the proper filter
to use.
Refer to the Maintenance Schedule to determine when to
replace the engine air cleaner/filter and crankcase
ventilation filter. See ªScheduled Maintenance Servicesº
in the Index.
Page 287 of 412

6-18
CAUTION:
Operating the engine with the air cleaner/filter
off can cause you or others to be burned. The air
cleaner not only cleans the air, it stops flame if
the engine backfires. If it isn't there, and the
engine backfires, you could be burned. Don't
drive with it off, and be careful working on the
engine with the air cleaner/filter off.
NOTICE:
If the air cleaner/filter is off, a backfire can
cause a damaging engine fire. And, dirt can
easily get into your engine, which will damage it.
Always have the air cleaner/filter in place when
you're driving.
Automatic Transmission Fluid
If your vehicle has a diesel engine, see ªAutomatic
Transmission Fluidº in the Diesel Supplement.
When to Check and Change
A good time to check your automatic transmission fluid
level is when the engine oil is changed.
Change both the fluid and filter every 50,000 miles
(83 000 km) if the vehicle's GVWR is over 8,600 or
if the vehicle is mainly driven under one or more of
these conditions:
�In heavy city traffic where the outside temperature
regularly reaches 90�F (32�C) or higher.
�In hilly or mountainous terrain.
�When doing frequent trailer towing.
�Uses such as found in taxi, police or delivery service.
If your vehicle's GVWR is not over 8,600 and you do not
use your vehicle under any of these conditions, change the
fluid and filter every 100,000 miles (166 000 km).
See ªScheduled Maintenance Servicesº in the Index.
Page 339 of 412

6-70
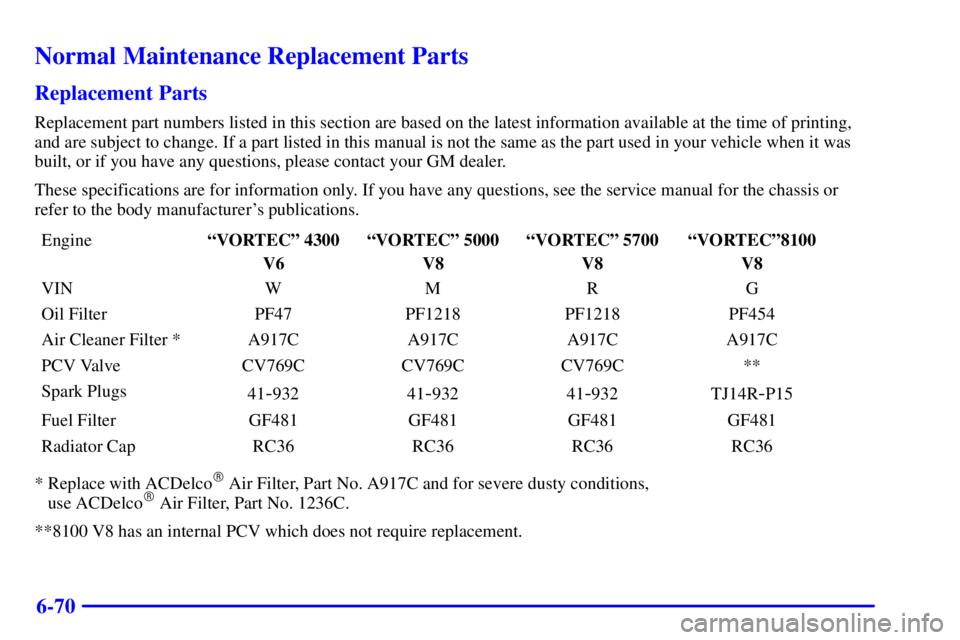
Normal Maintenance Replacement Parts
Replacement Parts
Replacement part numbers listed in this section are based on the latest information available at the time of printing,
and are subject to change. If a part listed in this manual is not the same as the part used in your vehicle when it was
built, or if you have any questions, please contact your GM dealer.
These specifications are for information only. If you have any questions, see the service manual for the chassis or
refer to the body manufacturer's publications.
EngineªVORTECº 4300
V6ªVORTECº 5000
V8ªVORTECº 5700
V8ªVORTECº8100
V8
VIN W M R G
Oil Filter PF47 PF1218 PF1218 PF454
Air Cleaner Filter * A917C A917C A917C A917C
PCV Valve CV769C CV769C CV769C **
Spark Plugs
41
-932 41-932 41-932 TJ14R-P15
Fuel Filter GF481 GF481 GF481 GF481
Radiator Cap RC36 RC36 RC36 RC36
* Replace with ACDelco
� Air Filter, Part No. A917C and for severe dusty conditions,
use ACDelco� Air Filter, Part No. 1236C.
**8100 V8 has an internal PCV which does not require replacement.