Page 281 of 448
5-7
12. Remove the cables in reverse order following the
diagram and directions below to prevent electrical
shorting. Take care that they don't touch each
other or any other metal.
Jumper Cable Removal
A. Heavy, Unpainted Metal Engine Part
B. Good Battery
C. Dead BatteryTo disconnect the jumper cables from both vehicles,
do the following:
1. Disconnect the black negative (
-) cable from the
heavy, unpainted metal engine part on the vehicle
with the dead battery.
2. Disconnect the black negative (
-) cable from the
negative (
-) battery terminal on the vehicle with the
good battery.
3. Disconnect the red positive (+) cable from the
positive (+) battery terminal on the vehicle with the
good battery.
4. Disconnect the red positive (+) cable from the
positive battery terminal of the other vehicle.
ProCarManuals.com
Page 301 of 448

5-27 Storing a Flat or Spare Tire and Tools
CAUTION:
Storing a jack, a tire or other equipment in
the passenger compartment of the vehicle could
cause injury. In a sudden stop or collision, loose
equipment could strike someone. Store all these
in the proper place.
NOTICE:
An aluminum wheel with a flat tire should
always be stored under the vehicle with the hoist.
However, storing it that way for an extended
period could damage the wheel. To avoid this,
have the wheel repaired as soon as possible.
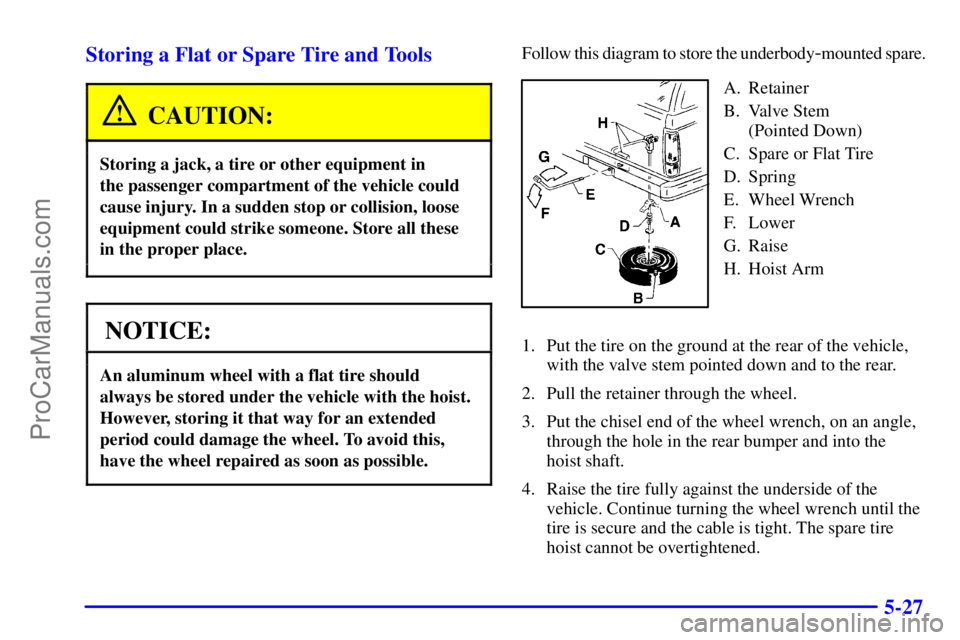
Follow this diagram to store the underbody-mounted spare.
A. Retainer
B. Valve Stem
(Pointed Down)
C. Spare or Flat Tire
D. Spring
E. Wheel Wrench
F. Lower
G. Raise
H. Hoist Arm
1. Put the tire on the ground at the rear of the vehicle,
with the valve stem pointed down and to the rear.
2. Pull the retainer through the wheel.
3. Put the chisel end of the wheel wrench, on an angle,
through the hole in the rear bumper and into the
hoist shaft.
4. Raise the tire fully against the underside of the
vehicle. Continue turning the wheel wrench until the
tire is secure and the cable is tight. The spare tire
hoist cannot be overtightened.
ProCarManuals.com
Page 302 of 448
5-28
5. Make sure the tire is stored securely. Push, pull, and
then try to rotate or turn the tire. If the tire moves,
use the wheel wrench to tighten the cable.Follow this diagram for the inside
-mounted spare.
A. Spare or Flat Tire
B. Retainer
C. NutD. Wheel Carrier
E. Hook
ProCarManuals.com
Page 303 of 448
5-29
Follow this diagram for the rear-mounted spare.
A. Wheel Carrier
B. Spare or Flat Tire
C. Wheel Nut and Locking Nut CylinderReinstall the locking wheel nut using the wheel wrench.
Then push the lock case onto the lug nut until it stops.
The key does not have to be inserted into the lock. Push
the lock case to be sure it is secured. The special lug nut
and lock case is not intended to be used on any road
wheel, only on the spare wheel carrier. Tighten the nuts
on the wheel carrier to 22 to 32 lb
-ft (30 to 40 N´m).
CAUTION:
Make sure the tire and carrier are secure.
Driving with the tire or carrier unlatched
could injure pedestrians or damage the vehicle.
ProCarManuals.com