Page 145 of 288
FOUR-WHEEL DRIVE (4WD) OPERATION (IF EQUIPPED)
For important information regarding safe operation of this type
of vehicle, seePreparing to drive your vehiclein this chapter.
When four–wheel drive (4WD) is engaged, power is supplied to all four
wheels through a transfer case. 4WD power can be selected when
additional driving power is desired.
If equipped with the Electronic Shift 4WD System, and the
instrument panel control is moved to 4WD Low while the vehicle
is moving, the system will not engage and no damage will occur to
the 4WD system. Before 4WD Low can be engaged, the vehicle
must be brought to a complete stop with the brake pedal
depressed and the transmission placed in neutral (or the clutch
pedal depressed on manual transmissions).
4WD operation is not recommended on dry pavement. Doing so could
result in difficult disengagement of the transfer case, increased tire wear
and decreased fuel economy.
Electronic shift on the fly (ESOF) 4x4 system (if equipped)
The 4WD system:
•provides 4x4 High engagement and disengagement while the vehicle is
moving.
•is operated by a rotary control located on the instrument panel that
allows you select 2WD, 4x4 High or 4x4 Low operation.
•uses hub locks that can be engaged and disengaged automatically by
using a rotary control located on the instrument panel.
Driving
145
Page 173 of 288
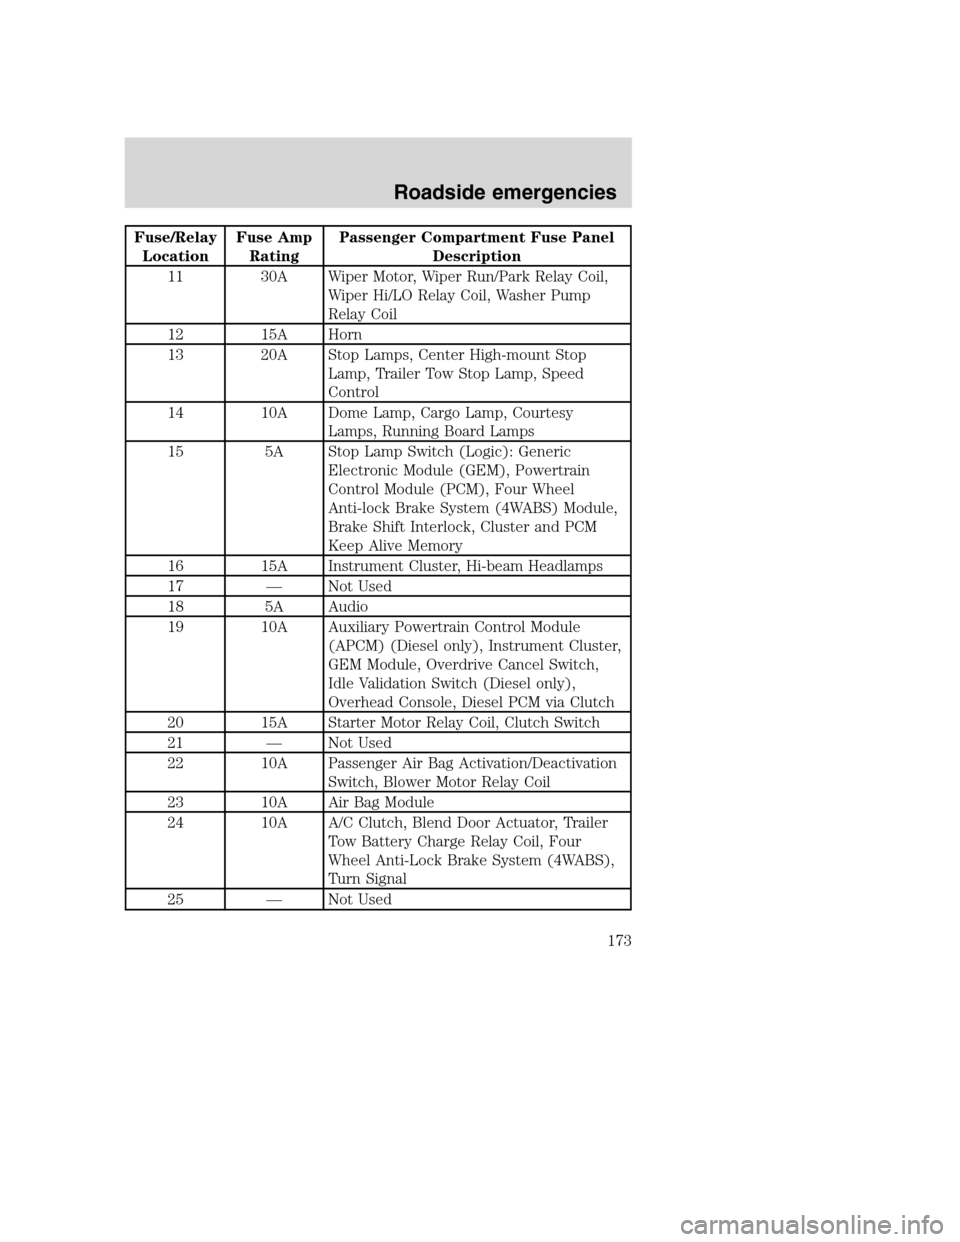
Fuse/Relay
LocationFuse Amp
RatingPassenger Compartment Fuse Panel
Description
11 30A Wiper Motor, Wiper Run/Park Relay Coil,
Wiper Hi/LO Relay Coil, Washer Pump
Relay Coil
12 15A Horn
13 20A Stop Lamps, Center High-mount Stop
Lamp, Trailer Tow Stop Lamp, Speed
Control
14 10A Dome Lamp, Cargo Lamp, Courtesy
Lamps, Running Board Lamps
15 5A Stop Lamp Switch (Logic): Generic
Electronic Module (GEM), Powertrain
Control Module (PCM), Four Wheel
Anti-lock Brake System (4WABS) Module,
Brake Shift Interlock, Cluster and PCM
Keep Alive Memory
16 15A Instrument Cluster, Hi-beam Headlamps
17 — Not Used
18 5A Audio
19 10A Auxiliary Powertrain Control Module
(APCM) (Diesel only), Instrument Cluster,
GEM Module, Overdrive Cancel Switch,
Idle Validation Switch (Diesel only),
Overhead Console, Diesel PCM via Clutch
20 15A Starter Motor Relay Coil, Clutch Switch
21 — Not Used
22 10A Passenger Air Bag Activation/Deactivation
Switch, Blower Motor Relay Coil
23 10A Air Bag Module
24 10A A/C Clutch, Blend Door Actuator, Trailer
Tow Battery Charge Relay Coil, Four
Wheel Anti-Lock Brake System (4WABS),
Turn Signal
25 — Not Used
Roadside emergencies
173
Page 174 of 288
Fuse/Relay
LocationFuse Amp
RatingPassenger Compartment Fuse Panel
Description
26 — Not Used
27 10A Ignition Run Power Feed (Customer
Access)
28 15A Brake Shift Interlock, DRL Relay Coil,
Speed Control Module, Backup Lamps,
Trailer Tow Backup Lamp Relay Coil,
Electronic Shift On The Fly Hub Lock
Solenoid, Vacuum Pump Motor
29 5A Instrument Cluster (Charge and Airbag
Warning Lamps)
30 30A PCM Relay Coil, Ignition Coil (Gasoline
only), Fuel Heater (Diesel only),
Wastegate Solenoid (Diesel only), Injector
Driver Module Relay Coil (Diesel only)
31 5A Fog Lamp Switch
Relay 1 — Interior Lamp Relay
Relay 2 — Not Used
Relay 3 — Horn
Relay 4 — Power Window One Touch Down Relay
Relay 5 — Accessory Delay Relay
Roadside emergencies
174
Page 199 of 288
OPENING THE HOOD
1. Inside the vehicle, pull the hood
release handle located under the
bottom left corner of the instrument
panel.
2. Go to the front of the vehicle and
release the auxiliary latch located
under the right center of the hood.
Slide the handle to release the
auxiliary latch.
3. Lift the hood until the lift
cylinders hold it open.
HOOD
Maintenance and care
199
Page 243 of 288
Using the right bulbs
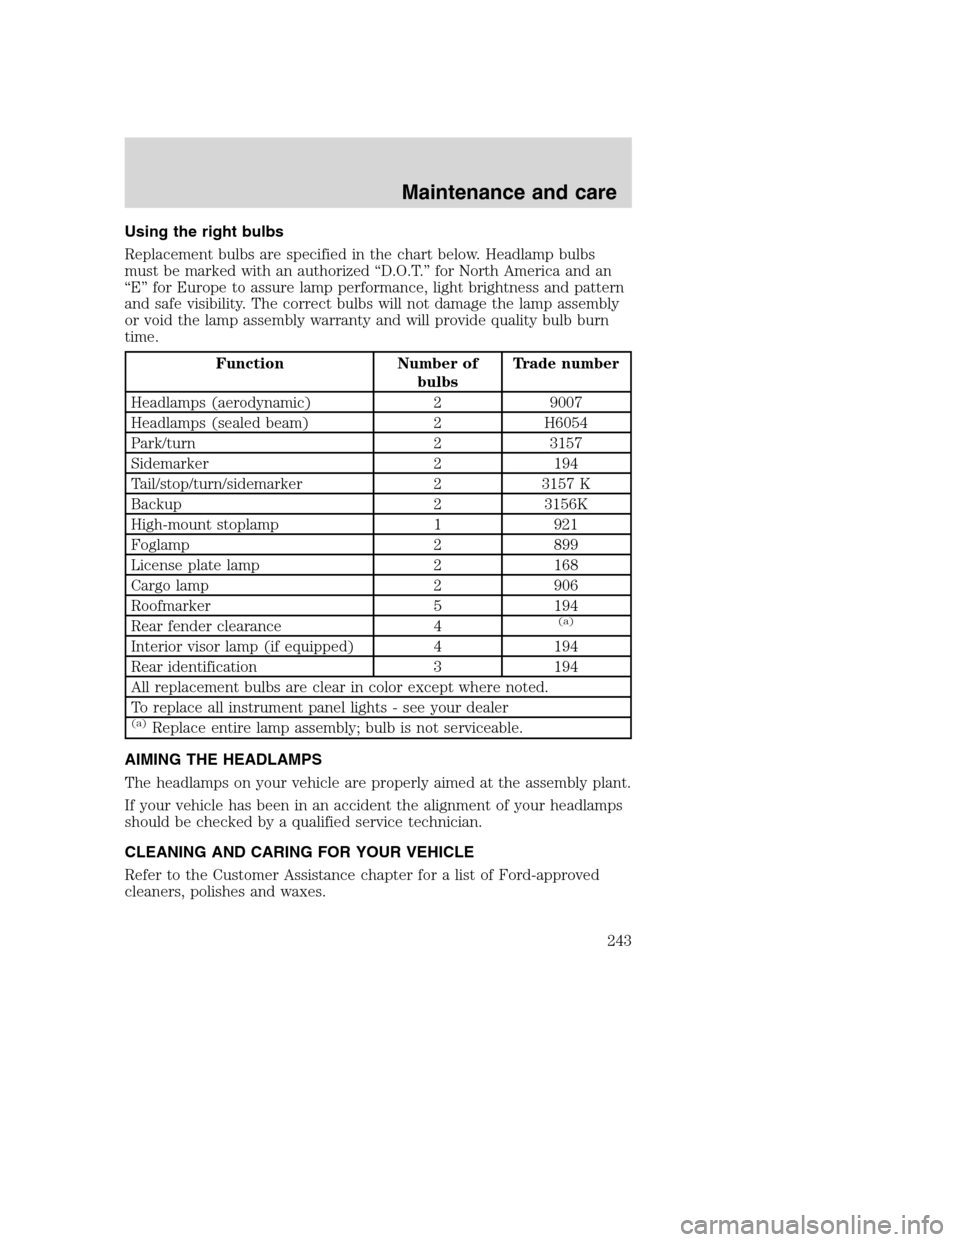
Replacement bulbs are specified in the chart below. Headlamp bulbs
must be marked with an authorized “D.O.T.” for North America and an
“E” for Europe to assure lamp performance, light brightness and pattern
and safe visibility. The correct bulbs will not damage the lamp assembly
or void the lamp assembly warranty and will provide quality bulb burn
time.
Function Number of
bulbsTrade number
Headlamps (aerodynamic) 2 9007
Headlamps (sealed beam) 2 H6054
Park/turn 2 3157
Sidemarker 2 194
Tail/stop/turn/sidemarker 2 3157 K
Backup 2 3156K
High-mount stoplamp 1 921
Foglamp 2 899
License plate lamp 2 168
Cargo lamp 2 906
Roofmarker 5 194
Rear fender clearance 4
(a)
Interior visor lamp (if equipped) 4 194
Rear identification 3 194
All replacement bulbs are clear in color except where noted.
To replace all instrument panel lights - see your dealer
(a)Replace entire lamp assembly; bulb is not serviceable.
AIMING THE HEADLAMPS
The headlamps on your vehicle are properly aimed at the assembly plant.
If your vehicle has been in an accident the alignment of your headlamps
should be checked by a qualified service technician.
CLEANING AND CARING FOR YOUR VEHICLE
Refer to the Customer Assistance chapter for a list of Ford-approved
cleaners, polishes and waxes.
Maintenance and care
243
Page 247 of 288
Cleaning the windshield, wiper blades and rear window
If the wiper blades do not wipe properly, clean the wiper blade rubber
element with undiluted windshield washer solution or a mild detergent.
To avoid damaging the blades, do not use fuel, kerosene, paint thinner or
other solvents.
If the wiper still does not wipe properly, this could be caused by
substances on the windshield or rear window such as tree sap and some
hot wax treatments used by commercial car washes. Clean the outside of
the windshield or rear window with a non-abrasive cleaner such as Ford
Ultra-Clear Spray Glass Cleaner, (E4AZ-19C507–AA), available from your
Ford Dealer.Do notuse abrasive cleansers on glass as they may cause
scratches. The windshield or rear window is clean if beads do not form
when you rinse it with water. The windshield, rear window and wiper
blades should be cleaned on a regular basis, and blades or rubber
elements replaced when worn.
Cleaning the instrument panel
Clean with a damp cloth, then dry with a dry cloth.
Avoid cleaner or polish that increases the gloss of the upper portion of
the instrument panel. The dull finish in this area helps protect the driver
from undesirable windshield reflection.
Do not use chemical solvents or strong detergents when cleaning
the steering wheel or instrument panel to avoid contamination of
the air bag system.
Cleaning the instrument cluster lens
Clean with a damp cloth, then dry with a dry cloth.
Do not use household or glass cleaners as these may damage the lens.
Cleaning the interior fabric
Remove dust and loose dirt with a whisk broom or a vacuum cleaner.
Remove fresh spots immediately. Do not use household or glass cleaners.
These agents can stain and discolor the fabric. Use a mild soap and
water solution if necessary.
Maintenance and care
247
Page 262 of 288
Vehicle identification number
The vehicle identification number is
attached to a metal tag and is
located on the driver side
instrument panel. (Please note that
in the graphic XXXX is
representative of your vehicle
identification number.)
Engine number
The engine number (the last eight numbers of the vehicle identification
number) is stamped on the engine block, transmission, frame and
transfer case (if equipped).
XXXXXXXXXXXXXXXXX
Capacities and specifications
262
Page 279 of 288
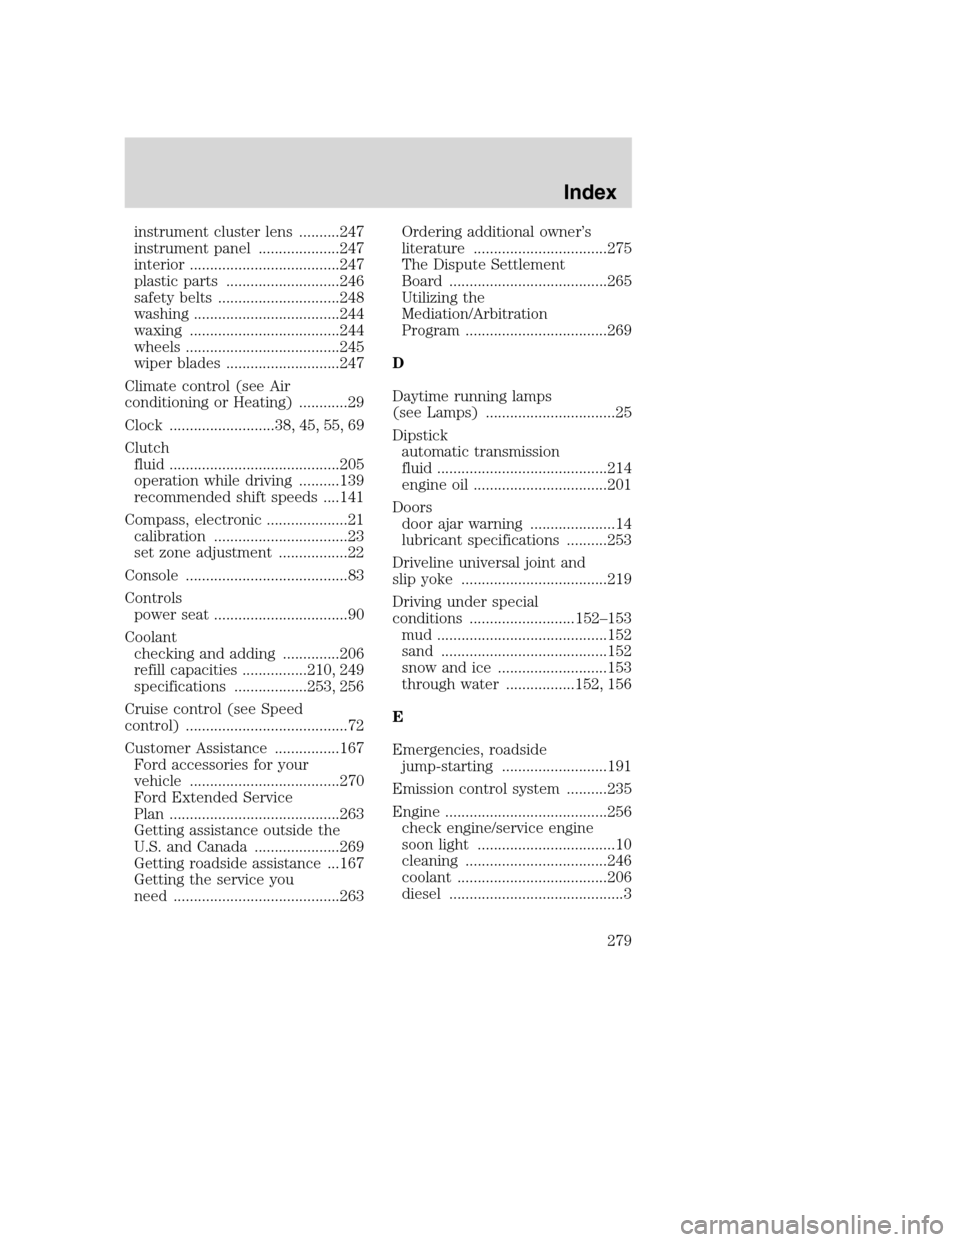
instrument cluster lens ..........247
instrument panel ....................247
interior .....................................247
plastic parts ............................246
safety belts ..............................248
washing ....................................244
waxing .....................................244
wheels ......................................245
wiper blades ............................247
Climate control (see Air
conditioning or Heating) ............29
Clock ..........................38, 45, 55, 69
Clutch
fluid ..........................................205
operation while driving ..........139
recommended shift speeds ....141
Compass, electronic ....................21
calibration .................................23
set zone adjustment .................22
Console ........................................83
Controls
power seat .................................90
Coolant
checking and adding ..............206
refill capacities ................210, 249
specifications ..................253, 256
Cruise control (see Speed
control) ........................................72
Customer Assistance ................167
Ford accessories for your
vehicle .....................................270
Ford Extended Service
Plan ..........................................263
Getting assistance outside the
U.S. and Canada .....................269
Getting roadside assistance ...167
Getting the service you
need .........................................263Ordering additional owner’s
literature .................................275
The Dispute Settlement
Board .......................................265
Utilizing the
Mediation/Arbitration
Program ...................................269
D
Daytime running lamps
(see Lamps) ................................25
Dipstick
automatic transmission
fluid ..........................................214
engine oil .................................201
Doors
door ajar warning .....................14
lubricant specifications ..........253
Driveline universal joint and
slip yoke ....................................219
Driving under special
conditions ..........................152–153
mud ..........................................152
sand .........................................152
snow and ice ...........................153
through water .................152, 156
E
Emergencies, roadside
jump-starting ..........................191
Emission control system ..........235
Engine ........................................256
check engine/service engine
soon light ..................................10
cleaning ...................................246
coolant .....................................206
diesel ...........................................3
Index
279