Page 64 of 240

²Do not expose tapes to direct sunlight, high humidity, extreme heat or
extreme cold. Allow tapes that may have been exposed to extreme
temperatures to reach a moderate temperature before playing.
²Tighten very loose tapes by inserting a finger or pencil into the hole
and turning the hub.
²Remove loose labels before inserting tapes.
²Do not leave tapes in the cassette player for a long time when not
being played.
Radio frequency information
The Federal Communications Commission (FCC) and the Canadian Radio
and Telecommunications Commission(CRTC) establish the frequencies
AM and FM stations may use for their broadcasts. Allowable frequencies
are:
AM 530, 540±1600, 1610 kHz
FM 87.7, 87.9±107.7, 107.9 MHz
Not all frequencies are used in a given area.
Radio reception factors
Three factors can affect radio reception:
²Distance/strength.The further an FM signal travels, the weaker it is.
The listenable range of the average FM station is approximately 40 km
(24 miles). This range can be affected by ªsignal modulation.º Signal
modulation is a process radio stations use to increase their
strength/volume relative to other stations.
²Terrain.Hills, mountains and tall buildings between your vehicle's
antenna and the radio station signal can cause FM reception problems.
Static can be caused on AM stations by power lines, electric fences,
traffic lights and thunderstorms. Moving away from an interfering
structure (out of its ªshadowº) returns your reception to normal.
²Station overload.Weak signals are sometimes captured by stronger
signals when you pass a broadcast tower. A stronger signal may
temporarily overtake a weaker signal and play while the weak station
frequency is displayed.
The audio system automatically switches to single channel reception if it
will improve the reception of a station normally received in stereo.
Controls and features
64
Page 72 of 240
The compass reading may be affected when you drive near large
buildings, bridges, power lines and powerful broadcast antenna. Magnetic
or metallic objects placed in or on the vehicle may also affect compass
accuracy. Adjustments may need to be made to the zone and calibration
of the compass.
Usually, when something affects the compass readings, the compass will
correct itself after a few days of operating your vehicle in normal
conditions. If the compass still appears to be inaccurate, a manual
calibration may be necessary. Refer toCompass calibration
adjustment.
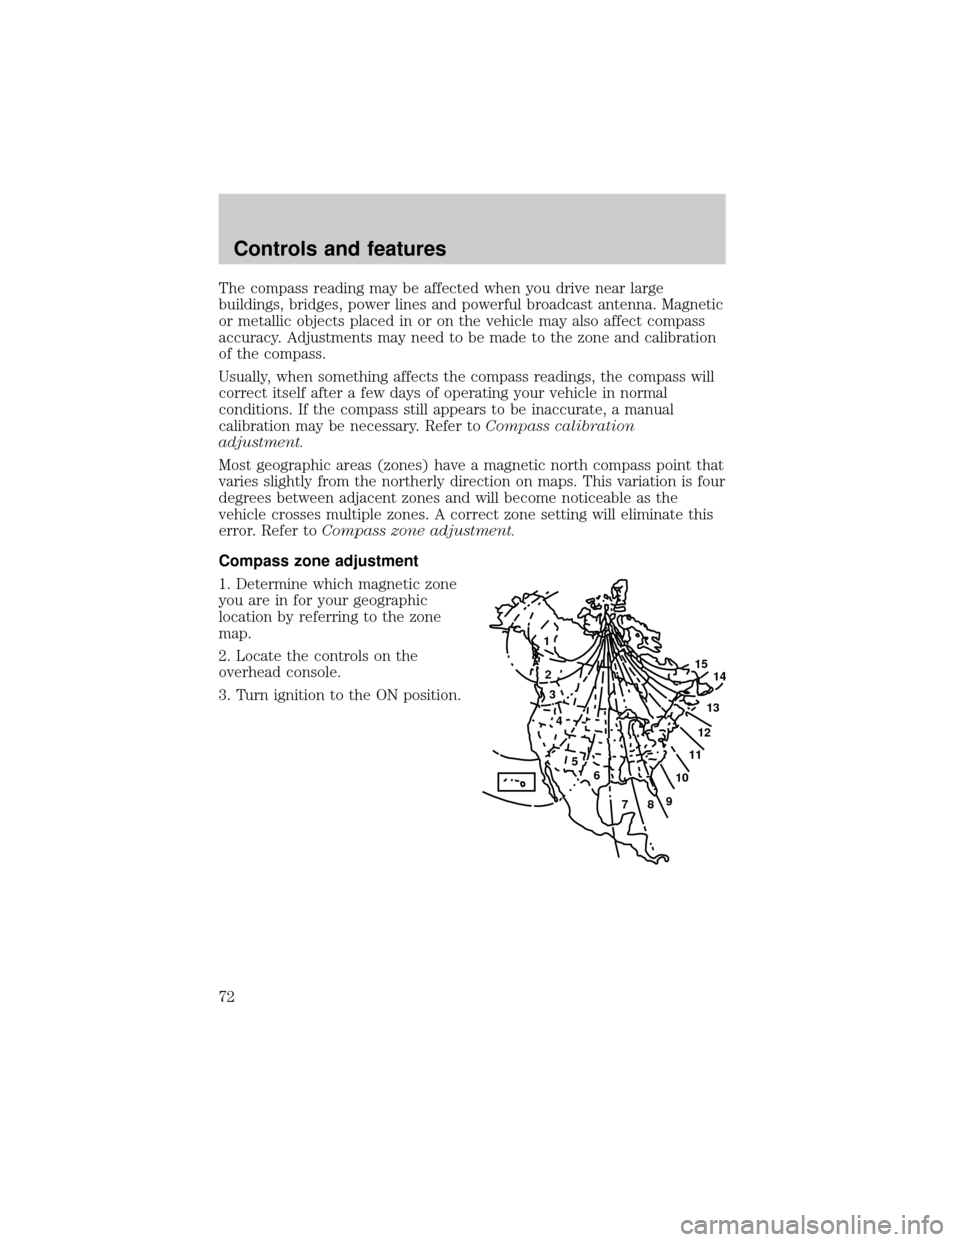
Most geographic areas (zones) have a magnetic north compass point that
varies slightly from the northerly direction on maps. This variation is four
degrees between adjacent zones and will become noticeable as the
vehicle crosses multiple zones. A correct zone setting will eliminate this
error. Refer toCompass zone adjustment.
Compass zone adjustment
1. Determine which magnetic zone
you are in for your geographic
location by referring to the zone
map.
2. Locate the controls on the
overhead console.
3. Turn ignition to the ON position.
1
2
3
4
5
6
7891011121314 15
Controls and features
72
Page 73 of 240
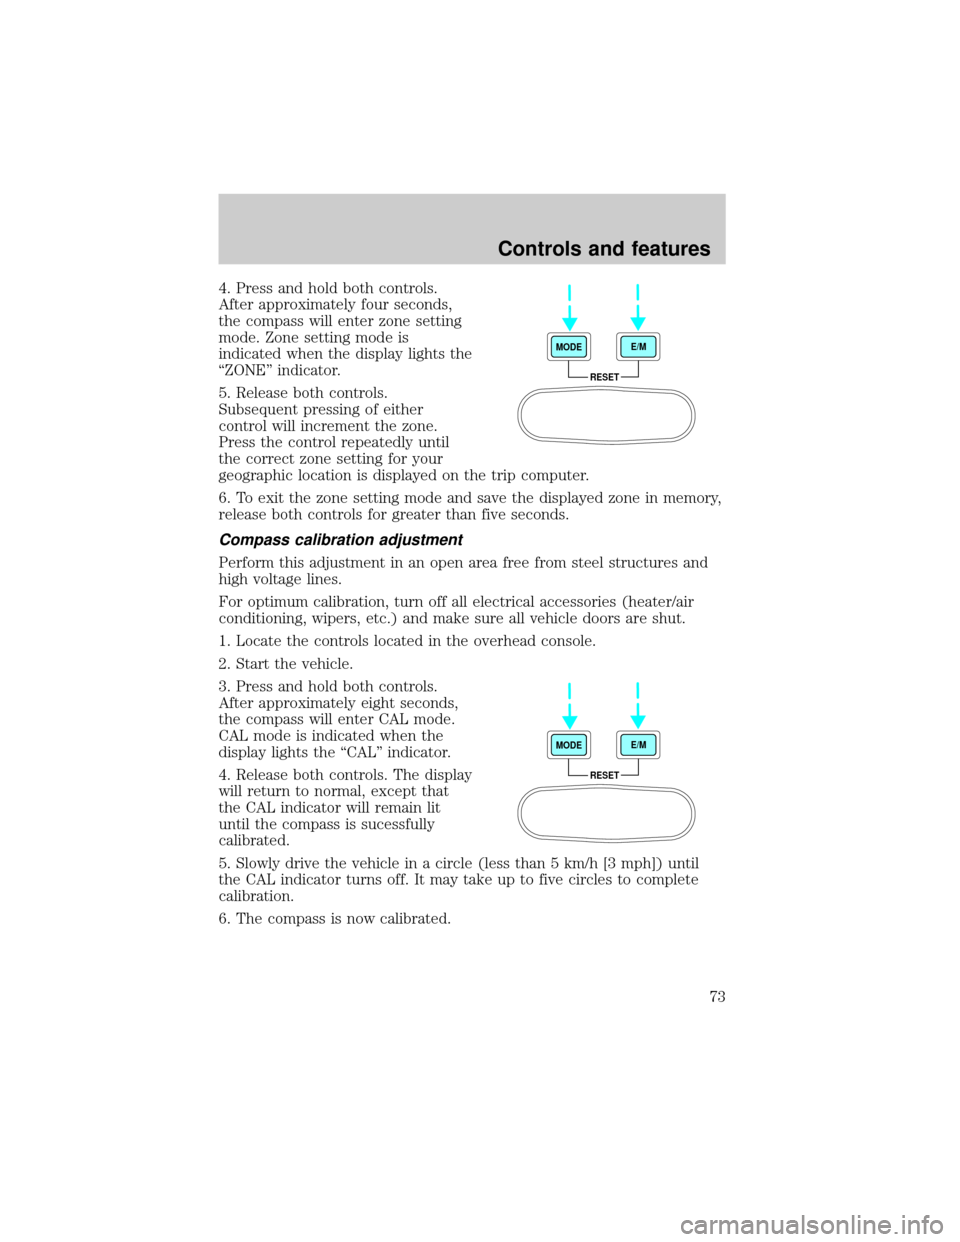
4. Press and hold both controls.
After approximately four seconds,
the compass will enter zone setting
mode. Zone setting mode is
indicated when the display lights the
ªZONEº indicator.
5. Release both controls.
Subsequent pressing of either
control will increment the zone.
Press the control repeatedly until
the correct zone setting for your
geographic location is displayed on the trip computer.
6. To exit the zone setting mode and save the displayed zone in memory,
release both controls for greater than five seconds.
Compass calibration adjustment
Perform this adjustment in an open area free from steel structures and
high voltage lines.
For optimum calibration, turn off all electrical accessories (heater/air
conditioning, wipers, etc.) and make sure all vehicle doors are shut.
1. Locate the controls located in the overhead console.
2. Start the vehicle.
3. Press and hold both controls.
After approximately eight seconds,
the compass will enter CAL mode.
CAL mode is indicated when the
display lights the ªCALº indicator.
4. Release both controls. The display
will return to normal, except that
the CAL indicator will remain lit
until the compass is sucessfully
calibrated.
5. Slowly drive the vehicle in a circle (less than 5 km/h [3 mph]) until
the CAL indicator turns off. It may take up to five circles to complete
calibration.
6. The compass is now calibrated.
RESET MODEE/M
RESET MODEE/M
Controls and features
73
Page 79 of 240

Sounding a panic alarm
Press both controls to activate the
alarm. The horn will sound and the
lights will flash.
To deactivate the alarm, press both
controls again or turn the ignition to
ACC or ON.
This device complies with part 15 of
the FCC rules and with RS-210 of
Industry Canada. Operation is
subject to the following two
conditions: (1) This device may not cause harmful interference, and (2)
This device must accept any interference received, including interference
that may cause undesired operation.
Changes or modifications not expressly approved by the party
responsible for compliance could void the user's authority to
operate the equipment.
Illuminated entry
The illuminated entry system will turn on the interior lights when the
remote transmitter unlock control is pressed.
The illuminated entry system will turn off the interior lights if the
ignition switch is turned to the ON position, or if the remote transmitter
lock control is pressed, or after 25 seconds of illumination.
The inside lights will not turn off if:
²they have been turned on with the dimmer control or
²any door is open.
The battery save feature will turn off the interior lights 45 minutes after
the last door is closed, even if the dimmer control is on.
Controls and features
79
Page 85 of 240
Press rear to raise or lower the rear
portion of the seat cushion.
Press the control to move the seat
forward, backward, up or down.
Heated seats (if equipped)
To operate the heated seats:
²Push control to activate.
²Push again to deactivate.
The indicator light will illuminate when activated.
Seating and safety restraints
85
Page 91 of 240
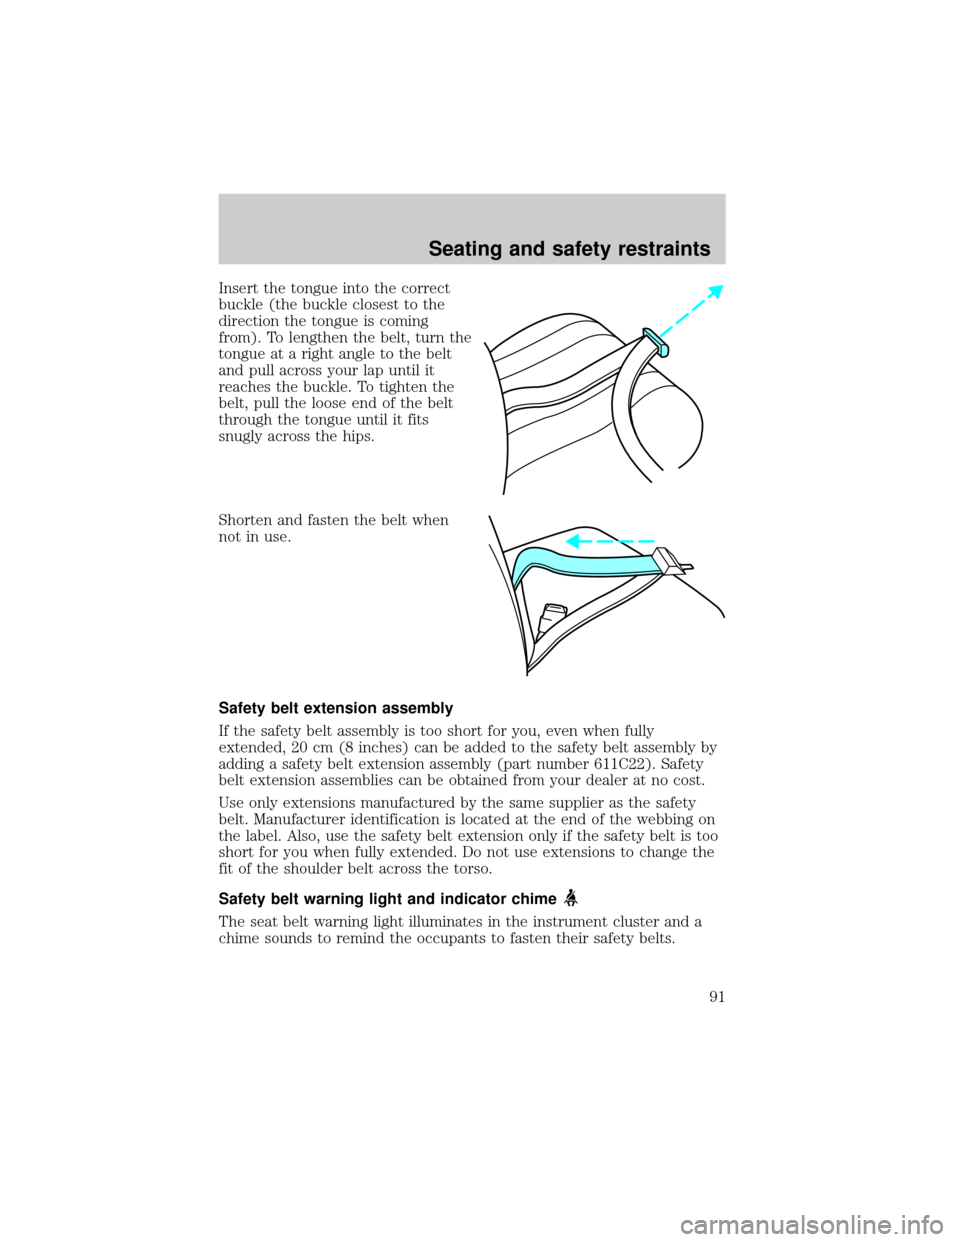
Insert the tongue into the correct
buckle (the buckle closest to the
direction the tongue is coming
from). To lengthen the belt, turn the
tongue at a right angle to the belt
and pull across your lap until it
reaches the buckle. To tighten the
belt, pull the loose end of the belt
through the tongue until it fits
snugly across the hips.
Shorten and fasten the belt when
not in use.
Safety belt extension assembly
If the safety belt assembly is too short for you, even when fully
extended, 20 cm (8 inches) can be added to the safety belt assembly by
adding a safety belt extension assembly (part number 611C22). Safety
belt extension assemblies can be obtained from your dealer at no cost.
Use only extensions manufactured by the same supplier as the safety
belt. Manufacturer identification is located at the end of the webbing on
the label. Also, use the safety belt extension only if the safety belt is too
short for you when fully extended. Do not use extensions to change the
fit of the shoulder belt across the torso.
Safety belt warning light and indicator chime
The seat belt warning light illuminates in the instrument cluster and a
chime sounds to remind the occupants to fasten their safety belts.
Seating and safety restraints
91
Page 92 of 240
Conditions of operation
If... Then...
The driver's safety belt is not
buckled before the ignition
switch is turned to the ON
position...The safety belt warning light
illuminates1-2 minutes and the
warning chime sounds 4-8 seconds.
The driver's safety belt is
buckled while the indicator
light is illuminated and the
warning chime is sounding...The safety belt warning light and
warning chime turn off.
The driver's safety belt is
buckled before the ignition
switch is turned to the ON
position...The safety belt warning light and
indicator chime remain off.
Belt minder
The Belt Minder feature is a supplemental warning to the safety belt
warning function. This feature provides additional reminders to the
driver that the driver's safety belt is unbuckled by intermittently
sounding a chime and illuminating the safety belt warning lamp in the
instrument cluster.
If... Then...
The driver's safety belt is not
buckled before the vehicle has
reached at least 5 km/h (3 mph)
and 1-2 minutes have elapsed
since the ignition switch has
been turned to ON...The Belt Minder feature is activated -
the safety belt warning light illuminates
and the warning chime sounds for 6
seconds every 30 seconds, repeating for
approximately 5 minutes or until safety
belt is buckled.
The driver's safety belt is
buckled while the safety belt
indicator light is illuminated and
the safety belt warning chime is
sounding...The Belt Minder feature will not
activate.
The driver's safety belt is
buckled before the ignition
switch is turned to the ON
position...The Belt Minder feature will not
activate.
The purpose of the Belt Minder is to remind occasional wearers to wear
safety belts all of the time.
Seating and safety restraints
92
Page 93 of 240
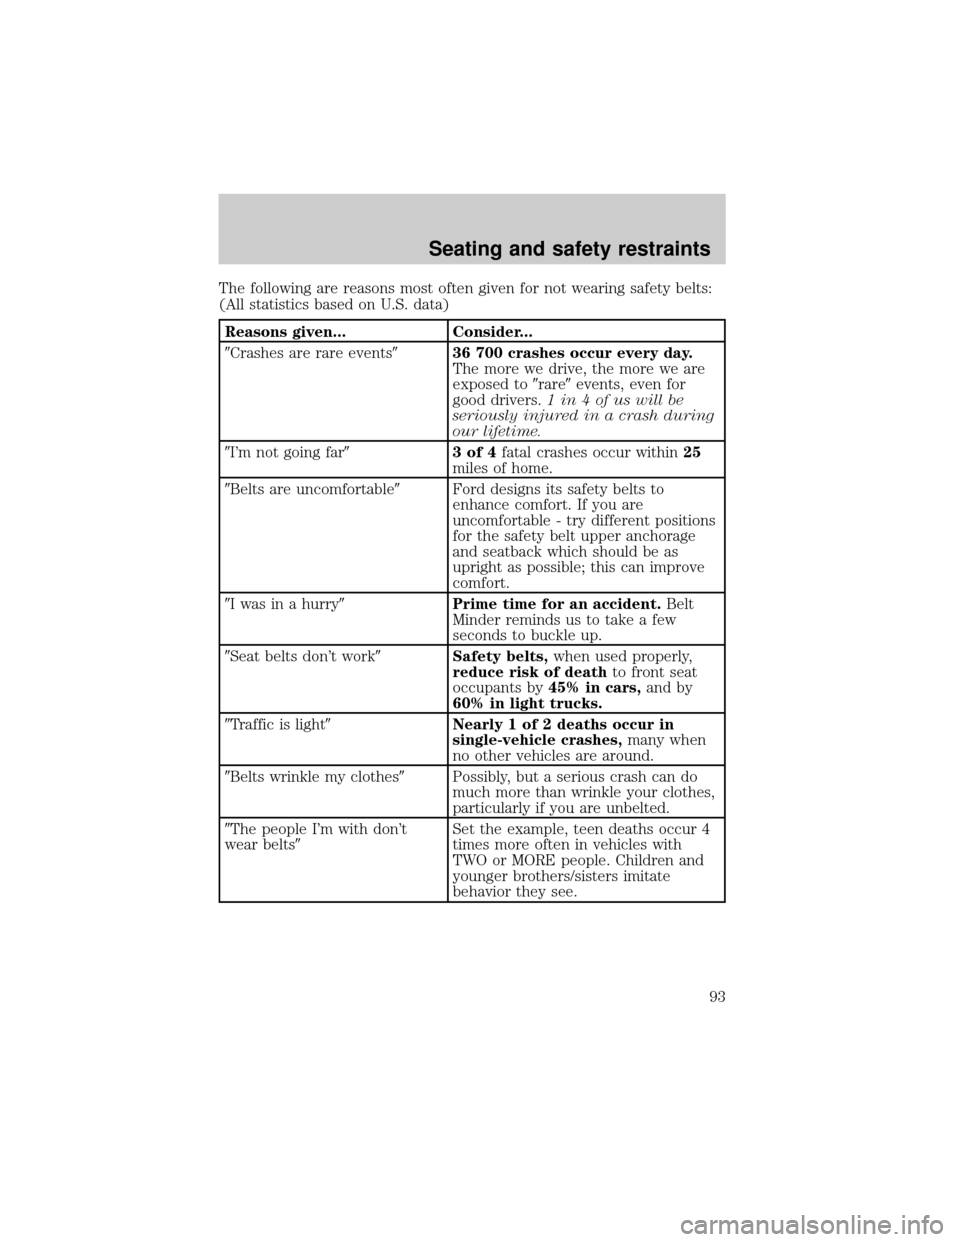
The following are reasons most often given for not wearing safety belts:
(All statistics based on U.S. data)
Reasons given... Consider...
9Crashes are rare events936 700 crashes occur every day.
The more we drive, the more we are
exposed to9rare9events, even for
good drivers.1 in 4 of us will be
seriously injured in a crash during
our lifetime.
9I'm not going far93of4fatal crashes occur within25
miles of home.
9Belts are uncomfortable9Ford designs its safety belts to
enhance comfort. If you are
uncomfortable - try different positions
for the safety belt upper anchorage
and seatback which should be as
upright as possible; this can improve
comfort.
9I was in a hurry9Prime time for an accident.Belt
Minder reminds us to take a few
seconds to buckle up.
9Seat belts don't work9Safety belts,when used properly,
reduce risk of deathto front seat
occupants by45% in cars,and by
60% in light trucks.
9Traffic is light9Nearly 1 of 2 deaths occur in
single-vehicle crashes,many when
no other vehicles are around.
9Belts wrinkle my clothes9Possibly, but a serious crash can do
much more than wrinkle your clothes,
particularly if you are unbelted.
9The people I'm with don't
wear belts9Set the example, teen deaths occur 4
times more often in vehicles with
TWO or MORE people. Children and
younger brothers/sisters imitate
behavior they see.
Seating and safety restraints
93