Page 143 of 240
HAZARD FLASHER
Use only in an emergency to warn traffic of vehicle breakdown,
approaching danger, etc. The hazard flashers can be operated when the
ignition is off.
²The hazard lights control is
located on top of the steering
column.
²Depress hazard lights control to
activate all hazard flashers
simultaneously.
²Depress control again to turn the
flashers off.
FUSES AND RELAYS
Fuses
If electrical components in the
vehicle are not working, a fuse may
have blown. Blown fuses are
identified by a broken wire within
the fuse. Check the appropriate
fuses before replacing any electrical
components.
Always replace a fuse with one that has the specified amperage
rating. Using a fuse with a higher amperage rating can cause
severe wire damage and could start a fire.
15
Roadside emergencies
143
Page 145 of 240
Passenger compartment fuse panel
The fuse panel is located below and to the left of the steering wheel by
the brake pedal. Remove the panel cover to access the fuses.
To remove a fuse use the fuse puller tool provided on the fuse panel cover.
The fuses are coded as follows.
Fuse/Relay
LocationFuse Amp
RatingPassenger Compartment Fuse
Panel Description
1 20A Horn
2 15A Turn/Hazard Lamps
3 20A Cigar Lighter
4 10A Diagnostic Connectors
5 15A Back-Up Lamps, DRL Relays,
Blend Door Actuator, Heated Seat
Module (SuperCrewzer only),
On/Off Fan Clutch (SuperCrewzer
only), Warning Chime Module
(SuperCrewzer only)
Relay #1
Relay #2
Relay #3
Horn
Relay #4
Relay #5 One Touch
Down Interior
Lamps#1
#12#22
#2
#3
#4
#5
#6
#7
#8
#9
#10
#11#13
#23
#14
#15
#16
#17#24
#25
#26
#27
#18
#28
#19
#29
#20
#21#30
#31
Roadside emergencies
145
Page 155 of 240

Connecting the jumper cables
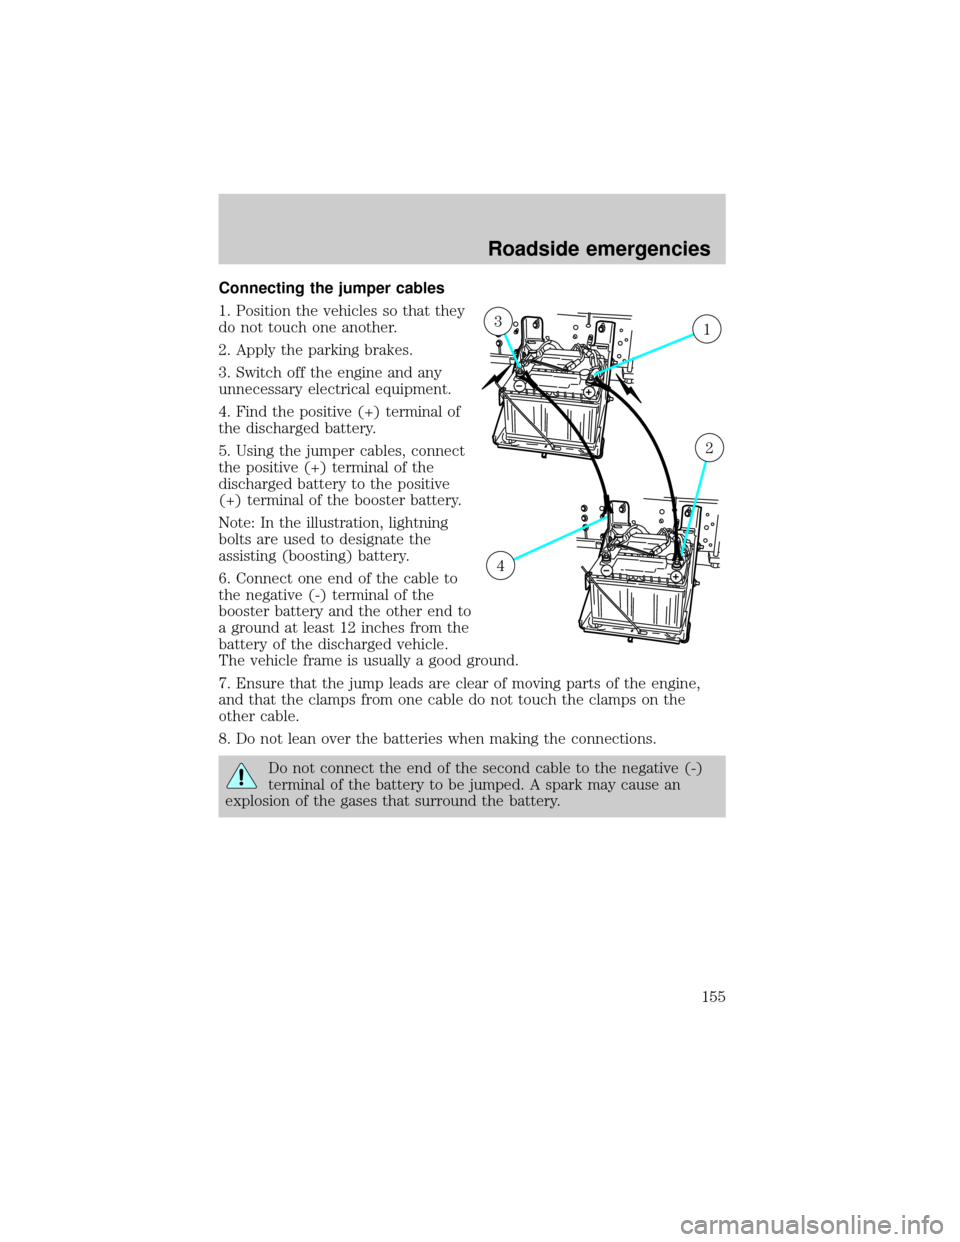
1. Position the vehicles so that they
do not touch one another.
2. Apply the parking brakes.
3. Switch off the engine and any
unnecessary electrical equipment.
4. Find the positive (+) terminal of
the discharged battery.
5. Using the jumper cables, connect
the positive (+) terminal of the
discharged battery to the positive
(+) terminal of the booster battery.
Note: In the illustration, lightning
bolts are used to designate the
assisting (boosting) battery.
6. Connect one end of the cable to
the negative (-) terminal of the
booster battery and the other end to
a ground at least 12 inches from the
battery of the discharged vehicle.
The vehicle frame is usually a good ground.
7. Ensure that the jump leads are clear of moving parts of the engine,
and that the clamps from one cable do not touch the clamps on the
other cable.
8. Do not lean over the batteries when making the connections.
Do not connect the end of the second cable to the negative (-)
terminal of the battery to be jumped. A spark may cause an
explosion of the gases that surround the battery.
13
2
4
Roadside emergencies
155
Page 174 of 240

Batteries normally produce explosive gases which can cause
personal injury. Therefore, do not allow flames, sparks or lighted
substances to come near the battery. When working near the battery,
always shield your face and protect your eyes. Always provide proper
ventilation.
When lifting a plastic-cased battery, excessive pressure on the
end walls could cause acid to flow through the vent caps,
resulting in personal injury and/or damage to the vehicle or battery.
Lift the battery with a battery carrier or with your hands on opposite
corners.
Keep batteries out of reach of children. Batteries contain sulfuric
acid. Avoid contact with skin, eyes or clothing. Shield your eyes
when working near the battery to protect against possible splashing of
acid solution. In case of acid contact with skin or eyes, flush
immediately with water for a minimum of 15 minutes and get prompt
medical attention. If acid is swallowed, call a physician immediately.
AIR FILTER
When to service
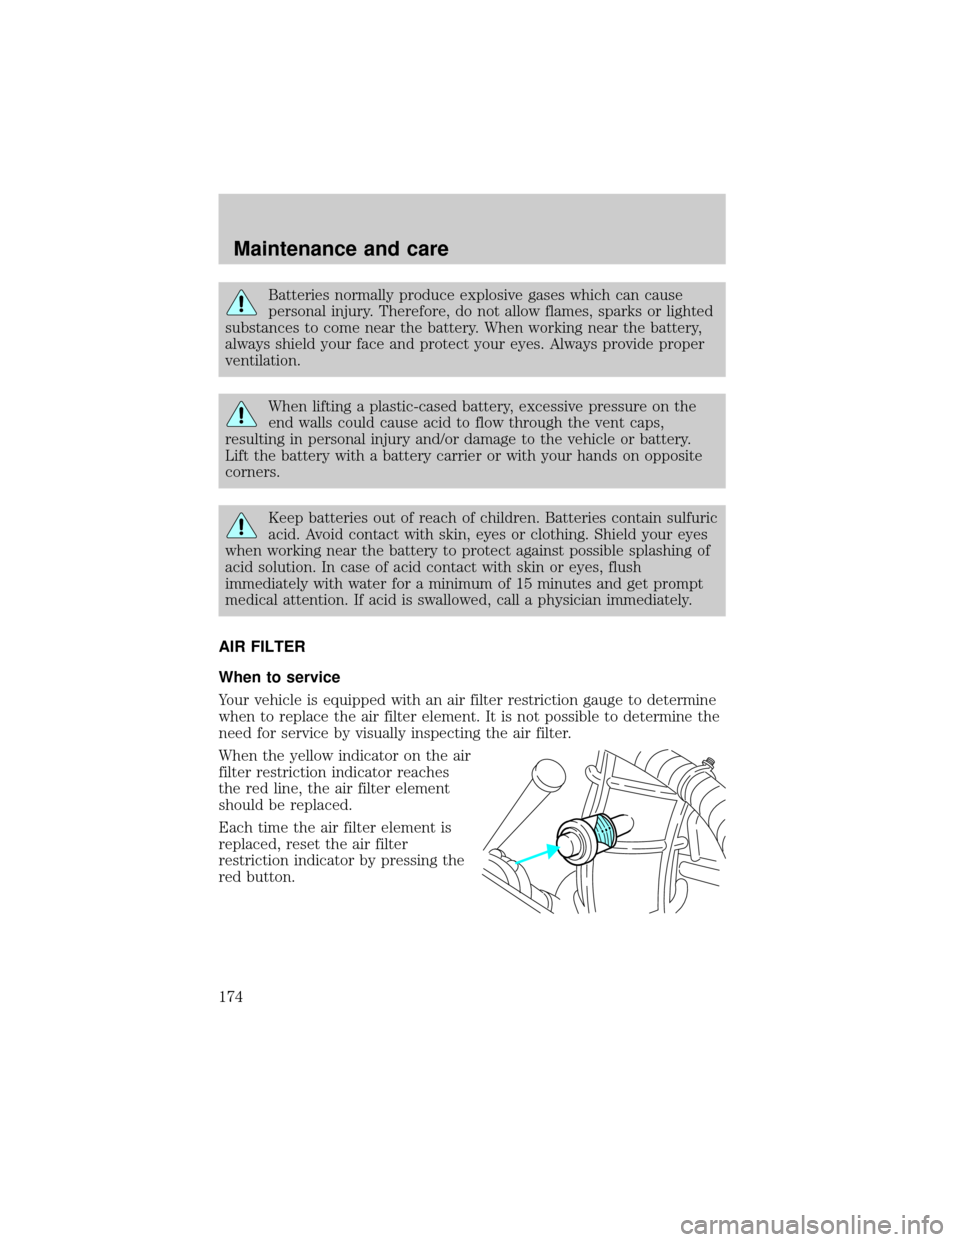
Your vehicle is equipped with an air filter restriction gauge to determine
when to replace the air filter element. It is not possible to determine the
need for service by visually inspecting the air filter.
When the yellow indicator on the air
filter restriction indicator reaches
the red line, the air filter element
should be replaced.
Each time the air filter element is
replaced, reset the air filter
restriction indicator by pressing the
red button.
Maintenance and care
174
Page 180 of 240

Tires are one of the weaker weight carrying components of the
vehicle. Do not overload the vehicle beyond safe load carrying
capacity.
Avoid hammering rim with steel hammers.
Never run the engine with one wheel off the ground.
Failure to retighten wheel lug nuts as required could allow the
wheel to come off while the vehicle is in motion, possibly causing
loss of vehicle control and collision. Loose wheel studs may also cause
shimmy and vibration.
Use of aftermarket wheel assemblies is not recommended; they
may be incompatible with your vehicle and may result in
equipment failure and possible injury. Replacement with used wheels is
not advised; they may have been treated harshly or have high mileage
and could fail without warning.
A wheel or tire of the wrong size or type may adversely affect
such things as load carrying capacity, wheel and bearing life,
brake cooling, speedometer/odometer calibration, stopping ability,
headlight aim, bumper height, vehicle ground clearance and tire or tire
chain clearance to the body and chassis.
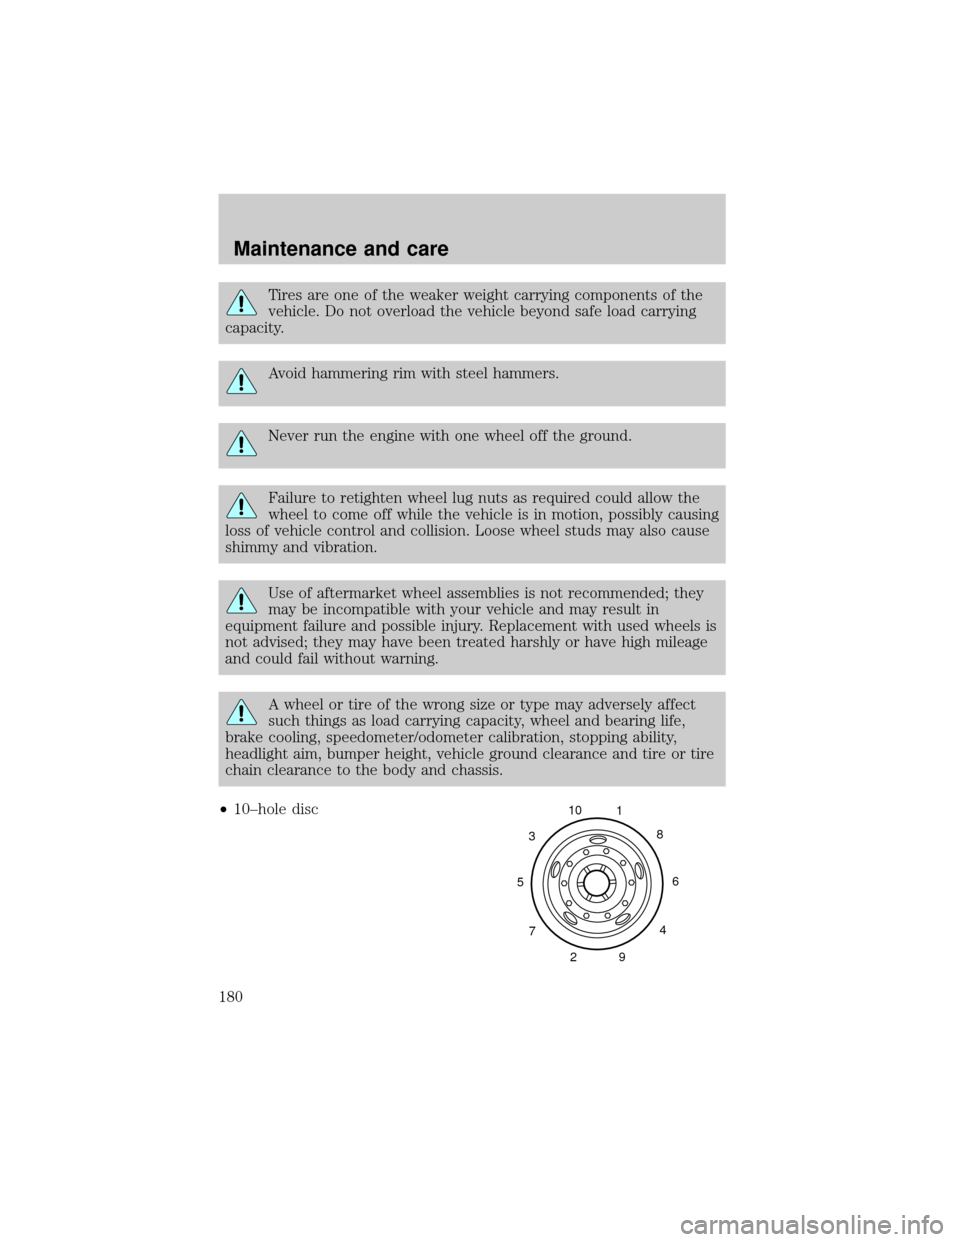
²10±hole disc
5310
1
8
6
4
9 2 7
Maintenance and care
180
Page 190 of 240

The amount of Empty Reserve varies and should not be relied
upon to increase driving range. When refueling your vehicle after
the fuel gauge indicates empty, you might not be able to refuel
the full amount of the advertised capacity of the fuel tank due to
the empty reserve still present in the tank.
Filling the tank
For consistent results:
²Use the same fill rate setting (low Ð medium Ð high) each time
during filling.
²Allow three automatic click-offs when filling.
²Always use fuel of a known quality, preferably a national brand.
²Have the vehicle loading and distribution the same every time.
²When refueling a vehicle equipped with dual fuel tanks, if the two
tanks are not filled equally, the fuel gauge reading may fluctuate
slightly until the fuel level between the two tanks balance out and
become equal.
Your results will be most accurate if your filling method is consistent.
Calculating fuel economy
1. Fill the fuel tank(s) completely and record the initial odometer reading
(in kilometers or miles).
2. Each time you fill the tank(s), record the amount of fuel added (in
liters or gallons).
3. After at least three to five tank fill-ups, fill the fuel tank(s) and record
the current odometer reading.
4. Subtract your initial odometer reading from the current odometer reading.
5. Follow one of the simple calculations in order to determine fuel economy:
Multiply liters used by 100, then divide by total kilometers traveled.
Divide total miles traveled by total gallons used.
Maintenance and care
190
Page 195 of 240

Using the right bulbs
Function Number of
bulbsTrade number
Headlamps 2 4652
Park/turn signal 2 1157
Sidemarker/rear marker lamp 5 red 12
(amber)194
Tail/stop lamp 4 2057
Backup 4 1156
Foglamp 2 899
Running board/courtesy lamp 6 194
License plate lamp 2 194
Cabmarker 5 168
Exterior visor lamp (if equipped) 4 194
Rear fender clearance 4
(a)
Rear identification 3 194
Dome lamp 1 105
To replace all instrument panel lights - see your dealer
(a)Replace entire lamp assembly; bulb is not serviceable.
AIMING THE HEADLAMPS
The headlamps on your vehicle are properly aimed at the assembly plant.
If your vehicle has been in an accident the alignment of your headlamps
should be checked by a qualified service technician.
MINOR TROUBLESHOOTING GUIDE
Diesel engine
For troubleshooting information, refer to the diesel engine operator's
manual.
If engine won't crank
For troubleshooting information, refer to the engine operator's manual.
If engine cranks but won't start
For troubleshooting information, refer to the engine operator's manual.
Maintenance and care
195
Page 196 of 240

If engine runs hot
For troubleshooting information, refer to the engine operator's manual.
If fuses burn out
Burned-out or ªblown-outº fuses or circuit breaker tripping (if equipped)
usually indicate an electrical short circuit, although a fuse may
occasionally fail from vibration. Insert a second fuse or reset the breaker
(if equipped). If this fuse immediately burns out or the breaker (if
equipped) trips and you cannot locate the fuse, return your vehicle to
your dealer for a circuit check.
If lamp bulbs burn out
Repeated lamp burn-out usually indicates a loose connection, either at
the lamp socket, the system ground or a malfunctioning voltage
regulator. If examination does not indicate the cause of the trouble,
return your vehicle to your dealer for inspection.
If headlamps flash on and off
If headlamps flash on and off at regular intervals, the system circuit
breaker (if equipped) is operating, indicating a short circuit or overload.
Take your vehicle to your dealer for a circuit check.
CLEANING AND CARING FOR YOUR VEHICLE
Refer to the Customer Assistance chapter for a list of Ford-approved
cleaners, polishes and waxes.
Washing your vehicle
Wash your vehicle regularly with
cold or lukewarm water. Never use
strong detergents or soap. If your
vehicle is particularly dirty, use a
quality car wash detergent. Always
use a clean sponge, washing glove
or similar device and plenty of water
for best results. To avoid spots,
avoid washing when the hood is still
warm, immediately after or during
exposure to strong sunlight.
Maintenance and care
196