Page 67 of 224

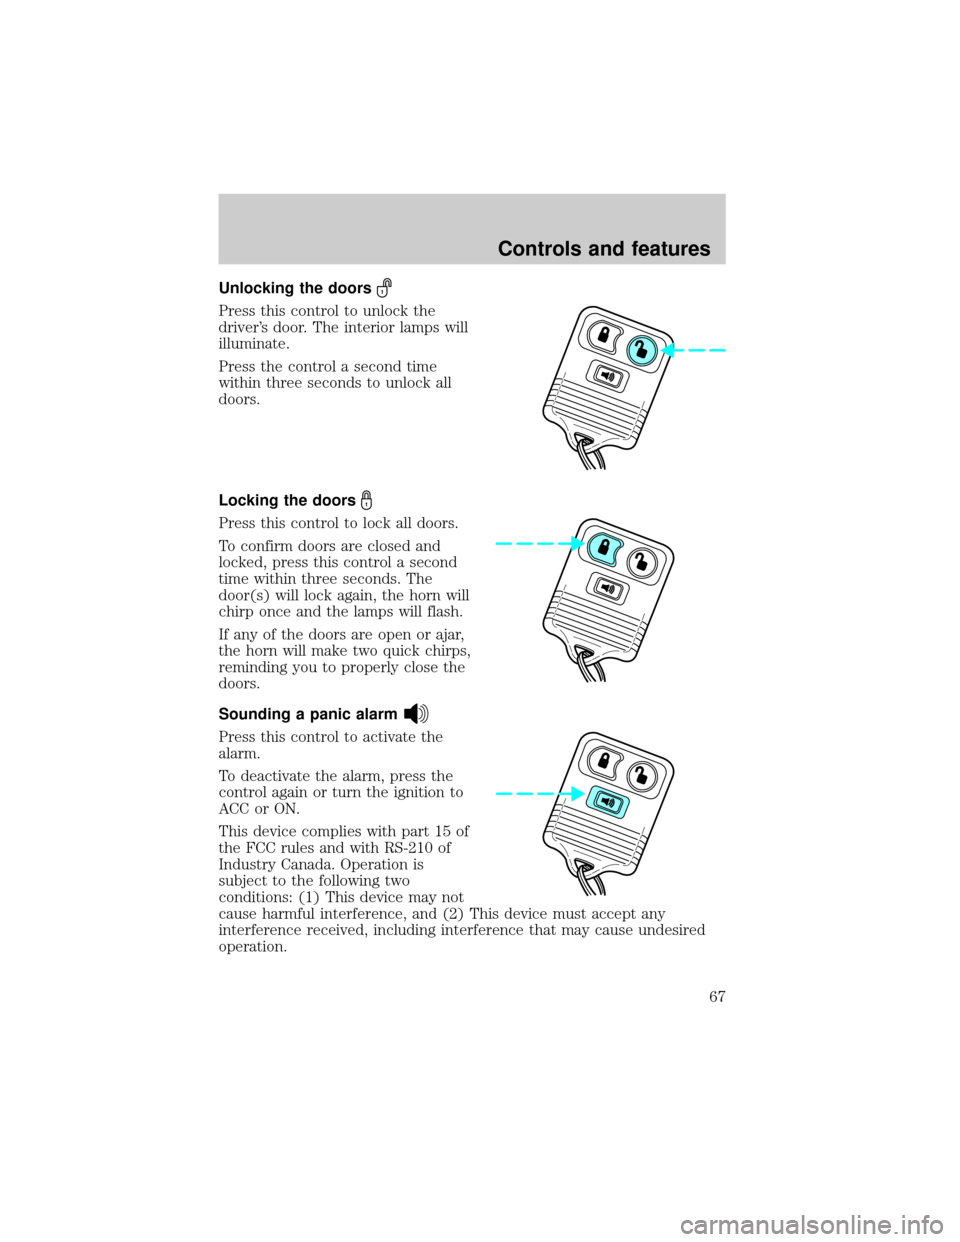
Unlocking the doors
Press this control to unlock the
driver's door. The interior lamps will
illuminate.
Press the control a second time
within three seconds to unlock all
doors.
Locking the doors
Press this control to lock all doors.
To confirm doors are closed and
locked, press this control a second
time within three seconds. The
door(s) will lock again, the horn will
chirp once and the lamps will flash.
If any of the doors are open or ajar,
the horn will make two quick chirps,
reminding you to properly close the
doors.
Sounding a panic alarm
Press this control to activate the
alarm.
To deactivate the alarm, press the
control again or turn the ignition to
ACC or ON.
This device complies with part 15 of
the FCC rules and with RS-210 of
Industry Canada. Operation is
subject to the following two
conditions: (1) This device may not
cause harmful interference, and (2) This device must accept any
interference received, including interference that may cause undesired
operation.
Controls and features
67
Page 70 of 224

Reprogramming transmitters
Your dealer will be able to reprogram remote transmitter(s) to your
vehicle. Installation of a new battery to your remote transmitter doesnot
cause the remote transmitter to become deprogrammed.
Autolock (if equipped)
This feature automatically locks all doors when:
²all vehicle doors are closed
²the ignition is in the ON position
²you shift into or through R (Reverse)
²the brake pedal is released
Relock
The autolock feature repeats when:
²any door is opened and closed
²the ignition switch is in the ON position, and
²the brake pedal is released
Deactivating/activating the autolock feature
Before following the procedure, make sure that the ignition is OFF and
all vehicle doors are closed.
You must complete steps 1-7 within 30 seconds or the procedure will
have to be repeated. If the procedure needs to be repeated, you must
wait 30 seconds.
1. Turn the ignition key to ON.
2. Press the power door unlock control three times.
3. Turn the ignition key from ON to OFF.
4. Press the power door unlock control three times.
5. Turn the ignition back to ON. The horn will chirp.
6. Press the unlock control, then press the lock control. The horn will
chirp once if autolock was deactivated or twice (one short and one long
chirp) if autolock was activated.
7. Turn the ignition to OFF. The horn will chirp once to confirm the
procedure is complete.
Controls and features
70
Page 72 of 224

Your personal code does not replace the permanent code that the
dealership gave you. You can use either code to unlock your vehicle. If a
second personal code is entered, the module will erase it in favor of the
new code.
If you wish to erase your personal code, use the following instructions:
1. Enter factory set code.
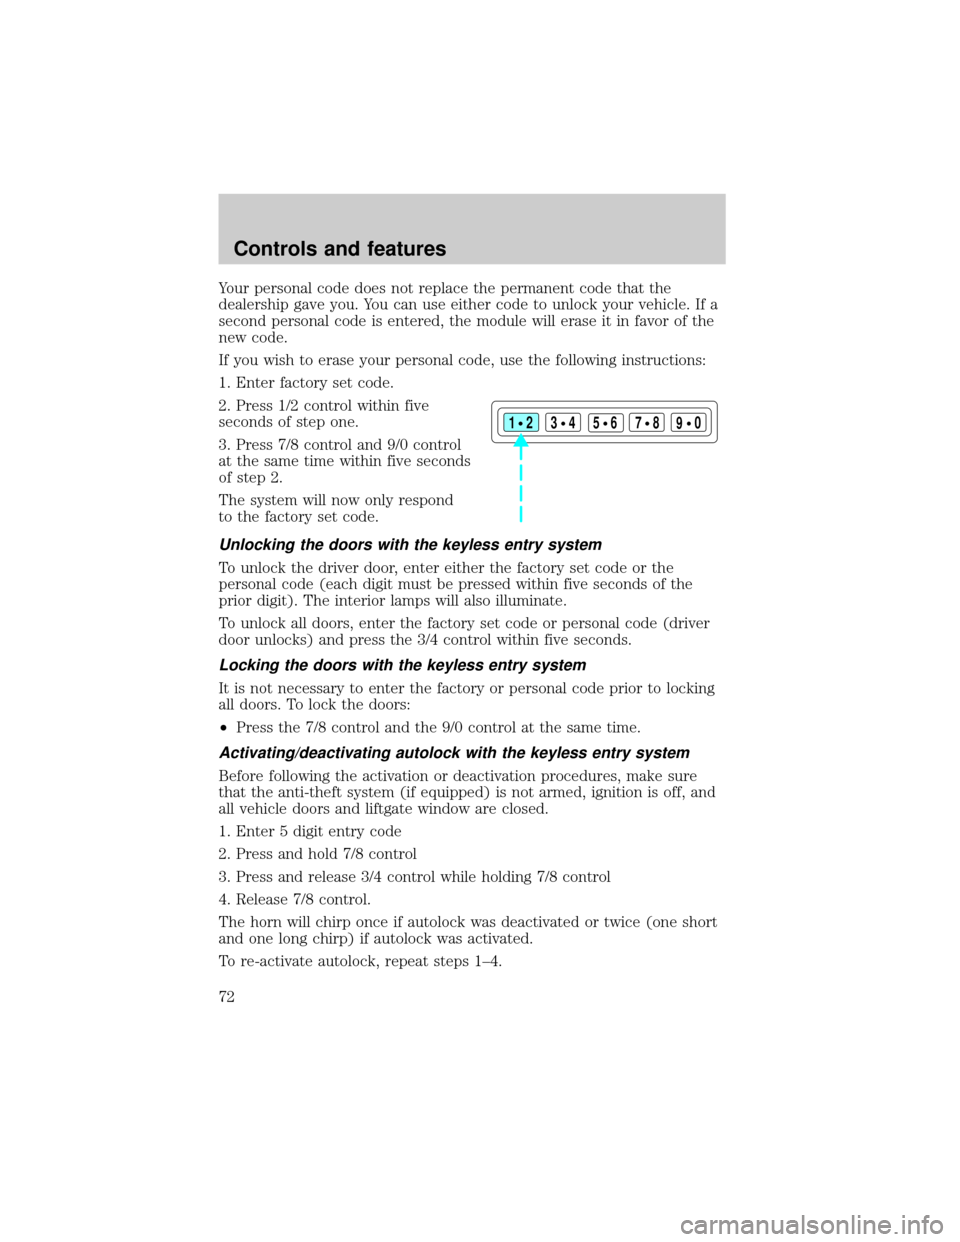
2. Press 1/2 control within five
seconds of step one.
3. Press 7/8 control and 9/0 control
at the same time within five seconds
of step 2.
The system will now only respond
to the factory set code.
Unlocking the doors with the keyless entry system
To unlock the driver door, enter either the factory set code or the
personal code (each digit must be pressed within five seconds of the
prior digit). The interior lamps will also illuminate.
To unlock all doors, enter the factory set code or personal code (driver
door unlocks) and press the 3/4 control within five seconds.
Locking the doors with the keyless entry system
It is not necessary to enter the factory or personal code prior to locking
all doors. To lock the doors:
²Press the 7/8 control and the 9/0 control at the same time.
Activating/deactivating autolock with the keyless entry system
Before following the activation or deactivation procedures, make sure
that the anti-theft system (if equipped) is not armed, ignition is off, and
all vehicle doors and liftgate window are closed.
1. Enter 5 digit entry code
2. Press and hold 7/8 control
3. Press and release 3/4 control while holding 7/8 control
4. Release 7/8 control.
The horn will chirp once if autolock was deactivated or twice (one short
and one long chirp) if autolock was activated.
To re-activate autolock, repeat steps 1±4.
123
45678
90
Controls and features
72
Page 135 of 224

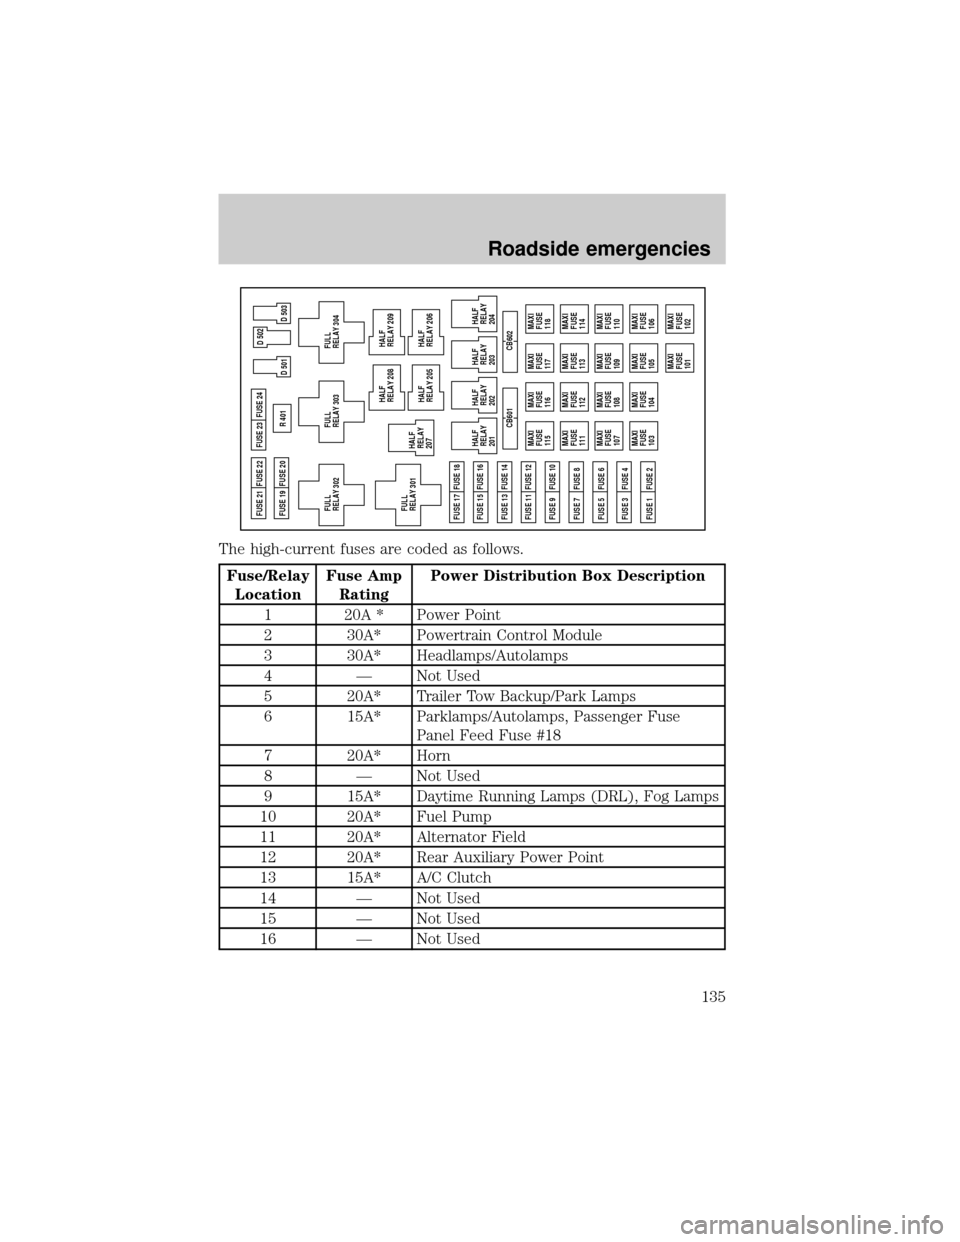
The high-current fuses are coded as follows.
Fuse/Relay
LocationFuse Amp
RatingPower Distribution Box Description
1 20A * Power Point
2 30A* Powertrain Control Module
3 30A* Headlamps/Autolamps
4 Ð Not Used
5 20A* Trailer Tow Backup/Park Lamps
6 15A* Parklamps/Autolamps, Passenger Fuse
Panel Feed Fuse #18
7 20A* Horn
8 Ð Not Used
9 15A* Daytime Running Lamps (DRL), Fog Lamps
10 20A* Fuel Pump
11 20A* Alternator Field
12 20A* Rear Auxiliary Power Point
13 15A* A/C Clutch
14 Ð Not Used
15 Ð Not Used
16 Ð Not Used
MAXI
FUSE
115MAXI
FUSE
116MAXI
FUSE
117
MAXI
FUSE
118
MAXI
FUSE
111MAXI
FUSE
112MAXI
FUSE
113
MAXI
FUSE
114
MAXI
FUSE
107MAXI
FUSE
108MAXI
FUSE
109
MAXI
FUSE
110
MAXI
FUSE
103MAXI
FUSE
104MAXI
FUSE
105
MAXI
FUSE
106
MAXI
FUSE
101MAXI
FUSE
102 CB601 CB602 FUSE 17 FUSE 18FUSE 21 FUSE 22
FUSE 19 FUSE 20FUSE 23
FULL
RELAY 302R 401
D 501 FUSE 24
FUSE 15 FUSE 16
FUSE 13 FUSE 14
FUSE 11 FUSE 12
FUSE 9 FUSE 10
FUSE 7 FUSE 8
FUSE 5 FUSE 6
FUSE 3 FUSE 4
FUSE 1 FUSE 2
D 503 D 502
FULL
RELAY 301HALF
RELAY
207
FULL
RELAY 303
FULL
RELAY 304
HALF
RELAY
201
HALF
RELAY
202HALF
RELAY 208
HALF
RELAY 209
HALF
RELAY 205
HALF
RELAY 206
HALF
RELAY
203
HALF
RELAY
204
Roadside emergencies
135
Page 137 of 224

Fuse/Relay
LocationFuse Amp
RatingPower Distribution Box Description
202 Ð Front Wiper Run/Park Relay
203 Ð Trailer Tow Backup Lamp Relay
204 Ð A/C Clutch Relay
205 Ð Horn Relay
206 Ð Fog Lamp Relay
207 Ð Front Washer Pump Relay
208 Ð Not Used
209 Ð Front Wiper Hi/Lo Relay
301 Ð Fuel Pump Relay
302 Ð Trailer Tow Battery Charge Relay
303 Ð Not Used
304 Ð Powertrain Control Module Relay
305 Ð Not Used
306 Ð Not Used
401 Ð Not Used
501 Ð Powertrain Control Module Diode
502 Ð A/C Compressor Diode
503 Ð Not Used
601 30A CB Power Windows, Moonroof
602 Ð Not Used
*Mini fuses **Maxi fuses
CHANGING THE TIRES
If you get a flat tire while driving, do not apply the brake heavily.
Instead, gradually decrease your speed. Hold the steering wheel firmly
and slowly move to a safe place on the side of the road.
Spare tire information
Your vehicle is equipped with a spare tire that may be used as a spare or
a regular tire. The spare tire wheel may not match the road wheel, and is
not equipped with wheel trim. The wheel trim from the wheel/tire may
be used on the spare if the wheels match.
Roadside emergencies
137