2001 FORD EXPLORER SPORT TRAC brake
[x] Cancel search: brakePage 220 of 264

Readiness for Inspection/Maintenance (I/M) testing
In some localities, it may be a legal requirement to pass an I/M test of
the on-board diagnostics system. If your ªCheck Engine/Service Engine
Soonº light is on, refer to the description in theWarning lights and
chimessection of theInstrumentationchapter. Your vehicle may not
pass the I/M test with the ªCheck Engine/Service Engine Soonº light on.
If the vehicle's powertrain system or its battery has just been serviced,
the on-board diagnostics system is reset to a ªnot ready for I/M testº
condition. To ready the on-board diagnostics system for I/M testing, a
minimum of 30 minutes of city and highway driving is necessary as
described below:
²First, at least 10 minutes of driving on an expressway or highway.
²Next, at least 20 minutes driving in stop-and-go, city-type traffic with
at least four idle periods.
Allow the vehicle to sit for at least eight hours without starting the
engine. Then, start the engine and complete the above driving cycle. The
engine must warm up to its normal operating temperature. Once started,
do not turn off the engine until the above driving cycle is complete.
BULBS
Replacing exterior bulbs
Check the operation of the following lamps frequently:
²Headlamps
²Foglamps
²High-mount brakelamp
²Brakelamps
²Turn signals
²License plate lamp
²Tail lamps
²Back-up lamps
Do not remove lamp bulbs unless they can be replaced immediately with
new ones. If a bulb is removed for an extended period of time,
contaminants may enter the lamp housings and affect lamp performance.
Maintenance and care
220
Page 223 of 264

Replacing tail lamp/turn/backup lamp bulbs
The tail lamp/turn/backup lamp bulbs are located in the same portion of
the tail lamp assembly, one just below the other. Follow the same steps
to replace either bulb:
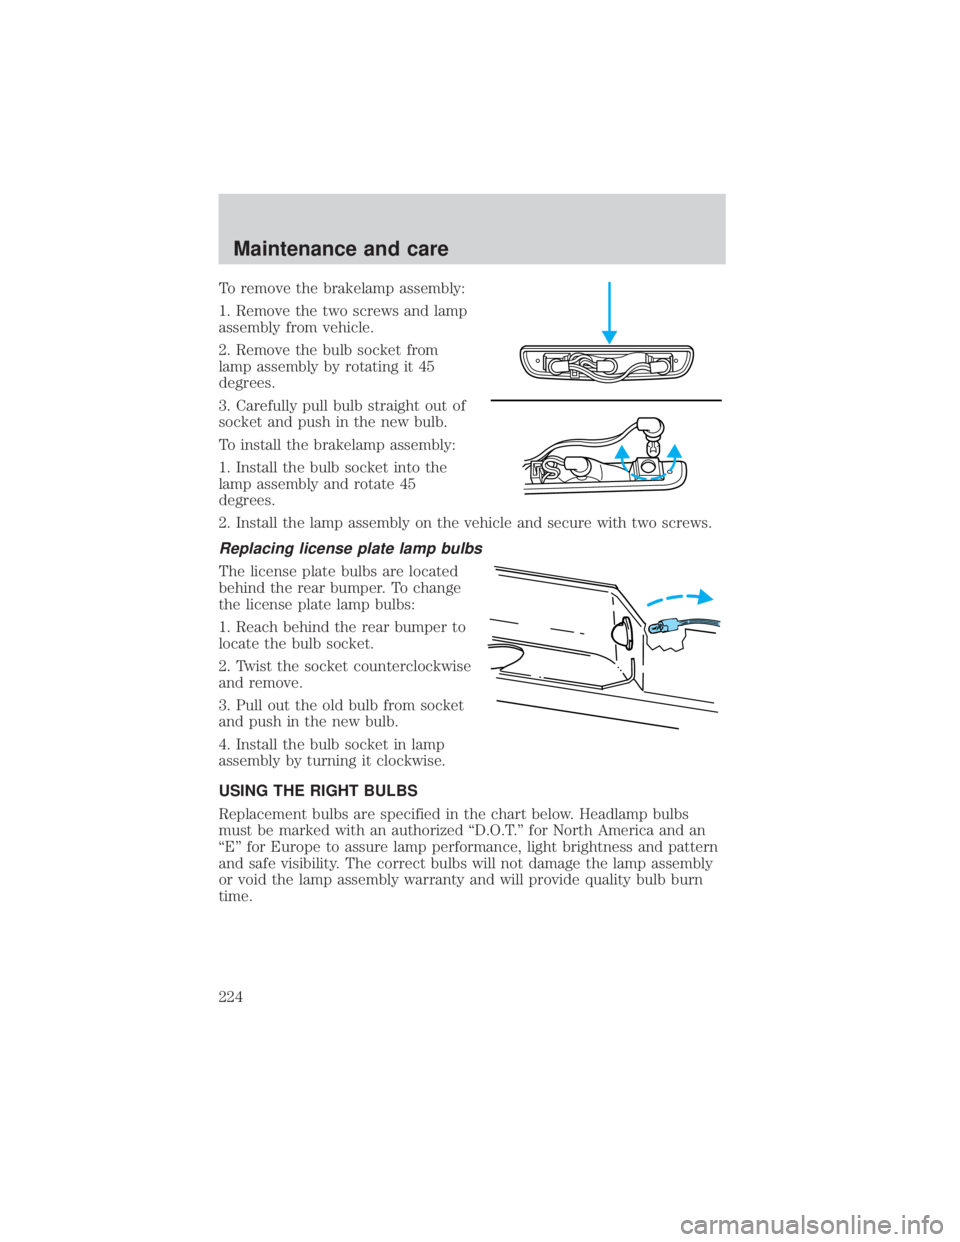
1. Lower the tailgate to expose the
lamp assembly.
2. Remove the three rubber plugs,
screws and the lamp assembly from
vehicle.
3. Rotate bulb socket
counterclockwise and remove from
lamp assembly.
4. Carefully pull the bulb straight
out of the socket and push in the
new bulb.
5. Install the bulb socket in lamp
assembly by turning clockwise.
6. Install the lamp assembly and
secure with three screws and rubber
plugs.
Replacing foglamp bulbs
1. Remove the bulb socket from the
foglamp by turning
counterclockwise.
2. Disconnect the electrical
connector from the foglamp bulb.
3. Connect the electrical connector to the new foglamp bulb.
4. Install the bulb socket in the foglamp turning clockwise.
Replacing high-mount brakelamp and cargo lamp bulbs
The replacement of the high-mount brakelamp bulb and cargo lamp bulb
is basically the same. This procedure covers the high-mount brakelamp
bulb.
Maintenance and care
223
Page 224 of 264

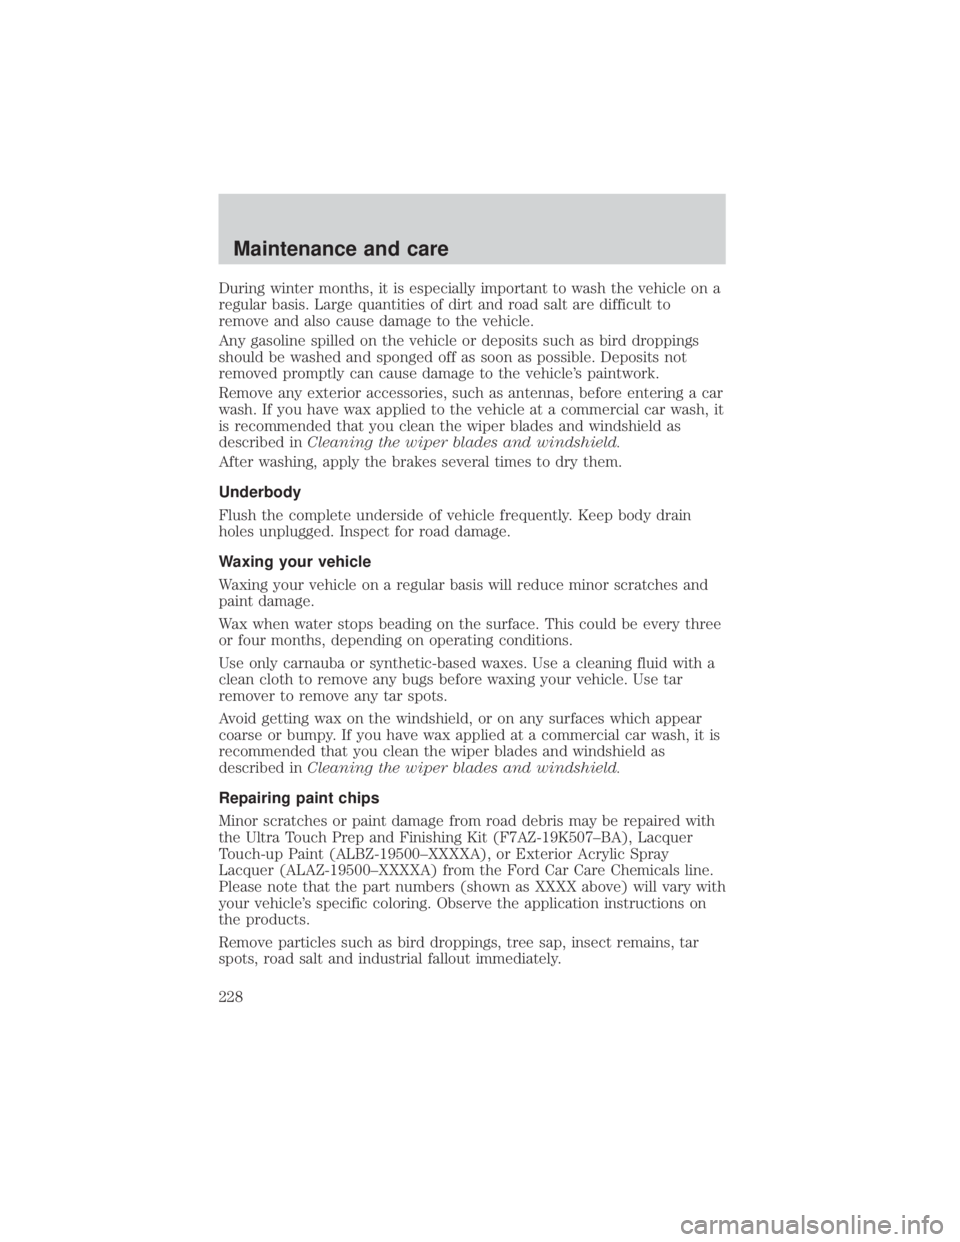
To remove the brakelamp assembly:
1. Remove the two screws and lamp
assembly from vehicle.
2. Remove the bulb socket from
lamp assembly by rotating it 45
degrees.
3. Carefully pull bulb straight out of
socket and push in the new bulb.
To install the brakelamp assembly:
1. Install the bulb socket into the
lamp assembly and rotate 45
degrees.
2. Install the lamp assembly on the vehicle and secure with two screws.
Replacing license plate lamp bulbs
The license plate bulbs are located
behind the rear bumper. To change
the license plate lamp bulbs:
1. Reach behind the rear bumper to
locate the bulb socket.
2. Twist the socket counterclockwise
and remove.
3. Pull out the old bulb from socket
and push in the new bulb.
4. Install the bulb socket in lamp
assembly by turning it clockwise.
USING THE RIGHT BULBS
Replacement bulbs are specified in the chart below. Headlamp bulbs
must be marked with an authorized ªD.O.T.º for North America and an
ªEº for Europe to assure lamp performance, light brightness and pattern
and safe visibility. The correct bulbs will not damage the lamp assembly
or void the lamp assembly warranty and will provide quality bulb burn
time.
Maintenance and care
224
Page 225 of 264

Function Number of bulbs Trade number
Headlamps 2 9007
Park/turn/side marker
lamps2
3157 AK (amber)
Rear stop/tail /turn lamps 2 3157K
Backup lamp 2 3156K
Hi-mount brake lamp 1 922
Fog lamp 2 9145
Rear license plate lamps 2 194
Overhead map lamp 2 PC579
(XU5A-13466-AA)
Map lamps 2 168 (T10)
Dome lamp 1 906
Cargo lamp 2 906
Front door courtesy lamp
(if equipped)1
168
Ashtray lamp 1 161
All replacement bulbs are clear in color except where noted.
To replace all instrument panel lights - see your dealer.
REPLACING THE INTERIOR BULBS
Check the operation of the following interior bulbs frequently:
²interior overhead lamp
²map lamp
For bulb replacement, see a dealer or qualified technician.
AIMING THE HEADLAMPS
The headlamps on your vehicle are properly aimed at the assembly plant.
If your vehicle has been in an accident the alignment of your headlamps
should be checked by a qualified service technician.
Maintenance and care
225
Page 228 of 264

During winter months, it is especially important to wash the vehicle on a
regular basis. Large quantities of dirt and road salt are difficult to
remove and also cause damage to the vehicle.
Any gasoline spilled on the vehicle or deposits such as bird droppings
should be washed and sponged off as soon as possible. Deposits not
removed promptly can cause damage to the vehicle's paintwork.
Remove any exterior accessories, such as antennas, before entering a car
wash. If you have wax applied to the vehicle at a commercial car wash, it
is recommended that you clean the wiper blades and windshield as
described inCleaning the wiper blades and windshield.
After washing, apply the brakes several times to dry them.
Underbody
Flush the complete underside of vehicle frequently. Keep body drain
holes unplugged. Inspect for road damage.
Waxing your vehicle
Waxing your vehicle on a regular basis will reduce minor scratches and
paint damage.
Wax when water stops beading on the surface. This could be every three
or four months, depending on operating conditions.
Use only carnauba or synthetic-based waxes. Use a cleaning fluid with a
clean cloth to remove any bugs before waxing your vehicle. Use tar
remover to remove any tar spots.
Avoid getting wax on the windshield, or on any surfaces which appear
coarse or bumpy. If you have wax applied at a commercial car wash, it is
recommended that you clean the wiper blades and windshield as
described inCleaning the wiper blades and windshield.
Repairing paint chips
Minor scratches or paint damage from road debris may be repaired with
the Ultra Touch Prep and Finishing Kit (F7AZ-19K507±BA), Lacquer
Touch-up Paint (ALBZ-19500±XXXXA), or Exterior Acrylic Spray
Lacquer (ALAZ-19500±XXXXA) from the Ford Car Care Chemicals line.
Please note that the part numbers (shown as XXXX above) will vary with
your vehicle's specific coloring. Observe the application instructions on
the products.
Remove particles such as bird droppings, tree sap, insect remains, tar
spots, road salt and industrial fallout immediately.
Maintenance and care
228
Page 233 of 264

MOTORCRAFT PART NUMBERS
Component 4.0L SOHC V6 engine
Air filter element FA-1658
Fuel filter FG-986B
Battery BXT-65-650
Oil filter FL-820S
PCV valve EV-243
Spark plugs* AGSF-22PP
* Refer to Vehicle Emissions Control Information (VECI) decal for spark
plug gap information.
REFILL CAPACITIES
Fluid Ford Part
NameApplication
Capacity
Brake and
clutch fluidHigh
Performance
DOT 3 Motor
Vehicle Brake
FluidAll Fill to line on
reservoir
Engine oil
(including filter
change)Motorcraft SAE
5W-30 Super
Premium Motor
OilAll 4.7L (5.0
quarts)
Fuel tank N/A All 77.6L (20.5
gallons)
Power steering
fluidMotorcraft
MERCONtAT FAll Fill to line on
reservoir
Transmission
fluid
1Motorcraft
MERCONtV
AT F5R55E
Automatic (4x2)9.5L (10.0
quarts)2
5R55E
Automatic (4x4)9.8L (10.3
quarts)2
Transfer case Motorcraft
MERCONtAT F4WD 1.2L (1.3
quarts)3
Capacities and specifications
233
Page 235 of 264

4Add the coolant type originally equipped in your vehicle.
5Fill to 6 mm to 14 mm (1/4 inch to 9/16 inch) below bottom of filler
plug hole.
6For vehicles equipped with a conventional rear axle, refer to your
scheduled maintenance guide for axle fluid change intervals.
7Vehicles equipped with Traction-Lok axle require synthetic rear axle
lubricant. Rear axles containing synthetic lubricant are lubricated for life.
These lubricants are not to be checked or changed unless a leak is
suspected or service is required. The axle lubricant should be changed
any time the axle has been submerged in water.
Add 118 ml (4 oz.) of Additive Friction Modifier C8AZ-19B546-A or
equivalent meeting Ford specification EST-M2C118±A for complete refill
of Traction-Lok axles.
LUBRICANT SPECIFICATIONS
ItemFord Part
Name or
equivalentFord Part
NumberFord
Specification
Body hinges,
latches, door
striker plates
and rotors, seat
tracks, fuel filler
door hinge and
spring, hood
latch, auxiliary
latch, seat
tracksMulti-Purpose
GreaseD0AZ-19584-AA
or
F5AZ-19G209-AAESB-M1C93-B or
ESR-M1C159-A
Hydraulic clutch
fluid and brake
fluidHigh
Perfromance
DOT 3 Motor
Vehicle Brake
FluidC6AZ-19542-ABESA-M6C25-A
and DOT 3
Driveshaft, slip
spline, universal
jointsPremium Long
Life GreaseXG-1-C or
XG-1-T or
XG-1-KESA-M1C75-B
Capacities and specifications
235
Page 254 of 264

A
Air bag supplemental restraint
system ........................................112
and child safety seats ............114
description ..............................112
disposal ....................................117
driver air bag ..........................115
indicator light ...................10, 117
operation .................................115
passenger air bag ...................115
Air cleaner filter ...............190, 233
Air conditioning ..........................20
rear seat controls .....................23
Ambulance packages ....................3
Antifreeze (see Engine
coolant) .....................................191
Anti-lock brake system (see
Brakes) ..............................132±133
Anti-theft system
warning light .............................11
Audio system (see Radio) .........27
Automatic transmission ............136
driving an automatic
overdrive .................................137
fluid, adding ............................196
fluid, checking ........................196
fluid, refill capacities ..............233
fluid, specification ..................238
Auxiliary power point .................73
Axle
lubricant specifications ..235, 238
refill capacities ........................233
traction lok ..............................135
B
Battery .......................................200acid, treating emergencies .....200
charging system
warning light .............................11
jumping a disabled battery ....174
maintenance-free ....................200
replacement, specifications ...233
servicing ..................................200
voltage gauge ............................16
Belt minder ...............................108
Brakes ........................................132
anti-lock ...........................132±133
anti-lock brake system
(ABS) warning light .........10, 133
brake warning light ..................10
fluid, checking and adding ....188
fluid, refill capacities ..............233
fluid, specifications .........235, 238
lubricant specifications ..235, 238
parking ....................................133
shift interlock ..........................136
Break-in period .............................3
C
Capacities for refilling fluids ....233
Cargo cage ...................................76
Cassette tape player ...................37
Certification Label ....................240
Child safety restraints ..............118
child safety belts ....................118
Child safety seats ......................119
attaching with tether straps ..124
in front seat ............................121
in rear seat ......................121, 123
Cleaning your vehicle ...............227
engine compartment ..............229
exterior ............................228, 232
exterior lamps .........................230
Index
254