Page 94 of 280

Large metallic objects, electronic
devices on the key chain that can be
used to purchase gasoline or similar
items, or a second key on the same
key ring as thecoded keymay
cause vehicle starting issues. If
present, you need to keep these
objects from touching thecoded
keywhile starting the engine. These
objects and devices cannot damage
thecoded key,but can cause a
momentary NOÐSTART condition if
they are too close to the key during
engine start. If a problem occurs,
turn ignition OFF and restart the
engine with all other objects on the
key ring held away from the ignition key. Check to make sure thecoded
keyis an approved Fordcoded key.
If your keys are lost or stolen you
will need to do the following:
²Use your spare key to start the
vehicle, or
²Have your vehicle towed to a
dealership or locksmith. The key
codes will need to be erased from
your vehicle and new key codes will need to be re-coded.
Replacing coded keys can be very costly and you may want to store an
extra programmed key away from the vehicle in a safe place to prevent
an unforeseen inconvenience.
The correctcoded keymust be used for your vehicle. The use of the
wrong type ofcoded keymay lead to a ªNO-STARTº condition.
If an unprogrammed key is used in the ignition it will cause a
ªNO STARTº condition.
Programming spare keys
A maximum of eight keys can be coded to your vehicle. Only
SecuriLockykeys can be used. To program acoded keyyourself, you
will need two previously programmedcoded keys(keys that already
operate your vehicle's engine) and the new unprogrammed key(s) readily
Controls and features
94
Page 103 of 280
4. Flip seat forward.
5. Pull the seatback release strap
toward the front seat. Make sure the
seat belt buckle heads are fully
extended towards the front of the
vehicle and are away from the
seatback.
NOTE:When the seatback release
strap is pulled use your other hand
to guide the seatback.
Seating and safety restraints
103
Page 104 of 280
6. Rotate seatback down into load
floor position.
Make sure seat belt buckle
heads are not trapped
underneath the seatback and that
the seat belt buckle heads are
fully extended towards the front
of the vehicle. Seat belt buckle
heads may break if they are
trapped underneath the seatback
as the seatback is rotated down.
Returning the rear seats to upright position
1. Pull seatback up and into upright
position making sure seatback locks
into place. While holding the
seatback, pull the release and push
seatback backward into the desired
position.
Seating and safety restraints
104
Page 120 of 280
Do not put anything on or over the air bag module. Placing
objects on or over the air bag inflation area may cause those
objects to be propelled by the air bag into your face and torso causing
serious injury.
Do not attempt to service, repair, or modify the air bag
supplemental restraint systems or its fuses. See your Ford or
Lincoln Mercury dealer.
Modifications to the front end of the vehicle, including frame,
bumper, front end body structure and tow hooks may affect the
performance of the air bag sensors increasing the risk of injury. Do not
modify the front end of the vehicle.
Additional equipment may affect the performance of the air bag
sensors increasing the risk of injury. Please refer to the Body
Builders Layout Book for instructions about the appropriate installation
of additional equipment.
Seating and safety restraints
120
Page 132 of 280

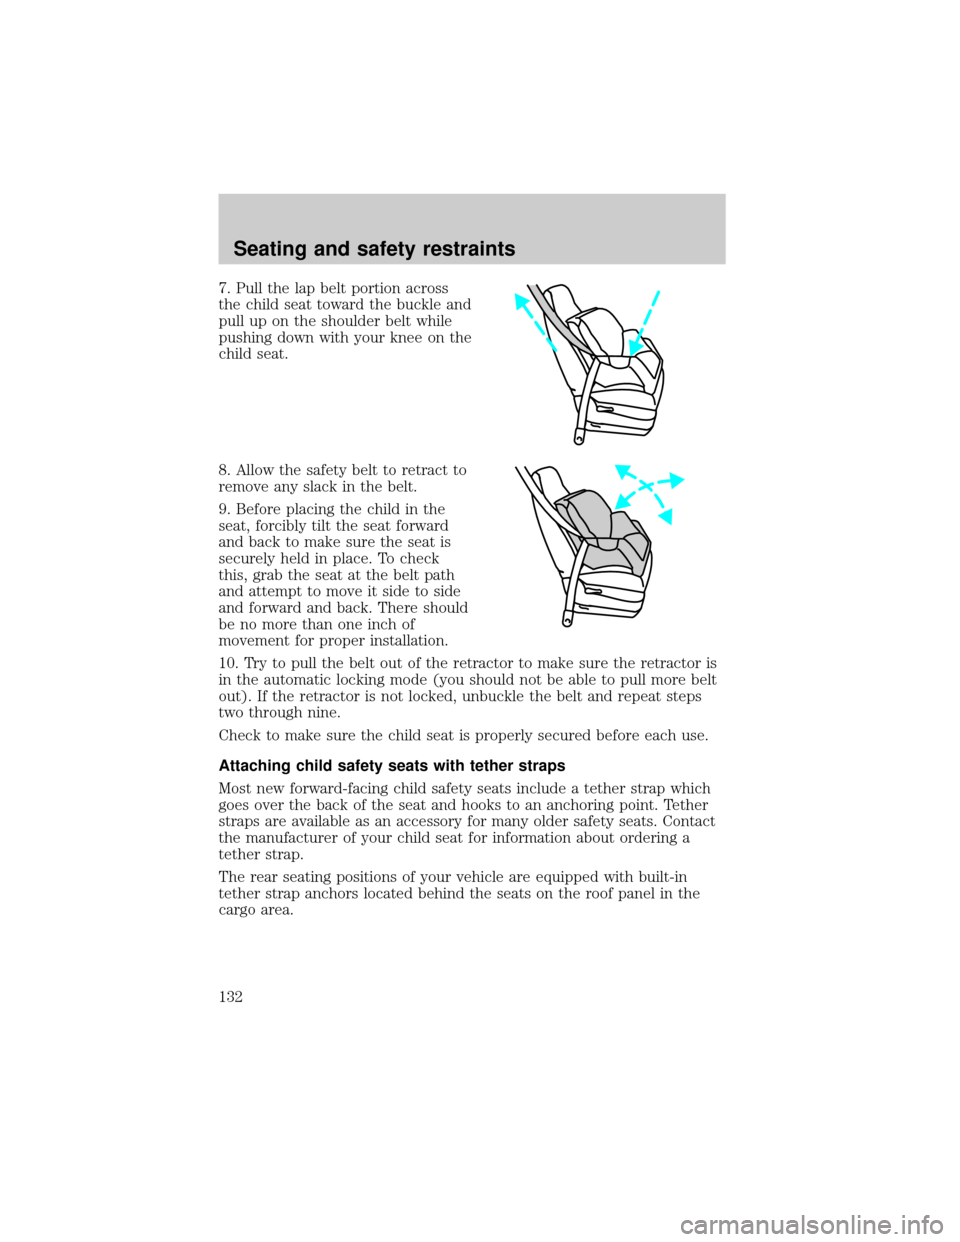
7. Pull the lap belt portion across
the child seat toward the buckle and
pull up on the shoulder belt while
pushing down with your knee on the
child seat.
8. Allow the safety belt to retract to
remove any slack in the belt.
9. Before placing the child in the
seat, forcibly tilt the seat forward
and back to make sure the seat is
securely held in place. To check
this, grab the seat at the belt path
and attempt to move it side to side
and forward and back. There should
be no more than one inch of
movement for proper installation.
10. Try to pull the belt out of the retractor to make sure the retractor is
in the automatic locking mode (you should not be able to pull more belt
out). If the retractor is not locked, unbuckle the belt and repeat steps
two through nine.
Check to make sure the child seat is properly secured before each use.
Attaching child safety seats with tether straps
Most new forward-facing child safety seats include a tether strap which
goes over the back of the seat and hooks to an anchoring point. Tether
straps are available as an accessory for many older safety seats. Contact
the manufacturer of your child seat for information about ordering a
tether strap.
The rear seating positions of your vehicle are equipped with built-in
tether strap anchors located behind the seats on the roof panel in the
cargo area.
Seating and safety restraints
132
Page 155 of 280

Allow more stopping distance and drive slower than usual. Consider
using one of the lower gears.
VEHICLE LOADING
Before loading a vehicle, familiarize yourself with the following terms:
²Base Curb Weight:Weight of the vehicle including any standard
equipment, fluids, lubricants, etc. It does not include occupants or
aftermarket equipment.
²Payload:Combined maximum allowable weight of cargo, occupants
and optional equipment. The payload equals the gross vehicle weight
rating minus base curb weight.
²GVW (Gross Vehicle Weight):Base curb weight plus payload
weight. The GVW is not a limit or a specification.
²GVWR (Gross Vehicle Weight Rating):Maximum permissable total
weight of the base vehicle, occupants, optional equipment and cargo.
The GVWR is specific to each vehicle and is listed on the Safety
Certification Label on the driver's door pillar.
²GAWR (Gross Axle Weight Rating):Carrying capacity for each axle
system. The GAWR is specific to each vehicle and is listed on the
Safety Certification Label on the driver's door pillar.
²GCW (Gross Combined Weight):The combined weight of the
towing vehicle (including occupants and cargo) and the loaded trailer.
²GCWR (Gross Combined Weight Rating):Maximum permissable
combined weight of towing vehicle (including occupants and cargo)
and the loaded trailer
²Maximum Trailer Weight Rating:Maximum weight of a trailer the
vehicle is permitted to tow. The maximum trailer weight rating is
determined by subtracting the vehicle curb weight for each
engine/transmission combination, any required option weight for trailer
towing and the weight of the driver from the GCWR for the towing
vehicle.
²Maximum Trailer Weight:Maximum weight of a trailer the loaded
vehicle (including occupants and cargo) is permitted to tow. It is
determined by subtracting the weight of the loaded trailer towing
vehicle from the GCWR for the towing vehicle.
²Trailer Weight Range:Specified weight range that the trailer must
fall within that ranges from zero to the maximum trailer weight rating.
Driving
155
Page 157 of 280

Your vehicle has the capability to haul more cargo and people than most
passenger cars. Depending upon the type and placement of the load,
hauling cargo and people may raise the center of gravity of the vehicle.
Calculating the load your vehicle can carry/tow
1. Use the appropriate maximum gross combined weight rating (GCWR)
chart to find the maximum GCWR for your type engine and rear axle
ratio.
2. Weigh your vehicle as you customarily operate the vehicle without
cargo. To obtain correct weights, try taking your vehicle to a shipping
company or an inspection station for trucks.
3. Subtract your loaded vehicle weight from the maximum GCWR on the
following charts. This is the maximum trailer weight your vehicle can tow
and must fall below the maximum shown under maximum trailer weight
on the chart.
DRIVING THROUGH WATER
Do not drive quickly through standing water, especially if the depth is
unknown. Traction or brake capability may be limited and if the ignition
system gets wet, your engine may stall. Water may also enter your
engine's air intake and severely damage your engine.
If driving through deep or standing water is unavoidable, proceed very
slowly. Never drive through water that is higher than the bottom of the
hubs.
Once through the water, always try the brakes. Wet brakes do not stop
the vehicle as effectively as dry brakes. Drying can be improved by
moving your vehicle slowly while applying light pressure on the brake
pedal.
Driving through deep water where the transaxle is submerged
may allow water into the transaxle and cause internal damage.
TRAILER TOWING
Trailer towing with your vehicle may require the use of a trailer tow
option package.
Trailer towing puts additional loads on your vehicle's engine, transaxle,
axle, brakes, tires, and suspension. For your safety and to maximize
vehicle performance, be sure to use the proper equipment while towing.
Driving
157
Page 158 of 280

Follow these guidelines to ensure safe towing procedure:
²Stay within your vehicle's load limits.
²Thoroughly prepare your vehicle for towing. Refer toPreparing to
towin this chapter.
²Use extra caution when driving while trailer towing. Refer toDriving
while you towin this chapter.
²Service your vehicle more frequently if you tow a trailer. Refer to the
severe duty schedule in the scheduled maintenance guide.
²Do not tow a trailer until your vehicle has been driven at least 800 km
(500 miles).
²Refer to the instructions included with towing accessories for the
proper installation and adjustment specifications.
Do not exceed the maximum loads listed on the Certification label. For
load specification terms found on the label, refer toVehicle loadingin
this chapter. Remember to figure in the tongue load of your loaded
vehicle when figuring the total weight.
EngineTrailer weight range (0-Maximum) - kg
(lbs.)
2.0L DOHC Zetec I4 0-454 (0-1 000)
3.0L DOHC Duratec V-6 0-907 (0-2 000)
3.0L DOHC Duratec V-6
(w/trailer tow package)0-1 587 (0-3 500)
Do not exceed the GVWR or the GAWR specified on the
certification label.
Towing trailers beyond the maximum recommended gross trailer
weight exceeds the limit of the vehicle and could result in
engine damage, transmission damage, structural damage, loss of
control, and personal injury.
Preparing to tow
Use the proper equipment for towing a trailer, and make sure it is
properly attached to your vehicle. See your dealer or a reliable trailer
dealer if you require assistance.
Driving
158