Page 176 of 224

Fuel Filler Cap
Your fuel tank filler cap has an indexed design with a 1/8 turn on/off
feature.
When fueling your vehicle:
1. Turn the engine off.
2.
Carefully turn the filler cap counterclockwise 1/8 of a turn until it stops.
3. Pull to remove the cap from the fuel filler pipe.
4. To install the cap, align the tabs on the cap with the notches on the
filler pipe.
5. Turn the filler cap clockwise 1/8 of a turn until it stops.
If the ªService Engine Soon/Check Engineº indicator comes on and stays
on after you start the engine, the fuel filler cap may not be properly
installed. Turn off the engine, remove the fuel filler cap, align the cap
properly and reinstall it.
If you must replace the fuel filler cap, replace it with a fuel filler
cap that is designed for your vehicle. The customer warranty may
be void for any damage to the fuel tank or fuel system if the
correct genuine Ford or Motorcraft fuel filler cap is not used.
The fuel system may be under pressure. If the fuel filler cap is
venting vapor or if you hear a hissing sound, wait until it stops
before completely removing the fuel filler cap. Otherwise, fuel may
spray out and injure you or others.
If you do not use the proper fuel filler cap, excessive pressure or
vacuum in the fuel tank may damage the fuel system or cause
the fuel cap to disengage in a collision, which may result in possible
personal injury.
Fuel Filter
For fuel filter replacement, see your dealer or a qualified service
technician. Refer to the scheduled maintenance guide for the appropriate
intervals for changing the fuel filter.
Replace the fuel filter with an authorized Motorcraft part. The
customer warranty may be void for any damage to the fuel system
if an authorized Motorcraft fuel filter is not used.
Maintenance and care
176
ProCarManuals.com
Page 183 of 224

6. Remove the bulb retaining ring by
rotating it counterclockwise (when
viewed from the rear) to free it
from the bulb socket, and slide the
ring off the plastic base. Keep the
ring to retain the new bulb.
7. Without turning, remove the old
bulb from lamp assembly by gently
pulling it straight back out of the
lamp assembly and replace.
To install the new bulb:
Handle a halogen headlamp bulb carefully and keep out of
children's reach. Grasp the bulb only by its plastic base and do
not touch the glass. The oil from your hand could cause the bulb to
break the next time the headlamps are operated.
1. With the flat side of the bulb's plastic base facing upward, insert the
glass end of the bulb into the lamp assembly. You may need to turn the
bulb left or right to align the grooves in the plastic base with the tabs in
the lamp assembly. When the grooves are aligned, push the bulb into the
socket until the plastic base contacts the rear of the lamp assembly.
2. Install the bulb retaining ring over the plastic base until it contacts the
rear of the lamp assembly by rotating clockwise until you feel a ªstop.º
3. Install the electrical connector into the rear of the plastic base until it
snaps, locking it into position.
4. Install the headlamp assembly into the vehicle and secure it with the
clip tabs.
5. Turn the headlamps on and make sure they work properly. If the
headlamp was correctly aligned before you changed the bulb, you should
not need to align it again.
Replacing headlamp bulbs (low series)
To remove the headlamp bulb:
1. Make sure headlamp switch is in OFF position.
2. Open the hood.
Maintenance and care
183
ProCarManuals.com
Page 184 of 224
3. Remove the two headlamp screws
and bezel from the headlamp
housing.
4. Remove the four headlamp bulb
retaining screws.
5. Disconnect the electrical
connector from the bulb.
6. Remove the headlamp.
To install the new bulb, follow the removal procedures in reverse order.
Replacing front parking lamp/turn signal bulbs
1. Make sure the headlamp control is in the OFF position.
2. Open the hood.
3. Remove two screws and pull lamp assembly away from the vehicle.
4. Rotate the bulb socket
counterclockwise and remove.
5. Carefully pull out the bulb
straight out of the socket and push
in new bulb.
To complete installation, follow the
removal procedures in reverse order.
Maintenance and care
184
ProCarManuals.com
Page 185 of 224

Replacing high-mount brakelamp bulbs
The interior cargo lamp (if equipped) will have to be removed from
under the high-mount brakelamp assembly located inside the vehicle.
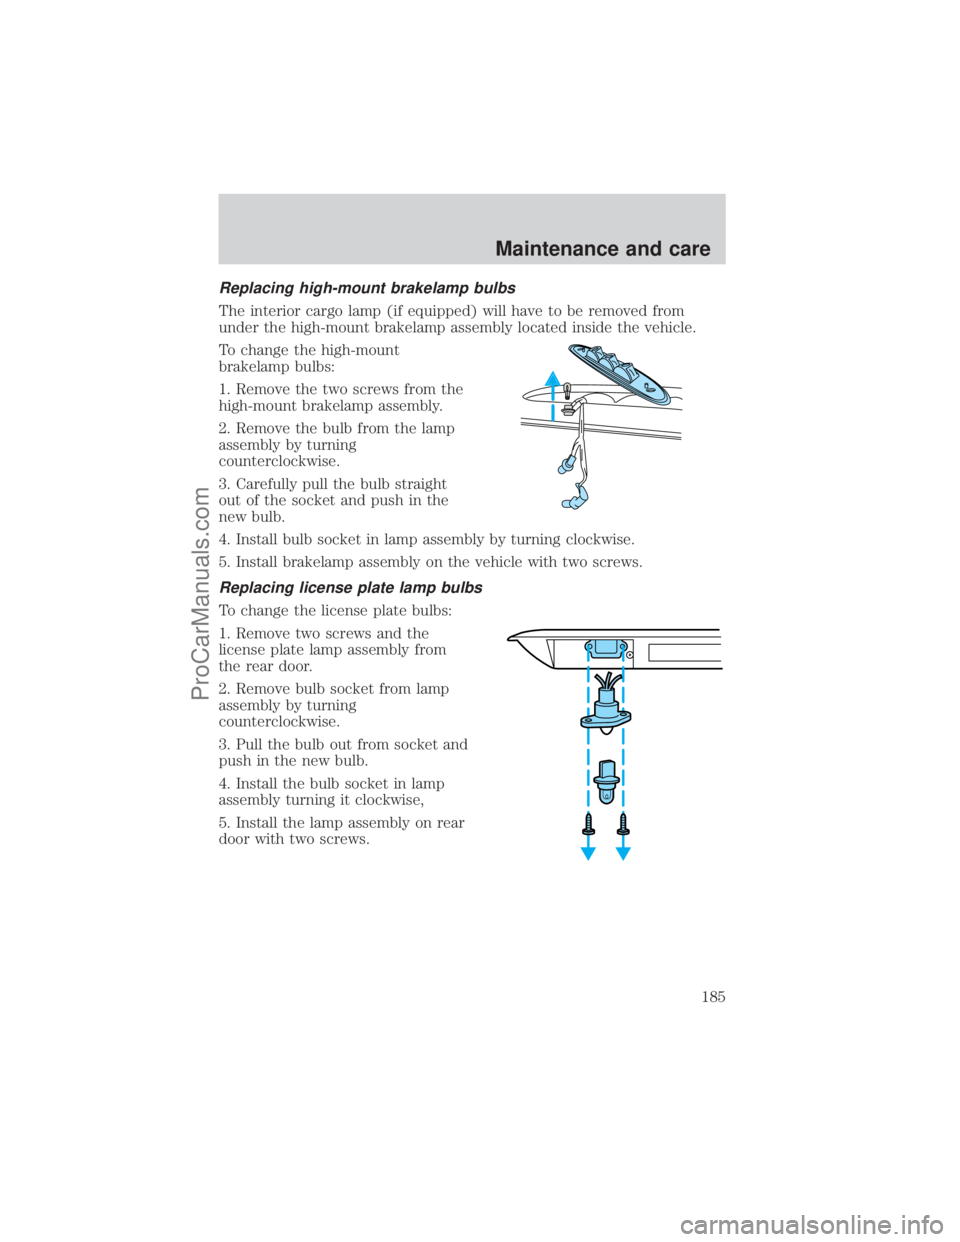
To change the high-mount
brakelamp bulbs:
1. Remove the two screws from the
high-mount brakelamp assembly.
2. Remove the bulb from the lamp
assembly by turning
counterclockwise.
3. Carefully pull the bulb straight
out of the socket and push in the
new bulb.
4. Install bulb socket in lamp assembly by turning clockwise.
5. Install brakelamp assembly on the vehicle with two screws.
Replacing license plate lamp bulbs
To change the license plate bulbs:
1. Remove two screws and the
license plate lamp assembly from
the rear door.
2. Remove bulb socket from lamp
assembly by turning
counterclockwise.
3. Pull the bulb out from socket and
push in the new bulb.
4. Install the bulb socket in lamp
assembly turning it clockwise,
5. Install the lamp assembly on rear
door with two screws.
Maintenance and care
185
ProCarManuals.com
Page 186 of 224
Replacing tail lamp/turn/backup lamp bulbs
The tail lamp/turn/backup lamp
bulbs are located the tail lamp
assembly, one just below the other.
Follow the same steps to replace
either bulb:
1. Remove the four screws and the
lamp assembly from vehicle.
2. Rotate bulb socket
counterclockwise and remove from
lamp assembly.
3. Carefully pull the bulb straight
out of the socket and push in the
new bulb.
4. Install the bulb socket in lamp
assembly by turning clockwise.
5. Install the lamp assembly and
secure with four screws.
USING THE RIGHT BULBS
Replacement bulbs are specified in the chart below. Headlamp bulbs
must be marked with an authorized ªD.O.T.º for North America and an
ªEº for Europe to assure lamp performance, light brightness and pattern
and safe visibility. The correct bulbs will not damage the lamp assembly
or void the lamp assembly warranty and will provide quality bulb burn
time.
Maintenance and care
186
ProCarManuals.com
Page 189 of 224

Remove particles such as bird droppings, tree sap, insect remains, tar
spots, road salt and industrial fallout immediately.
Cleaning the wheels
Wash with the same detergent as the body of your vehicle. Do not use
acid-based or alcohol-based wheel cleaners, steel wool, fuel or strong
detergents. Never use abrasives that will damage the finish of special
wheel surfaces. Use a tar remover to remove grease and tar.
The brushes used in some automatic car washes may damage the finish
on your wheels. Before going to a car wash, find out if the brushes are
abrasive.
Cleaning the engine
Engines are more efficient when they are clean because grease and dirt
buildup keep the engine warmer than normal. When washing:
²Take care when using a power washer to clean the engine. The high
pressure fluid could penetrate the sealed parts and cause damage.
²Do not spray with cold water to avoid cracking the engine block or
other engine components.
²Never apply anything to the drive belt (including belt dressing).
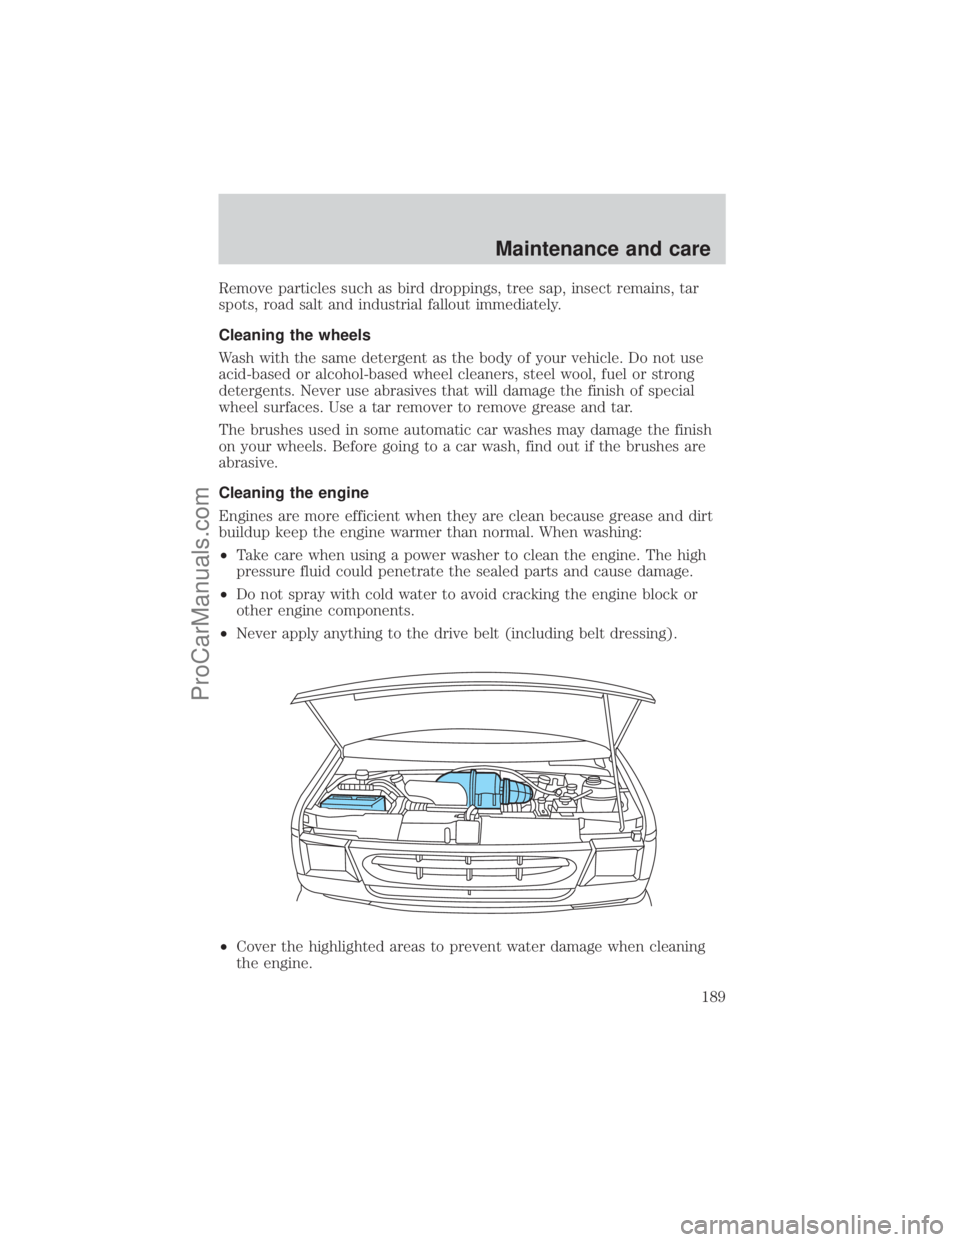
²Cover the highlighted areas to prevent water damage when cleaning
the engine.
Maintenance and care
189
ProCarManuals.com
Page 197 of 224

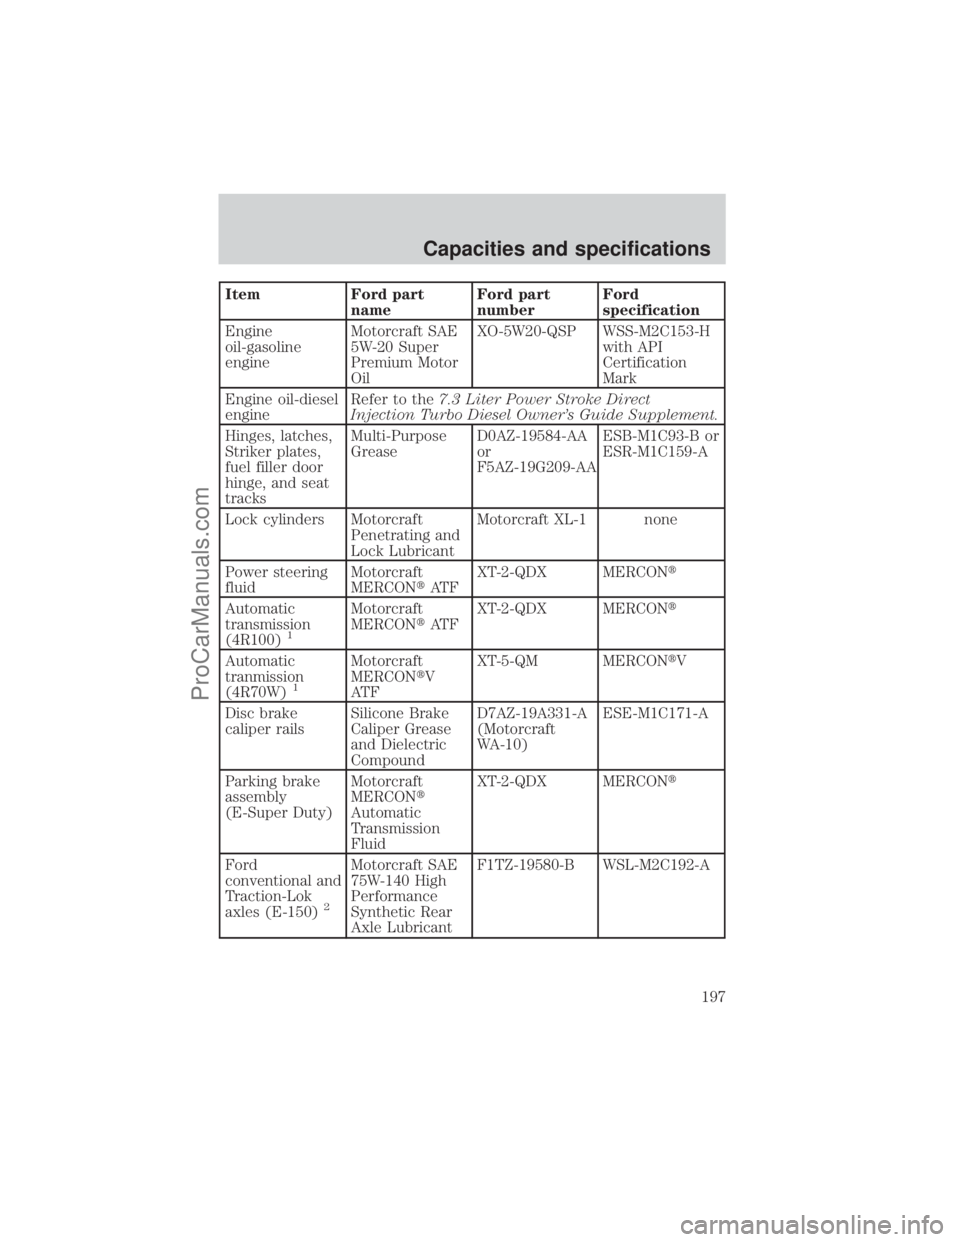
Item Ford part
nameFord part
numberFord
specification
Engine
oil-gasoline
engineMotorcraft SAE
5W-20 Super
Premium Motor
OilXO-5W20-QSP WSS-M2C153-H
with API
Certification
Mark
Engine oil-diesel
engineRefer to the7.3 Liter Power Stroke Direct
Injection Turbo Diesel Owner's Guide Supplement.
Hinges, latches,
Striker plates,
fuel filler door
hinge, and seat
tracksMulti-Purpose
GreaseD0AZ-19584-AA
or
F5AZ-19G209-AAESB-M1C93-B or
ESR-M1C159-A
Lock cylinders Motorcraft
Penetrating and
Lock LubricantMotorcraft XL-1 none
Power steering
fluidMotorcraft
MERCONtAT FXT-2-QDX MERCONt
Automatic
transmission
(4R100)
1
Motorcraft
MERCONtAT FXT-2-QDX MERCONt
Automatic
tranmission
(4R70W)
1
Motorcraft
MERCONtV
AT FXT-5-QM MERCONtV
Disc brake
caliper railsSilicone Brake
Caliper Grease
and Dielectric
CompoundD7AZ-19A331-A
(Motorcraft
WA-10)ESE-M1C171-A
Parking brake
assembly
(E-Super Duty)Motorcraft
MERCONt
Automatic
Transmission
FluidXT-2-QDX MERCONt
Ford
conventional and
Traction-Lok
axles (E-150)
2
Motorcraft SAE
75W-140 High
Performance
Synthetic Rear
Axle LubricantF1TZ-19580-B WSL-M2C192-A
Capacities and specifications
197
ProCarManuals.com
Page 211 of 224

Ford Deluxe Leather and Vinyl Cleaner (not available in Canada)
Motorcraft Vinyl Cleaner (Canada only)
Ford Extra Strength Tar and Road Oil Remover* (not available in
Canada)
Ford Extra Strength Upholstery Cleaner (not available in Canada)
Ford Metal Surface Cleaner
Ford Multi-Purpose Cleaner*
Motorcraft Car Wash Concentrate
Motorcraft Carlite Glass Cleaner
Ford Spot and Stain Remover*
Ford Super Premium Tire and Trim Dressing
Ford Triple Clean
Ford Ultra-Clear Spray Glass Cleaner (not available in Canada)
* May be sold with the Motorcraft name
FORD ACCESSORIES FOR YOUR VEHICLE
A wide selection of Ford accessories are available for your vehicle
through your local authorized Ford, Lincoln Mercury or Ford of Canada
dealer. These quality accessories have been specifically engineered to
fulfill your automotive needs; they are custom designed to complement
the style and aerodynamic appearance of your vehicle. In addition, each
accessory is made from high quality materials and meets or exceeds
Ford's rigid engineering and safety specifications. Ford accessories are
warranted for up to 12 months or 20 000 km (12 000 miles) on all cars
and light trucks and 12 months with unlimited distance on medium duty
trucks unless the accessory is installed on a new vehicle, then the
warranty becomes the balance of the new vehicle's warranty or the
accessories warranty, whichever is greater. See your dealer for complete
warranty information and availability.
Not all accessories are available for all models.
Vehicle Security
Styled wheel locks
Vehicle security systems
Customer assistance
211
ProCarManuals.com