2001 FORD E-250 oil
[x] Cancel search: oilPage 148 of 224

²Oil levels above the MAX mark may cause engine damage. Some oil
must be removed from the engine by a service technician.
7. Put the indicator back in and ensure it is fully seated.
Adding engine oil
1. Check the engine oil. For instructions, refer toChecking the engine
oilin this chapter.
2. If the engine oil level is not within the normal range, add only certified
engine oil of the recommended viscosity. Remove the engine oil filler cap
and use a funnel to pour the engine oil into the opening.
3. Recheck the engine oil level. Make sure the oil level is not above the
MAX mark on the engine oil level indicator (dipstick).
4. Install the indicator and ensure it is fully seated.
5. Fully install the engine oil filler cap by turning the filler cap clockwise
1/4 of a turn until three clicks are heard until it is latched.
To avoid possible oil loss, DO NOT operate the vehicle with the
engine oil level indicator and/or the engine oil filler cap removed.
Engine oil and filter recommendations
Look for this certification
trademark.
SAE 5W-20 engine oil is recommended.
Only use oils ªCertified For Gasoline Enginesº by the American
Petroleum Institute (API). Use Motorcraft or an equivalent oil meeting
Ford specification WSS-M2C153±H.SAE 5W-20 oil provides optimum
fuel economy and durability performance meeting all
requirements for your vehicle's engine.
Do not use supplemental engine oil additives, oil treatments or engine
treatments. They are unnecessary and could, under certain conditions,
lead to engine damage which is not covered by your warranty.
Maintenance and care
148
ProCarManuals.com
Page 149 of 224

Change your engine oil and filter according to the appropriate schedule
listed in the scheduled maintenance guide.
Ford production and aftermarket (Motorcraft) oil filters are designed for
added engine protection and long life. If a replacement oil filter is used
that does not meet Ford material and design specifications, start-up
engine noises or knock may be experienced.
It is recommended you use the appropriate Motorcraft oil filter (or
another brand meeting Ford specifications) for your engine application.
AIR FILTER MAINTENANCE
Refer to the scheduled maintenance guide for the appropriate intervals
for changing the air filter element.
When changing the air filter element, use only the Motorcraft air filter
element listed. Refer toMotorcraft Part Numbersin theCapacities and
specificationschapter.
Do not start your engine with the air cleaner removed and do
not remove it while the engine is running.
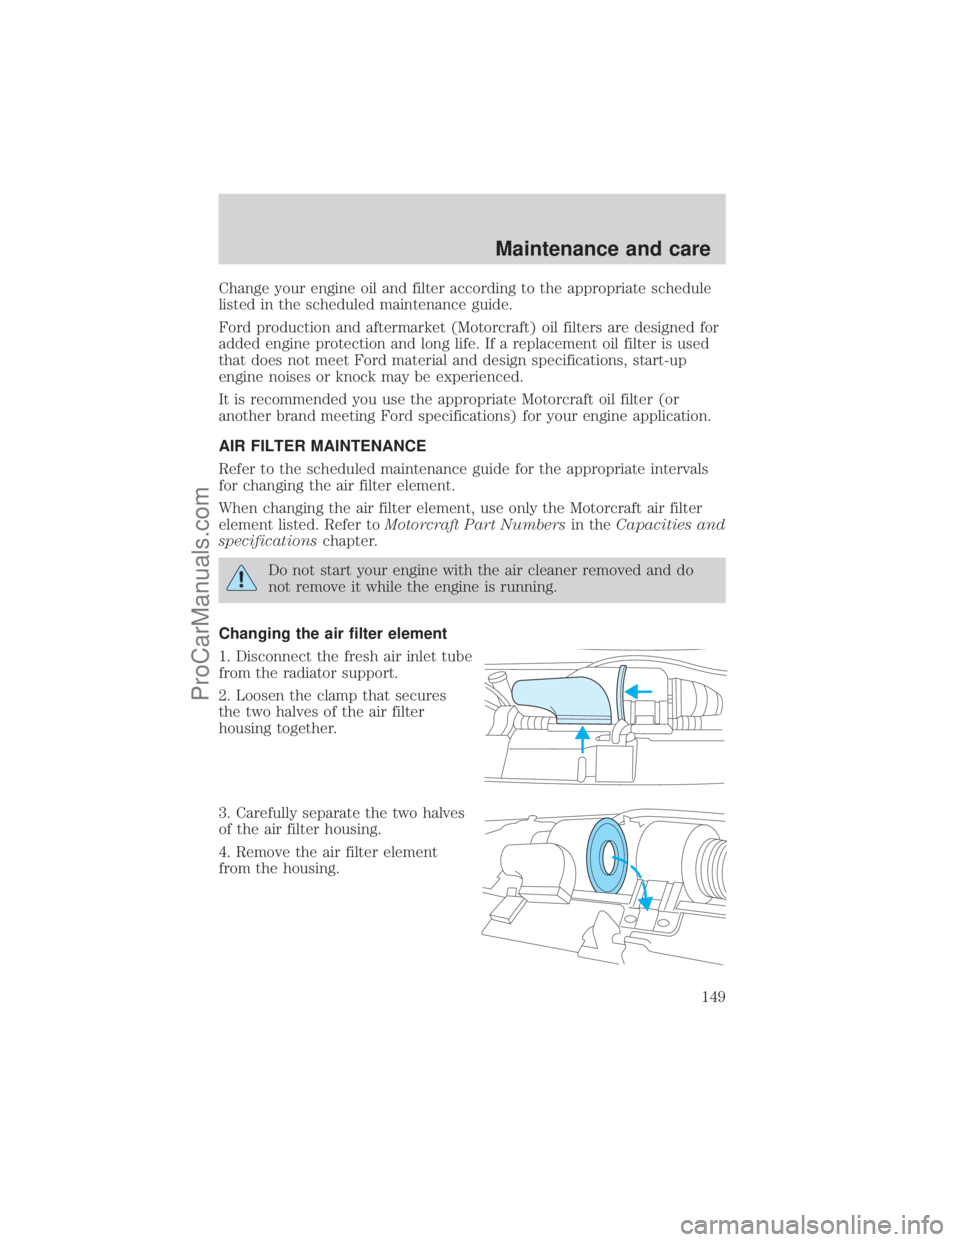
Changing the air filter element
1. Disconnect the fresh air inlet tube
from the radiator support.
2. Loosen the clamp that secures
the two halves of the air filter
housing together.
3. Carefully separate the two halves
of the air filter housing.
4. Remove the air filter element
from the housing.
Maintenance and care
149
ProCarManuals.com
Page 151 of 224

Do not let the reservoir for the master cylinder run dry. This
may cause the brakes to fail.
WINDSHIELD WASHER FLUID
Checking and adding washer fluid
Check the washer fluid whenever
you stop for fuel. The reservoir is
highlighted with a
symbol.
If the level is low, add enough fluid
to fill the reservoir. In very cold
weather, do not fill the reservoir all
the way.
Only use a washer fluid that meets Ford specifications. Refer to
Lubricant specificationsin theCapacities and specificationschapter.
State or local regulations on volatile organic compounds may restrict the
use of methanol, a common windshield washer antifreeze additive.
Washer fluids containing non-methanol antifreeze agents should be used
only if they provide cold weather protection without damaging the
vehicle's paint finish, wiper blades or washer system.
Do not put washer fluid in the engine coolant reservoir. Washer
fluid placed in the cooling system may harm engine and cooling
system components.
ENGINE COOLANT
Checking engine coolant
Your vehicle was factory-filled with a 50/50 engine coolant and water
concentration. If the concentration of coolant falls below 40% or above
60%, the engine parts could become damaged or not work properly.A
50/50 mixture of coolant and water provides the following:
²freeze protection down to -36É C (-34É F).
²boiling protection up to 129É C (265É F).
²protection against rust and other forms of corrosion.
Maintenance and care
151
ProCarManuals.com
Page 179 of 224

²Using the air conditioner or defroster may reduce fuel economy.
²You may want to turn off the speed control in hilly terrain if
unnecessary shifting between third and fourth gear occurs.
Unnecessary shifting of this type could result in reduced fuel
economy.
²Warming up a vehicle on cold mornings is not required and may
reduce fuel economy.
²Resting your foot on the brake pedal while driving may reduce fuel
economy.
²Combine errands and minimize stop-and-go driving.
Maintenance
²Keep tires properly inflated and use only recommended size.
²Operating a vehicle with the wheels out of alignment will reduce fuel
economy.
²Use recommended engine oil. Refer toLubricant Specifications.
²Perform all regularly scheduled maintenance items. Follow the
recommended maintenance schedule and owner maintenance checks
found in your vehicle scheduled maintenance guide.
Conditions
²Heavily loading a vehicle or towing a trailer may reduce fuel economy
at any speed.
²Carrying unnecessary weight may reduce fuel economy (approximately
0.4 km/L [1 mpg] is lost for every 180 kg [400 lb] of weight carried).
²Adding certain accessories to your vehicle (for example bug
deflectors, rollbars/light bars, running boards, ski/luggage racks) may
reduce fuel economy.
²Using fuel blended with alcohol may lower fuel economy.
²Fuel economy may decrease with lower temperatures during the first
12±16 km (8±10 miles) of driving.
²Driving on flat terrain offers improved fuel economy as compared to
driving on hilly terrain.
²Transmissions give their best fuel economy when operated in the top
cruise gear and with steady pressure on the gas pedal.
²Close windows for high speed driving.
Maintenance and care
179
ProCarManuals.com
Page 183 of 224

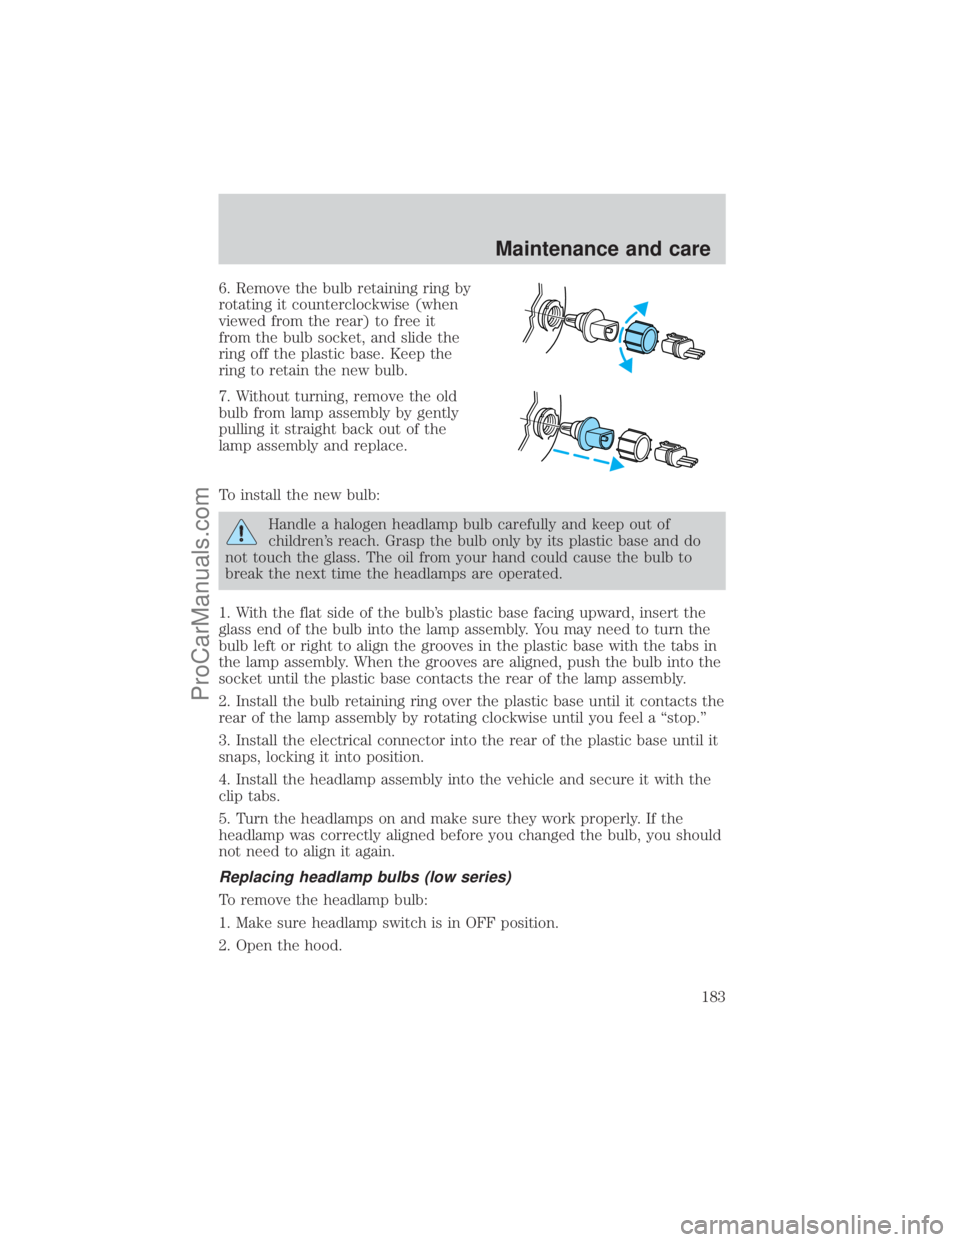
6. Remove the bulb retaining ring by
rotating it counterclockwise (when
viewed from the rear) to free it
from the bulb socket, and slide the
ring off the plastic base. Keep the
ring to retain the new bulb.
7. Without turning, remove the old
bulb from lamp assembly by gently
pulling it straight back out of the
lamp assembly and replace.
To install the new bulb:
Handle a halogen headlamp bulb carefully and keep out of
children's reach. Grasp the bulb only by its plastic base and do
not touch the glass. The oil from your hand could cause the bulb to
break the next time the headlamps are operated.
1. With the flat side of the bulb's plastic base facing upward, insert the
glass end of the bulb into the lamp assembly. You may need to turn the
bulb left or right to align the grooves in the plastic base with the tabs in
the lamp assembly. When the grooves are aligned, push the bulb into the
socket until the plastic base contacts the rear of the lamp assembly.
2. Install the bulb retaining ring over the plastic base until it contacts the
rear of the lamp assembly by rotating clockwise until you feel a ªstop.º
3. Install the electrical connector into the rear of the plastic base until it
snaps, locking it into position.
4. Install the headlamp assembly into the vehicle and secure it with the
clip tabs.
5. Turn the headlamps on and make sure they work properly. If the
headlamp was correctly aligned before you changed the bulb, you should
not need to align it again.
Replacing headlamp bulbs (low series)
To remove the headlamp bulb:
1. Make sure headlamp switch is in OFF position.
2. Open the hood.
Maintenance and care
183
ProCarManuals.com
Page 190 of 224

²Never wash or rinse the engine while it is running; water in the
running engine may cause internal damage.
Cleaning non-painted plastic exterior parts
Use vinyl cleaner for routine cleaning. Clean with a tar remover if
necessary. Do not clean plastic parts with thinners, solvents or
petroleum-based cleaners.
Cleaning the exterior lamps
Wash with the same detergent as the exterior of your vehicle. If
necessary, use a tar remover such as Ford Extra Strength Tar and Road
Oil Remover (B7A-19520±AA).
To avoid scratching the lamps, do not use a dry paper towel, chemical
solvents or abrasive cleaners.
Cleaning the wiper blades, windshield and rear window
If the wiper blades do not wipe properly, clean the wiper blade rubber
element with undiluted windshield washer solution or a mild detergent.
To avoid damaging the blades, do not use fuel, kerosene, paint thinner or
other solvents.
If the wiper still does not wipe properly, this could be caused by
substances on the windshield or rear window such as tree sap and some
hot wax treatments used by commercial car washes. Clean the outside of
the windshield or rear window with a non-abrasive cleaner such as Ford
Ultra-Clear Spray Glass Cleaner, (E4AZ-19C507±AA), available from your
Ford Dealer.Do notuse abrasive cleansers on glass as they may cause
scratches. The windshield or rear window is clean if beads do not form
when you rinse it with water. The windshield, rear window and wiper
blades should be cleaned on a regular basis, and blades or rubber
elements replaced when worn.
Cleaning the instrument panel
Clean with a damp cloth, then dry with a dry cloth.
Avoid cleaner or polish that increases the gloss of the upper portion of
the instrument panel. The dull finish in this area helps protect the driver
from undesirable windshield reflection.
Maintenance and care
190
ProCarManuals.com
Page 192 of 224

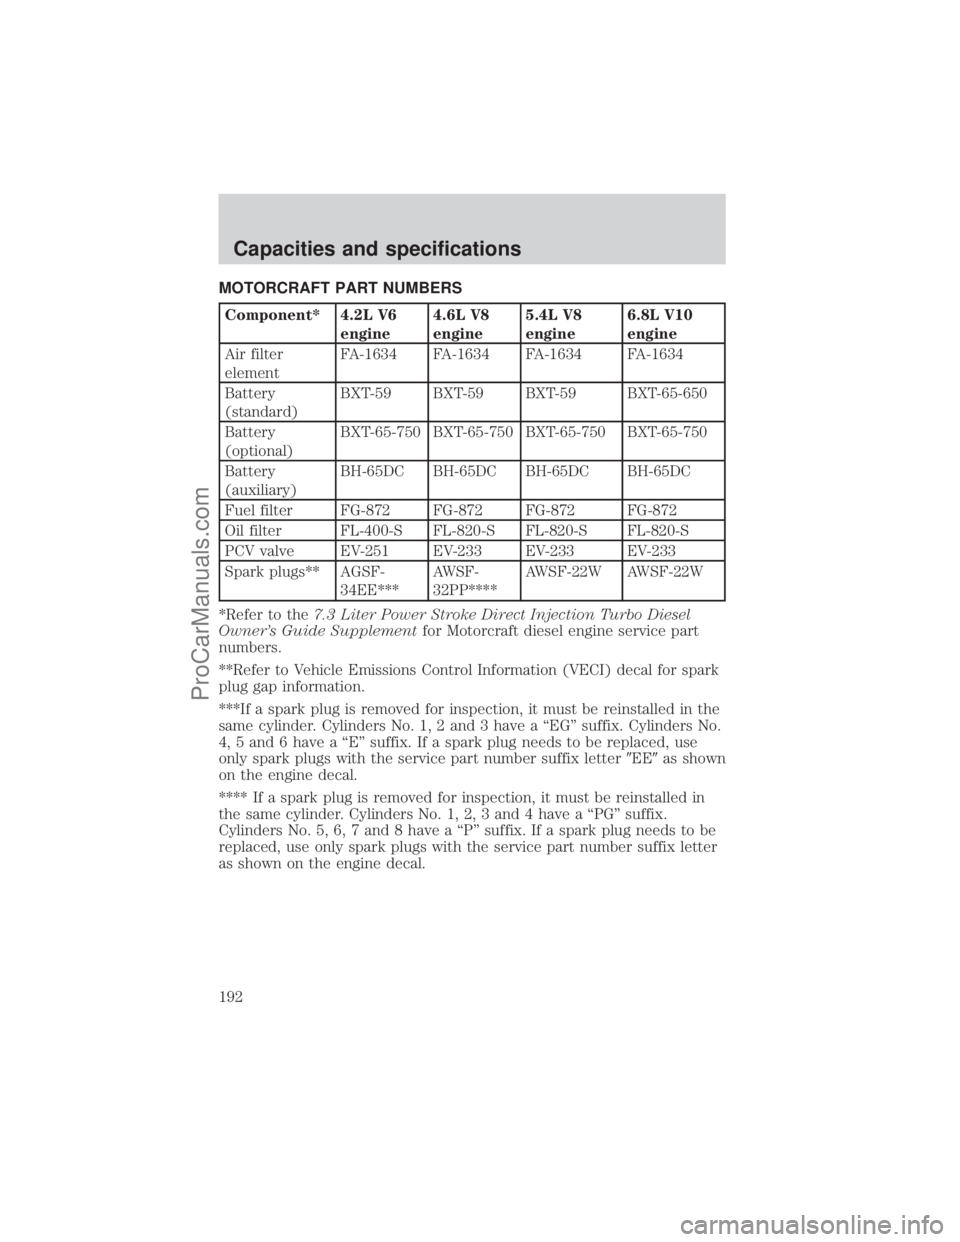
MOTORCRAFT PART NUMBERS
Component* 4.2L V6
engine4.6L V8
engine5.4L V8
engine6.8L V10
engine
Air filter
elementFA-1634 FA-1634 FA-1634 FA-1634
Battery
(standard)BXT-59 BXT-59 BXT-59 BXT-65-650
Battery
(optional)BXT-65-750 BXT-65-750 BXT-65-750 BXT-65-750
Battery
(auxiliary)BH-65DC BH-65DC BH-65DC BH-65DC
Fuel filter FG-872 FG-872 FG-872 FG-872
Oil filter FL-400-S FL-820-S FL-820-S FL-820-S
PCV valve EV-251 EV-233 EV-233 EV-233
Spark plugs** AGSF-
34EE***AWSF-
32PP****AWSF-22W AWSF-22W
*Refer to the7.3 Liter Power Stroke Direct Injection Turbo Diesel
Owner's Guide Supplementfor Motorcraft diesel engine service part
numbers.
**Refer to Vehicle Emissions Control Information (VECI) decal for spark
plug gap information.
***If a spark plug is removed for inspection, it must be reinstalled in the
same cylinder. Cylinders No. 1, 2 and 3 have a ªEGº suffix. Cylinders No.
4, 5 and 6 have a ªEº suffix. If a spark plug needs to be replaced, use
only spark plugs with the service part number suffix letter9EE9as shown
on the engine decal.
**** If a spark plug is removed for inspection, it must be reinstalled in
the same cylinder. Cylinders No. 1, 2, 3 and 4 have a ªPGº suffix.
Cylinders No. 5, 6, 7 and 8 have a ªPº suffix. If a spark plug needs to be
replaced, use only spark plugs with the service part number suffix letter
as shown on the engine decal.
Capacities and specifications
192
ProCarManuals.com
Page 193 of 224

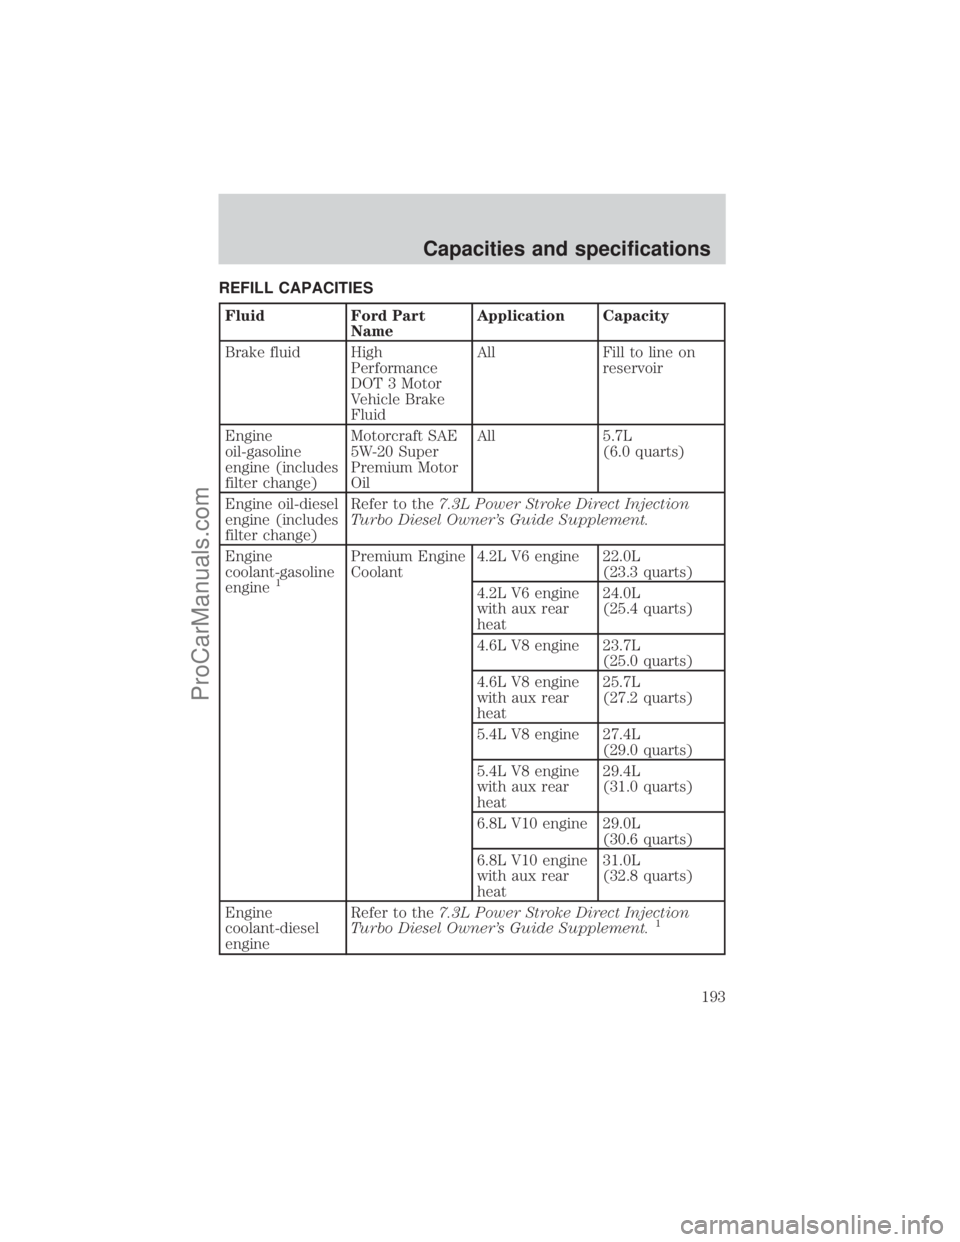
REFILL CAPACITIES
Fluid Ford Part
NameApplication Capacity
Brake fluid High
Performance
DOT 3 Motor
Vehicle Brake
FluidAll Fill to line on
reservoir
Engine
oil-gasoline
engine (includes
filter change)Motorcraft SAE
5W-20 Super
Premium Motor
OilAll 5.7L
(6.0 quarts)
Engine oil-diesel
engine (includes
filter change)Refer to the7.3L Power Stroke Direct Injection
Turbo Diesel Owner's Guide Supplement.
Engine
coolant-gasoline
engine
1
Premium Engine
Coolant4.2L V6 engine 22.0L
(23.3 quarts)
4.2L V6 engine
with aux rear
heat24.0L
(25.4 quarts)
4.6L V8 engine 23.7L
(25.0 quarts)
4.6L V8 engine
with aux rear
heat25.7L
(27.2 quarts)
5.4L V8 engine 27.4L
(29.0 quarts)
5.4L V8 engine
with aux rear
heat29.4L
(31.0 quarts)
6.8L V10 engine 29.0L
(30.6 quarts)
6.8L V10 engine
with aux rear
heat31.0L
(32.8 quarts)
Engine
coolant-diesel
engineRefer to the7.3L Power Stroke Direct Injection
Turbo Diesel Owner's Guide Supplement.
1
Capacities and specifications
193
ProCarManuals.com