Page 4 of 351
Table of Contents
Windows
Keys and Door Locks
Remote Keyless Entry System
Remote Trunk Release
Automatic Transaxle
Parking Brake
Tilt Wheel
Turn Signal/Multifunction Lever
Windshield WipersCruise Control (If Equipped)
Exterior and Interior Lamps
Mirrors
Storage Compartments
Convenience Net (If Equipped)
Accessory Power Outlet
Sunroof (Option)
Instrument Panel, Warning Lights and Gages Seats and Seat Controls
Safety BeltsSupplemental Restraint System (SRS)
Restraint Systems for Children
Section
1
Section
2
Seats and Restraint Systems
Features and Controls
ii
Page 11 of 351

ix
For example,
these symbols
are used on an
original battery:
CAUTION
POSSIBLE
INJURY
PROTECT
EYES BY
SHIELDING
CAUSTIC
BATTERY
ACID COULD
CAUSE
BURNS
AVOID
SPARKS OR
FLAMES
SPARK OR
FLAME
COULD
EXPLODE
BATTERY
These symbols
are important for
you and your
passengers
whenever your
vehicle is driven:
CHILD
RESTRAINT
TOP STRAP
ANCHOR
DOOR LOCK
UNLOCK
FASTEN
SEAT
BELTS
POWER
WINDOW
AIR BAG
These symbols
have to do with
your lamps:
MASTER
LIGHTING
SWITCH
TURN
SIGNALS
PARKING
LAMPS
HAZARD
WARNING
FLASHER
DAYTIME
RUNNING
LAMPS
FOG LAMPS
These symbols
are on some of
your controls:
WINDSHIELD
WIPER
WINDSHIELD
WASHER
WINDSHIELD
DEFROSTER
REAR
WINDOW
DEFOGGER
VENTILATING
FAN
These symbols
are used on
warning and
indicator lights:
ENGINE
COOLANT
TEMP
BATTERY
CHARGING
SYSTEM
BRAKE
COOLANT
ENGINE OIL
PRESSURE
ANTI-LOCK
BRAKES
Here are some
other symbols
you may see:
FUSE
LIGHTER
HORN
FUEL
Vehicle Symbols
These are some of the symbols you may find on your vehicle. Also see ªWarning Lights and Gagesº in the Index.
Page 66 of 351

2-
2-1
Section 2 Features and Controls
Here you can learn about the many standard and optional features on your vehicle, and information on starting,
shifting and braking. Also explained are the instrument panel and the warning systems that tell you if everything is
working properly
-- and what to do if you have a problem.
2
-2 Windows
2
-4 Keys
2
-6 Door Locks
2
-10 Remote Keyless Entry System (If Equipped)
2
-14 Trunk
2
-17 Theft
2
-18 Passlock�
2-18 New Vehicle ªBreak-Inº
2
-19 Ignition Positions
2
-20 Starting Your Engine
2
-21 Engine Coolant Heater (Option)
2
-22 Automatic Transaxle Operation
2
-26 Parking Brake
2
-27 Shifting Into PARK (P)
2
-29 Shifting Out of PARK (P)
2
-29 Parking Over Things That Burn2
-30 Engine Exhaust
2
-30 Running Your Engine While You're Parked
2
-31 Tilt Wheel
2
-32 Turn Signal/Multifunction Lever
2
-39 Exterior Lamps
2
-41 Interior Lamps
2
-42 Mirrors
2
-44 Storage Compartments
2
-45 Ashtray and Cigarette Lighter
2
-45 Sun Visors
2
-46 Accessory Power Outlet
2
-46 Garment Hook
2
-47 Sunroof (Option)
2
-48 The Instrument Panel -- Your
Information System
2
-52 Warning Lights, Gages and Indicators
Page 76 of 351

2-11
Changes or modifications to this system by other than
an authorized service facility could void authorization
to use this equipment.
At times you may notice a decrease in range. This is
normal for any remote keyless entry system. If the
transmitter does not work or if you have to stand closer
to your vehicle for the transmitter to work, try this:
�Check the distance. You may be too far from your
vehicle. You may need to stand closer during rainy
or snowy weather.
�Check the location. Other vehicles or objects may
be blocking the signal. Take a few steps to the left
or right, hold the transmitter higher, and try again.
�Check to determine if battery replacement or
resynchronization is necessary. See the instructions
that follow.
�If you're still having trouble, see your dealer or a
qualified technician for service.Operation
The following functions are
available with the keyless
entry system:
LOCK: All doors will automatically lock when the
LOCK button on the transmitter is pressed. The interior
lamps will turn off after all of the doors are closed. If all
of the doors are closed when the transmitter lock button
is pressed, the parking lamps will flash twice and the
horn will chirp (if the horn chirp feature is enabled) to
indicate locking has occurred.
Page 79 of 351

2-14
To replace the battery in the keyless entry system, do
the following:
1. Use a coin or similar object to separate the bottom
half from the top half of the transmitter.
2. Remove the battery and replace it with the new one.
Make sure the positive (+) side of the battery faces
down. Use one three
-volt, CR2032, or equivalent,
type battery.
3. Put the two halves back together. Make sure the
cover is on tightly, so water won't get in.
4. Check the operation of the transmitter with your
vehicle. If the transmitter does not work, try
resynchronizing the transmitter with the receiver.
Resynchronization
Your keyless entry system is equipped with a security
system that prevents anyone from recording and playing
back your signal. The transmitter does not send the same
signal twice to the receiver. The receiver will not respond
to a signal that has been sent to it more than once.
To synchronize your transmitter and receiver, follow
these directions:
1. Stand close to your vehicle.
2. Press and hold the LOCK and UNLOCK buttons on
the transmitter at the same time.
3. Hold the buttons for five seconds. In this time, the
doors should lock and unlock once. This confirms
the resynchronization. If the doors do not lock and
unlock, see your dealer for service.
Trunk
To unlock the trunk from the outside, insert the key and
turn the trunk lock cylinder.
When closing the trunk, close from the center to ensure
it fully latches.
Page 97 of 351
2-32
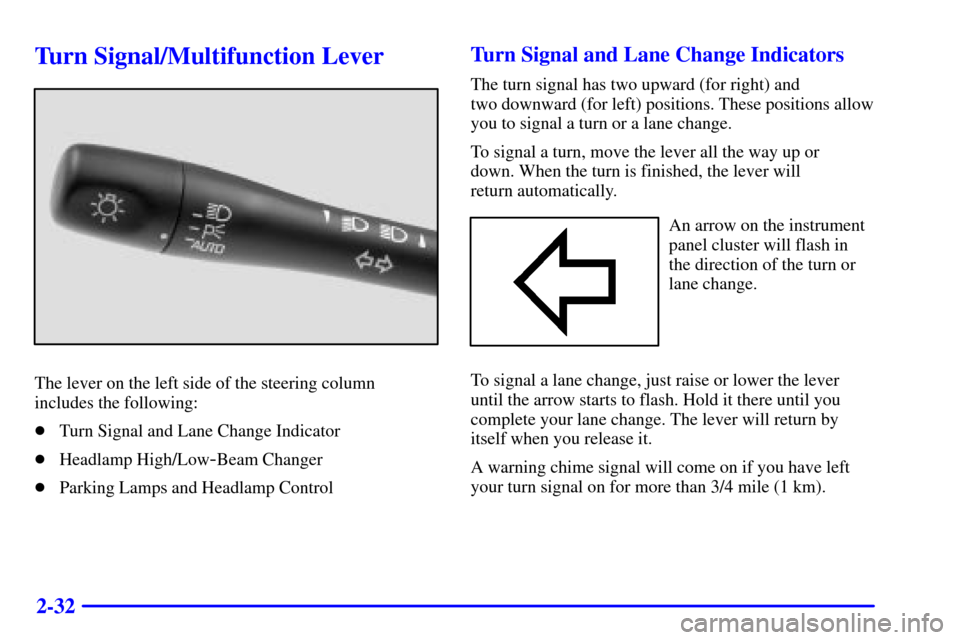
Turn Signal/Multifunction Lever
The lever on the left side of the steering column
includes the following:
�Turn Signal and Lane Change Indicator
�Headlamp High/Low
-Beam Changer
�Parking Lamps and Headlamp Control
Turn Signal and Lane Change Indicators
The turn signal has two upward (for right) and
two downward (for left) positions. These positions allow
you to signal a turn or a lane change.
To signal a turn, move the lever all the way up or
down. When the turn is finished, the lever will
return automatically.
An arrow on the instrument
panel cluster will flash in
the direction of the turn or
lane change.
To signal a lane change, just raise or lower the lever
until the arrow starts to flash. Hold it there until you
complete your lane change. The lever will return by
itself when you release it.
A warning chime signal will come on if you have left
your turn signal on for more than 3/4 mile (1 km).
Page 98 of 351
2-33
As you signal a turn or a lane change, if the arrows flash
rapidly, a signal bulb may be burned out and other
drivers won't see your turn signal.
If a bulb is burned out, replace it to help avoid an
accident. If the arrows don't go on at all when you
signal a turn, check for burned
-out bulbs and then check
the fuse. See ªFuses and Circuit Breakersº in the Index.
Headlamps
The headlamp control is on the turn
signal/multifunction lever.
Turn the headlamp control to this symbol to turn
on the following:
�Parking Lamps
�Sidemarker Lamps
�Taillamps
�License Plate Lamps
�Instrument Panel Lights
Turn the headlamp control to this symbol to turn on
the following:
�Headlamps
�Parking Lamps
�Sidemarker Lamps
�Taillamps
�License Plate Lamps
�Instrument Panel Lights
Turning the headlamp control to AUTO will provide for
automatic operation of the headlamps, taillamps and
parking lamps. For more information see ªAutomatic
Light Controlº later in this section.
Page 99 of 351

2-34 Headlamp High/Low-Beam Changer
To change the headlamps from low beam to high beam,
push the turn signal/multifunction lever away from you.
When the high beams are
on, a light on the instrument
panel cluster also will be on
if the ignition is in ON.
To change the headlamps from high beam to low beam,
pull the turn signal lever toward you.
Lamps On Reminder
If you open the driver's door and turn off the
ignition while leaving the lamps on, you will hear a
warning chime.
Flash-to-Pass
This feature lets you use your high-beam headlamps to
signal a driver in front of you that you want to pass.
To use it, pull the turn signal/multifunction lever toward
you until the high
-beam headlamps come on, then
release the lever to turn them off.
Windshield Wipers
You control the windshield wipers by moving the stalk
with the wiper symbol on it up or down.
For a single wiper cycle, push the stalk down to
MIST, then release it. For more cycles, hold the stalk
down longer.
For steady wiping at low speed, move the stalk up to the
LO position. For high
-speed wiping, move the stalk up
further, to HI. To stop the wipers, move the stalk to OFF.