Page 275 of 412
6-6
If your vehicle has a diesel engine, see ªFilling Your
Tank (Diesel Engine)º in the Diesel Engine Supplement.
The fuel cap is behind a
hinged door on the driver's
side of your vehicle.
While refueling your
vehicle, hang the cap by the
tether from the hook on the
filler door.To remove the cap, turn it slowly to the
left (counterclockwise). The cap has a spring in it; if
you let go of the cap too soon, it will spring back
to the right.
CAUTION:
If you get gasoline on yourself and then
something ignites it, you could be badly burned.
Gasoline can spray out on you if you open the
fuel filler cap too quickly. This spray can happen
if your tank is nearly full, and is more likely in
hot weather. Open the fuel filler cap slowly and
wait for any ªhissº noise to stop. Then unscrew
the cap all the way.
Be careful not to spill gasoline. Clean gasoline from
painted surfaces as soon as possible. See ªCleaning the
Outside of Your Vehicleº in the Index.
Page 276 of 412
 until you hear a clicking sound. Make
sure you fully install the cap. The diagnostic system can
determine if the fuel cap has been l")
6-7
When you put the cap back on, turn it to the
right (clockwise) until you hear a clicking sound. Make
sure you fully install the cap. The diagnostic system can
determine if the fuel cap has been left off or improperly
installed. This would allow fuel to evaporate into the
atmosphere. See ªMalfunction Indicator Lampº in
the Index.
NOTICE:
If you need a new cap, be sure to get the right
type. Your dealer can get one for you. If you get
the wrong type, it may not fit properly. This may
cause your malfunction indicator lamp to light
and your fuel tank and emissions system may be
damaged. See ªMalfunction Indicator Lampº in
the Index.
Filling a Portable Fuel Container
CAUTION:
Never fill a portable fuel container while it is in
your vehicle. Static electricity discharge from the
container can ignite the gasoline vapor. You can
be badly burned and your vehicle damaged if this
occurs. To help avoid injury to you and others:
�Dispense gasoline only into
approved containers.
�Do not fill a container while it is inside a
vehicle, in a vehicle's trunk, pickup bed or
on any surface other than the ground.
�Bring the fill nozzle in contact with the
inside of the fill opening before operating
the nozzle. Contact should be maintained
until the filling is complete.
�Don't smoke while pumping gasoline.
Page 277 of 412
6-8
Checking Things Under the Hood
CAUTION:
If your vehicle has air conditioning, the auxiliary
engine fan under the hood can start up and
injure you even when the engine is not running.
Keep hands, clothing and tools away from any
underhood electric fan.
CAUTION:
Things that burn can get on hot engine parts and
start a fire. These include liquids like fuel, oil,
coolant, brake fluid, windshield washer and other
fluids, and plastic or rubber. You or others could
be burned. Be careful not to drop or spill things
that will burn onto a hot engine.
Hood Release
To open the hood, first pull
this handle inside the
vehicle. It is located in front
of the driver's side door
frame near the floor.
Page 281 of 412
6-12
Engine:
�Removal or rendering engine speed governor
(if equipped) inoperative so as to allow engine speed
to exceed manufacturer specifications.
Fan and Drive:
�Removal of fan clutch (if equipped) or rendering
clutch inoperative.
�Removal of the fan shroud (if equipped).
Air Intake:
�Removal of the air cleaner silencer.
�Reversing the air cleaner cover.
Exhaust:
�Removal of the muffler and/or resonator.
�Removal of the exhaust pipes and exhaust
pipe clamps.Engine Oil (Gasoline Engine)
If your vehicle has a diesel engine, see ªEngine Oil
(Diesel Engine)º in the Diesel Engine Supplement.
Checking Engine Oil
It's a good idea to check your engine oil every time you
get fuel. In order to get an accurate reading, the oil must
be warm and the vehicle must be on level ground.
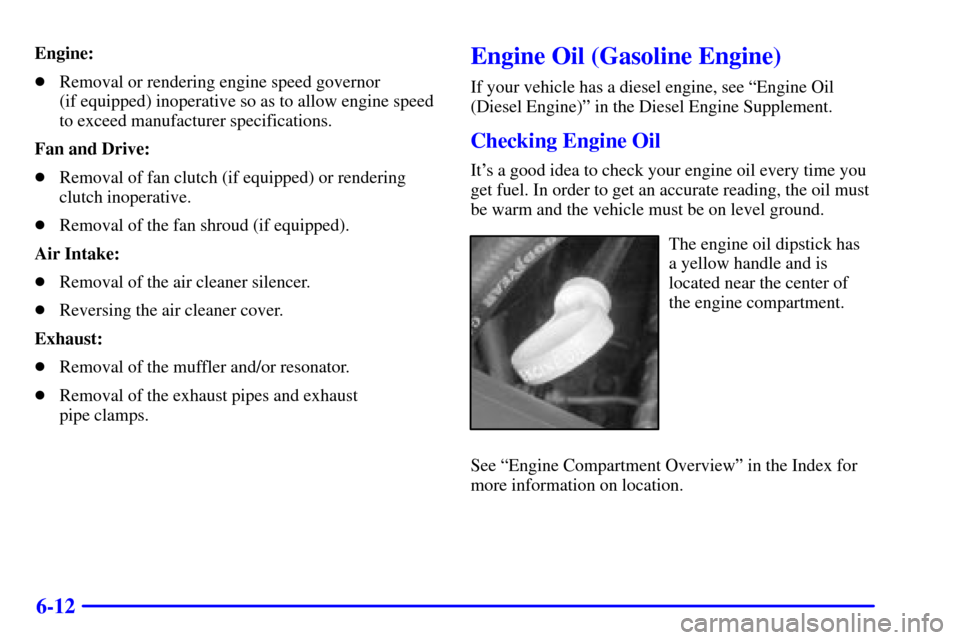
The engine oil dipstick has
a yellow handle and is
located near the center of
the engine compartment.
See ªEngine Compartment Overviewº in the Index for
more information on location.
Page 311 of 412

6-42 Inflation -- Tire Pressure
The Certification/Tire label, which is on the rear edge of
the driver's door, shows the correct inflation pressures
for your tires when they're cold. ªColdº means your
vehicle has been sitting for at least three hours or driven
no more than 1 mile (1.6 km).
NOTICE:
Don't let anyone tell you that underinflation or
overinflation is all right. It's not. If your tires
don't have enough air (underinflation), you can
get the following:
�Too much flexing
�Too much heat
�Tire overloading
�Bad wear
�Bad handling
�Bad fuel economy.
NOTICE: (Continued)
NOTICE: (Continued)
If your tires have too much air (overinflation),
you can get the following:
�Unusual wear
�Bad handling
�Rough ride
�Needless damage from road hazards.
When to Check
Check your tires once a month or more. Also, check the
tire pressure of the spare tire.
How to Check
Use a good quality pocket
-type gage to check tire
pressure. You can't tell if your tires are properly inflated
simply by looking at them. Radial tires may look
properly inflated even when they're underinflated.
Be sure to put the valve caps back on the valve
stems. They help prevent leaks by keeping out
dirt and moisture.
Page 326 of 412

6-57
Finish Damage
Any stone chips, fractures or deep scratches in the finish
should be repaired right away. Bare metal will corrode
quickly and may develop into a major repair expense.
Minor chips and scratches can be repaired with touch
-up
materials available from your dealer or other service
outlets. Larger areas of finish damage can be corrected
in your dealer's body and paint shop.
Underbody Maintenance
Chemicals used for ice and snow removal and dust
control can collect on the underbody. If these are not
removed, accelerated corrosion (rust) can occur on
the underbody parts such as fuel lines, frame, floor
pan and exhaust system even though they have
corrosion protection.
At least every spring, flush these materials from the
underbody with plain water. Clean any areas where mud
and other debris can collect. Dirt packed in closed areas
of the frame should be loosened before being flushed.
Your dealer or an underbody car washing system can do
this for you.
Chemical Paint Spotting
Some weather and atmospheric conditions can create a
chemical fallout. Airborne pollutants can fall upon and
attack painted surfaces on your vehicle. This damage
can take two forms: blotchy, ringlet
-shaped
discolorations, and small irregular dark spots etched into
the paint surface.
Although no defect in the paint job causes this, GM will
repair, at no charge to the owner, the surfaces of new
vehicles damaged by this fallout condition within
12 months or 12,000 miles (20 000 km) of purchase,
whichever occurs first.
This applies only to materials manufactured and sold by
General Motors. Bodies, body conversions or equipment
not made or sold by General Motors are not covered.
Page 334 of 412
6-65
NAME CIRCUITS PROTECTED
ETC Electronic Throttle Control
RR BLOWER Rear Auxiliary Blower
Motor Relays
FUEL SOL Fuel Solenoid
ENG
-I Heated O2 Sensors, Mass Air
Flow Sensor, Evap Canister Purge
Valve, Crankshaft Position Sensor,
Secondary Air Injection Relay
(Diesel), Water in Fuel Sensor
(Diesel), Fuel Heater (Diesel),
Glowplug Relay (Diesel),
Wastegate Solenoid (Diesel)
ECM
-I Ignition Coil, Camshaft Position
Sensor, VCM, Fuel Injectors,
Coil Driver
IGN
-E Air Conditioning Clutch Relay
SPARE Spare Fuse
SPARE Spare Fuse
SPARE Spare FuseNAME CIRCUITS PROTECTED
A/C Air Conditioning Clutch Relay
HORN Horn Relay, Underhood Lamp(s)
ECM
-B Fuel Pump Relay, VCM, PCM,
Fuel Pump and Engine Oil
Pressure Switch
SPARE Spare Fuse
SPARE Spare Fuse
AUX A Upfitter Provisions
AUX B Upfitter Provisions
A/C RELAY Air Conditioning
HORN RELAY Horn
A.I.R. RELAY Air
FUEL PUMP
RELAYFuel Pump
STARTER
RELAYStarter
ABS EXPORT
RELAYABS Export
Page 336 of 412
6-67
Capacities and Specifications
All capacities are approximate. When adding, be sure to fill to the appropriate level or as recommended in
this manual.
See refrigerant charge label under the hood for charge capacity information and requirements.
Engine Identification -- Gasoline Engines
EngineªVORTECº 4300 ªVORTECº 5000 ªVORTECº 5700 ªVORTECº 8100
Type V6 V8 V8 V8
VIN Code W M R G
Fuel System CSFI
1CSFI1CSFI1MFI2
Spark
Plug Gap0.060 inches
(1.52 mm)0.060 inches
(1.52 mm)0.060 inches
(1.52 mm)0.060 inches
(1.52 mm)
Firing Order
1
-6-5-4-3-21-8-4-3-6-5-7-21-8-4-3-6-5-7-21-8-7-2-6-5-4-3
1Central Sequential Fuel Injection
2Sequential Fuel Injection
º in the Diesel Engine Supplement.
The fuel cap is behind a
hinged door on the drivers
side of your vehicle.
While ref")