Page 276 of 363
6-22
Checking the Fluid Level
Prepare your vehicle as follows:
�Park your vehicle on a level place.
Keep the engine running.
�With the parking brake applied, place the
shift lever in PARK (P).
�With your foot on the brake pedal, move the
shift lever through each gear range, pausing for
about three seconds in each range. Then, position the
shift lever in PARK (P).
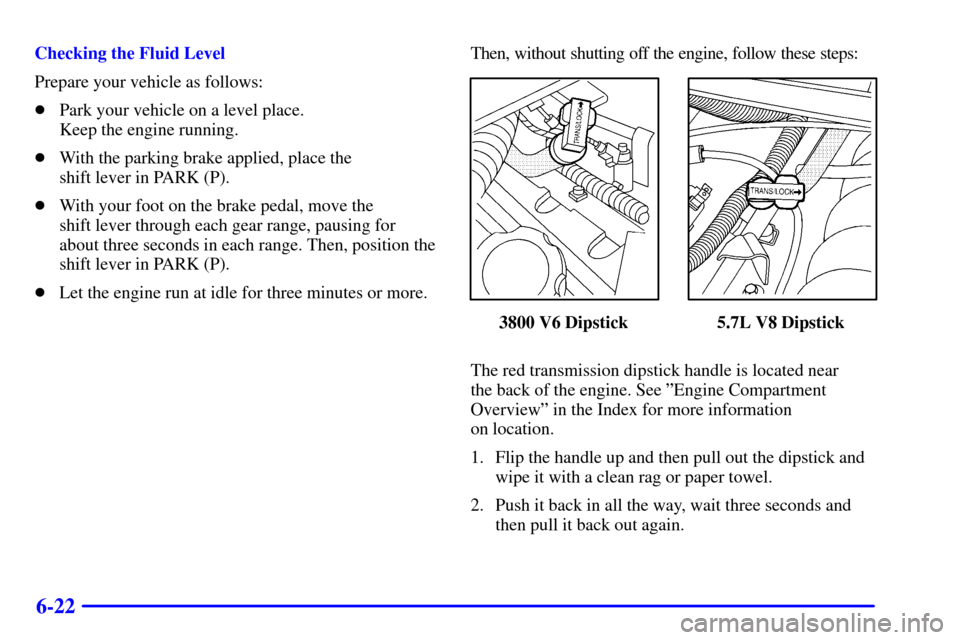
�Let the engine run at idle for three minutes or more.Then, without shutting off the engine, follow these steps:
3800 V6 Dipstick 5.7L V8 Dipstick
The red transmission dipstick handle is located near
the back of the engine. See ºEngine Compartment
Overviewº in the Index for more information
on location.
1. Flip the handle up and then pull out the dipstick and
wipe it with a clean rag or paper towel.
2. Push it back in all the way, wait three seconds and
then pull it back out again.
Page 278 of 363
6-24
Manual Transmission Fluid
When to Check
A good time to have it checked is when the engine oil is
changed. However, the fluid in your manual
transmission doesn't require changing.
How to Check
Because this operation can be difficult, you may
choose to have this done at your Chevrolet dealership
service department.
If you do it yourself, be sure to follow all the
instructions here, or you could get a false reading.
NOTICE:
Too much or too little fluid can damage your
transmission. Too much can mean that some of
the fluid could come out and fall on hot engine
parts or exhaust system parts, starting a fire.
Be sure to get an accurate reading if you check
your transmission fluid.
Check the fluid level only when your engine is off, the
vehicle is parked on a level place and the transmission is
cool enough for you to rest your fingers on the
transmission case.
Then, follow these steps:
6-Speed Transmission shown
(5
-Speed Transmission similar)
Page 280 of 363

6-26 When to Check and What to Use
See ªEngine Compartment Overviewº in the Index for
information on location.
Refer to the Maintenance Schedule to determine how
often you should check the fluid level in your clutch
master cylinder reservoir and for the proper fluid. See
ªOwner Checks and Servicesº and ªRecommended
Fluids and Lubricantsº in the Index.
How to Check and Add Fluid
The proper fluid should be added if the level is below
the plastic step on the reservoir. See the instructions on
the reservoir cap. See ªEngine Compartment Overviewº
in the Index for more information on location.
Rear Axle
When to Check and Change Lubricant
Refer to the Maintenance Schedule to determine how
often to check the lubricant and when to change it.
See ªScheduled Maintenance Servicesº in the Index.
How to Check Lubricant
If the level is below the bottom of the filler plug hole,
you'll need to add some lubricant. Add enough lubricant
to raise the level to the bottom of the filler plug hole.
What to Use
Standard Differential
Use SAE 75W
-90 Synthetic Gear Lubricant
(GM Part No. 12378261) or equivalent meeting
GM Specification 9986115.
Page 282 of 363

6-28 What to Use
Use a mixture of one-half clean, drinkable water and
one
-half DEX-COOL� coolant which won't damage
aluminum parts. If you use this coolant mixture, you
don't need to add anything else.
CAUTION:
Adding only plain water to your cooling system
can be dangerous. Plain water, or some other
liquid like alcohol, can boil before the proper
coolant mixture will. Your vehicle's coolant
warning system is set for the proper coolant
mixture. With plain water or the wrong mixture,
your engine could get too hot but you wouldn't
get the overheat warning. Your engine could
catch fire and you or others could be burned.
Use a 50/50 mixture of clean, drinkable water
and DEX
-COOL� coolant.
NOTICE:
If you use an improper coolant mixture, your
engine could overheat and be badly damaged.
The repair cost wouldn't be covered by your
warranty. Too much water in the mixture can
freeze and crack the engine, radiator, heater core
and other parts.
If you have to add coolant more than four times a year,
have your dealer check your cooling system.
NOTICE:
If you use the proper coolant, you don't have to
add extra inhibitors or additives which claim to
improve the system. These can be harmful.
Page 283 of 363

6-29 Checking Coolant
See ªEngine Compartment Overviewº in the Index for
information on location.
The vehicle must be on a level surface. When your engine
is cold, check the dipstick on the cap of the coolant
recovery tank. The coolant level should be at COLD, or a
little higher. When your engine is warm, the level on the
dipstick should be up to HOT, or a little higher.
Adding Coolant to the Recovery Tank
If you need more coolant, add the proper DEX
-COOL�
coolant mixture at the coolant recovery tank, but only
when your engine is cool. If the tank is very low or
empty, also add coolant to the radiator. See ªEngine
Overheatingº in the Index for information.
CAUTION:
Turning the radiator pressure cap when the
engine and radiator are hot can allow steam
and scalding liquids to blow out and burn you
badly. Never turn the pressure cap
-- even a
little
-- when the engine and radiator are hot.
Add coolant mixture at the recovery tank, but be careful
not to spill it.
CAUTION:
You can be burned if you spill coolant on hot
engine parts. Coolant contains ethylene glycol,
and it will burn if the engine parts are hot
enough. Don't spill coolant on a hot engine.
Occasionally check the coolant level in the radiator. For
information on how to add coolant to the radiator, see
ªCooling Systemº in the Index.
Page 285 of 363

6-31 When to Check Power Steering Fluid
It is not necessary to regularly check power steering fluid
unless you suspect there is a leak in the system or you hear
an unusual noise. A fluid loss in this system could indicate
a problem. Have the system inspected and repaired.
How to Check Power Steering Fluid
Turn the key off, let the engine compartment cool down,
wipe the cap and the top of the reservoir clean, then
unscrew the cap and wipe the dipstick with a clean rag.
Replace the cap and completely tighten it. Then remove
the cap again and look at the fluid level on the dipstick.
�When the engine compartment is hot, the level
should be at the H (hot) mark.
�When the engine compartment is cool, the level
should be at the C (cold) mark.
If necessary, add only enough fluid to bring the level up
to the mark.
What to Use
To determine what kind of fluid to use, see
ªRecommended Fluids and Lubricantsº in the Index.
Always use the proper fluid. Failure to use the proper
fluid can cause leaks and damage hoses and seals.
Page 287 of 363

6-33
Brakes
Brake Fluid
Your brake master cylinder reservoir is on the driver's
side of the engine compartment. See ªEngine
Compartment Overviewº in the Index. It is filled with
DOT
-3 brake fluid.
There are only two reasons why the brake fluid level in the
reservoir might go down. The first is that the brake fluid
goes down to an acceptable level during normal brake
lining wear. When new linings are put in, the fluid levelgoes back up. The other reason is that fluid is leaking out
of the brake system. If it is, you should have your brake
system fixed, since a leak means that sooner or later your
brakes won't work well, or won't work at all.
So, it isn't a good idea to ªtop offº your brake fluid.
Adding brake fluid won't correct a leak. If you add fluid
when your linings are worn, then you'll have too much
fluid when you get new brake linings. You should add
(or remove) brake fluid, as necessary, only when work is
done on the brake hydraulic system.
CAUTION:
If you have too much brake fluid, it can spill on
the engine. The fluid will burn if the engine is hot
enough. You or others could be burned, and your
vehicle could be damaged. Add brake fluid only
when work is done on the brake hydraulic system.
See ªChecking Brake Fluidº in this section.
When your brake fluid falls to a low level, your brake
warning light will come on. See ªBrake System Warning
Lightº in the Index.
Page 323 of 363

6-69
Capacities and Specifications
The following approximate capacities are given in English
and metric conversions. Please refer to ªRecommended
Fluids and Lubricantsº in the Index for more information.
Air Conditioning�See the refrigerant . . . . . . . . . . . .
information label under the hood.
Automatic Transmission
Drain and Refill 5.0 quarts (4.7 L). . . . . . . . . . . . . .
Overhaul
3800 V6 8.8 quarts (8.3 L). . . . . . . . . . . . . . . . . . . .
5.7L V8 10.8 quarts (10.2 L). . . . . . . . . . . . . . . . . .
Manual Transmission
Five
-Speed 3.4 quarts (3.2 L). . . . . . . . . . . . . . . . .
Six
-Speed 4.0 quarts (3.8 L). . . . . . . . . . . . . . . . . .
Cooling System
3800 V6
With Manual Transmission 11.6 quarts (11.0 L). . . .
With Automatic Transmission 11.4 quarts (10.8 L). .
5.7L V8
With Manual Transmission 11.9 quarts (11.3 L). . . .
With Automatic Transmission 11.8 quarts (11.2 L). .
Crankcase
With Oil and Filter Change
3800 V6 4.5 quarts (4.2 L). . . . . . . . . . . . . . . . . . . . .
5.7L V8 5.5 quarts (5.2 L). . . . . . . . . . . . . . . . . . . . . Fuel Tank16.5 U.S. gallons (63 L) . . . . . . . . . . . . . .
Tire Pressures, SizesSee Tire
-Loading . . . . . . . . . . .
Information label on rear edge of driver's door.
Wheel Nut Torque100 lb
-ft (140 N´m) . . . . . . . . . .
Rear Axle Lubricant1.75 quarts (1.7 L) . . . . . . . . .
All capacities are approximate. When adding, be sure to
fill to the approximate level, as recommended in this
manual. Recheck fluid level after filling.
Engine Specifications
Type
VIN Engine Code K V6. . . . . . . . . . . . . . . . . . . . . .
VIN Engine Code G V8. . . . . . . . . . . . . . . . . . . . . .
Fuel DeliveryFuel Injection . . . . . . . . . . . . . . . . . . .
Valve ArrangementIn
-Head . . . . . . . . . . . . . . . . . . .
Displacement
3800 V6 231 cubic inches (3791 cc). . . . . . . . . . . . .
5.7L V8 346 cubic inches (5670 cc). . . . . . . . . . . . .
Firing Order
3800 V6 1
-6-5-4-3-2 . . . . . . . . . . . . . . . . . . . . . . . .
5.7L V8 1
-8-7-2-6-5-4-3 . . . . . . . . . . . . . . . . . . . . .
Thermostat Temperature Specification
3800 V6 195�F (91�C) . . . . . . . . . . . . . . . . . . . . . . .
5.7L V8 180�F (82�C) . . . . . . . . . . . . . . . . . . . . . . .