Page 274 of 448

4-58 Trailer Wiring Harness
The light-duty trailer wiring is a six-wire harness
assembly. The optional heavy
-duty trailer wiring is an
eight
-wire harness assembly. The harnesses are stored
under the vehicle, along the passenger
-side frame
crossmember on two
-door vehicles or on the driver's
side corner frame rear crossmember on four
-door
vehicles. The heavy
-duty trailer wiring is fused in the
engine compartment fuse block. See ªFuses and Circuit
Breakersº in the Index. Both harnesses have no
connector and should be wired by a qualified
electrical technician. The technician can use the
following color code chart when connecting the
wiring harness to your trailer.�Dark Blue: Use for electric trailer brakes or auxiliary
wiring (eight
-wire harness only).
�Red: Use for battery charging; it connects to the
starter solenoid (eight
-wire harness only).
�Light Green: Back
-up lamps.
�Brown: Taillamps and parking lamps.
�Yellow: Left stoplamp and turn signal.
�Dark Green: Right stoplamp and turn signal.
�White: Ground wire.
�Light Blue: Auxiliary stoplamp.
Securely attach the harness to the trailer, then tape or
strap it to your vehicle's frame rail. Be sure you leave it
loose enough so the wiring doesn't bend or break,
but not so loose that it drags on the ground. Store the
harness in its original place. Wrap the harness together
and tie it neatly so it won't be damaged.
Page 301 of 448

5-27 Storing a Flat or Spare Tire and Tools
CAUTION:
Storing a jack, a tire or other equipment in
the passenger compartment of the vehicle could
cause injury. In a sudden stop or collision, loose
equipment could strike someone. Store all these
in the proper place.
NOTICE:
An aluminum wheel with a flat tire should
always be stored under the vehicle with the hoist.
However, storing it that way for an extended
period could damage the wheel. To avoid this,
have the wheel repaired as soon as possible.
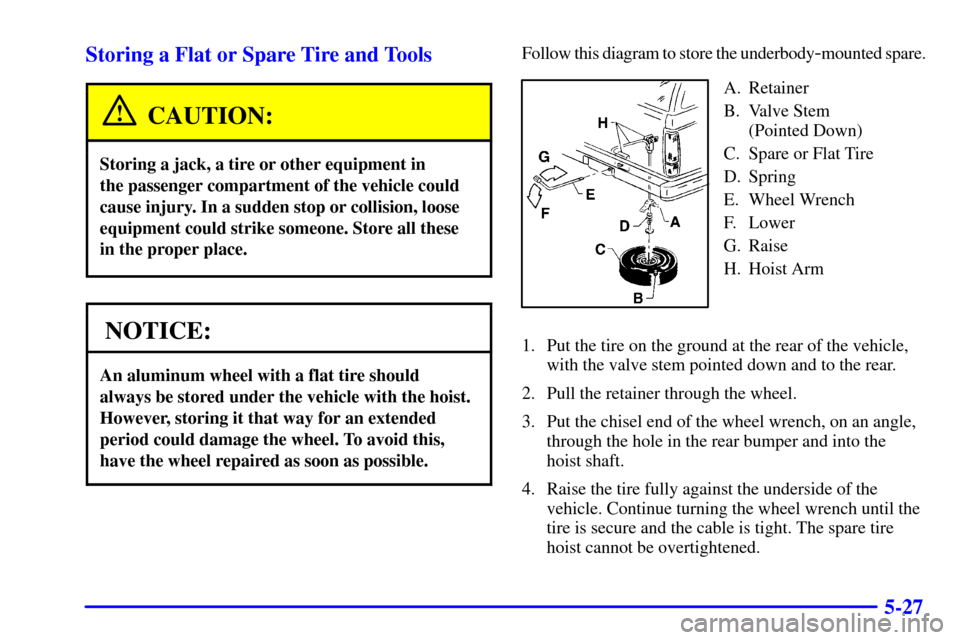
Follow this diagram to store the underbody-mounted spare.
A. Retainer
B. Valve Stem
(Pointed Down)
C. Spare or Flat Tire
D. Spring
E. Wheel Wrench
F. Lower
G. Raise
H. Hoist Arm
1. Put the tire on the ground at the rear of the vehicle,
with the valve stem pointed down and to the rear.
2. Pull the retainer through the wheel.
3. Put the chisel end of the wheel wrench, on an angle,
through the hole in the rear bumper and into the
hoist shaft.
4. Raise the tire fully against the underside of the
vehicle. Continue turning the wheel wrench until the
tire is secure and the cable is tight. The spare tire
hoist cannot be overtightened.
Page 302 of 448
5-28
5. Make sure the tire is stored securely. Push, pull, and
then try to rotate or turn the tire. If the tire moves,
use the wheel wrench to tighten the cable.Follow this diagram for the inside
-mounted spare.
A. Spare or Flat Tire
B. Retainer
C. NutD. Wheel Carrier
E. Hook
Page 303 of 448
5-29
Follow this diagram for the rear-mounted spare.
A. Wheel Carrier
B. Spare or Flat Tire
C. Wheel Nut and Locking Nut CylinderReinstall the locking wheel nut using the wheel wrench.
Then push the lock case onto the lug nut until it stops.
The key does not have to be inserted into the lock. Push
the lock case to be sure it is secured. The special lug nut
and lock case is not intended to be used on any road
wheel, only on the spare wheel carrier. Tighten the nuts
on the wheel carrier to 22 to 32 lb
-ft (30 to 40 N´m).
CAUTION:
Make sure the tire and carrier are secure.
Driving with the tire or carrier unlatched
could injure pedestrians or damage the vehicle.
Page 304 of 448

5-30
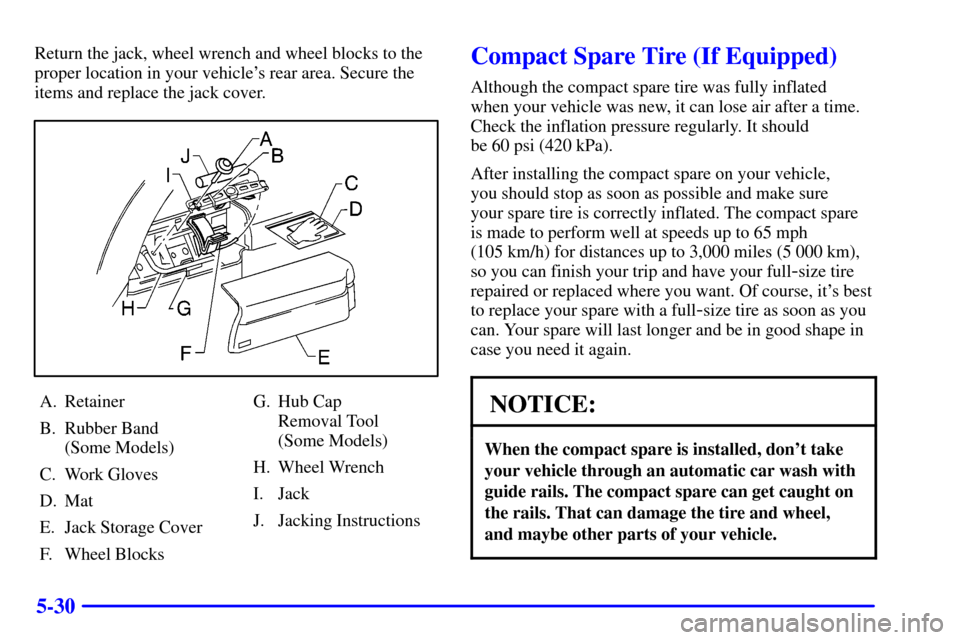
Return the jack, wheel wrench and wheel blocks to the
proper location in your vehicle's rear area. Secure the
items and replace the jack cover.
A. Retainer
B. Rubber Band
(Some Models)
C. Work Gloves
D. Mat
E. Jack Storage Cover
F. Wheel BlocksG. Hub Cap
Removal Tool
(Some Models)
H. Wheel Wrench
I. Jack
J. Jacking Instructions
Compact Spare Tire (If Equipped)
Although the compact spare tire was fully inflated
when your vehicle was new, it can lose air after a time.
Check the inflation pressure regularly. It should
be 60 psi (420 kPa).
After installing the compact spare on your vehicle,
you should stop as soon as possible and make sure
your spare tire is correctly inflated. The compact spare
is made to perform well at speeds up to 65 mph
(105 km/h) for distances up to 3,000 miles (5 000 km),
so you can finish your trip and have your full
-size tire
repaired or replaced where you want. Of course, it's best
to replace your spare with a full
-size tire as soon as you
can. Your spare will last longer and be in good shape in
case you need it again.
NOTICE:
When the compact spare is installed, don't take
your vehicle through an automatic car wash with
guide rails. The compact spare can get caught on
the rails. That can damage the tire and wheel,
and maybe other parts of your vehicle.
Page 322 of 448

6-15
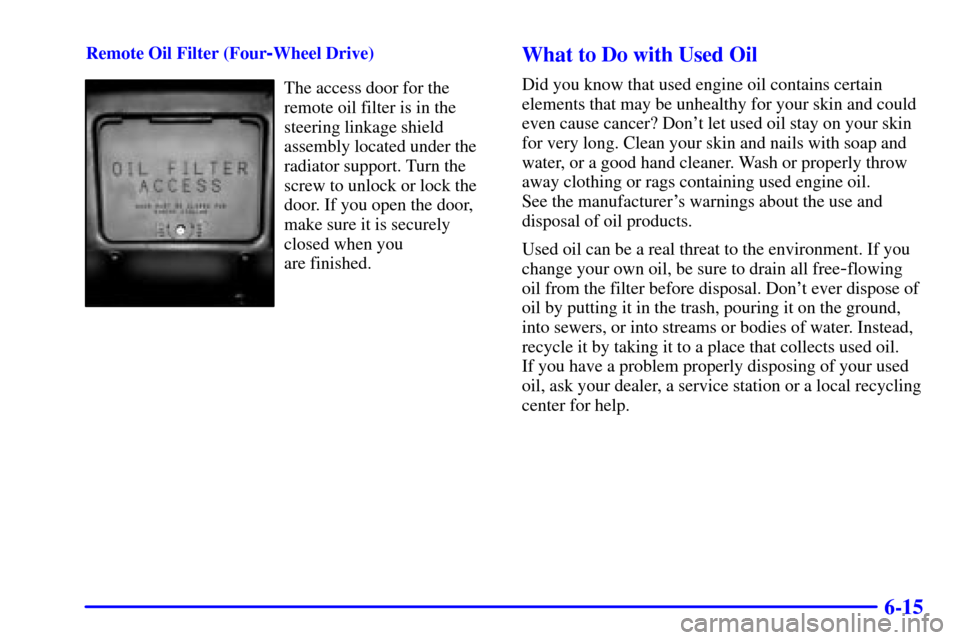
Remote Oil Filter (Four-Wheel Drive)
The access door for the
remote oil filter is in the
steering linkage shield
assembly located under the
radiator support. Turn the
screw to unlock or lock the
door. If you open the door,
make sure it is securely
closed when you
are finished.
What to Do with Used Oil
Did you know that used engine oil contains certain
elements that may be unhealthy for your skin and could
even cause cancer? Don't let used oil stay on your skin
for very long. Clean your skin and nails with soap and
water, or a good hand cleaner. Wash or properly throw
away clothing or rags containing used engine oil.
See the manufacturer's warnings about the use and
disposal of oil products.
Used oil can be a real threat to the environment. If you
change your own oil, be sure to drain all free
-flowing
oil from the filter before disposal. Don't ever dispose of
oil by putting it in the trash, pouring it on the ground,
into sewers, or into streams or bodies of water. Instead,
recycle it by taking it to a place that collects used oil.
If you have a problem properly disposing of your used
oil, ask your dealer, a service station or a local recycling
center for help.
Page 353 of 448

6-46 Tire Inspection and Rotation
Tires should be rotated every 6,000 to 8,000 miles
(10 000 to 13 000 km). Any time you notice unusual
wear, rotate your tires as soon as possible and check
wheel alignment. Also check for damaged tires or
wheels. See ªWhen It's Time for New Tiresº and
ªWheel Replacementº later in this section for more
information. Make sure the spare tire is stored securely.
Push, pull, and then try to rotate or turn the tire. If it
moves, use the wheel wrench to tighten the cable. See
ªStoring a Flat or Spare Tire and Toolsº in the Index.
The purpose of regular rotation is to achieve more uniform
wear for all tires on the vehicle. The first rotation is the most
important. See ªScheduled Maintenance Servicesº in the
Index for scheduled rotation intervals.
When rotating your tires, always use one of the correct
rotation patterns shown here.
If your vehicle has a compact spare tire, don't include it
in your tire rotation.
After the tires have been rotated, adjust the front and
rear inflation pressures as shown on the Certification/Tire
label. Make certain that all wheel nuts are properly
tightened. See ªWheel Nut Torqueº in the Index.
Page 424 of 448

7-43 At Least Twice a Year
Restraint System Check
Make sure the safety belt reminder light and all your
belts, buckles, latch plates, retractors and anchorages are
working properly. Look for any other loose or damaged
safety belt system parts. If you see anything that might
keep a safety belt system from doing its job, have it
repaired. Have any torn or frayed safety belts replaced.
Also look for any opened or broken air bag coverings,
and have them repaired or replaced. (The air bag system
does not need regular maintenance.)
Wiper Blade Check
Inspect wiper blades for wear or cracking. Replace blade
inserts that appear worn or damaged or that streak or
miss areas of the windshield. Also see ªWiper Blades,
Cleaningº in the Index.Spare Tire Check
At least twice a year, after the monthly inflation check
of the spare tire determines that the spare is inflated to
the correct tire inflation pressure, make sure that the
spare tire is stored securely. Push, pull, and then try to
rotate or turn the tire. If it moves, use the wheel wrench
to tighten the cable. See ªStoring the Spare Tire and
Toolsº in the Index.
Weatherstrip Lubrication
Silicone grease on weatherstrips will make them last
longer, seal better, and not stick or squeak. Apply
silicone grease with a clean cloth. During very cold,
damp weather more frequent application may be
required. See ªRecommended Fluids and Lubricantsº
in the Index.