Page 231 of 388
5-13
CAUTION:
You can be burned if you spill coolant on hot
engine parts. Coolant contains ethylene glycol
and it will burn if the engine parts are hot
enough. Don't spill coolant on a hot engine.
When the coolant in the coolant recovery tank is at the
ADD mark, start your vehicle.
If the overheat warning continues, there's one more
thing you can try. You can add the proper coolant
mixture directly to the radiator, but be sure the cooling
system is cool before you do it.
Page 233 of 388
5-15 How to Add Coolant to the Radiator
1. You can remove
the radiator
pressure cap when
the cooling system,
including the
radiator pressure
cap and upper
radiator hose, is no
longer hot.
Turn the pressure cap slowly counterclockwise until
it first stops. (Don't press down while turning the
pressure cap.)
If you hear a hiss, wait for that to stop. A hiss means
there is still some pressure left.
See ªEngine Compartment Overviewº in the Index
for more information on location.
2. Then keep turning
the pressure cap,
but now push down
as you turn it.
Remove the
pressure cap.
Page 234 of 388
5-16
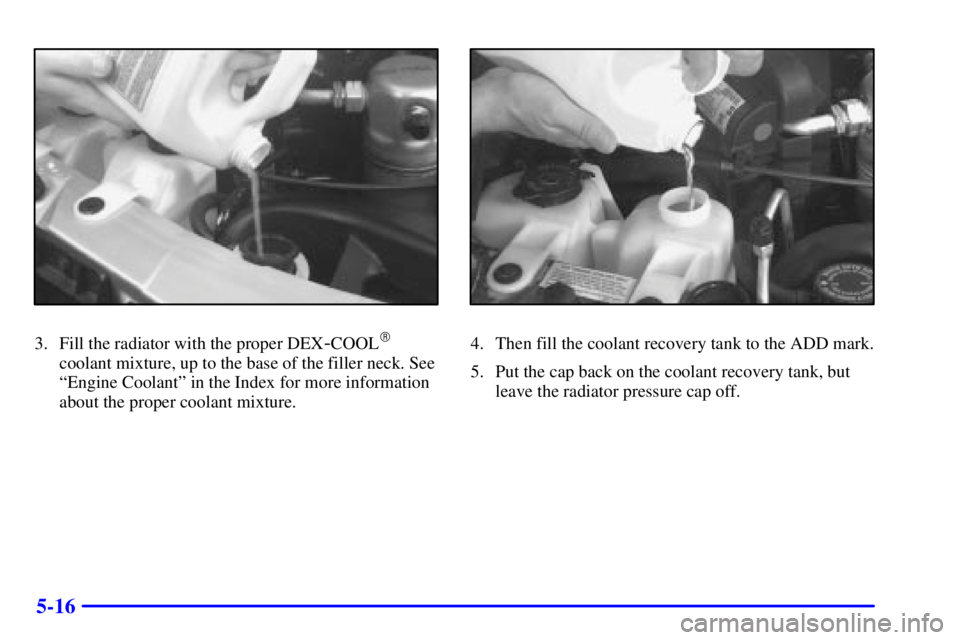
3. Fill the radiator with the proper DEX-COOL�
coolant mixture, up to the base of the filler neck. See
ªEngine Coolantº in the Index for more information
about the proper coolant mixture.
4. Then fill the coolant recovery tank to the ADD mark.
5. Put the cap back on the coolant recovery tank, but
leave the radiator pressure cap off.
Page 235 of 388
5-17
6. Start the engine and let it run until you can feel the
upper radiator hose getting hot. Watch out for the
engine cooling fan.
7. By this time, the coolant level inside the radiator
filler neck may be lower. If the level is lower, add
more of the proper DEX
-COOL� coolant mixture
through the filler neck until the level reaches the
base of the filler neck.
8. Then replace the pressure cap. At any time during
this procedure if coolant begins to flow out of the
filler neck, reinstall the pressure cap. Be sure the
arrows on the pressure cap line up like this.
Page 236 of 388

5-18
Engine Fan Noise
This vehicle has a clutched engine cooling fan. When
the clutch is engaged, the fan spins faster to provide
more air to cool the engine. In most everyday driving
conditions, the clutch is not fully engaged. This
improves fuel economy and reduces fan noise. Under
heavy vehicle loading, trailer towing and/or high outside
temperatures, the fan speed increases when the clutch
engages. So you may hear an increase in fan noise.
This is normal and should not be mistaken as the
transmission slipping or making extra shifts. It is merely
the cooling system functioning properly. The fan will
slow down when additional cooling is not required and
the clutch disengages.
You may also hear this fan noise when you start the
engine. It will go away as the fan clutch disengages.
If a Tire Goes Flat
It's unusual for a tire to ªblow outº while you're driving,
especially if you maintain your tires properly. If air goes
out of a tire, it's much more likely to leak out slowly.
But if you should ever have a ªblowout,º here are a few
tips about what to expect and what to do:
If a front tire fails, the flat tire will create a drag that
pulls the vehicle toward that side. Take your foot off the
accelerator pedal and grip the steering wheel firmly.
Steer to maintain lane position, and then gently brake to
a stop well out of the traffic lane.
A rear blowout, particularly on a curve, acts much like a
skid and may require the same correction you'd use in a
skid. In any rear blowout, remove your foot from the
accelerator pedal. Get the vehicle under control by
steering the way you want the vehicle to go. It may be
very bumpy and noisy, but you can still steer. Gently
brake to a stop
-- well off the road if possible.
If a tire goes flat, the next part shows how to use your
jacking equipment to change a flat tire safely.
Page 237 of 388
5-19
Changing a Flat Tire
If a tire goes flat, avoid further tire and wheel damage
by driving slowly to a level place. Turn on your hazard
warning flashers.
CAUTION:
Changing a tire can cause an injury. The vehicle
can slip off the jack and roll over you or other
people. You and they could be badly injured.
Find a level place to change your tire. To help
prevent the vehicle from moving:
1. Set the parking brake firmly.
2. Put the shift lever in PARK (P).
3. Turn off the engine.
4. Put the wheel blocks at the front and
rear of the tire farthest away from the
one being changed. That would be the
tire on the other side of the vehicle, at
the opposite end.The following steps will tell you how to use the jack and
change a tire.
Page 251 of 388

5-33
NOTICE:
When the compact spare is installed, don't take
your vehicle through an automatic car wash with
guide rails. The compact spare can get caught on
the rails. That can damage the tire and wheel,
and maybe other parts of your vehicle.
Don't use your compact spare on other vehicles.
And don't mix your compact spare tire or wheel with
other wheels or tires. They won't fit. Keep your spare
tire and its wheel together.
NOTICE:
Tire chains won't fit your compact spare. Using
them can damage your vehicle and can damage
the chains too. Don't use tire chains on your
compact spare.
If You're Stuck: In Sand, Mud,
Ice or Snow
In order to free your vehicle when it is stuck, you will
need to spin the wheels, but you don't want to spin your
wheels too fast. The method known as ªrockingº can
help you get out when you're stuck, but you must
use caution.
CAUTION:
If you let your tires spin at high speed, they can
explode, and you or others could be injured. And,
the transmission or other parts of the vehicle can
overheat. That could cause an engine
compartment fire or other damage. When you're
stuck, spin the wheels as little as possible. Don't
spin the wheels above 35 mph (55 km/h) as shown
on the speedometer.
Page 253 of 388

6-
6-1
Section 6 Service and Appearance Care
Here you will find information about the care of your vehicle. This section begins with service and fuel information,
and then it shows how to check important fluid and lubricant levels. There is also technical information about your
vehicle, and a part devoted to its appearance care.
6
-2 Service
6
-3 Fuel
6
-5 Filling Your Tank
6
-7 Filling a Portable Fuel Container
6
-8 Checking Things Under the Hood
6
-11 Engine Oil
6
-15 Engine Cover
6
-19 Engine Air Cleaner/Filter
6
-20 Automatic Transmission Fluid
6
-24 All-Wheel Drive (If Equipped)
6
-25 Rear Axle
6
-26 Engine Coolant
6
-29 Radiator Pressure Cap
6
-30 Power Steering Fluid
6
-30 Windshield Washer Fluid
6
-32 Brakes6
-35 Battery
6
-36 Bulb Replacement
6
-42 Windshield Wiper Blade Replacement
6
-43 Tires
6
-51 Appearance Care
6
-51 Cleaning the Inside of Your Vehicle
6
-54 Cleaning the Outside of Your Vehicle
6
-56 Cleaning Tires
6
-57 Finish Damage
6
-57 Underbody Maintenance
6
-58 GM Vehicle Care/Appearance Materials
6
-59 Vehicle Identification Number (VIN)
6
-59 Service Parts Identification Label
6
-60 Electrical System
6
-68 Capacities and Specifications
6
-69 Normal Maintenance Replacement Parts