Page 277 of 388
6-25 Front Axle
When to Check and Change Lubricant
Refer to the Maintenance Schedule to determine how
often to check the lubricant and when to change it. See
ªScheduled Maintenance Servicesº in the Index.
How to Check Lubricant
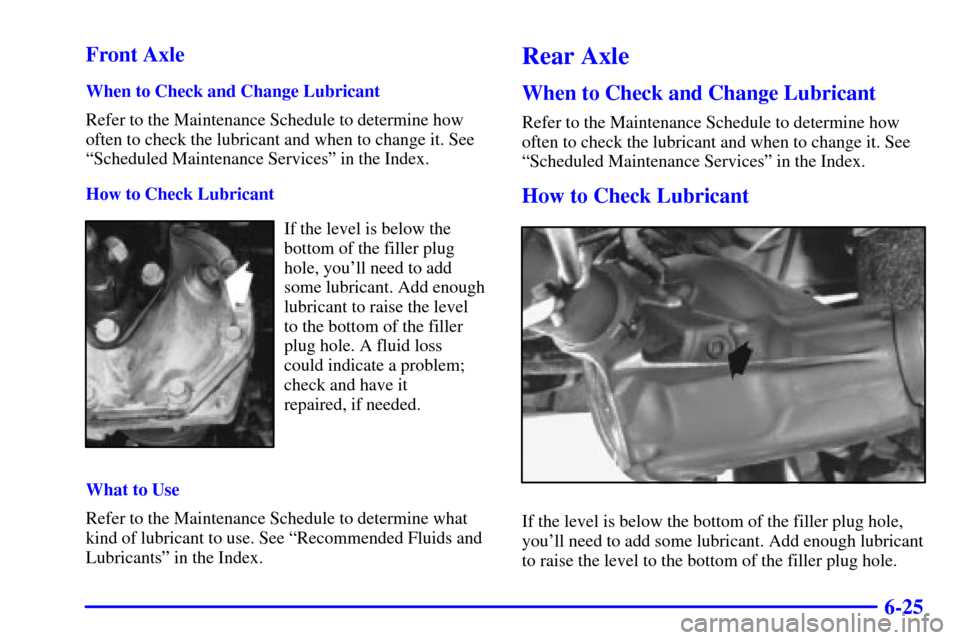
If the level is below the
bottom of the filler plug
hole, you'll need to add
some lubricant. Add enough
lubricant to raise the level
to the bottom of the filler
plug hole. A fluid loss
could indicate a problem;
check and have it
repaired, if needed.
What to Use
Refer to the Maintenance Schedule to determine what
kind of lubricant to use. See ªRecommended Fluids and
Lubricantsº in the Index.
Rear Axle
When to Check and Change Lubricant
Refer to the Maintenance Schedule to determine how
often to check the lubricant and when to change it. See
ªScheduled Maintenance Servicesº in the Index.
How to Check Lubricant
If the level is below the bottom of the filler plug hole,
you'll need to add some lubricant. Add enough lubricant
to raise the level to the bottom of the filler plug hole.
Page 278 of 388
6-26 What to Use
Refer to the Maintenance Schedule to determine what
kind of lubricant to use. See ªRecommended Fluids and
Lubricantsº in the Index.
Engine Coolant
The cooling system in your vehicle is filled with
DEX
-COOL� engine coolant. This coolant is designed
to remain in your vehicle for 5 years or 150,000 miles
(240 000 km), whichever occurs first, if you add only
DEX
-COOL� extended life coolant.
The following explains your cooling system and how to
add coolant when it is low. If you have a problem with
engine overheating, see ªEngine Overheatingº in
the Index.
A 50/50 mixture of clean, drinkable water and
DEX
-COOL� coolant will:
�Give freezing protection down to
-34�F (-37�C).
�Give boiling protection up to 265�F (129�C).
�Protect against rust and corrosion.
�Help keep the proper engine temperature.
�Let the warning lights and gages work as
they should.
NOTICE:
When adding coolant, it is important that you use
only DEX
-COOL� (silicate-free) coolant.
If coolant other than DEX-COOL is added to the
system, premature engine, heater core or
radiator corrosion may result. In addition, the
engine coolant will require change sooner
-- at
30,000 miles (50 000 km) or 24 months,
whichever occurs first. Damage caused by the
use of coolant other than DEX
-COOL� is not
covered by your new vehicle warranty.
What to Use
Use a mixture of one-half clean, drinkable water and
one
-half DEX-COOL� coolant which won't damage
aluminum parts. If you use this coolant mixture, you
don't need to add anything else.
Page 284 of 388
6-32
Brakes
Brake Fluid
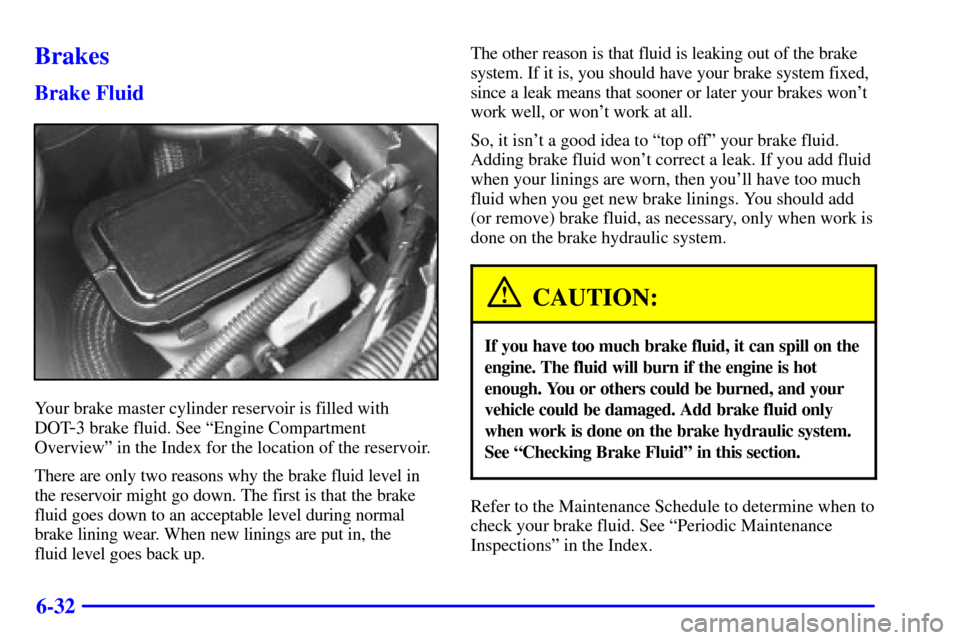
Your brake master cylinder reservoir is filled with
DOT
-3 brake fluid. See ªEngine Compartment
Overviewº in the Index for the location of the reservoir.
There are only two reasons why the brake fluid level in
the reservoir might go down. The first is that the brake
fluid goes down to an acceptable level during normal
brake lining wear. When new linings are put in, the
fluid level goes back up.The other reason is that fluid is leaking out of the brake
system. If it is, you should have your brake system fixed,
since a leak means that sooner or later your brakes won't
work well, or won't work at all.
So, it isn't a good idea to ªtop offº your brake fluid.
Adding brake fluid won't correct a leak. If you add fluid
when your linings are worn, then you'll have too much
fluid when you get new brake linings. You should add
(or remove) brake fluid, as necessary, only when work is
done on the brake hydraulic system.
CAUTION:
If you have too much brake fluid, it can spill on the
engine. The fluid will burn if the engine is hot
enough. You or others could be burned, and your
vehicle could be damaged. Add brake fluid only
when work is done on the brake hydraulic system.
See ªChecking Brake Fluidº in this section.
Refer to the Maintenance Schedule to determine when to
check your brake fluid. See ªPeriodic Maintenance
Inspectionsº in the Index.
Page 287 of 388
6-35
Your rear drum brakes don't have wear indicators, but if
you ever hear a rear brake rubbing noise, have the rear
brake linings inspected immediately. Also, the rear
brake drums should be removed and inspected each time
the tires are removed for rotation or changing. When
you have the front brake pads replaced, have the rear
brakes inspected, too.
Brake linings should always be replaced as complete
axle sets.
See ªBrake System Inspectionº in Section 7 of this manual
under Part C ªPeriodic Maintenance Inspections.º
Brake Pedal Travel
See your dealer if the brake pedal does not return to
normal height, or if there is a rapid increase in pedal
travel. This could be a sign of brake trouble.
Brake Adjustment
Every time you make a brake stop, your disc brakes
adjust for wear.
If your brake pedal goes down farther than normal, your
rear drum brakes may need adjustment. Adjust them by
backing up and firmly applying the brakes a few times.
Replacing Brake System Parts
The braking system on a vehicle is complex. Its many
parts have to be of top quality and work well together if
the vehicle is to have really good braking. Your vehicle
was designed and tested with top
-quality GM brake
parts. When you replace parts of your braking
system
-- for example, when your brake linings wear
down and you have to have new ones put in
-- be sure
you get new approved GM replacement parts. If you
don't, your brakes may no longer work properly. For
example, if someone puts in brake linings that are wrong
for your vehicle, the balance between your front and
rear brakes can change
-- for the worse. The braking
performance you've come to expect can change in many
other ways if someone puts in the wrong replacement
brake parts.
Battery
Your new vehicle comes with a maintenance free
ACDelco� battery. When it's time for a new battery,
get one that has the replacement number shown on the
original battery's label. We recommend an ACDelco
battery. See ªEngine Compartment Overviewº in the
Index for battery location.
Page 294 of 388
6-42
4. Press the tab and
turn the socket
counterclockwise
to remove the socket
from the bezel.
If the socket does not
have a tab, turn the
socket counterclockwise
to remove the socket
from the bezel.
5. Remove the old bulb from the socket and replace it
with a new one.
6. Reverse Steps 1 through 4 to reinstall the taillamp.Windshield Wiper
Blade Replacement
Windshield wiper blades should be inspected at least
twice a year for wear and cracking. See ªWiper Blade
Checkº in the Index for more information.
To replace your windshield
wiper blade inserts, lift
the wiper arm away from
the windshield.
Pinch the two tabs on the wiper arm and slide the insert
out of the blade. Slide the new one in place. Make sure
the tabs are locked into position. See ªNormal
Maintenance Replacement Partsº in the Index for the
proper type of replacement blade.
Page 297 of 388
6-45
The purpose of regular rotation is to achieve more
uniform wear for all tires on the vehicle. The first
rotation is the most important. See ªScheduled
Maintenance Servicesº in the Index for scheduled
rotation intervals.
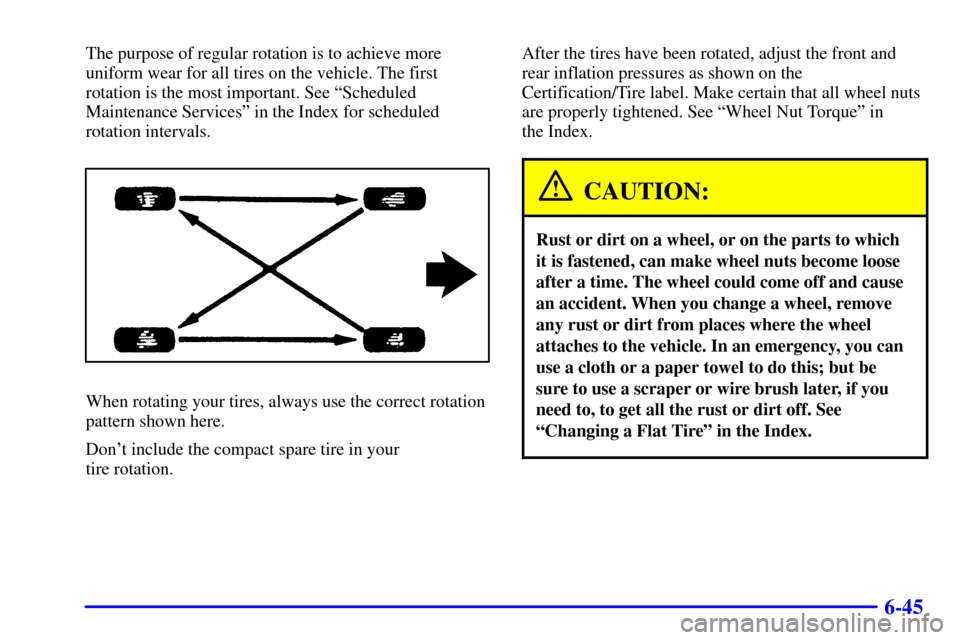
When rotating your tires, always use the correct rotation
pattern shown here.
Don't include the compact spare tire in your
tire rotation.After the tires have been rotated, adjust the front and
rear inflation pressures as shown on the
Certification/Tire label. Make certain that all wheel nuts
are properly tightened. See ªWheel Nut Torqueº in
the Index.
CAUTION:
Rust or dirt on a wheel, or on the parts to which
it is fastened, can make wheel nuts become loose
after a time. The wheel could come off and cause
an accident. When you change a wheel, remove
any rust or dirt from places where the wheel
attaches to the vehicle. In an emergency, you can
use a cloth or a paper towel to do this; but be
sure to use a scraper or wire brush later, if you
need to, to get all the rust or dirt off. See
ªChanging a Flat Tireº in the Index.
Page 309 of 388
6-57
Finish Damage
Any stone chips, fractures or deep scratches in the finish
should be repaired right away. Bare metal will corrode
quickly and may develop into a major repair expense.
Minor chips and scratches can be repaired with touch
-up
materials available from your dealer or other service
outlets. Larger areas of finish damage can be corrected
in your dealer's body and paint shop.
Underbody Maintenance
Chemicals used for ice and snow removal and dust
control can collect on the underbody. If these are not
removed, accelerated corrosion (rust) can occur on the
underbody parts such as fuel lines, frame, floor pan
and exhaust system even though they have
corrosion protection.
At least every spring, flush these materials from the
underbody with plain water. Clean any areas where mud
and other debris can collect. Dirt packed in closed areas
of the frame should be loosened before being flushed.
Your dealer or an underbody car washing system can do
this for you.
Chemical Paint Spotting
Some weather and atmospheric conditions can create a
chemical fallout. Airborne pollutants can fall upon and
attack painted surfaces on your vehicle. This damage
can take two forms: blotchy, ringlet
-shaped
discolorations, and small irregular dark spots etched into
the paint surface.
Although no defect in the paint job causes this, GM
will repair, at no charge to the owner, the surfaces of
new vehicles damaged by this fallout condition within
12 months or 12,000 miles (20 000 km) of purchase,
whichever occurs first.
Page 321 of 388
6-69 Front Axle Capacity
Front Axle 2.6 pint (1.2 L). . . . . . . . . . . . . . . . . . . . .
Rear Axle Capacity
Rear Axle 3.5 pint (1.7 L). . . . . . . . . . . . . . . . . . . . . .
Normal Maintenance
Replacement Parts
Replacement part numbers listed in this section are
based on the latest information available at the time of
printing, and are subject to change. If a part listed in this
manual is not the same as the part used in your vehicle
when it was built, or if you have any questions, please
contact your GM truck dealer.
Engine Oil Filter PF47*. . . . . . . . . . . . . . . . . . . . . . .
Engine Air Cleaner/Filter A1163C*. . . . . . . . . . . . . . .
Positive Crankcase Ventilation
(PCV) Valve CV769C*. . . . . . . . . . . . . . . . . . . . . .
Spark Plugs 41
-932* . . . . . . . . . . . . . . . . . . . . . . . . . . Spark Plug Gap 0.060 inches (1.52 mm). . . . . . . . . .
Fuel Filter GF481*. . . . . . . . . . . . . . . . . . . . . . . . . . . .
Wiper Blades (Front) Trico 22110158, Pin Type. . . . .
18 inches (45.7 cm) Length
Wiper Blade (Rear) Trico 22154396, Pin Type. . . . .
14 inches (35.5 cm) Length
*ACDelco
� part number
Vehicle Dimensions*
Length 189.8 inches (482.0 cm). . . . . . . . . . . . . . . . .
Width 77.5 inches (196.8 cm). . . . . . . . . . . . . . . . . . .
Height 76.0 inches (193.0 cm). . . . . . . . . . . . . . . . . . .
Wheelbase 111.0 inches (281.9 cm). . . . . . . . . . . . . .
Front Tread Width 65.1 inches (165.4 cm). . . . . . . . .
Rear Tread Width 65.1 inches (165.4 cm). . . . . . . . . .
*Figures reflect base equipment only.