2001 CADILLAC SEVILLE run flat
[x] Cancel search: run flatPage 5 of 371
Section
3
Comfort Controls and Audio Systems
Section
4
Your Driving and the Road
Section
5
Table of Contents (cont'd)
Defensive Driving
Drunken Driving
Control of a Vehicle
BrakingSteering
Driving Tips for Various Road Conditions
Loading Your Vehicle
Towing a Trailer Heating and Air Conditioning
Setting the Radio Clock
Radio/Cassette Player/CD PlayerRadio Theft-Deterrent Feature
Steering Wheel Controls
Hazard Warning Flashers
Jump Starting
Towing Your VehicleEngine Overheating
Changing a Flat Tire
If You're Stuck
Problems on the Road
iii
Page 161 of 371

2-94
CHECK FUEL GAGE - 50: This message will appear
when the fuel supply is less than 5 gallons (18.9 L) and
the display is turned off. A single chime will also sound
when this message is displayed.
CHECK GAS CAP
- 61: This message will appear if
the gas cap has not been fully tightened. You should
recheck your gas cap to ensure that it's fully tightened.
CHECK OIL LEVEL
- 36: For correct operation of
the low oil sensing system, your vehicle should be on a
level surface. A false CHECK OIL LEVEL message
may appear if the vehicle is parked on grades. The oil
level sensing system does not check for actual oil level
if the engine has been off for a short period of time, and
the oil level is never sensed while the engine is running.
If the CHECK OIL LEVEL message appears, and your
vehicle has been parked on level ground with the engine
off for at least 30 minutes, the oil level should be
checked by observing the oil dipstick. Prior to checking
the oil level, be sure the engine has been off for a few
minutes and your vehicle is on a level surface.
Then check the dipstick and add oil if necessary.
See ªEngine Oilº in the Index.CHECK TIRE PRESSURE
- 144: This message is
displayed when the Tire Pressure Monitor (TPM) system
detects a low or high tire pressure condition in one or
more of the road tires. By pressing the INFO button up
or down the DIC display will show which tire or tires do
not have the correct inflation pressure. A ªLOW TIREº
condition exists when the tire's air pressure is under
24 psi (165 kPa) and a ªHIGH TIREº condition exists
when the tire's air pressure is above 36 psi (248 kPa).
The system will display the air pressure, the tire location
(LF, RF, RR or LR) and if the air pressure is low or
high. The tire pressure information is available in
English or metric measurements. For example, a driver's
side front tire that is low may be shown as: 22 PSI LF
TIRE LOW.
The correct tire inflation pressure should be set to those
shown on the Tire Loading
-Information Label, located on
the rear edge of the driver's door. For more information
regarding proper tire inflation, see ªInflation
-- Tire
Pressureº in the Index. If a tire is low, you should stop
as soon as possible and inspect your tire(s) for damage.
If a tire is flat, see ªIf a Tire is Flatº in the Index.
Page 244 of 371

4-30
Loading Your Vehicle
Two labels on your vehicle show how much weight it
may properly carry. The Tire
-Loading Information label
found on the rear edge of the driver's door tells you the
proper size, speed rating and recommended inflation
pressures for the tires on your vehicle. It also gives you
important information about the number of people that
can be in your vehicle and the total weight that you can
carry. This weight is called the Vehicle Capacity Weight
and includes the weight of all occupants, cargo and all
options not installed in the factory.
The other label is the Certification label, found on
the rear edge of the driver's door. It tells you the
gross weight capacity of your vehicle, called the Gross
Vehicle Weight Rating (GVWR). The GVWR includes
the weight of the vehicle, all occupants, fuel and cargo.
Never exceed the GVWR for your vehicle, or the Gross
Axle Weight Rating (GAWR) for either the front or
rear axle.
If you do have a heavy load, you should spread it out.
Don't carry more than 176 lbs. (80 kg) in your trunk.
Page 270 of 371
5-17
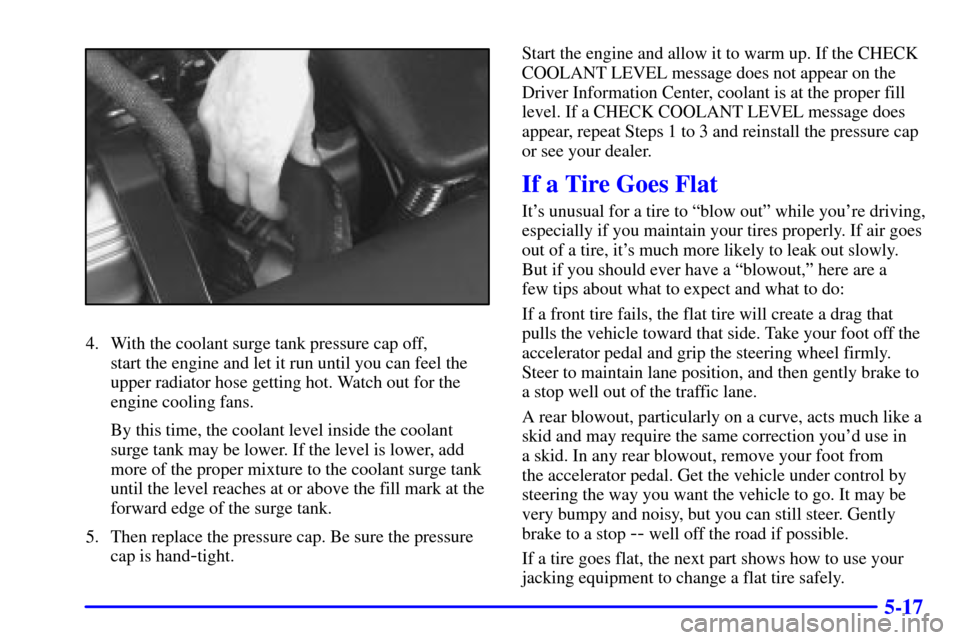
4. With the coolant surge tank pressure cap off,
start the engine and let it run until you can feel the
upper radiator hose getting hot. Watch out for the
engine cooling fans.
By this time, the coolant level inside the coolant
surge tank may be lower. If the level is lower, add
more of the proper mixture to the coolant surge tank
until the level reaches at or above the fill mark at the
forward edge of the surge tank.
5. Then replace the pressure cap. Be sure the pressure
cap is hand
-tight.Start the engine and allow it to warm up. If the CHECK
COOLANT LEVEL message does not appear on the
Driver Information Center, coolant is at the proper fill
level. If a CHECK COOLANT LEVEL message does
appear, repeat Steps 1 to 3 and reinstall the pressure cap
or see your dealer.
If a Tire Goes Flat
It's unusual for a tire to ªblow outº while you're driving,
especially if you maintain your tires properly. If air goes
out of a tire, it's much more likely to leak out slowly.
But if you should ever have a ªblowout,º here are a
few tips about what to expect and what to do:
If a front tire fails, the flat tire will create a drag that
pulls the vehicle toward that side. Take your foot off the
accelerator pedal and grip the steering wheel firmly.
Steer to maintain lane position, and then gently brake to
a stop well out of the traffic lane.
A rear blowout, particularly on a curve, acts much like a
skid and may require the same correction you'd use in
a skid. In any rear blowout, remove your foot from
the accelerator pedal. Get the vehicle under control by
steering the way you want the vehicle to go. It may be
very bumpy and noisy, but you can still steer. Gently
brake to a stop
-- well off the road if possible.
If a tire goes flat, the next part shows how to use your
jacking equipment to change a flat tire safely.
Page 273 of 371
5-20
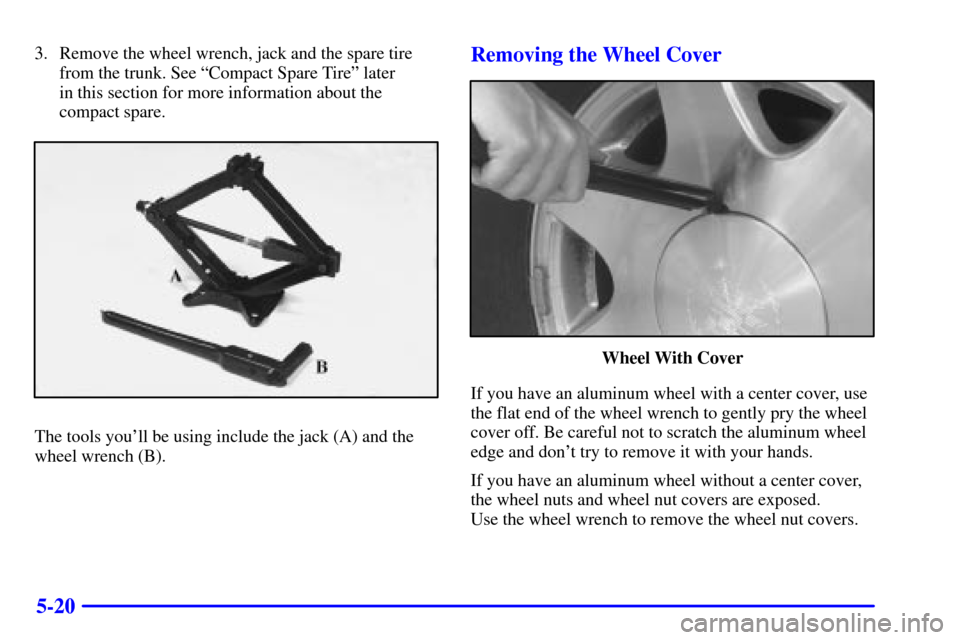
3. Remove the wheel wrench, jack and the spare tire
from the trunk. See ªCompact Spare Tireº later
in this section for more information about the
compact spare.
The tools you'll be using include the jack (A) and the
wheel wrench (B).
Removing the Wheel Cover
Wheel With Cover
If you have an aluminum wheel with a center cover, use
the flat end of the wheel wrench to gently pry the wheel
cover off. Be careful not to scratch the aluminum wheel
edge and don't try to remove it with your hands.
If you have an aluminum wheel without a center cover,
the wheel nuts and wheel nut covers are exposed.
Use the wheel wrench to remove the wheel nut covers.
Page 279 of 371
5-26
NOTICE:
Improperly tightened wheel nuts can lead to
brake pulsation and rotor damage. To avoid
expensive brake repairs, evenly tighten the wheel
nuts in the proper sequence and to the proper
torque specification.
Don't try to put a wheel cover on your compact spare tire.
It won't fit. Store the wheel cover and lug nut caps in the
trunk until you have the flat tire repaired or replaced.
NOTICE:
Wheel covers won't fit on your compact spare.
If you try to put a wheel cover on your compact
spare, you could damage the cover or the spare.
Storing the Flat Tire and Tools
CAUTION:
Storing a jack, a tire or other equipment in the
passenger compartment of the vehicle could
cause injury. In a sudden stop or collision, loose
equipment could strike someone. Store all these
in the proper place.
After you've put the compact spare tire on your vehicle,
you'll need to store the flat tire in your trunk.
Store the flat tire as far forward in the trunk as possible.
Store the jack and wheel wrench in their compartment in
the trunk. For storage, the jack must be raised until the
screw end is flush with the edge of the jack.
Page 331 of 371
6-49
When to Check
Check your tires once a month or more.
Don't forget your compact spare tire. It should be
at 60 psi (420 kPa).
How to Check
Use a good quality pocket
-type gage to check tire
pressure. You can't tell if your tires are properly inflated
simply by looking at them. Radial tires may look
properly inflated even when they're underinflated.
Be sure to put the valve caps back on the valve stems.
They help prevent leaks by keeping out dirt and moisture.
Tire Pressure Monitor (TPM) System
(If Equipped)
The Tire Pressure Monitor (TPM) system uses radio
and sensor technology to check tire pressure levels.
Sensors, mounted on each road wheel, transmit tire
pressure readings to a receiver located in the trunk. Tire
pressure status and tire pressure warnings are shown on
the Driver Information Center (DIC) display. See
ªDriver Information Center (DIC)º in the Index for
details regarding DIC controls and displays.The system operates on a radio frequency subject to
Federal Communications Commission (FCC) Rules
and with Industry and Science Canada.
This device complies with Part 15 of the FCC Rules.
Operation is subject to the following two conditions:
(1) this device may not cause harmful interference,
and (2) this device must accept any interference
received, including interference that may cause
undesired operation.
This device complies with RSS
-210 of Industry
and Science Canada. Operation is subject to the
following two conditions: (1) this device may not
cause interference, and (2) this device must accept any
interference received, including interference that may
cause undesired operation of the device.
Changes or modifications to this system by other than
an authorized service facility could void authorization to
use this equipment.
If the TPM system detects low tire pressure, below
24 psi (165 kPa), or high tire pressure, above 36 psi
(248 kPa), a message, CHECK TIRE PRESSURE, will
appear on the Driver Information Center (DIC) display.
Page 355 of 371

6-73
Minifuses Usage
6 Heated Seat Left Rear
7 Power Tilt and
Telescoping Steering
8 Supplemental Inflation Restraint
9 Not Used
10 Lamps Park Right
11 Fuel Tank Ventilation Solenoid
12 Ignition 1
13 Lamps, Parking Left
14 Interior Lamp Dimmer Module
15 Navigation
16 Heated Seat Left Front
17 Export Lighting
18 Rear Door Modules
19 Stoplamps
20 Neutral Safety Back
-up
21 Audio
22 Retained Accessory Power
for SunroofMinifuses Usage
23 Not Used
24 Not Used
25 Passenger Door Module
26 Fuel Door/Trunk Release (Body)
27 Interior Lamps
28 Rear HVAC Blower
29 Ignition Switch
30 Not Used
31 Heated Seat Right Front
32 Continuous Variable Road
Sensing Suspension
33 Heating, Ventilation,
Air Conditioning
34 Ignition 3 Rear
35 Antilock Braking System
36 Turn Signal/Hazard
37 Heated Seat Right Rear
38 Dash Integration Module