Page 221 of 328

4-38 Parking on Hills
CAUTION:
You really should not park your vehicle, with a
trailer attached, on a hill. If something goes
wrong, your rig could start to move. People can
be injured, and both your vehicle and the trailer
can be damaged.
But if you ever have to park your rig on a hill, here's
how to do it:
1. Apply the regular brakes, but do not shift
into PARK (P).
2. Have someone place chocks under the trailer wheels.
3. When the wheel chocks are in place, release the
regular brakes until the chocks absorb the load.
4. Reapply the regular brakes. Then shift into
PARK (P) firmly and apply the parking brake.
5. Release the regular brakes.
When You Are Ready to Leave After
Parking on a Hill
1. Apply your regular brakes and hold the pedal down
while you:
�Start your engine;
�Shift into a gear; and
�Be sure the parking brake has released.
2. Let up on the brake pedal.
3. Drive slowly until the trailer is clear of the chocks.
4. Stop and have someone pick up and store the chocks.
Maintenance When Trailer Towing
Your vehicle will need service more often when you're
pulling a trailer. See the Maintenance Schedule booklet for
more on this. Things that are especially important in trailer
operation are automatic transmission fluid (don't overfill),
engine oil, axle lubricant, drive belt, cooling system and
brake system. If you're trailering, it's a good idea to
review this information before you start your trip.
Check periodically to see that all hitch nuts and bolts are tight.
Engine Cooling When Trailer Towing
Your cooling system may temporarily overheat during
severe operating conditions. See ªEngine Overheatingº
in the Index.
Page 228 of 328
5-7
6. Don't let the other
end of the positive
cable touch metal.
Connect it to the
positive (+) terminal
of the good battery.
Now connect the
negative (
-) cable to
the good battery's
negative (
-) terminal.Don't let the other end of the negative (
-) cable
touch anything until the next step. The other end of
the negative (
-) cable doesn't go to the dead battery.
It goes to a heavy unpainted metal part on the engine
of the vehicle with the dead battery.
7. Attach the cable at least 18 inches (45 cm) away from
the dead battery, but not near engine parts that move.
A good spot to attach the
negative (
-) cable is on
the bracket between the
engine coolant surge tank
and the engine block.
8. Now start the vehicle with the good battery and run
the engine for a while.
9. Try to start the vehicle with the dead battery.
If it won't start after a few tries, it probably
needs service.
Page 229 of 328

5-8
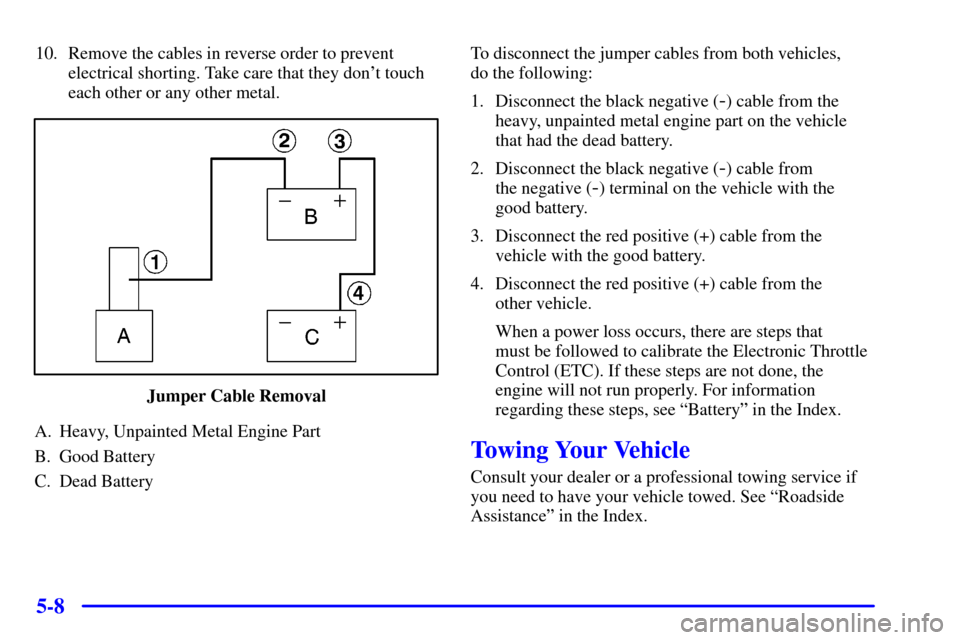
10. Remove the cables in reverse order to prevent
electrical shorting. Take care that they don't touch
each other or any other metal.
Jumper Cable Removal
A. Heavy, Unpainted Metal Engine Part
B. Good Battery
C. Dead BatteryTo disconnect the jumper cables from both vehicles,
do the following:
1. Disconnect the black negative (
-) cable from the
heavy, unpainted metal engine part on the vehicle
that had the dead battery.
2. Disconnect the black negative (
-) cable from
the negative (
-) terminal on the vehicle with the
good battery.
3. Disconnect the red positive (+) cable from the
vehicle with the good battery.
4. Disconnect the red positive (+) cable from the
other vehicle.
When a power loss occurs, there are steps that
must be followed to calibrate the Electronic Throttle
Control (ETC). If these steps are not done, the
engine will not run properly. For information
regarding these steps, see ªBatteryº in the Index.
Towing Your Vehicle
Consult your dealer or a professional towing service if
you need to have your vehicle towed. See ªRoadside
Assistanceº in the Index.
Page 231 of 328

5-10 If No Steam Is Coming From Your Engine
If you get an engine overheat warning but see or hear no
steam, the problem may not be too serious. Sometimes
the engine can get a little too hot when you:
�Climb a long hill on a hot day.
�Stop after high
-speed driving.
�Idle for long periods in traffic.
�Tow a trailer.
If you get the overheat warning with no sign of steam,
try this for a minute or so:
1. If your air conditioner is on, turn it off.
2. Dial temperature control to the highest heat setting
and open the windows, as necessary.
3. If you're in a traffic jam, shift to NEUTRAL (N);
otherwise, shift to the highest gear while
driving
-- DRIVE (D) or THIRD (3).If you no longer have the overheat warning, you
can drive. Just to be safe, drive slower for about
10 minutes. If the warning doesn't come back on,
you can drive normally.
If the warning continues, pull over, stop, and park
your vehicle right away.
If there's still no sign of steam, idle the engine for
three minutes while you're parked. If you still have the
warning, turn off the engine and get everyone out of
the vehicle until it cools down.
You may decide not to lift the hood but to get service
help right away.
Page 233 of 328

5-12
The coolant level should be at or slightly above the
KALT/COLD line (seam).
You may have a leak in the radiator hoses, heater
hoses, radiator, water pump or somewhere else in the
cooling system.
CAUTION:
Heater and radiator hoses, and other engine
parts, can be very hot. Don't touch them.
If you do, you can be burned.
Don't run the engine if there is a leak. If you run
the engine, it could lose all coolant. That could
cause an engine fire, and you could be burned.
Get any leak fixed before you drive the vehicle.
NOTICE:
Engine damage from running your engine
without coolant isn't covered by your warranty.
NOTICE:
When adding coolant, it is important that you
use only DEX
-COOL� (silicate-free) coolant.
If coolant other than DEX-COOL is added to
the system, premature engine, heater core or
radiator corrosion may result. In addition, the
engine coolant will require change sooner
-- at
30,000 miles (50 000 km) or 24 months,
whichever occurs first. Damage caused by the
use of coolant other than DEX
-COOL� is not
covered by your new vehicle warranty.
If there seems to be no leak, with the engine on,
check to see if the electric engine cooling fans are
running. If the engine is overheating, both fans should
be running. If they aren't, your vehicle needs service.
Page 252 of 328

6-
6-1
Section 6 Service and Appearance Care
Here you will find information about the care of your vehicle. This section begins with service and fuel information,
and then it shows how to check important fluid and lubricant levels. There is also technical information about your
vehicle, and a part devoted to its appearance care.
6
-2 Service
6
-3 Fuel
6
-5 Fuels in Foreign Countries
6
-5 Filling Your Tank
6
-8 Filling a Portable Fuel Container
6
-8 Checking Things Under the Hood
6
-11 Engine Oil
6
-15 Engine Air Cleaner/Filter
6
-19 Automatic Transmission Fluid
6
-19 Rear Axle
6
-20 Engine Coolant
6
-24 Surge Tank Pressure Cap
6
-24 Power Steering Fluid
6
-25 Windshield Washer Fluid
6
-26 Brakes
6
-30 Battery6
-30 Bulb Replacement
6
-37 Wiper Blade Replacement
6
-38 Tires
6
-47 Appearance Care
6
-49 Care of Safety Belts
6
-50 Cleaning the Outside of Your Vehicle
6
-52 Cleaning Aluminum or Chrome-Plated
Wheels (If Equipped)
6
-53 Underbody Maintenance
6
-54 GM Vehicle Care/Appearance Materials
6
-55 Vehicle Identification Number (VIN)
6
-55 Service Parts Identification Label
6
-56 Electrical System
6
-63 Replacement Bulbs
6
-63 Capacities and Specifications
6
-64 Normal Maintenance Replacement Parts
Page 253 of 328
6-2
Service
Your dealer knows your vehicle best and wants you to
be happy with it. We hope you'll go to your dealer for
all your service needs. You'll get genuine GM parts and
GM
-trained and supported service people.
We hope you'll want to keep your GM vehicle all GM.
Genuine GM parts have one of these marks:
Doing Your Own Service Work
If you want to do some of your own service work, you'll
want to use the proper service manual. It tells you much
more about how to service your vehicle than this manual
can. To order the proper service manual, see ªService
and Owner Publicationsº in the Index.
Your vehicle has an air bag system. Before attempting to
do your own service work, see ªServicing Your Air
Bag
-Equipped Vehicleº in the Index.
You should keep a record with all parts receipts and
list the mileage and the date of any service work you
perform. See ªMaintenance Recordº in the Maintenance
Schedule booklet.
Page 254 of 328

6-3
CAUTION:
You can be injured and your vehicle could be
damaged if you try to do service work on a
vehicle without knowing enough about it.
�Be sure you have sufficient knowledge,
experience, the proper replacement parts
and tools before you attempt any vehicle
maintenance task.
�Be sure to use the proper nuts, bolts and
other fasteners. ªEnglishº and ªmetricº
fasteners can be easily confused. If you use
the wrong fasteners, parts can later break
or fall off. You could be hurt.
Adding Equipment to the Outside of
Your Vehicle
Things you might add to the outside of your vehicle can
affect the airflow around it. This may cause wind noise
and affect windshield washer performance. Check with
your dealer before adding equipment to the outside of
your vehicle.
Fuel
Use premium unleaded gasoline rated at 91 octane or
higher for best performance. You may use middle grade
or regular unleaded gasolines, but your vehicle's
acceleration may be slightly reduced.
It is recommended that the gasoline meet specifications
which were developed by the American Automobile
Manufacturers Association (AAMA) and endorsed by
the Canadian Motor Vehicle Manufacturers Association
for better vehicle performance and engine protection.
Gasolines meeting the AAMA specification could
provide improved driveability and emission control
system performance compared to other gasolines.
In Canada, look for the
ªAuto Makers' Choiceº
label on the fuel pump.
Canada Only