Page 236 of 365
5-18
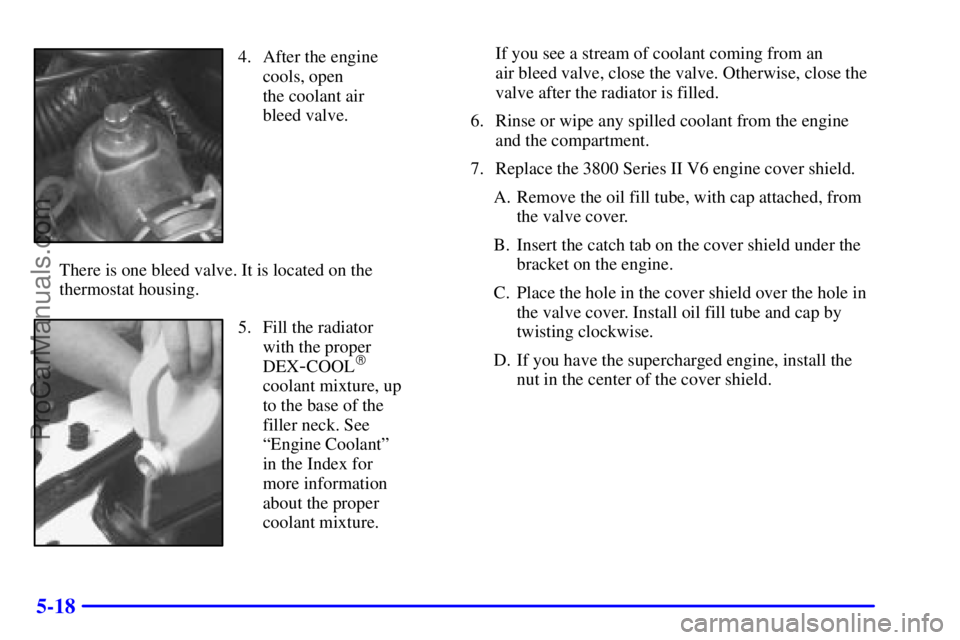
4. After the engine
cools, open
the coolant air
bleed valve.
There is one bleed valve. It is located on the
thermostat housing.
5. Fill the radiator
with the proper
DEX
-COOL�
coolant mixture, up
to the base of the
filler neck. See
ªEngine Coolantº
in the Index for
more information
about the proper
coolant mixture.If you see a stream of coolant coming from an
air bleed valve, close the valve. Otherwise, close the
valve after the radiator is filled.
6. Rinse or wipe any spilled coolant from the engine
and the compartment.
7. Replace the 3800 Series II V6 engine cover shield.
A. Remove the oil fill tube, with cap attached, from
the valve cover.
B. Insert the catch tab on the cover shield under the
bracket on the engine.
C. Place the hole in the cover shield over the hole in
the valve cover. Install oil fill tube and cap by
twisting clockwise.
D. If you have the supercharged engine, install the
nut in the center of the cover shield.
ProCarManuals.com
Page 237 of 365
5-19
8. Then fill the coolant recovery tank to the
COLD mark on the coolant recovery tank.
9. Put the cap back on the coolant recovery tank, but
leave the radiator pressure cap off.10. Start the engine and let it run until you can feel the
upper radiator hose getting hot. Watch out for the
engine cooling fans.
11. By this time, the coolant level inside the radiator
filler neck may be lower. If the level is lower, add
more of the proper DEX
-COOL� coolant mixture
through the filler neck until the level reaches the
base of the filler neck.
ProCarManuals.com
Page 238 of 365

5-20
12. Then replace the pressure cap. At any time during
this procedure if coolant begins to flow out of the
filler neck, reinstall the pressure cap. Be sure the
arrows on the pressure cap line up like this.
13. Check the coolant in the recovery tank.
The level in the coolant recovery tank should be at
the HOT mark when the engine is hot or at the
COLD mark when the engine is cold.
If a Tire Goes Flat
It's unusual for a tire to ªblow outº while you're driving,
especially if you maintain your tires properly. If air goes
out of a tire, it's much more likely to leak out slowly.
But if you should ever have a ªblowout,º here are a few
tips about what to expect and what to do:
If a front tire fails, the flat tire will create a drag that
pulls the vehicle toward that side. Take your foot off the
accelerator pedal and grip the steering wheel firmly.
Steer to maintain lane position, and then gently brake to
a stop well out of the traffic lane.
A rear blowout, particularly on a curve, acts much like a
skid and may require the same correction you'd use in a
skid. In any rear blowout, remove your foot from the
accelerator pedal. Get the vehicle under control by
steering the way you want the vehicle to go. It may be
very bumpy and noisy, but you can still steer. Gently
brake to a stop
-- well off the road if possible.
If a tire goes flat, the next part shows how to use your
jacking equipment to change a flat tire safely.
ProCarManuals.com
Page 239 of 365
5-21
Changing a Flat Tire
If a tire goes flat, avoid further tire and wheel damage
by driving slowly to a level place. Turn on your hazard
warning flashers.
CAUTION:
Changing a tire can cause an injury. The vehicle
can slip off the jack and roll over you or other
people. You and they could be badly injured.
Find a level place to change your tire. To help
prevent the vehicle from moving:
1. Set the parking brake firmly.
2. Put the shift lever in PARK (P).
3. Turn off the engine.
To be even more certain the vehicle won't move,
you can put blocks at the front and rear of the
tire farthest away from the one being changed.
That would be the tire on the other side of the
vehicle, at the opposite end.
The following steps will tell you how to use the jack and
change a tire.
ProCarManuals.com
Page 251 of 365

5-33
If You're Stuck: In Sand, Mud,
Ice or Snow
In order to free your vehicle when it is stuck, you will
need to spin the wheels, but you don't want to spin your
wheels too fast. The method known as ªrockingº can
help you get out when you're stuck, but you must
use caution.
CAUTION:
If you let your tires spin at high speed, they can
explode, and you or others could be injured.
And, the transaxle or other parts of the vehicle
can overheat. That could cause an engine
compartment fire or other damage. When you're
stuck, spin the wheels as little as possible. Don't
spin the wheels above 35 mph (55 km/h) as shown
on the speedometer.
NOTICE:
Spinning your wheels can destroy parts of your
vehicle as well as the tires. If you spin the wheels
too fast while shifting your transaxle back and
forth, you can destroy your transaxle.
For information about using tire chains on your vehicle,
see ªTire Chainsº in the Index.
Rocking Your Vehicle To Get It Out
First, turn your steering wheel left and right. That will
clear the area around your front wheels. If your vehicle
has the Traction Control System, you should turn the
system off. See ªFull
-Range Traction Control Systemº
or ªTraction Control Systemº in the Index. Then shift
back and forth between REVERSE (R) and a forward
gear, spinning the wheels as little as possible. Release
the accelerator pedal while you shift, and press lightly
on the accelerator pedal when the transaxle is in gear.
By slowly spinning your wheels in the forward and
reverse directions, you will cause a rocking motion that
may free your vehicle. If that doesn't get you out after a
few tries, you may need to be towed out. If you do
need to be towed out, see ªTowing Your Vehicleº in
the Index.
ProCarManuals.com
Page 252 of 365

6-
6-1
Section 6 Service and Appearance Care
Here you will find information about the care of your vehicle. This section begins with service and fuel information,
and then it shows how to check important fluid and lubricant levels. There is also technical information about your
vehicle, and a part devoted to its appearance care.
6
-2 Service
6
-3 Fuel
6
-5 Fuels in Foreign Countries
6
-6 Filling Your Tank
6
-8 Filling a Portable Fuel Container
6
-8 Checking Things Under the Hood
6
-14 Engine Oil
6
-20 Engine Air Cleaner/Filter
6
-21 Passenger Compartment Air Filter
6
-22 Supercharger Oil
6
-23 Automatic Transaxle Fluid
6
-27 Engine Coolant
6
-31 Power Steering Fluid
6
-32 Windshield Washer Fluid
6
-33 Brakes
6
-37 Battery
6
-38 Bulb Replacement6
-46 Windshield Wiper Blade Replacement
6
-47 Tires
6
-57 Appearance Care
6
-57 Cleaning the Inside of Your Vehicle
6
-59 Care of Safety Belts
6
-60 Cleaning the Outside of the Windshield and
Wiper Blades
6
-61 Cleaning the Outside of Your Vehicle
6
-62 Cleaning Aluminum or Chrome-Plated
Wheels (If Equipped)
6
-62 Cleaning Tires
6
-64 GM Vehicle Care/Appearance Materials
6
-65 Vehicle Identification Number (VIN)
6
-66 Electrical System
6
-72 Replacement Bulbs
6
-73 Capacities and Specifications
6
-74 Normal Maintenance Replacement Parts
ProCarManuals.com
Page 254 of 365

6-3
CAUTION:
You can be injured and your vehicle could be
damaged if you try to do service work on a
vehicle without knowing enough about it.
�Be sure you have sufficient knowledge,
experience, the proper replacement parts
and tools before you attempt any vehicle
maintenance task.
�Be sure to use the proper nuts, bolts and
other fasteners. ªEnglishº and ªmetricº
fasteners can be easily confused. If you use
the wrong fasteners, parts can later break
or fall off. You could be hurt.
Adding Equipment to the Outside of
Your Vehicle
Things you might add to the outside of your vehicle can
affect the airflow around it. This may cause wind noise
and affect windshield washer performance. Check with
your dealer before adding equipment to the outside of
your vehicle.
Fuel
The 8th digit of your vehicle identification number
(VIN) shows the code letter for your engine. You will
find the VIN at the top left of your instrument panel.
See ªVehicle Identification Numberº in the Index.
If you have the 3800 V6 engine (VIN Code K), use
regular unleaded gasoline rated at 87 octane or higher.
If you're using fuel rated at the recommended octane
or higher and you hear heavy knocking, your engine
needs service. But don't worry if you hear a little
pinging noise when you're accelerating or driving up a
hill. That's normal, and you don't have to buy a higher
octane fuel to get rid of pinging. It's the heavy, constant
knock that means you have a problem.
If you have the 3800 Supercharged V6 engine
(VIN Code 1), use premium unleaded gasoline rated
at 91 octane or higher. With the 3800 Supercharged
engine, in an emergency, you may be able to use a
lower octane
-- as low as 87 -- if heavy knocking
does not occur. If you are using 91 or higher octane
unleaded gasoline and you hear heavy knocking, your
engine needs service.
ProCarManuals.com
Page 255 of 365
 and endorsed by
the Canadian Motor Vehicle Manufacturers As")
6-4
It is recommended that the gasoline meet specifications
which were developed by the American Automobile
Manufacturers Association (AAMA) and endorsed by
the Canadian Motor Vehicle Manufacturers Association
for better vehicle performance and engine protection.
Gasolines meeting the AAMA specification could
provide improved driveability and emission control
system performance compared to other gasolines.
In Canada, look for the
ªAuto Makers' Choiceº
label on the fuel pump.
Canada OnlyBe sure the posted octane for premium is at least 91
(at least 87 for regular). If the octane is less than 87,
you may get a heavy knocking noise when you drive.
If it's bad enough, it can damage your engine.
If your vehicle is certified to meet California Emission
Standards (indicated on the underhood emission control
label), it is designed to operate on fuels that meet
California specifications. If such fuels are not available
in states adopting California emissions standards,
your vehicle will operate satisfactorily on fuels meeting
federal specifications, but emission control system
performance may be affected. The malfunction indicator
lamp on your instrument panel may turn on and/or your
vehicle may fail a smog
-check test. See ªMalfunction
Indicator Lampº in the Index. If this occurs, return to
your authorized Buick dealer for diagnosis to determine
the cause of failure. In the event it is determined that the
cause of the condition is the type of fuels used, repairs
may not be covered by your warranty.
ProCarManuals.com