Page 285 of 392
6-22
Checking the Fluid Level
Prepare your vehicle as follows:
�Park your vehicle on a level place.
Keep the engine running.
�With the parking brake applied, place the shift lever
in PARK (P).
�With your foot on the brake pedal, move the shift
lever through each gear range, pausing for about
three seconds in each range. Then, position the shift
lever in PARK (P).
�Let the engine run at idle for three to five minutes.Then, without shutting off the engine, follow these steps:
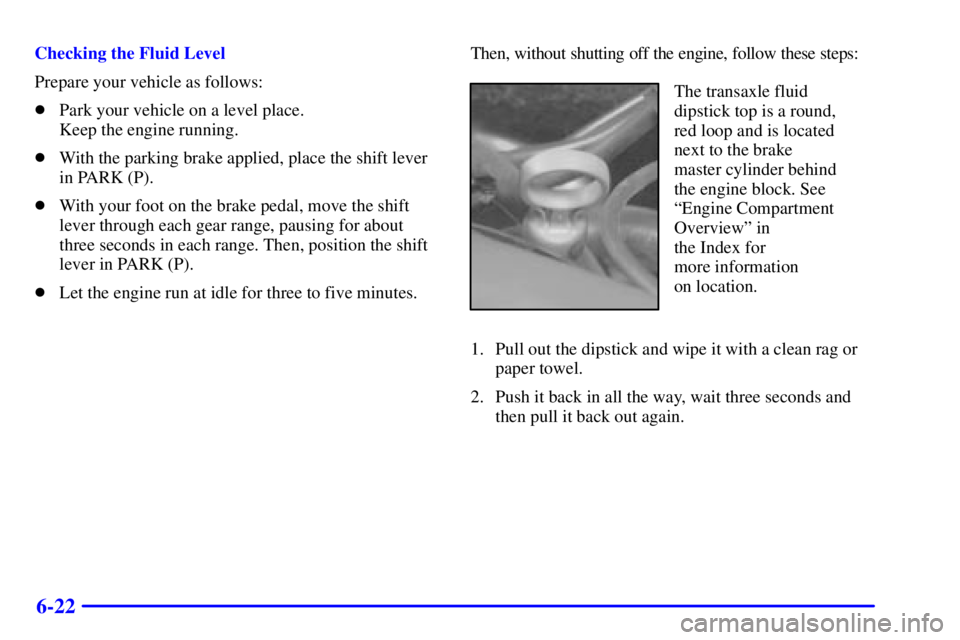
The transaxle fluid
dipstick top is a round,
red loop and is located
next to the brake
master cylinder behind
the engine block. See
ªEngine Compartment
Overviewº in
the Index for
more information
on location.
1. Pull out the dipstick and wipe it with a clean rag or
paper towel.
2. Push it back in all the way, wait three seconds and
then pull it back out again.
Page 290 of 392

6-27
CAUTION:
You can be burned if you spill coolant on hot
engine parts. Coolant contains ethylene glycol,
and it will burn if the engine parts are hot
enough. Don't spill coolant on a hot engine.
Occasionally check the coolant level in the radiator. For
information on how to add coolant to the radiator, see
ªCooling Systemº in the Index.
Radiator Pressure Cap
NOTICE:
Your radiator pressure cap is a 15 psi (105 kPa)
pressure
-type cap and must be tightly installed to
prevent coolant loss and possible engine damage
from overheating. Be sure the arrows on the cap
line up with the overflow tube on the radiator
filler neck.
Power Steering Fluid
When to Check Power Steering Fluid
It is not necessary to regularly check power steering fluid
unless you suspect there is a leak in the system or you hear
an unusual noise. A fluid loss in this system could indicate
a problem. Have the system inspected and repaired.
The power steering fluid reservoir on the L36 and
L67 engine is located below the generator and behind
the accessory drive belt on the passenger's side toward
the rear of the engine.
Page 313 of 392
. Any time you notice unusual wear,
rotate your tires as soon as possible and check wheel
ali")
6-50 Tire Inspection and Rotation
Tires should be rotated every 6,000 to 8,000 miles
(10 000 to 13 000 km). Any time you notice unusual wear,
rotate your tires as soon as possible and check wheel
alignment. Also check for damaged tires or wheels.
See ªWhen It's Time for New Tiresº and ªWheel
Replacementº later in this section for more information.
The purpose of regular rotation is to achieve more
uniform wear for all tires on the vehicle. The first
rotation is the most important. See ªScheduled
Maintenance Servicesº in the Index for scheduled
rotation intervals.
When rotating your tires, always use the correct rotation
pattern shown here.Don't include the compact spare tire in your
tire rotation.
After the tires have been rotated, adjust the front and
rear inflation pressures as shown on the Tire
-Loading
Information label. Reset the Check Tire Pressure
System. See ªCheck Tire Pressure Systemº in the Index.
Make certain that all wheel nuts are properly tightened.
See ªWheel Nut Torqueº in the Index.
CAUTION:
Rust or dirt on a wheel, or on the parts to which
it is fastened, can make wheel nuts become loose
after a time. The wheel could come off and cause
an accident. When you change a wheel, remove
any rust or dirt from places where the wheel
attaches to the vehicle. In an emergency, you can
use a cloth or a paper towel to do this; but be
sure to use a scraper or wire brush later, if
you need to, to get all the rust or dirt off.
See ªChanging a Flat Tireº in the Index.
Page 320 of 392

6-57
Don't use any of these unless this manual says you can.
In many uses, these will damage your vehicle:
�Alcohol
�Laundry Soap
�Bleach
�Reducing Agents
Cleaning the Inside of Your Vehicle
Use a vacuum cleaner often to get rid of dust and loose
dirt. Wipe vinyl, leather, plastic and painted surfaces
with a clean, damp cloth.
Cleaning of Fabric/Carpet
Your dealer has two cleaners, Multi-Purpose Interior
Cleaner and Capture Non
-Solvent Dry Spot and Soil
Remover for cleaning fabric and carpet. They will clean
normal spots and stains very well. You can get
GM
-approved cleaning products from your dealer.
See ªAppearance Care and Materialsº in the Index.Here are some cleaning tips:
�Always read the instructions on the cleaner label.
�Clean up stains as soon as you can
-- before they set.
�Carefully scrape off any excess stain.
�Use a clean cloth or sponge, and change to a clean
area often. A soft brush may be used if stains
are stubborn.
�If a ring forms on fabric after spot cleaning, clean the
entire area immediately or it will set.
Using Multi-Purpose Interior Cleaner
on Fabric
1. Vacuum and brush the area to remove any loose dirt.
2. Always clean a whole trim panel or section.
Mask surrounding trim along stitch or welt lines.
3. Mix powdered cleaner following the directions on
the container label to form thick suds.
4. Use suds only and apply with a clean sponge.
Don't saturate the material and don't rub it roughly.
5. As soon as you've cleaned the section, use a sponge
to remove the suds.
6. Wipe cleaned area with a clean, damp towel or cloth.
7. Wipe with a clean cloth and let dry.
Page 323 of 392

6-60
Cleaning the Outside of the
Windshield and Wiper Blades
If the windshield is not clear after using the windshield
washer, or if the wiper blade chatters when running, wax,
sap or other material may be on the blade or windshield.
Clean the outside of the windshield with GM Windshield
Cleaner, Bon Ami
� Powder (non-scratching glass
cleaning powder), GM Part No. 1050011. The windshield
is clean if beads do not form when you rinse it with water.
Grime from the windshield will stick to the wiper blades
and affect their performance. Clean the blade by wiping
vigorously with a cloth soaked in full
-strength windshield
washer solvent. Then rinse the blade with water.
Check the wiper blades and clean them as necessary;
replace blades that look worn.
Weatherstrips
Silicone grease on weatherstrips will make them last
longer, seal better, and not stick or squeak. Apply silicone
grease with a clean cloth at least every six months. During
very cold, damp weather more frequent application may be
required. See ªRecommended Fluids and Lubricantsº in
the Index.
Cleaning the Outside of Your Vehicle
The paint finish on your vehicle provides beauty, depth
of color, gloss retention and durability.
Washing Your Vehicle
The best way to preserve your vehicle's finish is to keep it
clean by washing it often with lukewarm or cold water.
Don't wash your vehicle in the direct rays of the sun.
Use a car washing soap. Don't use strong soaps or
chemical detergents. Be sure to rinse the vehicle well,
removing all soap residue completely. You can get
GM
-approved cleaning products from your dealer. See
ªAppearance Care and Materialsº in the Index. Don't
use cleaning agents that are petroleum based, or that
contain acid or abrasives. All cleaning agents should be
flushed promptly and not allowed to dry on the surface,
or they could stain. Dry the finish with a soft, clean
chamois or an all
-cotton towel to avoid surface
scratches and water spotting.
High pressure car washes may cause water to enter
your vehicle.
Page 324 of 392

6-61 Cleaning Exterior Lamps/Lenses
Use only lukewarm or cold water, a soft cloth and a
car washing soap to clean exterior lamps and lenses.
Follow instructions under ªWashing Your Vehicle.º
Finish Care
Occasional waxing or mild polishing of your vehicle by
hand may be necessary to remove residue from the paint
finish. You can get GM
-approved cleaning products
from your dealer. See ªAppearance Care and Materialsº
in the Index.
Your vehicle has a ªbasecoat/clearcoatº paint finish.
The clearcoat gives more depth and gloss to the colored
basecoat. Always use waxes and polishes that are
non
-abrasive and made for a basecoat/clearcoat paint finish.
NOTICE:
Machine compounding or aggressive polishing on
a basecoat/clearcoat paint finish may dull the
finish or leave swirl marks.
Foreign materials such as calcium chloride and other
salts, ice melting agents, road oil and tar, tree sap, bird
droppings, chemicals from industrial chimneys, etc., can
damage your vehicle's finish if they remain on painted
surfaces. Wash the vehicle as soon as possible. If
necessary, use non
-abrasive cleaners that are marked
safe for painted surfaces to remove foreign matter.
Exterior painted surfaces are subject to aging, weather
and chemical fallout that can take their toll over a period
of years. You can help to keep the paint finish looking
new by keeping your vehicle garaged or covered
whenever possible.
Cleaning Aluminum or
Chrome
-Plated Wheels (If Equipped)
Keep your wheels clean using a soft clean cloth with
mild soap and water. Rinse with clean water. After
rinsing thoroughly, dry with a soft clean towel. A wax
may then be applied.
The surface of these wheels is similar to the painted
surface of your vehicle. Don't use strong soaps,
chemicals, abrasive polishes, abrasive cleaners, cleaners
with acid or abrasive cleaning brushes on them because
you could damage the surface. Do not use chrome polish
on aluminum wheels.
Page 335 of 392
6-72
Removing the Rear Seat Cushion
NOTICE:
A fuse center is located under the rear seat
cushion. To help avoid damage to the fuse center,
be careful when removing or reinstalling the
seat cushion.
To Remove the Rear Seat Cushion
1. Pull up on the front of the cushion to release the
front hooks.
2. Pull the cushion up and out toward the front
of the vehicle.To Reinstall the Rear Seat Cushion
Page 345 of 392

Scheduled Maintenance
7-5
Short Trip/City Definition
Follow the Short Trip/City Scheduled Maintenance if
any one of these conditions is true for your vehicle:
�Most trips are less than 5 to 10 miles (8 to 16 km).
This is particularly important when outside
temperatures are below freezing.
�Most trips include extensive idling (such as frequent
driving in stop
-and-go traffic).
�Most trips are through dusty areas.
�You frequently tow a trailer or use a carrier on top of
your vehicle.
�If the vehicle is used for delivery service, police, taxi
or other commercial application.
One of the reasons you should follow this schedule
if you operate your vehicle under any of these conditions
is that these conditions cause engine oil to break
down sooner.
Short Trip/City Intervals
Every 3,000 Miles (5 000 km): Engine Oil and Filter
Change (or 3 months, whichever occurs first).
Every 6,000 Miles (10 000 km): Tire Rotation.
Every 12,000 Miles (20 000 km): Passenger
Compartment Air Filter Replacement.
Every 15,000 Miles (25 000 km): Engine Air Cleaner
Filter Inspection, if driving in dusty conditions.
Every 30,000 Miles (50 000 km): Engine Air
Cleaner Filter Replacement. Supercharger Oil Check
(or every 36 months, whichever occurs first)
(3800 Code 1 V6 engine only).
Every 50,000 Miles (83 000 km): Automatic Transaxle
Service (severe conditions only).
(Continued)