2001 BMW X5 3.0I tailgate
[x] Cancel search: tailgatePage 79 of 223

Index
Data
Technology
Repairs
Car care
Controls
Overview
79nCheck Control
Graphic display*
The following alerts or status messages
are displayed with icons from ignition
key position 2 and up until the defects
are corrected:
1 Check low beams
2 Add washer fluid (goes out after
approx. 1 minute)
3 Door open
4 Tailgate open
5 Check brake and tail lamps. A defective center brake lamp is indi-
cated by the upper symbol
When you open the door after stopping,
a warning signal sounds without a
visual indicator for:
> LIGHTS ON and
> KEY IN IGNITION LOCK.
390de121
Alphanumeric display*
Text messages are used to alert the
driver to system malfunctions when the
ignition key is turned to position 2. The
alert is accompanied by a gong.
1 Status report symbol
2 Display
3 CHECK button
Messages concerning system faults are
differentiated based on two priorities:
390us111
Priority 1
These defects are immediately indi-
cated by a gong and a flashing warning
symbol 1. Simultaneous defects will be
displayed consecutively. These status
messages remain in the display until the
defects are corrected. They cannot be
deleted by pressing the CHECK
button 3:
> RELEASE PARKINGBRAKE
> COOLANT TEMPERATURE
The coolant is overheated. Stop the
vehicle immediately and switch off
the engine. Refer to pages 78
and 160.
> STOP!ENGINE OILPRESS
The oil pressure is too low. Stop the
vehicle immediately and switch off
the engine. Refer to page 22.
Page 142 of 223

142n
Winter operation Rubber seals and components In order to prevent the weather-strip-
ping from freezing, apply BMW rubber
treatment or silicone spray to the seals
on the doors, hood and liftgate/tailgate.
A full range of car care products is
available from your BMW center.< Snow chains Mount BMW snow chains
* only on tire
size 235/65 R 17. Always mount chains
in pairs and on the rear wheels only.
Read and comply with the chain manu-
facturer's safety precautions. Do not
exceed a maximum speed of 30 mph
(50 km/h).
Starting offWhen starting in deep snow or
"rocking" the vehicle free, it may be
advisable to deactivate the DSC system
briefly. Refer to page 94.
Driving on low-traction road
surfaces Use smooth, gentle pressure to control
the accelerator pedal. Avoid excessive
engine speeds and shift to the next
higher gear at an early point. Also shift
to the next lower gear at an early point
when approaching grades or slopes.
Maintain an adequate distance
between yourself and the car ahead. BrakingWinter road conditions substantially
reduce the amount of traction available
between the tires and the road surface.
The resulting increases in braking
distance are considerable and should
be kept in mind at all times.
ABS is intended to prevent the wheels
from locking during brake applications,
thus helping to maintain vehicle stability
and steering response. If the ABS does not respond in a critical
braking situation and the wheels lock:
Reduce the pressure on the brake
pedal until the wheels just start to roll
again while still maintaining enough
force to continue braking. Following
that, increase pedal pressure again.
Reduce the pressure as the wheels
lock, then reapply pressure. Repeat this
braking sequence.
This type of staggered braking will
reduce the braking distance, and the
vehicle still remains responsive to
steering.
You can then attempt to steer around
hazards after you have reduced pres-
sure on the brake pedal.
Do not shift down on slick road
surfaces if you want to decelerate.
Doing so could cause the wheels to
lose traction and skid, thus resulting in
the loss of vehicle control.<
Depress the clutch during hard
braking on road surfaces that
provide only poor or uneven traction.<
Page 173 of 223

IndexDataTechnologyRepairsCar careControlsOverview
Overview
Controls and features
Operation, care
and maintenance
Owner service procedures
Technical data
Index Advanced technology
173n
Replacement procedures:
Onboard tool kit174
Windshield wiper blades174
Lamps and bulbs175
Changing a wheel181
Battery185
Fuses187
In case of electrical
malfunction:
Fuel filler door188
Sliding/Tilt sunroof188
Liftgate188
Tailgate189
Assistance, giving and
receiving:
Jump-starting190
Towing the vehicle191
Repairs
Page 177 of 223

IndexDataTechnologyRepairsCar careControlsOverview
177n
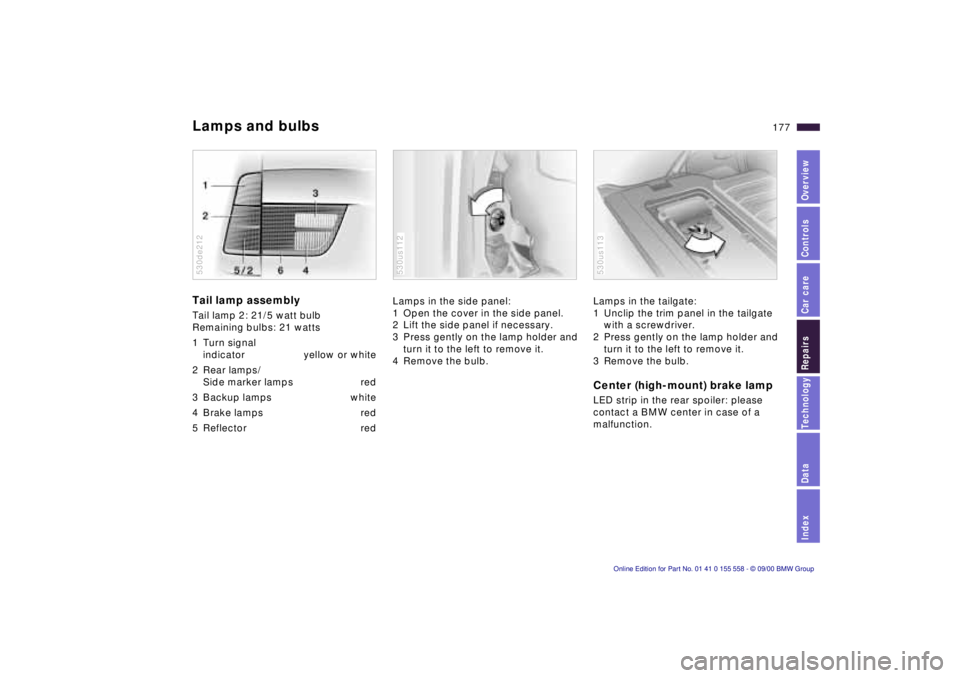
Lamps and bulbsTail lamp assembly Tail lamp 2: 21/5 watt bulb
Remaining bulbs: 21 watts
1 Turn signal
indicator yellow or white
2 Rear lamps/
Side marker lamps red
3 Backup lamps white
4 Brake lamps red
5 Reflector red530de212
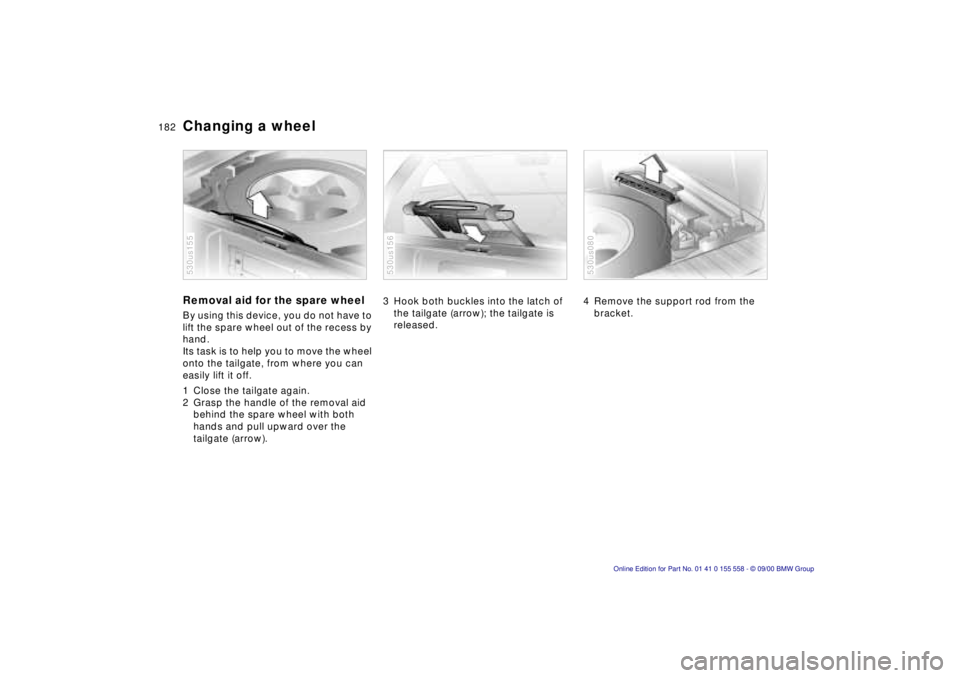
Lamps in the side panel:
1 Open the cover in the side panel.
2 Lift the side panel if necessary.
3 Press gently on the lamp holder and
turn it to the left to remove it.
4 Remove the bulb. 530us112
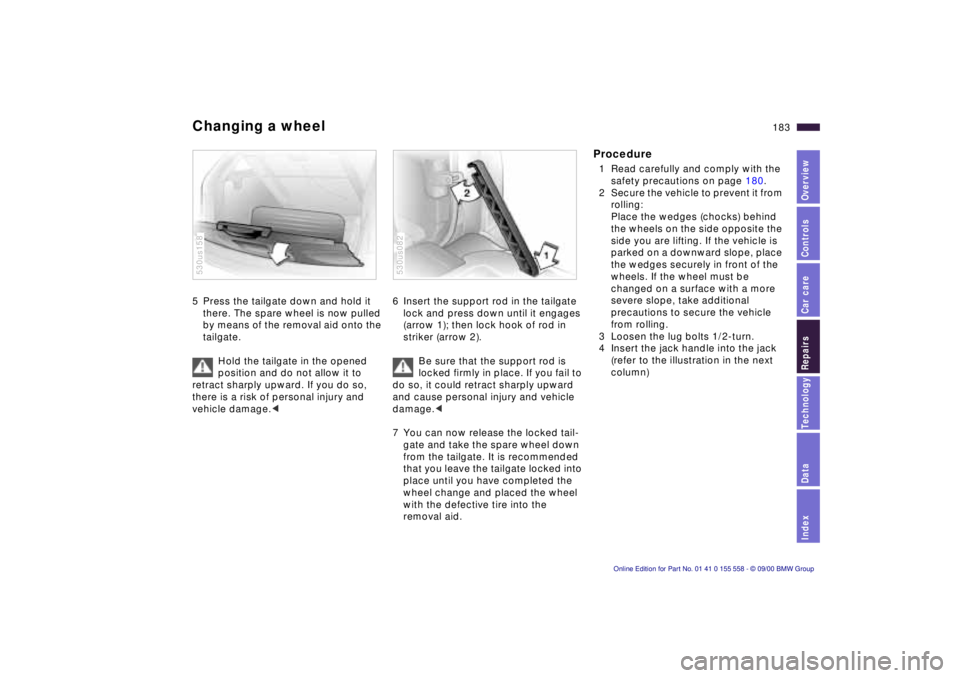
Lamps in the tailgate:
1 Unclip the trim panel in the tailgate
with a screwdriver.
2 Press gently on the lamp holder and
turn it to the left to remove it.
3 Remove the bulb. Center (high-mount) brake lampLED strip in the rear spoiler: please
contact a BMW center in case of a
malfunction. 530us113
Page 180 of 223

180n
Changing a wheel
Safety measures in the event of a
flat tire or wheel change: stop the
vehicle as far as possible from passing
traffic. Park on a firm, flat, surface.
Switch on the hazard warning flashers.
Turn the steering wheel to the straight-
ahead position, remove the key and
engage the steering lock. Shift into 1st or
reverse (selector lever in "Park" with
automatic transmission) and engage the
parking brake. All passengers should be
outside the vehicle and well away from
your immediate working area (behind a
guardrail, for instance). If a warning
triangle or portable hazard warning lamp
is required, set it up on the roadside at
an appropriate distance from the rear of
the vehicle. Comply with all safety guide-
lines and regulations. Change the wheel
only on a level, firm surface which is not
slippery. Avoid jacking the vehicle up on
a soft or slippery surface (snow, ice, very
smooth surfaces, etc.), since it could
slide sideways. Position the jack on a
firm support surface. Do not place
wooden blocks or similar objects under
the jack. If this is done, the jack might not
be able to reach its full support capacity
because of the limited height. Do not lie
under the vehicle or start the engine
when the vehicle is supported by the
jack. Failure to comply with this creates a
risk of fatal injury.<
What you will need In order to avoid rattling noises later,
note the position of the tools when you
remove them and return them to their
original position when you are through
using them.
>Two wedges (wheel chocks)
Open the liftgate and tailgate.
In the cargo area, fold up the floor
cover or pull-out cargo floor (refer to
page 127 or 128).
Take out the wedges (arrow) next to
the spare wheel. 530us117
>Lug wrench
Is located next to the spare wheel. 530us120
Page 182 of 223

182n
Changing a wheelRemoval aid for the spare wheelBy using this device, you do not have to
lift the spare wheel out of the recess by
hand.
Its task is to help you to move the wheel
onto the tailgate, from where you can
easily lift it off.
1 Close the tailgate again.
2 Grasp the handle of the removal aid
behind the spare wheel with both
hands and pull upward over the
tailgate (arrow).530us155
3 Hook both buckles into the latch of
the tailgate (arrow); the tailgate is
released.530us156
4 Remove the support rod from the
bracket.530us080
Page 183 of 223

IndexDataTechnologyRepairsCar careControlsOverview
183n
Changing a wheel5 Press the tailgate down and hold it
there. The spare wheel is now pulled
by means of the removal aid onto the
tailgate.
Hold the tailgate in the opened
position and do not allow it to
retract sharply upward. If you do so,
there is a risk of personal injury and
vehicle damage.< 530us158
6 Insert the support rod in the tailgate
lock and press down until it engages
(arrow 1); then lock hook of rod in
striker (arrow 2).
Be sure that the support rod is
locked firmly in place. If you fail to
do so, it could retract sharply upward
and cause personal injury and vehicle
damage.<
7 You can now release the locked tail-
gate and take the spare wheel down
from the tailgate. It is recommended
that you leave the tailgate locked into
place until you have completed the
wheel change and placed the wheel
with the defective tire into the
removal aid.530us082
Procedure1 Read carefully and comply with the
safety precautions on page 180.
2 Secure the vehicle to prevent it from
rolling:
Place the wedges (chocks) behind
the wheels on the side opposite the
side you are lifting. If the vehicle is
parked on a downward slope, place
the wedges securely in front of the
wheels. If the wheel must be
changed on a surface with a more
severe slope, take additional
precautions to secure the vehicle
from rolling.
3 Loosen the lug bolts 1/2-turn.
4 Insert the jack handle into the jack
(refer to the illustration in the next
column)
Page 184 of 223

184n
Changing a wheel5 Position the jack at the jacking point
closest to the flat tire so that the
jack base is vertically below the
jacking point and the entire surface
of the head of the jack will move
into the square recess of the jacking
point (refer to the illustration detail)
when the jack is cranked.
6 Jack the vehicle up until the wheel
you are changing is raised from the
ground.
7 Unscrew the lug bolts and remove
the wheel.
8 Remove accumulations of mud or
dirt from the mounting surfaces of
the wheel and hub. Clean the lug
bolts.
9 Position the spare wheel. Secure
the wheel by turning at least two lug
bolts into opposite bolt holes.530us203
10 Screw in the remaining lug bolts.
Tighten all the bolts securely.
11 Lower the jack and remove it from
beneath the vehicle.
12 Tighten the lug bolts in a diagonal
pattern.
13 Check and correct the tire inflation
pressure at the earliest opportunity.
The vehicle jack is designed for
changing wheels only. Do not
attempt to raise another vehicle model
with it or to raise any load of any kind.
To do so could cause accidents and
personal injury.
To ensure continued safety, have the
tightness of the lug bolts checked with
a calibrated lug wrench [torque specifi-
cation: 101 ft-lb (140 Nm)] at the
earliest opportunity.<
Store the wheel and the tools in the
order opposite that for removal.
Before removing the support rod,
be sure that the tailgate is held
down firmly. If you fail to do so, it could
retract sharply upward and cause
personal injury and vehicle damage.
After you remove the rod, close the tail-
gate carefully. Continue to hold it firmly
until it is completely closed.<
If light-alloy wheels other than original
BMW light-alloy wheels have been
mounted, it may be necessary to use
different lug bolts for those wheels.
Replace the defective tire as soon as
possible and have the new wheel/tire
balanced.
The spare wheel has a size
235/65 R 17 tire. If you have
mounted tires on your vehicle with a
different size, have wheels and tires of
the same size and specification rein-
stalled as soon as possible.
When the spare wheel is mounted, the
maximum speed rating is 130 mph
(210 km/h).<