2001 BMW SPORT WAGON instrument panel
[x] Cancel search: instrument panelPage 50 of 238
50n
Electric power windows Sliding/Tilt sunroof
*
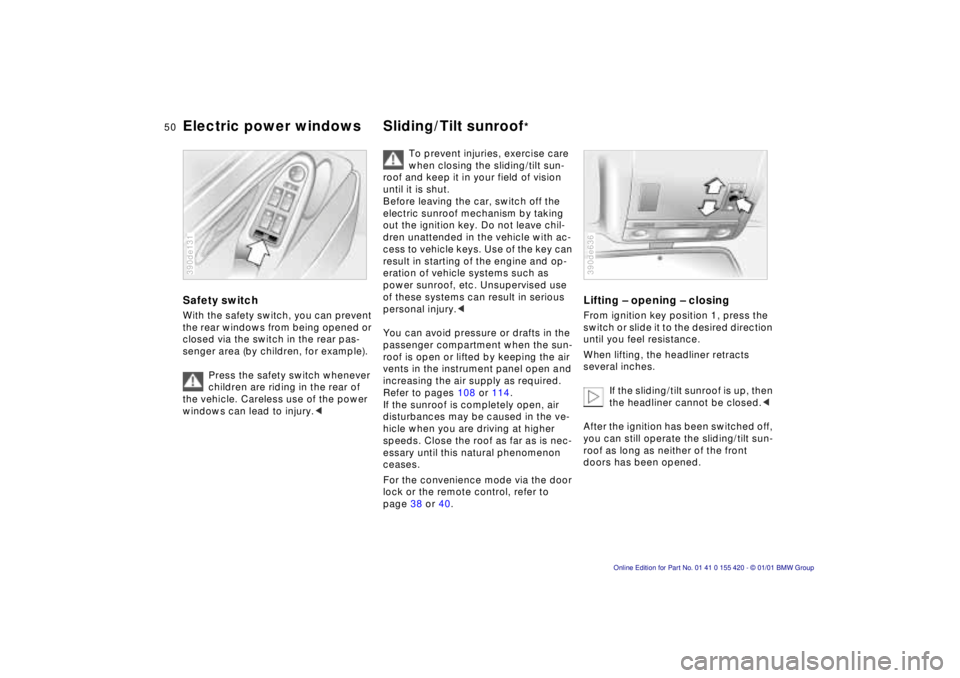
Safety switchWith the safety switch, you can prevent
the rear windows from being opened or
closed via the switch in the rear pas-
senger area (by children, for example).
Press the safety switch whenever
children are riding in the rear of
the vehicle. Careless use of the power
windows can lead to injury.< 390de131
To prevent injuries, exercise care
when closing the sliding/tilt sun-
roof and keep it in your field of vision
until it is shut.
Before leaving the car, switch off the
electric sunroof mechanism by taking
out the ignition key. Do not leave chil-
dren unattended in the vehicle with ac-
cess to vehicle keys. Use of the key can
result in starting of the engine and op-
eration of vehicle systems such as
power sunroof, etc. Unsupervised use
of these systems can result in serious
personal injury.<
You can avoid pressure or drafts in the
passenger compartment when the sun-
roof is open or lifted by keeping the air
vents in the instrument panel open and
increasing the air supply as required.
Refer to pages 108 or 114.
If the sunroof is completely open, air
disturbances may be caused in the ve-
hicle when you are driving at higher
speeds. Close the roof as far as is nec-
essary until this natural phenomenon
ceases.
For the convenience mode via the door
lock or the remote control, refer to
page 38 or 40.
Lifting – opening – closingFrom ignition key position 1, press the
switch or slide it to the desired direction
until you feel resistance.
When lifting, the headliner retracts
several inches.
If the sliding/tilt sunroof is up, then
the headliner cannot be closed.<
After the ignition has been switched off,
you can still operate the sliding/tilt sun-
roof as long as neither of the front
doors has been opened.390de636
Page 83 of 238
IndexDataTechnologyRepairsCar careControlsOverview
83n
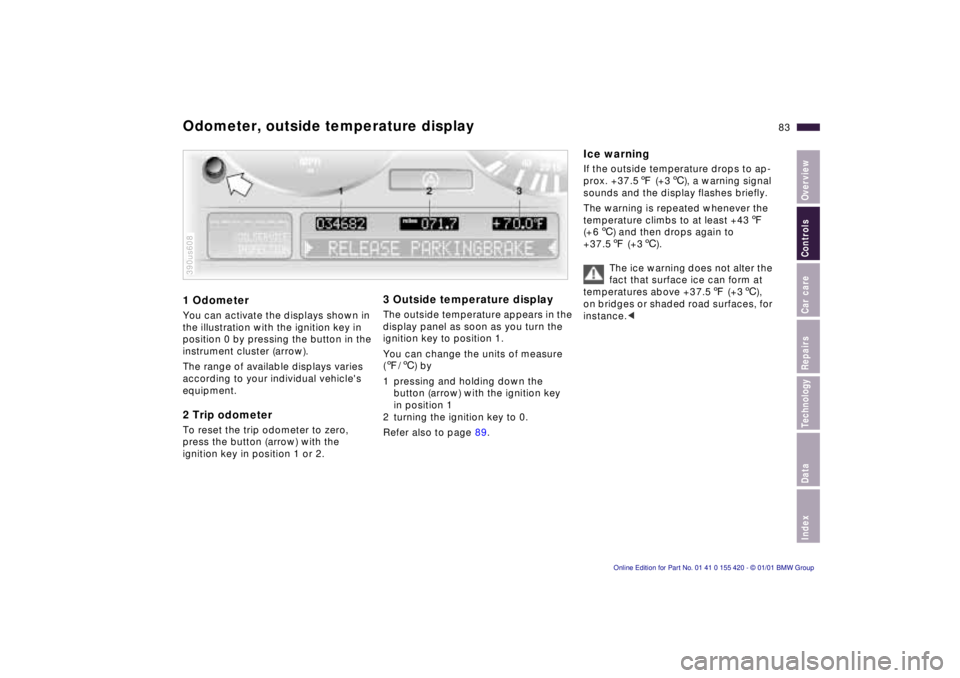
1 OdometerYou can activate the displays shown in
the illustration with the ignition key in
position 0 by pressing the button in the
instrument cluster (arrow).
The range of available displays varies
according to your individual vehicle's
equipment.2 Trip odometerTo reset the trip odometer to zero,
press the button (arrow) with the
ignition key in position 1 or 2.390us608
3 Outside temperature displayThe outside temperature appears in the
display panel as soon as you turn the
ignition key to position 1.
You can change the units of measure
(7/6) by
1 pressing and holding down the
button (arrow) with the ignition key
in position 1
2 turning the ignition key to 0.
Refer also to page 89.
Ice warningIf the outside temperature drops to ap-
prox. +37.57 (+36), a warning signal
sounds and the display flashes briefly.
The warning is repeated whenever the
temperature climbs to at least +437
(+66) and then drops again to
+37.57 (+36).
The ice warning does not alter the
fact that surface ice can form at
temperatures above +37.57 (+36),
on bridges or shaded road surfaces, for
instance.<
Odometer, outside temperature display
Page 159 of 238
Index
Data
Technology
Repairs
Car care
Controls
Overview
159nHood
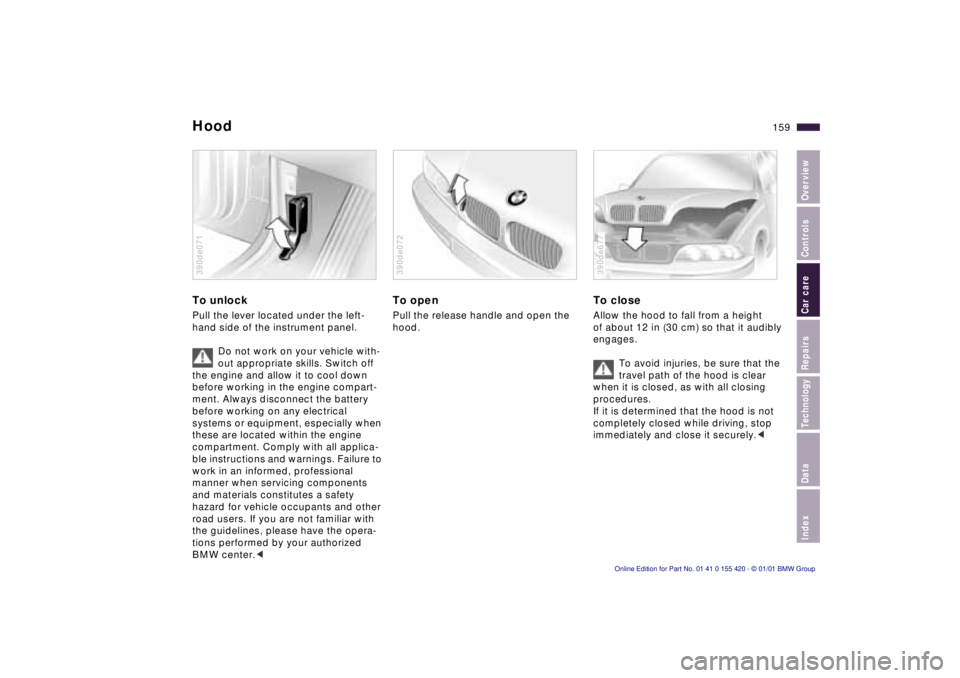
To unlock
Pull the lever located under the left-
hand side of the instrument panel.
Do not work on your vehicle with-
out appropriate skills. Switch off
the engine and allow it to cool down
before working in the engine compart-
ment. Always disconnect the battery
before working on any electrical
systems or equipment, especially when
these are located within the engine
compartment. Comply with all applica-
ble instructions and warnings. Failure to
work in an informed, professional
manner when servicing components
and materials constitutes a safety
hazard for vehicle occupants and other
road users. If you are not familiar with
the guidelines, please have the opera-
tions performed by your authorized
BMW center. <
390de071
To open
Pull the release handle and open the
hood.
390de072
To close
Allow the hood to fall from a height
of about 12 in (30 cm) so that it audibly
engages.
To avoid injuries, be sure that the
travel path of the hood is clear
when it is closed, as with all closing
procedures.
If it is determined that the hood is not
completely closed while driving, stop
immediately and close it securely. <
390de677
Page 174 of 238

174nCaring for your car
Window care
You can use window and glass cleaner
to clean inside window surfaces and
mirrors without smearing and streaking.
Never use polishing pastes or abrasive
(quartz) cleansers on mirror lenses.
When caring for break-resistant
security glass
*, observe the fol-
lowing instructions:
The inner surface of the side windows
is coated with a plastic film. For this
reason, do not affix any decals or adhe-
sive stickers on the inside of these win-
dows unless they are to be placed there
permanently.
Wash the glass with clean water. If nec-
essary, you may add a commercially-
available mild household cleaner. Do
not use abrasive cleaners.
If the windows are fogged or iced over,
treat them with an anti-misting cloth or
a deicer spray – do not use an ice
scraper. <
Clean the wiper blades with soapy wa-
ter. The wiper blades should be re-
placed twice a year, before and after
the cold season.
Use only wiper blades which have
been approved by BMW. <
Caring for other vehicle
components and materials
Light-alloy wheels should be treated
with alloy wheel cleaner, especially
during the winter months. However, do
not use aggressive products contain-
ing acids, strong alkalis or abrasives.
Do not use steam cleaners operating at
temperatures above 140 7 (60 6).
(Follow the manufacturer's instruc-
tions.)
If your vehicle has chrome parts
* such
as window moldings, door handles or
other items, clean these parts carefully
with ample clean water, especially if
they have an accumulation of road salt.
Use a chrome polish for an additional
treatment.
Plastic components, vinyl upholstery,
headliners, lamp lenses, the clear cover
of the instrument cluster and compo-
nents with a sprayed dull black surface
can be cleaned with water (add plastic
cleaner as required). Do not allow mois-
ture to soak through the seats or head-
liner. Never use solvents such as lac-
quer thinner, heavy-duty grease
remover, fuels, etc. Rubber components should be cleaned
with water only; a rubber treatment or
silicone spray may also be applied.
The safety belts should be cleaned with
a mild soap and water solution without
being removed from the vehicle. Never
attempt chemical or dry cleaning, as
damage to the belt fabric could result.
After cleaning, never allow the inertia
reel to retract the belts until they are
completely dry. Dirty safety belts pre-
vent the inertia reel mechanism from
retracting the strap properly, and thus
constitute a safety hazard.
Heavily soiled floor carpets and mats
*
can be cleaned with an interior cleaner.
The floor mats can be removed from
the vehicle for cleaning.
Please use only a damp cloth to clean
wooden fascia panels and components.
Follow up by drying with a soft cloth.
Use cleaning and car-care
products that you can obtain
at your BMW center. <
Page 176 of 238
176nAirbags Vehicle storage
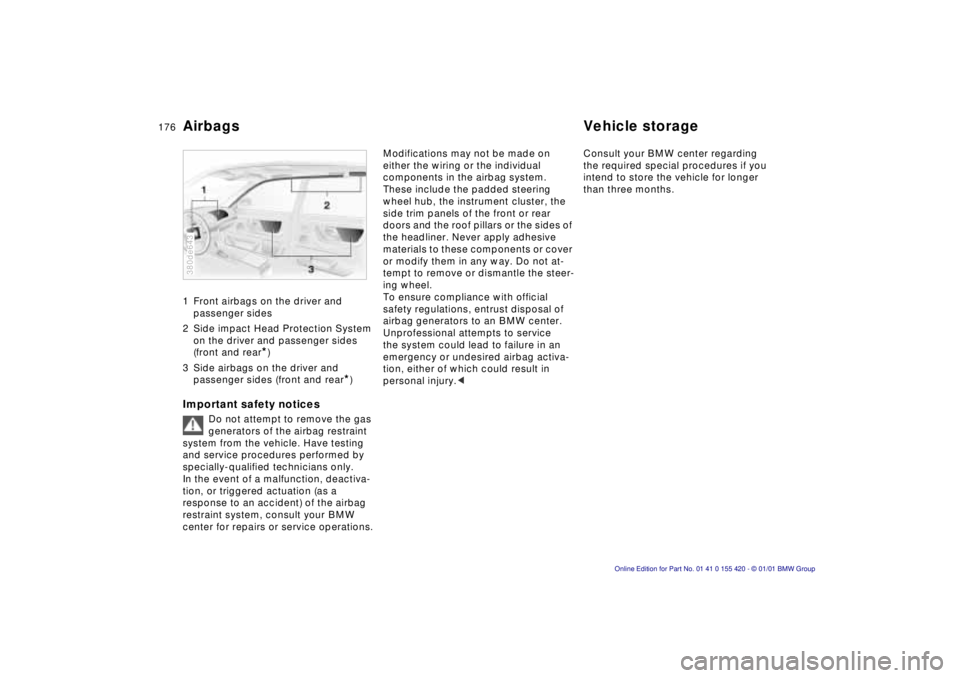
1 Front airbags on the driver and
passenger sides
2 Side impact Head Protection System on the driver and passenger sides
(front and rear
*)
3 Side airbags on the driver and passenger sides (front and rear
*)
Important safety notices
Do not attempt to remove the gas
generators of the airbag restraint
system from the vehicle. Have testing
and service procedures performed by
specially-qualified technicians only.
In the event of a malfunction, deactiva-
tion, or triggered actuation (as a
response to an accident) of the airbag
restraint system, consult your BMW
center for repairs or service operations.
380de643
Modifications may not be made on
either the wiring or the individual
components in the airbag system.
These include the padded steering
wheel hub, the instrument cluster, the
side trim panels of the front or rear
doors and the roof pillars or the sides of
the headliner. Never apply adhesive
materials to these components or cover
or modify them in any way. Do not at-
tempt to remove or dismantle the steer-
ing wheel.
To ensure compliance with official
safety regulations, entrust disposal of
airbag generators to an BMW center.
Unprofessional attempts to service
the system could lead to failure in an
emergency or undesired airbag activa-
tion, either of which could result in
personal injury. < Consult your BMW center regarding
the required special procedures if you
intend to store the vehicle for longer
than three months.
Page 178 of 238
178nOBD interface socket
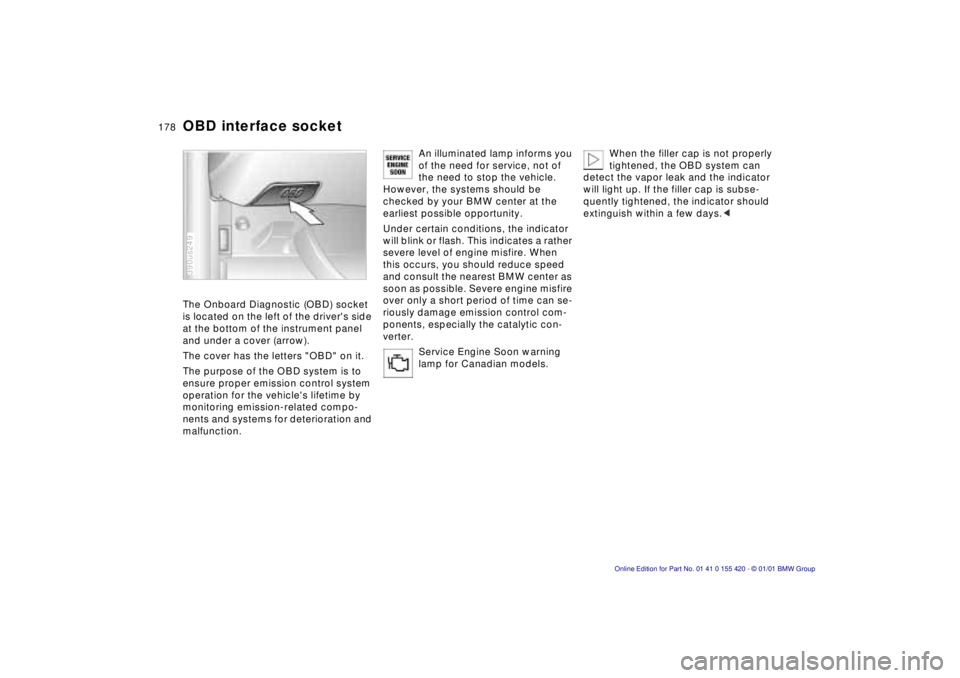
The Onboard Diagnostic (OBD) socket
is located on the left of the driver's side
at the bottom of the instrument panel
and under a cover (arrow).
The cover has the letters "OBD" on it.
The purpose of the OBD system is to
ensure proper emission control system
operation for the vehicle's lifetime by
monitoring emission-related compo-
nents and systems for deterioration and
malfunction.
390us249
An illuminated lamp informs you
of the need for service, not of
the need to stop the vehicle.
However, the systems should be
checked by your BMW center at the
earliest possible opportunity.
Under certain conditions, the indicator
will blink or flash. This indicates a rather
severe level of engine misfire. When
this occurs, you should reduce speed
and consult the nearest BMW center as
soon as possible. Severe engine misfire
over only a short period of time can se-
riously damage emission control com-
ponents, especially the catalytic con-
verter.
Service Engine Soon warning
lamp for Canadian models.When the filler cap is not properly
tightened, the OBD system can
detect the vapor leak and the indicator
will light up. If the filler cap is subse-
quently tightened, the indicator should
extinguish within a few days. <
Page 231 of 238

Everything from A to Z
231n
IndexDataTechnologyRepairsCar careControlsOverview
Height219
Height adjustment
seats52
steering wheel56
Help with jump
starting200
t
HiFi system211
High beams24
bulb replacement183
t
High Performance Synthetic
Oils166
High-mount brake lamp187
Hood release159
t
Horn25
Hydraulic Brake Assistant,
refer to DBC23, 100, 145
I
Ice warning83
Identification number of the
vehicle169
Identification, tires153
Ignition key36
Ignition lock68
Imprint4
Independent
ventilation94, 120
Independent ventilation,
refer also to the onboard
monitor Owner's Manual
Indicator lamps22
t
Inflation
pressure29
t
, 30, 150
monitoring103, 213
INSPECTION85
Instrument cluster18, 20
Instrument lighting105
Instrument panel20
Instrument panel switch78
Instruments18
Integrated rear
suspension214
Intensive
cleaning78, 79, 164
Interaxle tire rotation152
Interference indicators86
Interference with
car phones149
Interior lamps106
bulb replacement188
t
remote control40
Interior mirror57
with automatic dimming
feature211
Interior motion sensor48
deactivation48
Interior rearview mirror
with automatic dimming
feature57
Interlock68
Intermittent mode78
J
Jack190
t
Jump starting200
t
KKey Memory60
Key, transmitter36
Keys36
Keys with remote control36
Kickdown73, 76LLashing eye136
Leather care175
Length219
Level control
system23, 214
inactive148t
License plate lamps, bulb
replacement188t
Light switch105
Light-alloy wheels156
Lighter126
Lights-on warning105
LIMIT95
Load-securing devices136
Locking and unlocking the
doors38
Louvers108, 114
Low beams105
bulb replacement183tLow-fuel warning lamp84
Lug bolts191
Lug wrench191t
Luggage compartment46
capacity221
hanger46
lamps106
Luggage compartment
lamps, bulb
replacement189t
Luggage compartment lid/
tailgate43
emergency actuation43
opening separately43
remote control41
secure separately43
unlock in case of electrical
fault43t
Luggage space46
Luggage straps46
Lumbar support54
MM+S tires154
Magic Eye194
Maintenance85t, 170t
Malfunction displays86t