2001 BMW M3 COUPE flat tire
[x] Cancel search: flat tirePage 146 of 183
146n
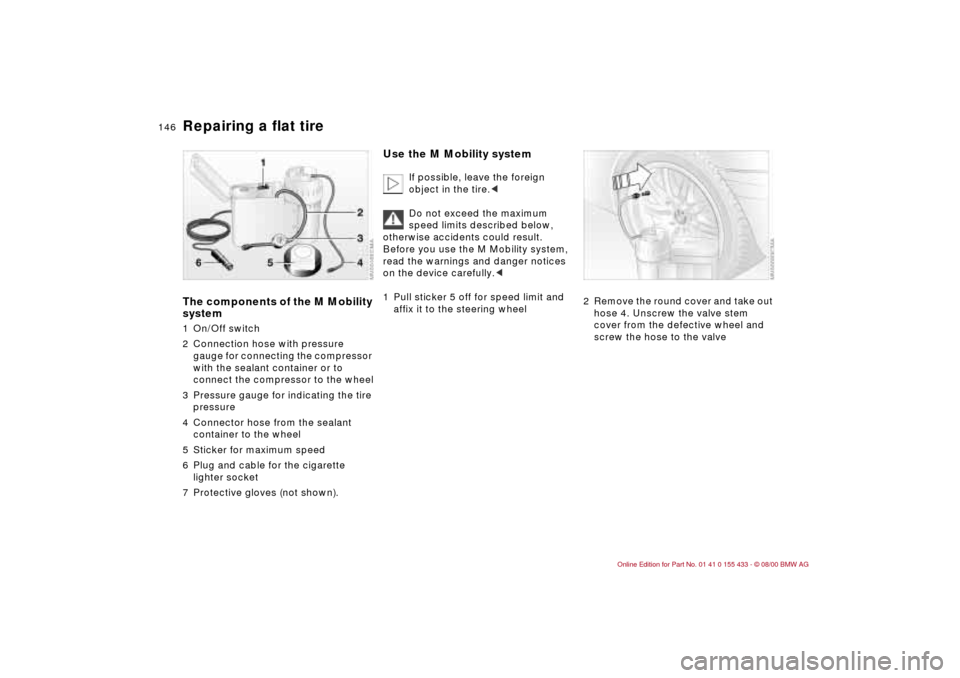
Repairing a flat tireThe components of the M Mobility
system1 On/Off switch
2 Connection hose with pressure
gauge for connecting the compressor
with the sealant container or to
connect the compressor to the wheel
3 Pressure gauge for indicating the tire
pressure
4 Connector hose from the sealant
container to the wheel
5 Sticker for maximum speed
6 Plug and cable for the cigarette
lighter socket
7 Protective gloves (not shown).
Use the M Mobility system
If possible, leave the foreign
object in the tire.<
Do not exceed the maximum
speed limits described below,
otherwise accidents could result.
Before you use the M Mobility system,
read the warnings and danger notices
on the device carefully.<
1 Pull sticker 5 off for speed limit and
affix it to the steering wheel
2 Remove the round cover and take out
hose 4. Unscrew the valve stem
cover from the defective wheel and
screw the hose to the valve
Page 147 of 183

IndexDataTechnologyRepairsCar careControlsOverview
147n
Repairing a flat tire3 Flip open the cover and pull out the
enclosed protective gloves. Take out
hose 2 with the pressure gauge and
screw it to the terminal for the sealant
container as shown in the illustration
4 Make sure that the system has been
switched off (position 0).
Take out the plug 6 and insert it into
the cigarette lighter socket in the
passenger compartment (refer to
page 93)
5 Make sure that the screw on the rear
of pressure gauge 3 is tightened
down. Turn on the M Mobility system
(position I, refer to illustration) and
allow three minutes to elapse to let
the sealant flow in. It does not matter
afterward what the tire's inflation
pressure is
6 Turn the device off.
Disconnect the connector hose from
the sealant container and the tire
valve. Stow the M Mobility system in
the luggage compartment
7 Then immediately drive at least
1.2 miles (2 km), so that the liquid
sealant distributes evenly throughout
the inside of the tire.
Do not exceed 40 mph (60 km/h), and
if possible, do not drop below
10 mph (20 km/h).
Stop at an appropriate spot
Page 148 of 183

148n
Repairing a flat tire Battery 8 Take out the hose with the pressure
gauge and screw it onto the valve.
Take out the plug and plug it into the
cigarette lighter socket in the
passenger compartment
9 Inflate the tire pressure:
>To increase the tire pressure: turn
on the M Mobility system
(position I). To check the new tire
pressure briefly turn off the device
>To reduce the tire pressure: turn
the screw on the back of the pres-
sure gauge; this will open the air
release valve
If the air pressure won't hold, still
carry out step 10 and then repeat
steps 7 through 10 again.
The use of the M Mobility system may
be ineffective if the damaged area in
the tire is larger than approx. 0.16 in
(4 mm). Please consult the nearest
BMW center if the tire cannot be
temporarily repaired with the M Mobility
system.<
10 Unscrew the hose from the valve
and stow the M Mobility system in
the luggage compartment.
After the flat tire has been fixed and you
start driving again, do not exceed a
maximum speed of 50 mph (80 km/h).
You will find corresponding instructions
for using the M Mobility system on the
device.
Replace the defective tire as soon as
possible and have the new wheel/tire
balanced. Re-initialize the Tire Pressure
Warning system (RDW), refer to
page 78 for further information. Have
the M Mobility system refilled. Contact
your BMW center for this.
Battery locationThe battery is located at the right-rear
of the luggage compartment. Raise the
luggage compartment floor panel (refer
to page 39). Using a screwdriver or a
coin and f turn, release both of the
caps as shown in the illustration, taking
them out along with an additional cap in
the top center of the right side trim
panel. Remove the fasteners. In order
to remove the storage tray, slide the
side trim panel slightly upward.
Battery posts, terminals, and
related accessories contain lead
and lead compounds. Wash hands after
handling.<
Page 158 of 183

158n
Deceleration sensors continuously
monitor the physical forces acting upon
the vehicle. If there is a deceleration
because of a head-on collision in which
the protection normally afforded by the
safety belts is no longer sufficient by
itself, then the gas generators for the
front airbags will be simultaneously
ignited on both the driver and
passenger sides. However, the
passenger-side airbag is only triggered
if an additional sensor has recognized
that the passenger seat is occupied.
In the event of a side impact, the front
head and side airbags or rear side
airbags
* will deploy if necessary on the
side where the impact occurs.
The airbags located under the marked
covers inflate and unfold in a matter of
a few milliseconds. In this process, they
tear through the designed separation
points of the upholstered covers or
press them out.
The gas required to inflate the airbags
is not dangerous, and it dissipates
together with the associated smoke.
The gas required to inflate the airbags
is not dangerous, and the smoke asso-
ciated with it dissipates.
The entire process is completed within
fractions of a second. The AM frequency bands (medium-
wave, long-wave and short-wave) make
it possible to receive stations from a
great distance, because the broadcast
signals travel not only along the ground
as surface waves, but also as atmo-
spheric waves that are reflected from
the ionosphere.
Frequency-modulation (FM) provides
substantially better sound quality than
on the. However, because FM trans-
missions rely on line-of-sight broadcast
waves, their effective reception range is
limited.
Airbags Radio reception
Page 176 of 183

Everything from A to Zhigh-speed aspirated
engine160
speed166
starting62t
torque166
Engine concept M3160
Engine oil
add123t
capacity169
consumption123
pressure20
temperature69
Entry to the rear47
Exterior mirrors49
Eyelets, towing155tFFailure messages72t
Fan87
Fault, ABS105
Filler cap cover25
Filling capacities169
Filling the washer
reservoir122t
First-aid kit24t
Flat tire111
repairing145
Fog lamps82
bulb replacement141t
Folding rear backrest95
Follow-Me-Home lamps81
Footbrake106Footwell lamps82
bulb replacement144t
Frost protection,
radiator125
Fuel26
consumption74
consumption display70
gauge70
preparation166
quality26
reserve indicator lamp70
Fuel filler door
manual release after
electrical fault152t
Fuel tank capacity169
Fuel tank gauge70
Functional status, electrical
and electronic
systems162
Fuses151
replacing151t
GGasoline26
Gasoline gauge70
Glove compartment90
Glove compartment lamp,
bulb replacement144t
Gross vehicle weight168
HHandbrake63
Handsfree system92
Hazard warning
flashers24t
Hazard warning triangle24
Head restraint46
Headlamp cleaning
system121, 122, 169
Headlamp cover,
care139t
Headlamp flasher82
Headlamp washer system,
refer to headlamp cleaning
system
Heated seats89
Heavy loads97
Height167
HiFi system Ð harman
kardon90
High beams65, 82
indicator lamp22
High engine speed160
High Performance Synthetic
Oil124
High-mount brake lamp143
Holder for beverages91
Hood release118t
Horn17
IIce warning73
Identification, tires114
Ignition key30
Ignition lock62
Imprint4
Indicator lamps20t
Individual settings52
Inflation
pressure26t, 111t
INSPECTION71
Instrument cluster18
Instrument lighting81
Instrument panel18
Interaxle tire rotation113t
Interface socket
for Onboard
Diagnostics135
Interference
cellular phone110
Interior lamps34, 82
bulb replacement143t
remote control34
Interior motion sensor40
Interior rearview mirror
automatic dimming
feature50, 161
Intermittent mode, wiper
system65
Page 178 of 183

Everything from A to ZPark Distance Control
(PDC)75
Parking brake63
Parking help75
Parking lamp82
Parking, winter109
PDC (Park Distance
Control)75
Performance166
Phone hookup92
Phone, mobile110
Pollen88
Power seat47
Power windows42
Pressure specifications for
tires26
Pressure,
tires26, 26t, 111
Protective gloves141QQuality Grades112RRadiator169
Radio
please refer to the
separate Owner's Manual
reception110, 158
Radio Data System
(RDS)159
Rain sensor66, 160RDS (Radio Data
System)159
RDW (Tire Pressure
Warning)78
indicator lamp22
Reading lamps83
Rear backrest, folding95
Rear lamps141t
Rear window
defroster67, 88
Rear-entry assist47
Rearview mirror49
Recirculated air mode87
Reclining seat45
Refueling25
Remote control33
Removing condensation
from the windows87t
Repairing a flat tire145t
Replace windshield wiper
blades138t
Replacement key30t
Replacing bulbs138t
Reporting safety defects7
Restraint system55, 59
Return used
batteries151t
Reverse64
Roller blind, sun
protection89
Roof load capacity168Roof-mounted luggage
rack98
Rubber seals and
components108
SSafety belt tensioner159
Safety belts54
height adjustment55
three-point safety belt95
Safety buttons36
Safety defects, reporting7
Safety feature, electric
power windows42
Safety glasses141
Seat
mechanical45
power47
Seat adjusting45
Seat heating89
Seat memory51
Securing cargo97
Securing loads97
Self-defrosting mirrors49
Self-diagnostics162
Service and Warranty
Information Booklet127
Service Interval
Display71, 127
Service Manual127
Side airbags56Side impact Head Protection
System56
Side lamps81
Side marker lamp, bulb
replacement139t
Side turn signals, bulb
replacement140t
Ski bag96
Sliding/tilt sunroof43
closing after electrical
fault153t
convenience
operation32, 33
remote control33
Snow chains108, 115
Socket93
for flashlights93
for power supplies93
for vacuum cleaner93
Spare key30t
Spark plugs170
Speaker92
Speedometer18
Sport-mode,
identification80
Sports seat46, 47
Starting
problems63t, 103
Starting the engine62
Steel wheels116
Steering110
Steering lock62
Page 179 of 183

Everything from A to Z
179n
IndexDataTechnologyRepairsCar careControlsOverview
Stopping the vehicle63
Storage areas91
Storing your vehicle133
Stroke166
Summer tires114
Sun roller blind89
Sun visors50
Surface ice warning73
Switching off the engine63
Switching off the interior
motion sensor41
Symbols, used4
Synthetic oils124TTachometer69
Tail lamps141
bulb replacement141t
Tank capacity169
Technical data166
Technical
modifications6, 134
Temperature display
outside temperature73
Temperature gauge
engine coolant70
Temperature layering88
Third brake lamp143
Through-loading system95
Tilt alarm34, 41
remote control34Tire codes114
Tire damage111t
Tire inflation
pressure26, 111
Tire Pressure Warning
(RDW)78
indicator lamp22
Tire Quality Grading112
Tire
replacement112, 113t
Tire specifications116
Tire tread111
Tools138t
Torque166
Towing eyelets155t
Towing the vehicle155t
Track167
Transmission64
Transporting children
safely59
Tread depth, tires111
Tread wear indicator111
Trip odometer69
Trunk, refer to luggage
compartment37
Turn signal indicator22, 65
bulb replacement140t
Turning radius167
Two-way radios110
UUniform Tire Quality
Grading112
Used batteries,
disposal151
Used engine oil,
disposal124VVacuum cleaner,
connecting93
Vanity mirror
bulb replacement144t
Vehicle battery148, 170
Vehicle care
exterior129
interior131
Vehicle Identification
Number (VIN)126
Vehicle immobilizer31
Vehicle painting129
Vehicle storage133
Vehicle weight168
Ventilation84
draft-free88
Vinyl, care131
Voice recognition23
WWarning lamps20t
Warning messages72t
Warranty and Service Guide
Booklet127
Washing your vehicle128
Water on roadways103
Waxing, paintwork130
Wear indicator in the
tires111
Weights168
Wheel rims114
Wheelbase167
Wheels and tires114, 116
Width167
Windows
convenience
operation32, 33
remote control33
Windshield washer reservoir,
filling
Windshield wiper65
Winter operation108
Winter tires114, 115
Wiper system65
Work in the engine
compartment118tXXenon lamps139, 163
Page 181 of 183

So that you will have important
specifications available when you
stop to refuel, we recommend
that you supplement this table
with data which apply to your
vehicle.
Fuel
Engine oil The oil volume between the
two marks on the oil dipstick
corresponds to approx.
1.1 US quarts (1 liter). Designation Premium Unleaded
Gasoline
AKI: minimum 91
QualityTire inflation pressures
Summer Winter
Front Rear Front Rear
4 persons
5 persons or 4 plus luggage
Refueling
BMW recommends Castrol