2001 BMW M ROADSTER COUPE fuel cap
[x] Cancel search: fuel capPage 12 of 171
Contents
Owner service procedures
Advanced technology
Technical data
Replacement procedures:
Onboard tool kit128
Windshield wiper blades128
Lamps and bulbs129
Master key with battery-
powered lamp134
Changing a wheel135
Repairing a flat tire135
Battery140
Fuses142
In case of electrical
malfunction:
Power convertible top143
Fuel filler door143
Assistance, giving and
receiving:
Jump-starting144
Towing the vehicle145Airbags150
Radio reception150
Dynamic Stability Control
(DSC)151
Safety belt tensioner151
Interior rearview mirror with
automatic dimming
feature152
Limited slip differential153Engine specifications156
Dimensions157
Weights158
Capacities159
Electrical system160
Drive belts160
ProCarManuals.com
Page 19 of 171
19n
IndexDataTechnologyRepairsCar careControlsOverview
Instrument cluster
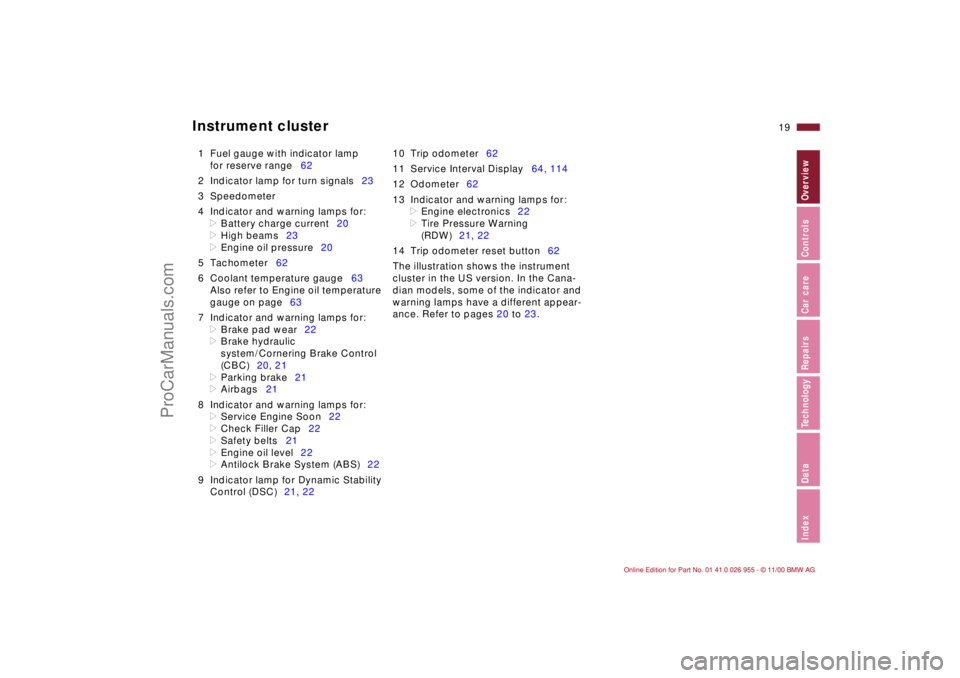
1 Fuel gauge with indicator lamp
for reserve range62
2 Indicator lamp for turn signals23
3 Speedometer
4 Indicator and warning lamps for:
>
Battery charge current20
>
High beams23
>
Engine oil pressure20
5 Tachometer62
6 Coolant temperature gauge63
Also refer to Engine oil temperature
gauge on page63
7 Indicator and warning lamps for:
>
Brake pad wear22
>
Brake hydraulic
system/Cornering Brake Control
(CBC)20, 21
>
Parking brake21
>
Airbags21
8 Indicator and warning lamps for:
>
Service Engine Soon22
>
Check Filler Cap22
>
Safety belts21
>
Engine oil level22
>
Antilock Brake System (ABS)22
9 Indicator lamp for Dynamic Stability
Control (DSC)21, 2210 Trip odometer62
11 Service Interval Display64, 114
12 Odometer62
13 Indicator and warning lamps for:
>
Engine electronics22
>
Tire Pressure Warning
(RDW)21, 22
14 Trip odometer reset button62
The illustration shows the instrument
cluster in the US version. In the Cana-
dian models, some of the indicator and
warning lamps have a different appear-
ance. Refer to pages 20 to 23.
ProCarManuals.com
Page 22 of 171
22n
Indicator and warning lamps
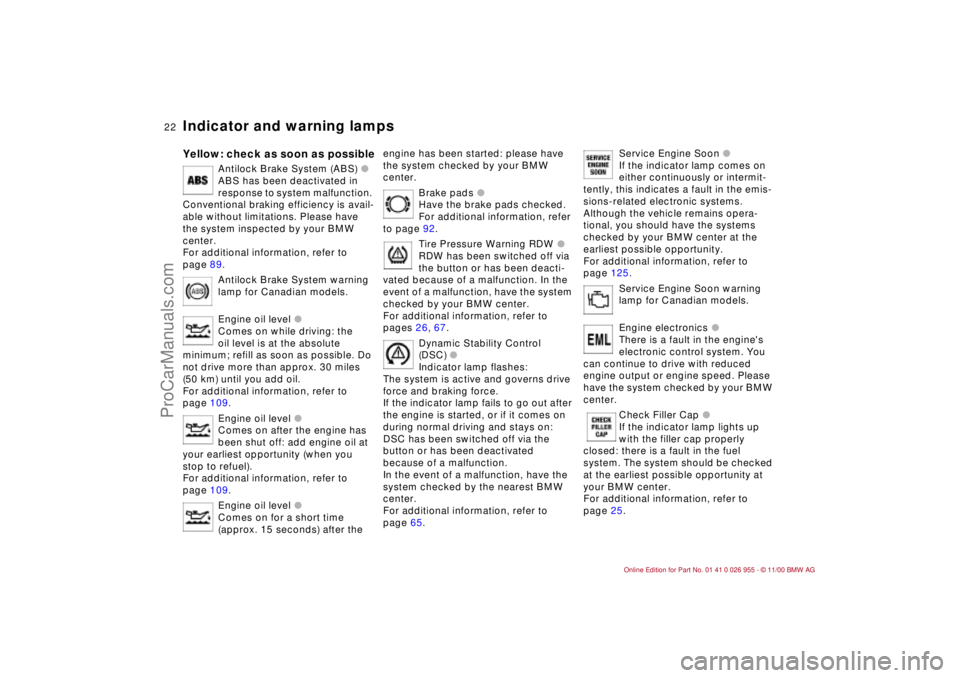
Yellow: check as soon as possible
Antilock Brake System (ABS)
l
ABS has been deactivated in
response to system malfunction.
Conventional braking efficiency is avail-
able without limitations. Please have
the system inspected by your BMW
center.
For additional information, refer to
page 89.
Antilock Brake System warning
lamp for Canadian models.
Engine oil level
l
Comes on while driving: the
oil level is at the absolute
minimum; refill as soon as possible. Do
not drive more than approx. 30 miles
(50 km) until you add oil.
For additional information, refer to
page 109.
Engine oil level
l
Comes on after the engine has
been shut off: add engine oil at
your earliest opportunity (when you
stop to refuel).
For additional information, refer to
page 109.
Engine oil level
l
Comes on for a short time
(approx. 15 seconds) after the
engine has been started: please have
the system checked by your BMW
center.
Brake pads
l
Have the brake pads checked.
For additional information, refer
to page 92.
Tire Pressure Warning RDW
l
RDW has been switched off via
the button or has been deacti-
vated because of a malfunction. In the
event of a malfunction, have the system
checked by your BMW center.
For additional information, refer to
pages 26, 67.
Dynamic Stability Control
(DSC)
l
Indicator lamp flashes:
The system is active and governs drive
force and braking force.
If the indicator lamp fails to go out after
the engine is started, or if it comes on
during normal driving and stays on:
DSC has been switched off via the
button or has been deactivated
because of a malfunction.
In the event of a malfunction, have the
system checked by the nearest BMW
center.
For additional information, refer to
page 65.
Service Engine Soon
l
If the indicator lamp comes on
either continuously or intermit-
tently, this indicates a fault in the emis-
sions-related electronic systems.
Although the vehicle remains opera-
tional, you should have the systems
checked by your BMW center at the
earliest possible opportunity.
For additional information, refer to
page 125.
Service Engine Soon warning
lamp for Canadian models.
Engine electronics
l
There is a fault in the engine's
electronic control system. You
can continue to drive with reduced
engine output or engine speed. Please
have the system checked by your BMW
center.
Check Filler Cap
l
If the indicator lamp lights up
with the filler cap properly
closed: there is a fault in the fuel
system. The system should be checked
at the earliest possible opportunity at
your BMW center.
For additional information, refer to
page 25.
ProCarManuals.com
Page 25 of 171
25n
IndexDataTechnologyRepairsCar careControlsOverview
First-aid kit
*
Refueling
M coupeIn the luggage compartment at the left
rear. Release the Velcro
® fasteners.
M roadsterIn the luggage compartment on the left
in a storage area; swing retaining strap
upward.
Some of the articles in the first-aid
kit may be used within a limited
time only. For this reason, check the
expiration dates of each of the items
regularly, and replace any whose expi-
ration dates have passed. You can
acquire replacements in any drugstore
or pharmacy.
Comply with legal requirements which
cover availability of a first-aid kit in the
vehicle.<
Before filling the tank, shut off the
engine, as otherwise fuel cannot
flow into the tank and the Service
Engine Soon warning lamp may come
on. Refer to page 22.<
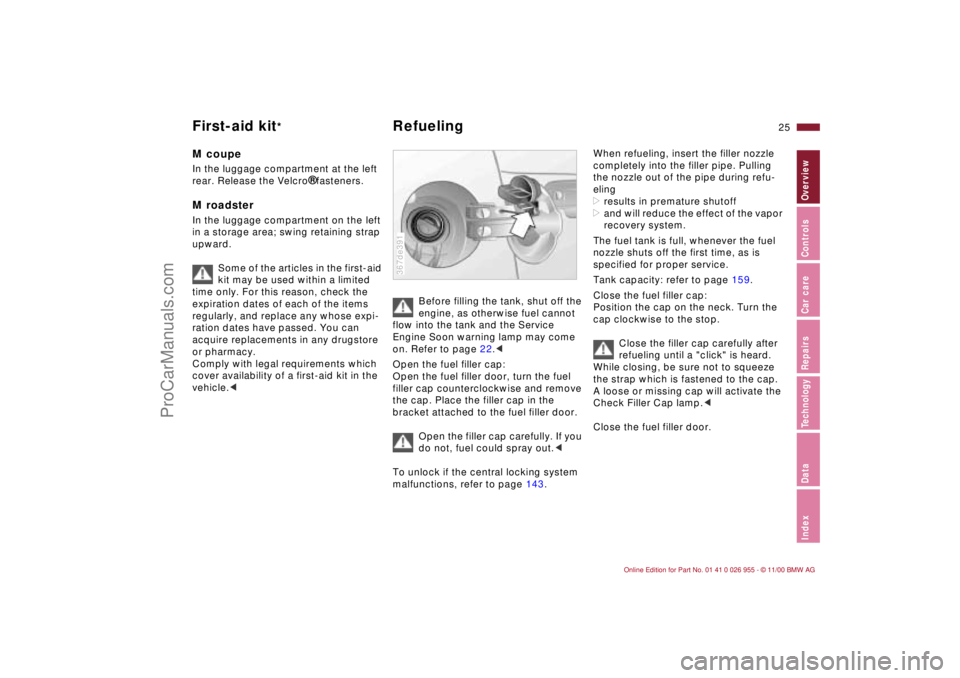
Open the fuel filler cap:
Open the fuel filler door, turn the fuel
filler cap counterclockwise and remove
the cap. Place the filler cap in the
bracket attached to the fuel filler door.
Open the filler cap carefully. If you
do not, fuel could spray out.<
To unlock if the central locking system
malfunctions, refer to page 143.
367de391
When refueling, insert the filler nozzle
completely into the filler pipe. Pulling
the nozzle out of the pipe during refu-
eling
>results in premature shutoff
>and will reduce the effect of the vapor
recovery system.
The fuel tank is full, whenever the fuel
nozzle shuts off the first time, as is
specified for proper service.
Tank capacity: refer to page 159.
Close the fuel filler cap:
Position the cap on the neck. Turn the
cap clockwise to the stop.
Close the filler cap carefully after
refueling until a "click" is heard.
While closing, be sure not to squeeze
the strap which is fastened to the cap.
A loose or missing cap will activate the
Check Filler Cap lamp.<
Close the fuel filler door.
ProCarManuals.com
Page 62 of 171
62n
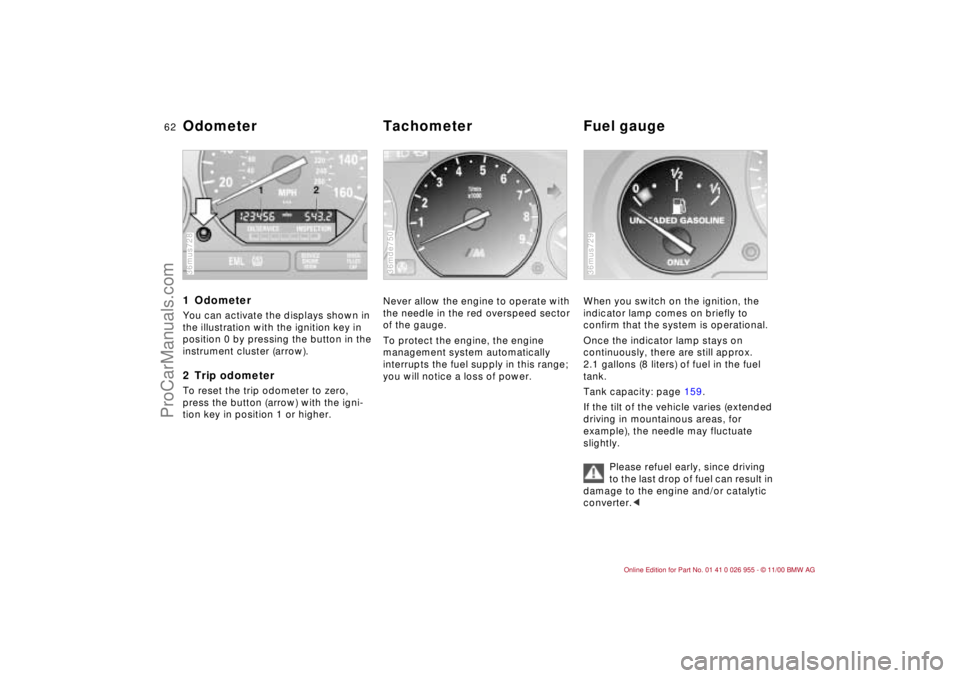
1 OdometerYou can activate the displays shown in
the illustration with the ignition key in
position 0 by pressing the button in the
instrument cluster (arrow).2 Trip odometerTo reset the trip odometer to zero,
press the button (arrow) with the igni-
tion key in position 1 or higher.36mus728
Never allow the engine to operate with
the needle in the red overspeed sector
of the gauge.
To protect the engine, the engine
management system automatically
interrupts the fuel supply in this range;
you will notice a loss of power.36mde750
When you switch on the ignition, the
indicator lamp comes on briefly to
confirm that the system is operational.
Once the indicator lamp stays on
continuously, there are still approx.
2.1 gallons (8 liters) of fuel in the fuel
tank.
Tank capacity: page 159.
If the tilt of the vehicle varies (extended
driving in mountainous areas, for
example), the needle may fluctuate
slightly.
Please refuel early, since driving
to the last drop of fuel can result in
damage to the engine and/or catalytic
converter.< 36mus729
Odometer Tachometer Fuel gauge
ProCarManuals.com
Page 83 of 171
83n
IndexDataTechnologyRepairsCar careControlsOverview
Roof-mounted luggage rackA special luggage system is available
for your coupe as an optional acces-
sory. Please comply with the precau-
tions included with the installation
instructions.
Because roof racks raise the center of
gravity of the vehicle when loaded, they
exercise a major effect on its handling
and steering response.
You should therefore always remember
not to exceed the approved roof load
capacity, the approved gross vehicle
weight or the axle loads when loading
the rack. You will find the specifications
for this under "Technical Data" on
page 158.
Make sure that the load is not too large
in size, and distribute it evenly. Always
load the heaviest pieces first (on the
bottom). Be sure that adequate clear-
ance is maintained for raising the
sunroof, and that objects do not project
into the opening path of the luggage
compartment lid.
Lash the roof luggage down correctly
and securely to prevent it from shifting
or being lost during driving – this would
endanger following traffic.Drive smoothly and avoid sudden
acceleration or braking. Do not corner
at high speeds.
The roof load increases the aerody-
namic resistance. Increased fuel
consumption results from this.
ProCarManuals.com
Page 101 of 171
101n
IndexDataTechnologyRepairsCar careControlsOverview
Wheel and tire combinationsThe right choice
Use only wheels and tires
approved by BMW for the corre-
sponding vehicle model, as otherwise
the tires may make contact with the
body as the result of tolerances despite
the same nominal size being used,
leading to serious accidents. If non-
approved wheels and tires are used,
BMW cannot evaluate their suitability,
and therefore cannot be held liable for
driving safety.<
For wheel and tire specifications
approved by BMW, refer to the informa-
tion on page 103.
The correct wheel and tire combi-
nation affects different systems
such as ABS, DSC and RDW. The func-
tion of these systems is impaired if
improper wheel and tire combinations
are used.
For this reason, use only tires of the
same brand and tread pattern on the
vehicle and, for example, restore the
approved wheel and tire combination
following a flat tire as soon as
possible.<
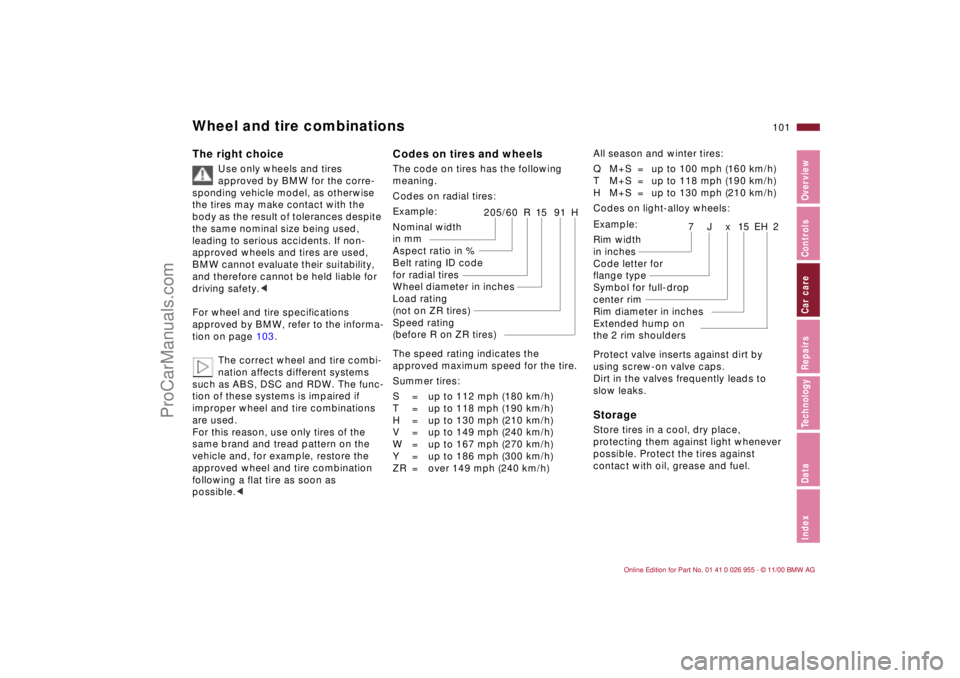
Codes on tires and wheelsThe code on tires has the following
meaning.
Codes on radial tires:
The speed rating indicates the
approved maximum speed for the tire.
Summer tires:
S = up to 112 mph (180 km/h)
T = up to 118 mph (190 km/h)
H = up to 130 mph (210 km/h)
V = up to 149 mph (240 km/h)
W = up to 167 mph (270 km/h)
Y = up to 186 mph (300 km/h)
ZR = over 149 mph (240 km/h) Example:
Nominal width
in mm
Aspect ratio in %
Belt rating ID code
for radial tires
Wheel diameter in inches
Load rating
(not on ZR tires)
Speed rating
(before R on ZR tires)
205/60 R 15 91 H
All season and winter tires:
Q M+S = up to 100 mph (160 km/h)
T M+S = up to 118 mph (190 km/h)
H M+S = up to 130 mph (210 km/h)
Codes on light-alloy wheels:
Protect valve inserts against dirt by
using screw-on valve caps.
Dirt in the valves frequently leads to
slow leaks.Storage Store tires in a cool, dry place,
protecting them against light whenever
possible. Protect the tires against
contact with oil, grease and fuel. Example:
Rim width
in inches
Code letter for
flange type
Symbol for full-drop
center rim
Rim diameter in inches
Extended hump on
the 2 rim shoulders
7x15EH2
J
ProCarManuals.com
Page 158 of 171
158n
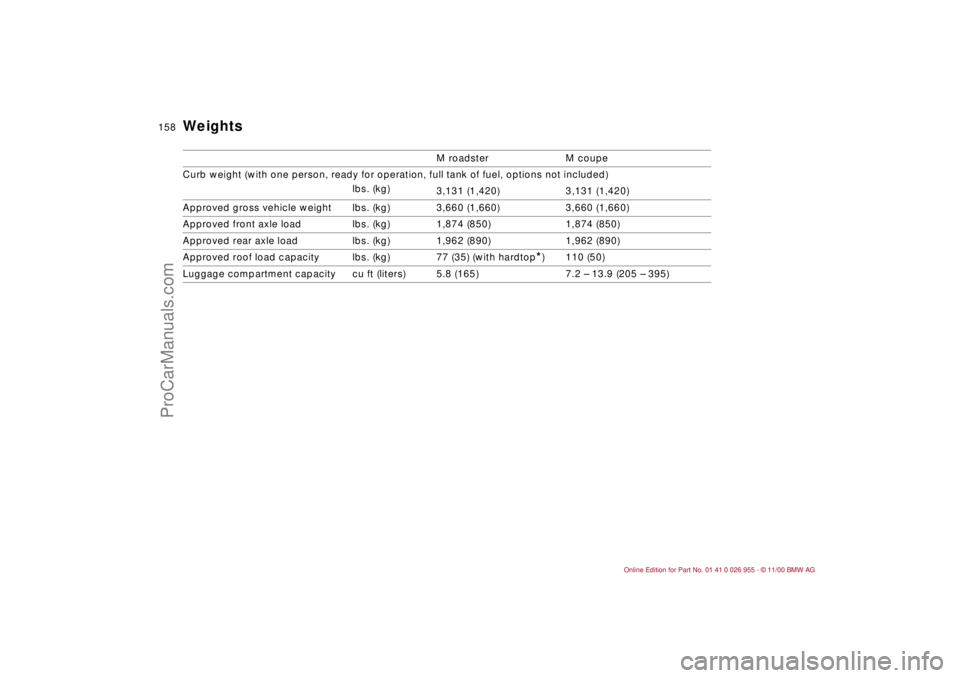
Weights
M roadster M coupe
Curb weight (with one person, ready for operation, full tank of fuel, options not included)
lbs. (kg)
3,131 (1,420) 3,131 (1,420)
Approved gross vehicle weight lbs. (kg) 3,660 (1,660) 3,660 (1,660)
Approved front axle load lbs. (kg) 1,874 (850) 1,874 (850)
Approved rear axle load lbs. (kg) 1,962 (890) 1,962 (890)
Approved roof load capacity lbs. (kg) 77 (35) (with hardtop
*) 110 (50)
Luggage compartment capacity cu ft (liters) 5.8 (165) 7.2 – 13.9 (205 – 395)
ProCarManuals.com