Page 196 of 1002
Downloaded from www.Manualslib.com manuals search engine
/Cylinder Head and Valvetrain
Press down on secondary chain tensionerand loclc into place
using
BMW special tool 11 3 292, or a thin drift or pin.
4 Remove exhaust camshaft impulse wheel mounting nuts
(arrows). Remove impulse wheel (A).
< Remove spring plate (A).
4 Remove intake camshaft sprocket mounting nuts (arrows)
and remove spring plate (labelled
FRONT).
Page 198 of 1002
Downloaded from www.Manualslib.com manuals search engine
11 6-22
Cylinder Head and Valvetrain
Remove secondary chain tensioner mounting bolts (arrows)
and remove tensioner with locking tool in place.
Remove primary chain sprocket mounting studs
(arrows) on
exhaust camshaft.
NOTE-
Counterhold camshafts when loosening.
Lifl primary chain sprocket off exhaust camshaft. Remove
sprocket from chain.
Page 200 of 1002

Downloaded from www.Manualslib.com manuals search engine
..--.
I Cylinder Head and Valvetrain - I
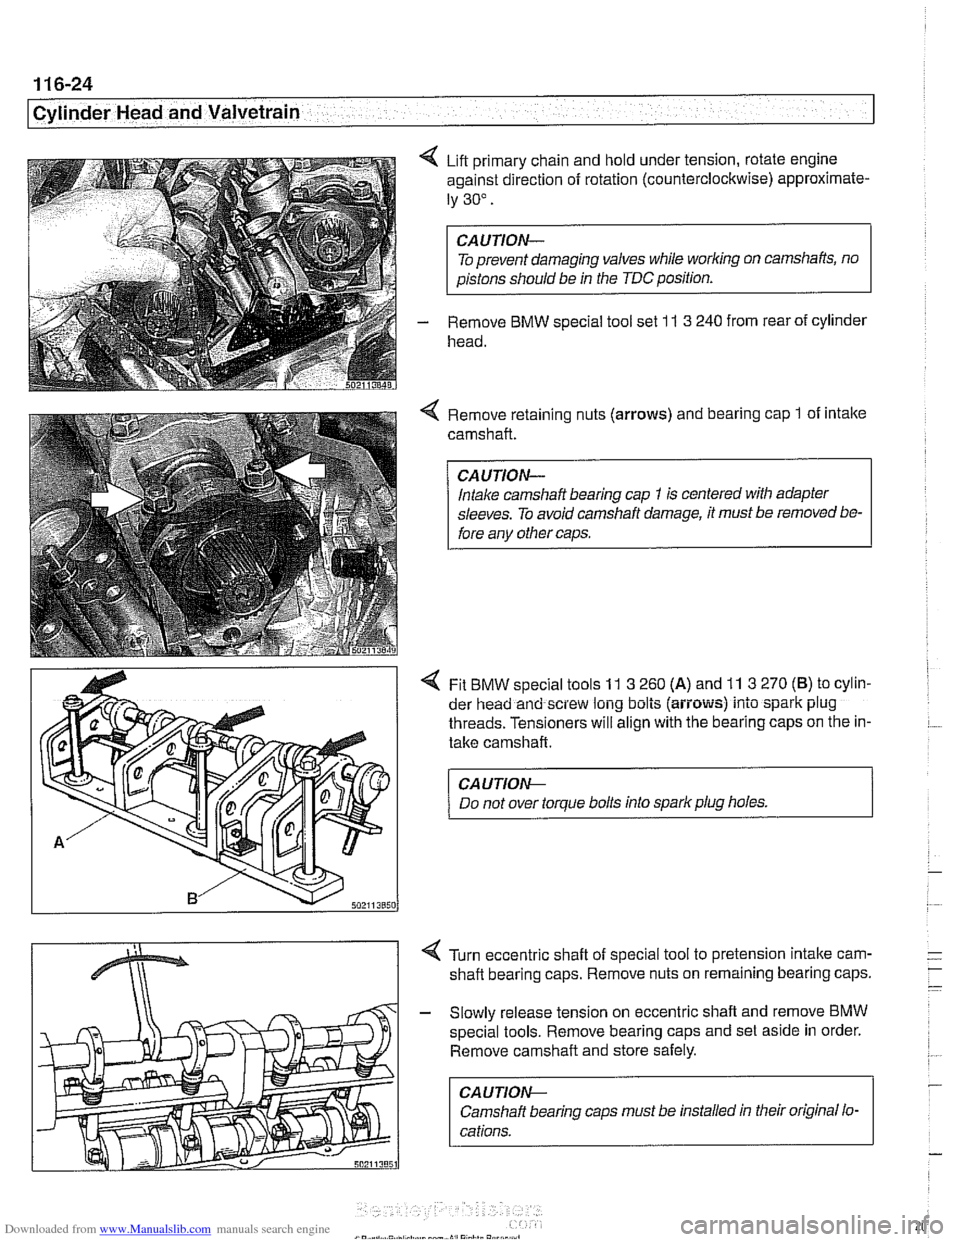
4 Lift primary chain and hold under tension, rotate engine
against direction of rotation (counterclockwise) approximate-
ly 30".
To prevent damaging valves while
worlcing on camshafts, no
aistons should be in the TDC position.
- Remove BMW special tool set 1 I 3 240 from rear of cylinder
head.
Remove retaining nuts (arrows) and bearing cap
1 of intake
camshaft.
Intake camshaft bearing cap
1 is centered with adapter
sleeves. To avoid camshaft damage, it must be removed be-
fore anv other caos.
4 Fit BMW special tools 11 3 260 (A) and 11 3 270 (B) to cylin-
der head and screw long bolts (aiiows) into spark plug
threads. Tensioners will align with the bearing caps on the in-
take camshaft.
CA UTION--
Do not over torque bolts into spark plug holes. 1
4 Turn eccentric shaft of special tool to pretension intake carn-
shaft bearing caps. Remove nuts on remaining bearing caps.
- Slowly release tension on eccentric shaft and remove BMW
special tools. Remove bearing caps and set aside in order.
Remove camshaft and store safely.
CA U TIOW-
Camshaft bearing caps must be installed in their original lo-
cations.
Page 204 of 1002
Downloaded from www.Manualslib.com manuals search engine
11 6-28
Cylinder Head and Valvetrain
Double
VANOS timing
chain components
1. Impulse wheel mounting nut
2. Exhaust camshaft impulse
wheel
3. Spring plate, exhaust
4. Thrust spacer (T
= 3.5 mm)
5. Splined shaft
6. Torx screw
7. Exhaust camshaft secondary
sprocket
8. Secondary timing chain
9. Splined sleeve
10. Primary sprocket
11. Threaded stud
12. Secondary chain tensioner
13. Secondary chain lower guide
14. Sprocket mounting nut
15. Spring plate, intake
16. Splined shaft
17. Intake camshaft sprocket
18. Locating stud
19. Thrust spacer
20. lntake camshaft impulse wheel
Page 207 of 1002
Downloaded from www.Manualslib.com manuals search engine
11 6-31
Cylinder Head and Valvetrain
< Install primary timing chain on timing chain sprocket and
place on exhaust camshaft so that pointer on sprocket
(arrow) lines up with cylinder head sealing surface.
4 Insert BMW special tool 11 4 220 into timing chain tensioner
bore and bring center spindle into contact with tensioning rail.
Tighten until slack is removed, but do not pretension timing
chain.
NOTE-
BMW special tool 11 4 220 is an adjustable primary chain
tensioner and simulates the function of the tensioner.
- Recheck arrow on primary sprocket is aligned with upper
edge of cylinder head. Reposition sprocket if necessary.
4 Insert and tighten threaded locat~ng studs (arrows) in ex-
haust camshaft.
Tightening
torques
Exhaust camshaft locating stud 20 Nm (15 ft-lb)
Page 208 of 1002
Downloaded from www.Manualslib.com manuals search engine
11 6-32
Cylinder Head and Valvetrain
4 Install secondary chain tensioner (arrows). Keep tensioner
compressed using
BMW special tool 11 3 292 or suitable pin.
4 Fit exhaust camshaft splined sleeve. Confirm that gap in
sleeve splines aligns with corresponding gap in carnshaft
splines
(arrows).
Slide splined shaft onto exhaust camshaft so that locating
tooth of shaft fits into spline gaps of camshaft and splined
sleeve
(arrows).
- Push splined shafl in further to rotate splined sleeve until the
three threaded holes in primary chain sprocket are centered
in the small slots of the splined sleeve.
Page 211 of 1002
Downloaded from www.Manualslib.com manuals search engine
. .
Cylinder Head and Valvetrain
Install exhaust camshaft impulse wheel, aligning pointer (B)
with top edge of cylinder head (A). Install mounting nuts (ar-
rows) finger tight.
4 Pull out exhaust camshaft splined shaft to stop.
- Press down on secondary chain tensioner and remove ten-
sioner lock-down tool.
Preload primary chain:
- Tighten adjusting screw on BMW special tool 11 4 220 to
specified torque.
Tightening torque Primary chain tensioner preload
0.7 Nm (6 in-lb)
Page 214 of 1002

Downloaded from www.Manualslib.com manuals search engine
I Cylinder Head and Valvetrain
- Remove adjustable primary timing chain tensioner tool and
reinstall primary chain tensioner cylinder to cylinder head.
Tightening torque
Primary chain tensioner cylinder
to 70 Nm (52 ft-lb)
cylinder head
- Remove flywheel locking tool from crankcase. Replace spe-
cial tool bore sealing plug.
- Remove camshaft locking tools from cylinder head
Install intake camshaft cover and cylinder head cover.
Check for correct seating of half-moon seals (A) in back of
cylinder head cover.
Use a small amount of Three Bond
8 1209 or equivalent
sealing compound at corners
(B) of half-moon cutouts.
Seat gasket and seal corners at VANOS unit with Three
Bond
@ 1209.
Tightening torque Cylinder head cover to cylinder head
(M6) 10 Nm (89 in-lb)
- Installation of the remaininq parts is reverse or removal, not- -
ing the following:
Change engine
011 and f~lter as descr~bed in 020 Mainte-
nance.
Reconnect battery.
To prevent damaging the engine electronic systems, install
all ground wire previously removed, including the ground
wires for the ignition coils.
Tightening torque
-
Radiator cooling fan to coolant pump 40 Nm
(30 ft-ib)
Spark plug to cylinder head
25 Nm (18 ft-ib)