2001 BMW 540I SEDAN height
[x] Cancel search: heightPage 52 of 238
52n
For maximum safety, please comply
with the following instructions when ad-
justing a seat:
Never try to adjust your seat while
operating the vehicle. The seat
could respond with unexpected move-
ment, and the ensuing loss of vehicle
control could lead to an accident.
Wear the safety belt firmly against your
body at all times. In the event of a fron-
tal impact, a loose lap belt could slide
over your hips, leading to abdominal
injury. In addition, the safety belt's
restraint effectiveness is reduced if the
belt is worn loosely.
Never ride with the backrest reclined to
an extreme horizontal angle (especially
important for front passengers to
remember). Keep the backrest relatively
upright to minimize the risk of "sliding
under" the safety belt and sustaining
injury in an accident.
Do not slide the seats to the rear
when the vehicle is at an extreme angle
(on garage ramps or steep slopes, for
instance), to prevent the shoulder
strap's automatic height adjustment
mechanism from disengaging.<
Correct sitting postureTo reduce strain on the spinal column,
sit all the way back in the seat and rest
your back fully against the backrest.
The ideal sitting posture is achieved
with your head extending from your
spine in a straight line.
For long-distance driving, you may wish
to increase the backrest tilt-angle
slightly to reduce muscular tension.
Please remember that you should
always remain able to grasp the entire
periphery of the steering wheel without
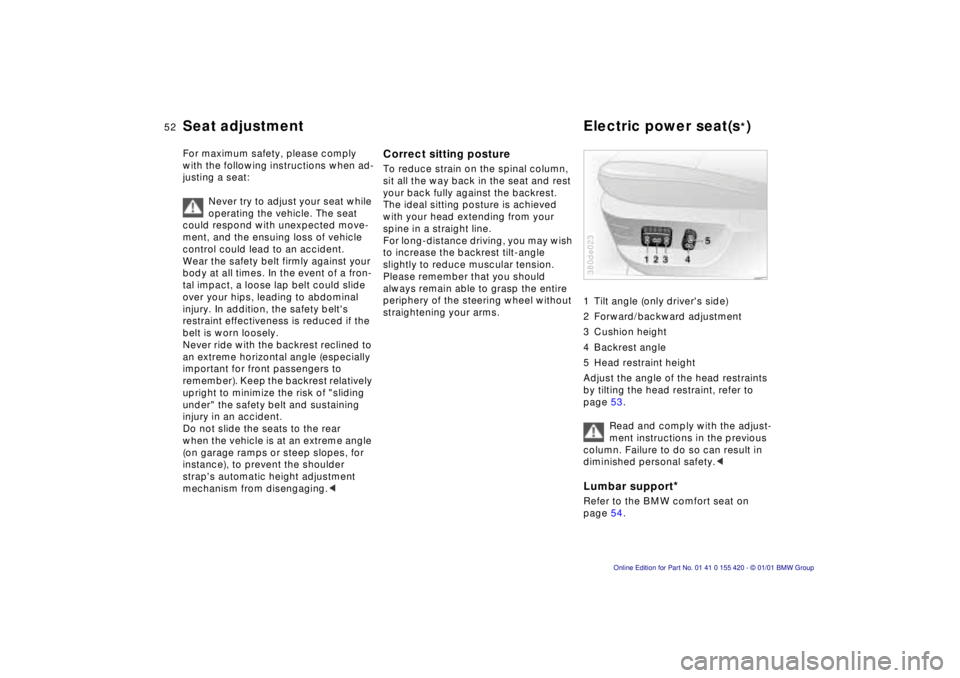
straightening your arms.1 Tilt angle (only driver's side)
2 Forward/backward adjustment
3 Cushion height
4 Backrest angle
5 Head restraint height
Adjust the angle of the head restraints
by tilting the head restraint, refer to
page 53.
Read and comply with the adjust-
ment instructions in the previous
column. Failure to do so can result in
diminished personal safety.<
Lumbar support
*
Refer to the BMW comfort seat on
page 54.380de023
Seat adjustment Electric power seat(s
*)
Page 53 of 238
IndexDataTechnologyRepairsCar careControlsOverview
53n
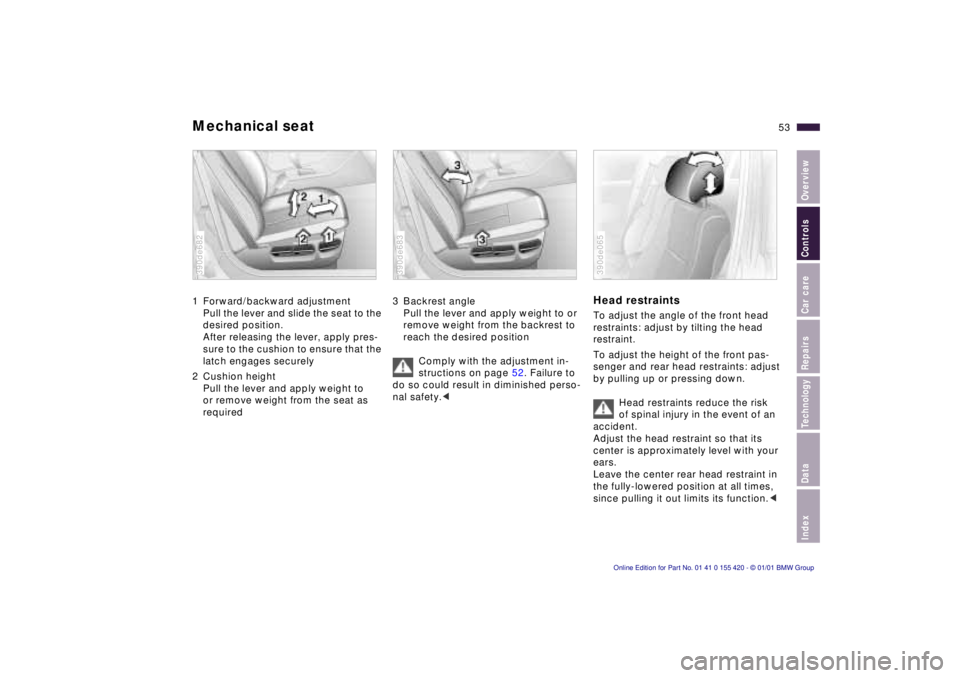
Mechanical seat1 Forward/backward adjustment
Pull the lever and slide the seat to the
desired position.
After releasing the lever, apply pres-
sure to the cushion to ensure that the
latch engages securely
2 Cushion height
Pull the lever and apply weight to
or remove weight from the seat as
required390de682
3 Backrest angle
Pull the lever and apply weight to or
remove weight from the backrest to
reach the desired position
Comply with the adjustment in-
structions on page 52. Failure to
do so could result in diminished perso-
nal safety.< 390de683
Head restraintsTo adjust the angle of the front head
restraints: adjust by tilting the head
restraint.
To adjust the height of the front pas-
senger and rear head restraints: adjust
by pulling up or pressing down.
Head restraints reduce the risk
of spinal injury in the event of an
accident.
Adjust the head restraint so that its
center is approximately level with your
ears.
Leave the center rear head restraint in
the fully-lowered position at all times,
since pulling it out limits its function.<390de065
Page 159 of 238
Index
Data
Technology
Repairs
Car care
Controls
Overview
159nHood
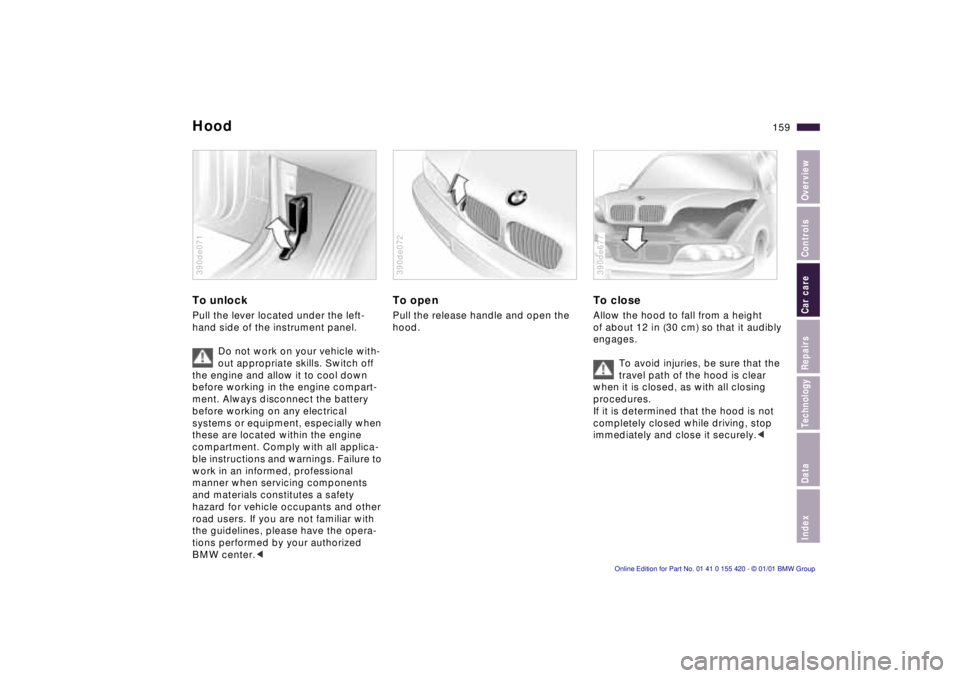
To unlock
Pull the lever located under the left-
hand side of the instrument panel.
Do not work on your vehicle with-
out appropriate skills. Switch off
the engine and allow it to cool down
before working in the engine compart-
ment. Always disconnect the battery
before working on any electrical
systems or equipment, especially when
these are located within the engine
compartment. Comply with all applica-
ble instructions and warnings. Failure to
work in an informed, professional
manner when servicing components
and materials constitutes a safety
hazard for vehicle occupants and other
road users. If you are not familiar with
the guidelines, please have the opera-
tions performed by your authorized
BMW center. <
390de071
To open
Pull the release handle and open the
hood.
390de072
To close
Allow the hood to fall from a height
of about 12 in (30 cm) so that it audibly
engages.
To avoid injuries, be sure that the
travel path of the hood is clear
when it is closed, as with all closing
procedures.
If it is determined that the hood is not
completely closed while driving, stop
immediately and close it securely. <
390de677
Page 190 of 238

190nChanging a wheel
Safety measures in the event of a
flat tire or wheel change:
Stop the vehicle as far as possible from
passing traffic. Park on a firm, flat,
surface. Switch on the hazard warning
flashers.
Turn the steering wheel to the straight-
ahead position, remove the key and
engage the steering lock. Shift into 1st
or reverse (selector lever in Park with
automatic transmission) and engage
the parking brake.
All passengers should be outside the
vehicle and well away from your imme-
diate working area (behind a guardrail,
for instance).
If necessary, set up your warning trian-
gle or portable hazard warning lamp on
the roadside at an appropriate distance
from the rear of the vehicle. Comply
with all safety guidelines and regula-
tions.
Change the wheel only on a level, firm
surface which is not slippery. Avoid
jacking the vehicle on a soft or slippery
support surface (snow, ice, loose
gravel, etc.), since it could slide side-
ways.Position the jack on a firm support
surface.
Do not place wooden blocks or similar
objects under the jack. If this is done,
the jack might not be able to reach its
full support capacity because of the
limited height.
Do not lie under the vehicle or start the
engine when the vehicle is supported
by the jack – risk of fatal injury. <
What you will need
In order to avoid rattling noises later,
note the position of the tools when you
remove them and return them to their
original position when you are through
using them.
> Car jack
sedan: fold back the luggage com-
partment floor mat for access, then
unscrew the wingnut to release the
jack (arrow).
sport wagon: raise the floor panel
and spare tire cover (refer to
page 134).
When you have completed work,
screw the jack all the way back
down. Fold the handle back and in-
sert it in its holder
> Wedge (wheel chock)
Located next to the jack. Loosen the
wing nut to remove it
394de090
Page 214 of 238
214nIntegrated rear suspension Level control system*
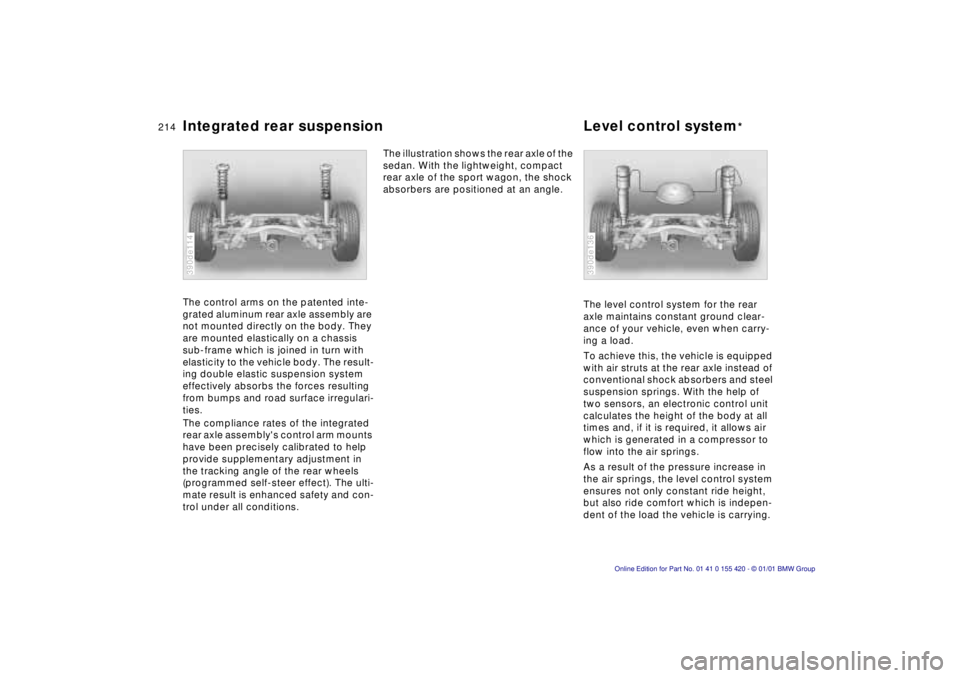
The control arms on the patented inte-
grated aluminum rear axle assembly are
not mounted directly on the body. They
are mounted elastically on a chassis
sub-frame which is joined in turn with
elasticity to the vehicle body. The result-
ing double elastic suspension system
effectively absorbs the forces resulting
from bumps and road surface irregulari-
ties.
The compliance rates of the integrated
rear axle assembly's control arm mounts
have been precisely calibrated to help
provide supplementary adjustment in
the tracking angle of the rear wheels
(programmed self-steer effect). The ulti-
mate result is enhanced safety and con-
trol under all conditions.
390de114
The illustration shows the rear axle of the
sedan. With the lightweight, compact
rear axle of the sport wagon, the shock
absorbers are positioned at an angle.
The level control system for the rear
axle maintains constant ground clear-
ance of your vehicle, even when carry-
ing a load.
To achieve this, the vehicle is equipped
with air struts at the rear axle instead of
conventional shock absorbers and steel
suspension springs. With the help of
two sensors, an electronic control unit
calculates the height of the body at all
times and, if it is required, it allows air
which is generated in a compressor to
flow into the air springs.
As a result of the pressure increase in
the air springs, the level control system
ensures not only constant ride height,
but also ride comfort which is indepen-
dent of the load the vehicle is carrying.
390de136
Page 220 of 238
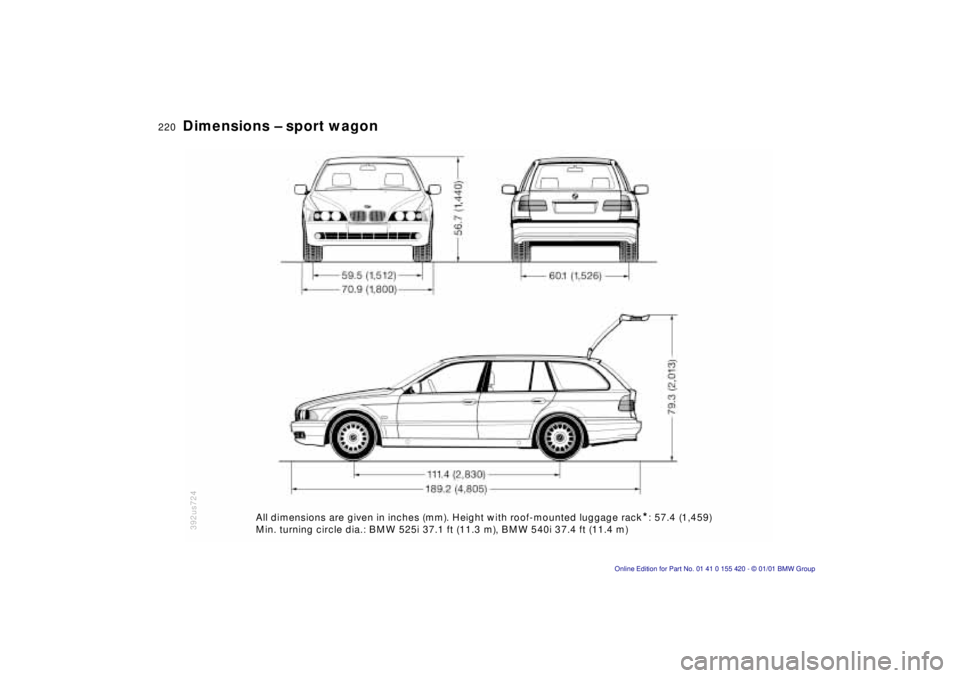
220nDimensions – sport wagon
392us724All dimensions are given in inches (mm). Height with roof-mounted lugg\
age rack*: 57.4 (1,459)
Min. turning circle dia.: BMW 525i 37.1 ft (11.3 m), BMW 540i 37.4 ft \
(11.4 m)
Page 231 of 238

Everything from A to Z
231n
IndexDataTechnologyRepairsCar careControlsOverview
Height219
Height adjustment
seats52
steering wheel56
Help with jump
starting200
t
HiFi system211
High beams24
bulb replacement183
t
High Performance Synthetic
Oils166
High-mount brake lamp187
Hood release159
t
Horn25
Hydraulic Brake Assistant,
refer to DBC23, 100, 145
I
Ice warning83
Identification number of the
vehicle169
Identification, tires153
Ignition key36
Ignition lock68
Imprint4
Independent
ventilation94, 120
Independent ventilation,
refer also to the onboard
monitor Owner's Manual
Indicator lamps22
t
Inflation
pressure29
t
, 30, 150
monitoring103, 213
INSPECTION85
Instrument cluster18, 20
Instrument lighting105
Instrument panel20
Instrument panel switch78
Instruments18
Integrated rear
suspension214
Intensive
cleaning78, 79, 164
Interaxle tire rotation152
Interference indicators86
Interference with
car phones149
Interior lamps106
bulb replacement188
t
remote control40
Interior mirror57
with automatic dimming
feature211
Interior motion sensor48
deactivation48
Interior rearview mirror
with automatic dimming
feature57
Interlock68
Intermittent mode78
J
Jack190
t
Jump starting200
t
KKey Memory60
Key, transmitter36
Keys36
Keys with remote control36
Kickdown73, 76LLashing eye136
Leather care175
Length219
Level control
system23, 214
inactive148t
License plate lamps, bulb
replacement188t
Light switch105
Light-alloy wheels156
Lighter126
Lights-on warning105
LIMIT95
Load-securing devices136
Locking and unlocking the
doors38
Louvers108, 114
Low beams105
bulb replacement183tLow-fuel warning lamp84
Lug bolts191
Lug wrench191t
Luggage compartment46
capacity221
hanger46
lamps106
Luggage compartment
lamps, bulb
replacement189t
Luggage compartment lid/
tailgate43
emergency actuation43
opening separately43
remote control41
secure separately43
unlock in case of electrical
fault43t
Luggage space46
Luggage straps46
Lumbar support54
MM+S tires154
Magic Eye194
Maintenance85t, 170t
Malfunction displays86t
Page 233 of 238

Everything from A to Z
233n
IndexDataTechnologyRepairsCar careControlsOverview
Rear wiper blade, blade
replacement182t
Rear-seat backrest,
removable128
Rearview mirror57
Recirculated air mode110
Recirculated-air control117
Reclining seat52
Refueling28
Releasing fuel filler door after
electrical defect198t
Releasing the hood159t
Reminder signal93
Remote control39
computer99
Removable rear-seat
backrest128
Removing condensation
from the
windows113t, 117t
from the
windshield113t, 117t
Replace wiper
blades182t
Replacement keys36
Replacement of tires151
Replacing fuses196t
Reporting safety defects7
Reservoir, washer
fluids164t
Residual heat118
Restraint system62Reverse71
Rims153
Roller sun blind120
Roof load capacity221
Roof-mounted luggage
rack137
Rubber parts147
SSafety belt tensioner210
Safety belts61
Safety lock buttons42
Seats
electric power52
forward/backward
adjustment52, 55
heating119
height adjustment52
machanical53
mechanical53
memory58
Secure the load46, 136
Selector lever, automatic
transmission72, 75
Self-dimming rearview
mirror211
Service and Warranty
Information Booklet
(US models)170
Service Interval
Display85, 170
Servotronic148Shift lever70
Shiftlock72, 75
Shoulder support54
Shutting off the engine69
Side airbags62
Side Impact Head Protection
System62
Side lamps, bulb
replacement184t
Ski bag129
Ski bag in the sport
wagon131
Skid control148
Sliding148
Sliding/tilt sunroof50
closing after an after an
electrical defect198t
convenience operation38
glass moonroof51
manual operation198
power supply
interruption51t
remote control40
Slippery roads147
Snow chains147, 155t
Socket127
Sound system, refer to
DSP211
Spare key36
Spare tire191t
Spark plugs224
Speaker125Special oil166t
Specifications for engine
oil166
Speed98
Speed control81
Speed limit95, 96
Speedometer18, 20
sport wagon
compartments in the
luggage
compartment133
folding down the rear
backrest132
lashing eyes136
load-securing
devices136
luggage
compartment132
luggage compartment
lamps, bulb
replacement189t
opening the rear
window44
partition net132
rear window wiper80
rear window wiper, blade
replacement182t
releasing the fuel filler
door after an electrical
defect198t
releasing the tailgate after
an electrical defect199t