2001 BMW 540I SEDAN automatic transmission
[x] Cancel search: automatic transmissionPage 82 of 238

82n
Cruise controlTo interrupt the cruise controlWhen the system is activated, press
button 1. The indicator lamp stays on.
You can use the cruise control again as
desired.
In addition, the system is also automati-
cally deactivated in response to the
following conditions:
>When you apply pressure to the
brake pedal.
>When you apply pressure to the
clutch pedal, and when you move
the automatic transmission selector
lever from "Drive" to "Neutral".
>If you exceed or fall below the
programmed speed for an extended
period (by depressing the accelera-
tor, for example).
To resume the stored settingPress button 4:
The vehicle accelerates to and main-
tains the last speed stored. When you
turn the ignition key to position 0, the
stored speed is deleted from the sys-
tem's memory and the system is deacti-
vated.To deactivate the systemWhen the cruise control has been inter-
rupted, press button 1 again. The indi-
cator lamp goes off and the stored
speed is canceled.
Page 121 of 238

IndexDataTechnologyRepairsCar careControlsOverview
121n
The conceptThe BMW Universal Transmitter re-
places up to three hand-held transmit-
ters that control different devices such
as a garage door opener, alarm sys-
tems or a door locking system. The
BMW Universal Transmitter recognizes
and "learns" the transmitted signal from
each of the original hand-held transmit-
ters.
The signal of an original hand-held
transmitter can be programmed to one
of three channel buttons. Following
that, each of the devices can be oper-
ated with the channel button that you
have programmed for it. A transmission
of the signal is indicated by the indica-
tor lamp.
Before you sell your vehicle, the pro-
grammed channel buttons should be
cleared. Refer to page 123 for the de-
scription of this process.
To prevent potential injuries or
damage during the programming
operation and before every remote trig-
gering of a programmed device using
the BMW Universal Transmitter, be sure
that there are no persons, animals or
objects within the range of movement
of the respective device.
Read and comply with the safety in-
structions for the original hand-held
transmitter also.<
To Canadian residents:
During programming, your hand-
held transmitter may automatically stop
transmitting after two seconds. This
may not be long enough to program the
BMW Universal Transmitter. If you are
programming from one of these hand-
held transmitters, the Universal Trans-
mitter's lamp may begin to flash in a se-
ries of double flashes. If this occurs,
continue to hold the button on the Uni-
versal Transmitter while you reactivate
your hand-held transmitter. You may
have to repeat this function several
times while programming.<
Before programming, read the
"User's information" section on
page 123.< The original hand-held transmitter
If this symbol is depicted on the
packaging or in the user's in-
structions for the original hand-
held transmitter, it may be assumed
that this original hand-held transmitter
is compatible with the BMW Universal
Transmitter.
Checking for the change codeIn order to determine whether the origi-
nal hand-held transmitter is equipped
with a change code system, you may
either refer to the instructions for the
original hand-held transmitter or pro-
gram a channel button as described in
the left column on page 122 under
"Programming."
Following that, press and hold the pro-
grammed channel button of the BMW
Universal Transmitter. If the indicator
lamp of the BMW Universal Transmitter
flashes rapidly for two seconds and
then stays on continuously, the original
hand-held transmitter is equipped with
a change code system. If the change
code system is available, program the
channel buttons as described in the
right-hand column on page 122 under
"Programming a hand-held transmitter
with change code."
If you have additional questions,
please consult your BMW center
or call 1-800-355-3515.<
BMW Universal Transmitter
*
Page 145 of 238

Index
Data
Technology
Repairs
Car care
Controls
Overview
145nDisc brakes
Driving notes
When driving in wet conditions and in
heavy rain, it is effective to apply light
pressure to the brake pedal every few
miles (kilometers). Watch traffic condi-
tions to ensure that this maneuver does
not endanger other road users. The
heat which is generated by the brake
applications helps to dry the brake
pads and rotors.
Maximum braking force is obtained
while the wheels continue to rotate,
peaking when the wheels remain on the
verge of locking without actually doing
so. ABS maintains this state automati-
cally. If the ABS fails, you should revert
to the staggered braking technique
described below (refer to page 147).
Extended or steep mountain descents
should be driven in the gear in which
only minimal periodic brake applica-
tions is required. This avoids excessive
strain on the brakes and possible im-
pairment of the braking effect.
The braking effect of the engine can be
further increased by downshifting, into
first gear, if necessary. In the manual
mode of the automatic transmission,
you can also downshift into first gear.
Refer to page 76. Should engine braking prove inade-
quate, you should still avoid extended,
continuous braking. Instead of main-
taining low to moderate pressure over
an extended period of time, you should
decelerate by applying more substantial
pressure to the brake pedal (watch for
following traffic!), then releasing the
pedal, then repeating the application.
This staggered braking technique
allows the brakes to cool in the intervals
between active braking phases,
preventing overheating and ensuring
that full braking capacity remains avail-
able at all times.
Do not coast with the clutch de-
pressed or with the transmission
or selector lever in Neutral. Do not
coast with the engine shut off. The
engine provides no braking effect when
the clutch is depressed or the transmis-
sion is in neutral, and there is no
power-assist for braking or steering
when the engine is not running.
Never allow floor mats, carpets or any
other objects to protrude into the area
around the accelerator, clutch and
brake pedals and obstruct their move-
ment. <
Dynamic Brake Control (DBC)*
If you apply the brakes rapidly, this
system automatically produces the
maximum braking force boost and thus
helps to achieve the shortest possible
braking distance during "panic stops."
All of the benefits of the ABS system
are exploited under these circum-
stances.
Do not reduce the pressure on the
brake pedal for the duration of the
brake application. When the brake
pedal is released, the DBC is deacti-
vated.
In the event of a malfunction, the yellow
warning lamp comes on. Conventional
braking efficiency is available without
limitations.
Have the system checked and repaired
at your BMW center as soon as possi-
ble.
For "Information for your safety"
covering the ABS system, refer to
page 144. This information also gener-
ally applies for DBC. <
Page 148 of 238

148nWinter operation Power steering Level control system*
Skid control
Release the accelerator pedal and
depress the clutch pedal. Countersteer
carefully and attempt to regain control
of the vehicle.
Parking
Engage 1st or reverse gear. If your
vehicle is equipped with an automatic
transmission, place the selector lever in
"Park." On vehicles with manual trans-
mission, also apply the parking brake
when parking on inclined surfaces. In
order to prevent the parking brake pads
from locking due to frost or corrosion,
dry them by gently applying the parking
brake as the vehicle is coming to a
stop. Make sure that following traffic is
not endangered.
The brake lamps do not come on
when the parking brake is
applied. <
If there is a change in steering behavior,
for instance greater steering effort or if
steering becomes lighter as speed
increases in vehicles equipped with
Servotronic
*:
Contact your BMW center for an
inspection.
If the power steering fails,
increased effort will be required
to steer the vehicle. <
The warning lamp for the level
control system comes on, or the
message "LEVEL CONTROL
INACTIVE" appears in the Check
Control
*: there is a malfunction in the
level control system.
Stop and inspect the vehicle. If it is
riding significantly lower in the rear than
in the front, or if it is sitting at an incline
(left rear compared to right rear),
consult the nearest authorized BMW
center. Drive with appropriate caution
in the meantime. The vehicle has
reduced ground clearance or driving
comfort is noticeably reduced.
Even if the attitude of the vehicle is
normal, you should consult the nearest
BMW center if the warning lamp indi-
cates a system fault.
Page 165 of 238

Index
Data
Technology
Repairs
Car care
Controls
Overview
165nEngine oil
Checking oil level
1 Park the vehicle on a level surface.
2 Shut the engine off after it has
reached normal operating
temperature.
3 After approx. 5 minutes, pull the dipstick out and wipe it off with a
clean lint-free cloth, paper towel, or
similar material.
4 Carefully push the dipstick all the way into the guide tube and pull it out
again.
5 The oil level should be in between the
two marks on the dipstick.
As with fuel economy, oil consumption
is directly influenced by your driving
style and vehicle operating conditions.
390de647
The oil volume between the two marks
on the dipstick corresponds to approx.
1.1 US quarts (1 liter). Do not fill beyond
the upper mark on the dipstick. Excess
oil will damage the engine.
460de189
To add oil
Wait until the level has dropped to just
above the lower mark before adding oil.
However, do not wait until the oil level
drops below the lower mark.
BMW engines are designed to op-
erate without oil additives; the use
of additives could lead to damage in
some cases. This is also true for the
manual transmission, the automatic
transmission, the differential, and the
power steering system. <
390de646
Page 190 of 238

190nChanging a wheel
Safety measures in the event of a
flat tire or wheel change:
Stop the vehicle as far as possible from
passing traffic. Park on a firm, flat,
surface. Switch on the hazard warning
flashers.
Turn the steering wheel to the straight-
ahead position, remove the key and
engage the steering lock. Shift into 1st
or reverse (selector lever in Park with
automatic transmission) and engage
the parking brake.
All passengers should be outside the
vehicle and well away from your imme-
diate working area (behind a guardrail,
for instance).
If necessary, set up your warning trian-
gle or portable hazard warning lamp on
the roadside at an appropriate distance
from the rear of the vehicle. Comply
with all safety guidelines and regula-
tions.
Change the wheel only on a level, firm
surface which is not slippery. Avoid
jacking the vehicle on a soft or slippery
support surface (snow, ice, loose
gravel, etc.), since it could slide side-
ways.Position the jack on a firm support
surface.
Do not place wooden blocks or similar
objects under the jack. If this is done,
the jack might not be able to reach its
full support capacity because of the
limited height.
Do not lie under the vehicle or start the
engine when the vehicle is supported
by the jack – risk of fatal injury. <
What you will need
In order to avoid rattling noises later,
note the position of the tools when you
remove them and return them to their
original position when you are through
using them.
> Car jack
sedan: fold back the luggage com-
partment floor mat for access, then
unscrew the wingnut to release the
jack (arrow).
sport wagon: raise the floor panel
and spare tire cover (refer to
page 134).
When you have completed work,
screw the jack all the way back
down. Fold the handle back and in-
sert it in its holder
> Wedge (wheel chock)
Located next to the jack. Loosen the
wing nut to remove it
394de090
Page 202 of 238

202nTowing the vehicle
The towed vehicle should always
be the lighter of the two vehicles.
If this is not the case, it is no longer
possible to control vehicle response. <
Tow-starting
It is not possible to start the engine of
vehicles equipped with an automatic
transmission by towing or pushing.
For instructions on jump starting, refer
to page 200.
Never attempt to use your vehicle to
push another vehicle, since damage to
the energy-absorbing bumpers could
result.
Towing a vehicle with automatic
transmission
1 Place the selector lever in position N.
2 Towing speed: Max. 45 mph (70 km/h).
3 Towing distance: Max. 95 miles (150 km).
4 Leave the ignition key in position 1 to ensure that the brake lamps, turn sig-
nals, horn and windshield wipers re-
main operative, and to prevent the
steering lock detent from engaging.
5 Switch on the hazard warning flash- ers (observe country-specific regula-
tions).
Find some means of identifying the ve-
hicle in tow, for instance, place a sign
or warning triangle in the rear window.
Make sure that the ignition key
remains in position 1 even when
the electrical system has failed to pre-
vent the steering lock from engaging.
The steering and brakes are without
power assist when the engine is off.
This means that increased effort is
required for steering and braking. <
Towing with a commercial
tow truck
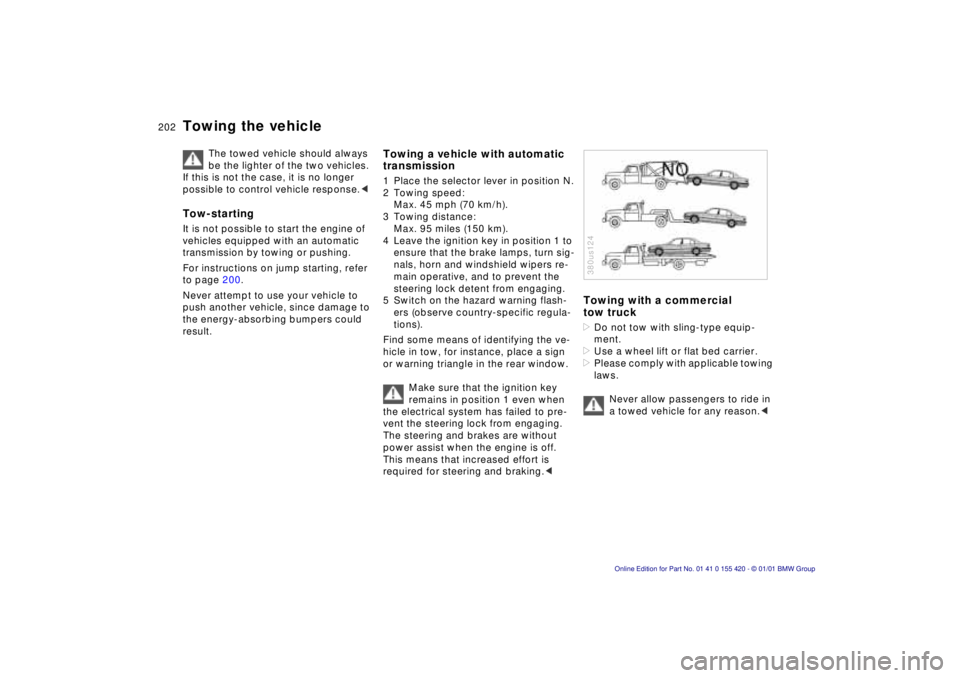
> Do not tow with sling-type equip-
ment.
> Use a wheel lift or flat bed carrier.
> Please comply with applicable towing
laws.
Never allow passengers to ride in
a towed vehicle for any reason. <
380us124
Page 205 of 238

Index
Data
Technology
Repairs
Car care
Controls
Overview
Overview
Controls and features Operation, care
and maintenance
Owner service procedures
Technical dataIndex
Advanced technology
205
n
Airbags 206
Adaptive Transmission Control (ATC) 207
Automatic Stability Control plus Traction (ASC+T)/Dynamic
Stability Control (DSC) 208
BMW active seat 210
Safety belt tensioner 210
DSP sound system 211
Mirrors with automatic dimmer 211
Rain sensor 212
Tire Pressure Control (RDC) 213
Integrated rear suspension 214
Level control system 214
Xenon lamps 215