2001 BMW 530i driver
[x] Cancel search: driverPage 5 of 1002

Downloaded from www.Manualslib.com manuals search engine
Foreword
For the BMW owner with basic mechanical skills and for independent auto service professionals.
this manual includes many of the specifications and procedures that were available to an
authorized BMW dealer service deoartment as this manual went to
Dress. The BMW owner with , no intention of working on his or her car will find that owning and referring to this manual makes it
possible to be better informed and to more
Itnowledgeably discuss repairs with a professional
automotive technician.
If you are a BMW owner intending to do maintenance and repair work, make sure you have
screwdrivers, a set of metric wrenches and sockets and metric Allen and
Torx wrenches, since
these basic hand tools are needed for most of the work described in
this manual. Many procedures
also require a torque wrench to ensure that fasteners are tightened properly and in accordance
with specifications. Additional information on basic tools and other tips are in
010 General. In
some cases, the text refers to special tools that are recommended or required to accomplish
adjustments or repairs. These tools are usually identified by their
BMW special tool number and
illustrated.
Disclaimer
We have endeavored to ensure the accuracy of the information in this manual. When the vast
array of data presented in the manual is
talten into account, however, no claim to infallibility can
be made. We therefore cannot be responsible for the result of any errors that may have crept into
the text. Please also read the Important Safety Notice on the copyright page at the beginning of
this book.
Prior to starting a repair procedure, read the procedure,
001 General Warnings and Cautions
and the warnigns and cautions that accompany the procedure. Reading a procedure before
beginning
work will help you determine in advance the need for specific skills, identify hazards,
prepare for appropriate capture and handling of hazardous materials, and the need for particular
tools and replacement parts such as gasltets.
Bentley Publishers encourages comments from the readers of this manual with regard to errors,
and/or suggestions for improvement of our product. These communications have been and will be
carefully considered in the preparation of this and other manuals. If you identify inconsistencies in
the manual, you may have found an error. Please contact the publisher and we will endeavor to
post applicable corrections on our
website. Posted corrections (errata) should be reviewed before
beginning
worlc. Please see the following web address:
BMW offers extensive warranties, especially on components of the fuel delivery and emission
control systems. Therefore, before deciding to repair a BMW that may be covered wholly or in part
by any warranties issued by
BMW of North America, LLC, consult your authorized BMW dealer.
You may find that the dealer can
make the repair either free or at minimum cost. Regardless of its
age, or whether it is under warranty, your BMW
Is both an easy car to service and an easy car to
get serviced. So
if at any time a repair is needed that you feel is too difficult to do yourself, a trained
BMW technician is ready to do the job for you.
Bentley Publishers
Page 9 of 1002
Downloaded from www.Manualslib.com manuals search engine
002 Vehicie identification and
VlN Decoder
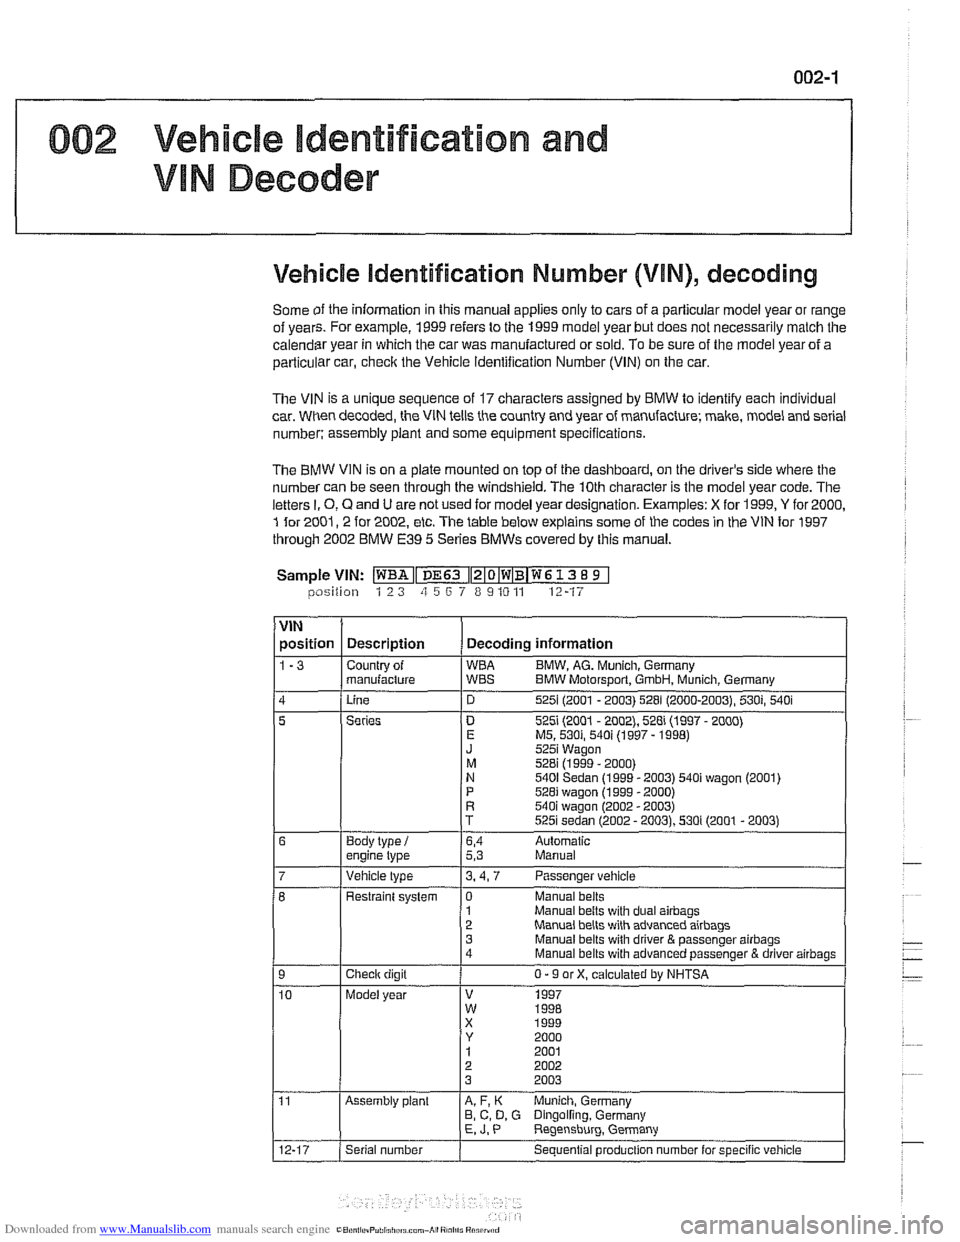
Vehicle identification Number (VIN), decoding
Some of the information in this manual applies only to cars of a parlicuiar model year or range
of vears. For
examole. 1999 refers to the 1999 model vear but does not necessarilv malch the
caiendsr year in which the car was manufactured or sold. To be sure of the model year of a
particular car,
checic the Vehicle ldentification Number (VIN) on the car.
The VIN is a unique sequence of 17 characters assigned by BMW lo identify each individual
car. When decoded, the VIN tells the country and year of manufacture; make, model and serial
number: assembly
plant and some equipment specifications.
The BMW VIN is on a plate mounted on top of the dashboard, on the driver's side where the
number can be seen through the windshield, The 10th character is the model year code. The
letters
I. 0, Q and U are not used for model year designation. Examples: X for 1999, Y for 2000,
1 for 2001,2 for 2002, etc. The table below explains some of the codes in the VIN for 1997
through 2002 BMW
E39 5 Series BMWs covered by this manual.
Sample
VIN: ~~Iz~o~w~B~w~ 13 8 9 1 lposition 1 2 3 zi 5 6 7 8 9 10 11 12-17
VIN
position Description Decoding information
1-3 Countrv of WBA B
I J 1 znan~+q ;BT BMW Molorsporl. Gmon, ~;nch Gerrn;!n,
Linc 525 (2UU1 - 2003) 528 (2000-2003. 530; 540 i
5
1
Manual belts with dual airbags Manual belts with advanced airbaos
Series
Body
type
i engine lype . ..
D 5251 (2001 - 2002), 528i (1997 - 2000) E MS. 530i, 540i (1997 - 1998) J 5251 Wagon
M 528i (1999 - 2000) N 5401 Sedan (1999 - 2003) 540i wagon (2001)
P 528i wagon (1999 - 2000) R 540i waaon 12002 - 20031
6,4 Aulomatic 5,3 Manual
Vehicle type 3.4.7 Passenger vehicle
Checlr digit
Model year Restraint
system
1 0 Manual belts
3 Manual belts wilh driver
& passenger airbags 4
Manual belts with advanced passenger B driver airbags
0 - 9 or X, calculated by NHTSA
V 1997 W 1RRR
Assembly plant A, F, K Munich, Germany
B, C, D, G Dingolfing. Germany E, J. P Reqensburq. Germany .
Serial number
Sequential produclion number lor specific vehicle
Page 19 of 1002

Downloaded from www.Manualslib.com manuals search engine
General
Table a. General bolt tightening torques in Nm
(max. permissible)
Bolt Class (according to DIN
267)
Gaskets and seals
Gasket aredesigned to crush and become thinner as the mat-
ing parts are bolted together. Once agasket has been used, it
is no longer capable
;f malting as good a seal as when new,
and is much more likely to leak.
Forthis reason, gaskets
should not be reused.
Some gaskets and seals are
d~rectional. Make sure thatthese
are
~nstalled correctly. In places where a shaft must pass
through a housing,
flex~ble lip seals are used to keep the lubri-
cating
011 or grease from leaking out past the rotatlng shaft.
Seals should never be reused once they have been removed.
When
rernovlng a seal, be careful not to damage the metal
surfaces.
The ltey to seal installation is to get the seal in straight without
damaging it. Use a seal driver that is the same diameter as
the seal housing to gently and evenly install into place.
If a
proper size seal driver is not available, a socket of the right
size will do.
Some seals are directional and special installation instruc-
tions apply. Make sure a seal is installed with the lip facing the
correct way. Note the installation direction of the old seal be-
fore removing it.
Page 22 of 1002

Downloaded from www.Manualslib.com manuals search engine
01 0-1 2
1 General
Information you need to know
Model
When ordering parts it is important that you know the correct
model designation for your car. Models covered in this E39
manual are the
525i,5281,530i, 540i in Sedan and Station
Wagon body styles.
Model year
This is not necessarily the same as date of manufacture or
date of sale.
A 1999 model may have been manufactured in
late 1998, and perhaps not sold until early 2000. It is still a
1999 model. Model years covered by this manual are 1997 to
2002.
Date of manufacture
This information is necessary when ordering replacement
parts or determining if any of the warranty recalls are applica-
ble to your car. The label on the driver's door below the door
latch will specify the month and year that the car was built.
Vehicle
Identification Number (VIN)
This is a combination of letters and numbers that identify the
particular car. The VIN appears on the state registration doc-
ument, and on the car itself. One location is on the right front
strut tower in the engine compartment (arrow), another in the
lower left corner of the windshield.
Engine code
5 Series car covered in this manual are powered by
6 and 8 - cylinderengines. For information on engine codes and en- -. -
gine applications, see 100 Engine-General. -
Transmission code
The transmission type with its identifying code may be
impor- :
tant when buying clutch parts, seals, gaskets, and other .- transmission-related parts. For information on transmission
codes and applications, see 200 Transmission-General.
Page 24 of 1002
Downloaded from www.Manualslib.com manuals search engine
01 0-1 4
General
Specialty tool suppliers
Peake Research, Automotive Products Division
P.O. Box 28776
San Jose, CA 95159
408-369-0406
[email protected]
http://www.peakeresearch.com
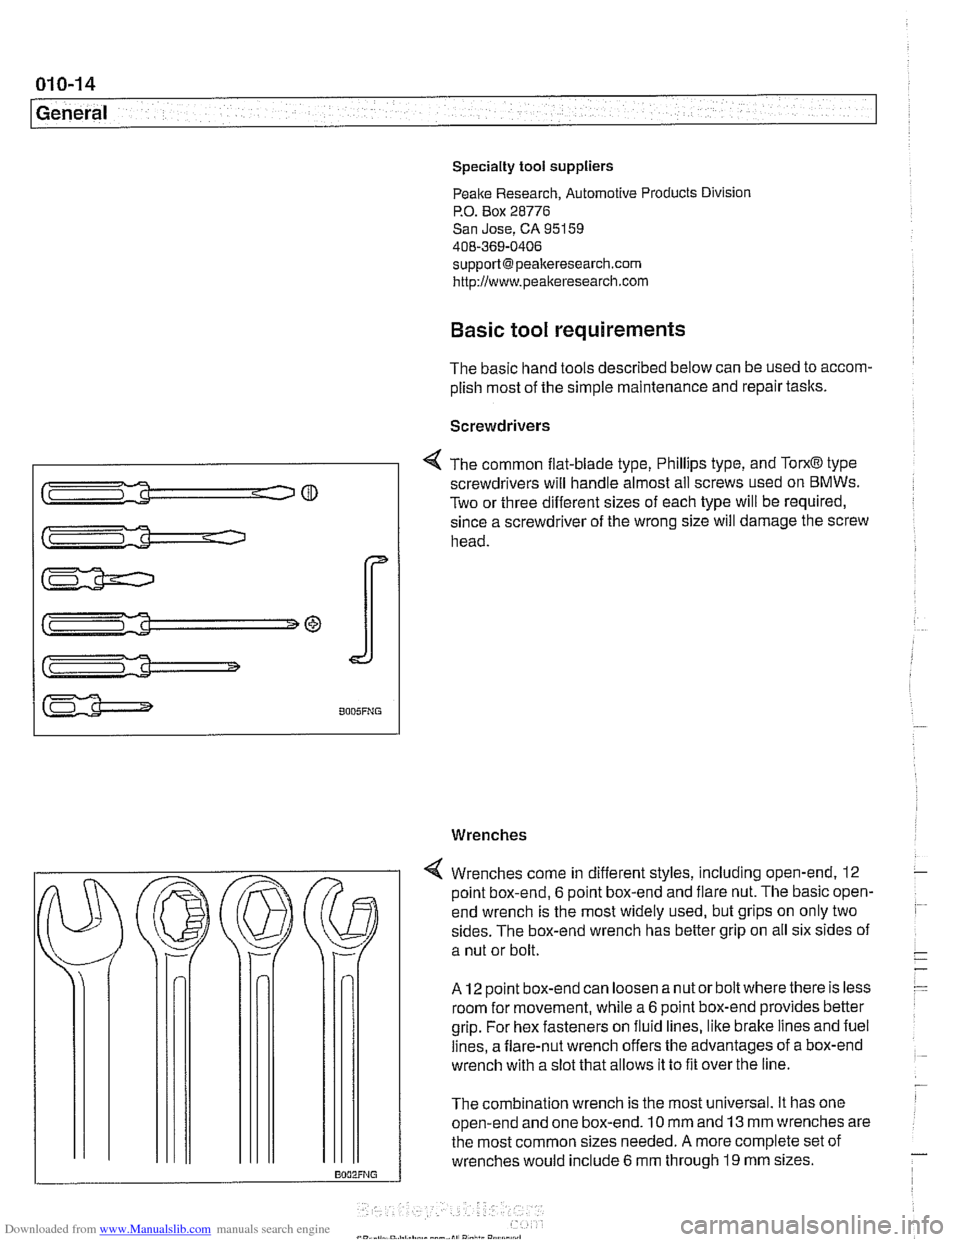
Basic tool requirements
The basic hand tools described below can be used to accom-
plish most of the simple maintenance and repair tasks.
Screwdrivers
4 The common flat-blade type, Phillips type, and TorxO type
screwdrivers will handle almost all screws used on
BMWs.
Two or three different sizes of each type will be required,
since a screwdriver of the wrong size will damage the screw
head.
Wrenches
4 Wrenches come in different styles, including open-end. 12
point box-end,
6 point box-end and flare nut. The basic open-
end wrench is the most widely used, but grips on only two
sides. The box-end wrench has better grip on all six sides of
a nut or bolt.
A 12 point box-end can loosen a nut or bolt where there is less
room for movement, while
a 6 point box-end provides better
grip. For hex fasteners on fluid lines, like brake lines and fuel
lines, a flare-nut wrench offers the advantages of a box-end
wrench with a slot that allows it to fit over the line.
The combination wrench is the most universal. It has one
open-end and one box-end. 10 mm and 13 mm wrenches are
the most common sizes needed.
A more complete set of
wrenches would include
6 mm through 19 mm sizes.
Page 28 of 1002

Downloaded from www.Manualslib.com manuals search engine
-
General
BMW special tools
Many repairs covered in this manual call for the use of BMW
special tools. Many of the BMW special tools mentioned in
this manual are simply the best thing to use to do the job cor-
rectly. In these cases, the tool is identified with a
BMW parl
number. See your authorized BMW dealer parts department
for information on how to order special tools.
There are some jobs for which expensive special tools are es-
sential, and not a cost-effective purchase for a one time repair
by the do-it-yourself owner. This manual includes such re-
pairs for the benefit of those with the necessary experience
and access to tools. For the do-it-yourselfer, the need for spe-
cial tools is noted in the text, and whether or not BMW dealer
service is recommended.
Changing a tire
- Stop car on as flat a surface as possible, in a place where you
can be easily seen by other drivers. Avoid stopping just over
the crest of a hill.
WARNING -
If a tire goes flat while driving, pull well off the road. Changing
a tire on a busy slreet or liigliway is very dangerous. If
nec-
essag drive a short distance on the flat tire to get to a safe
place. It is much better to ruin a tire or rim than to
risk being
hit.
-
- Turn on emergency flashers, and set out flares or emergency
markers well behind car.
Choclc wheel (wheel chock located
in trunk) diagonally opposite to the one being changed. Pas-
sengers should get out of car and stand well away from road.
- Take jaclc and tools from tool area beneath trunk mat. Re-
move spare tire from tire storage tray.
- Loosen wheel bolts while car is on ground, but leave them a
little snug.
< Place jack in lifting point nearest wheel being changed. Use
a board to provide a firm footing for jack if ground is soft.
Raise car only far enough so that the wheel is fully off ground
and then remove wheel nuts and wheel.
- Install spare wheel. Install wheel nuts and tighten them hand
tight using lug nut wrench.
Page 35 of 1002

Downloaded from www.Manualslib.com manuals search engine
Maintenance
Service Interval lndicator (Sll)
The BMW Service Interval lndicator (SII) notifies the driver
when oil change and other service is required. The
Sll dis-
plays the phrase "OIL SERVICE"
or"INSPECTI0N" and 7
light emitting diodes (LEDs) in the Instrumentcluster: 5green,
one yellow and one red.
For the
1997 and later 5 Series, BMW introduced an oil
change interval based on fuel consumption. The advantages
of this system are:
Fuel consumption is an accurate method of determining
engine load and the need for service.
The processing electronics are simple.
Resetting of indicator before the scheduled time will not
affect the time to the next service.
4 The Sll is programmed to measure a set volume of con-
sumed fuel. This volume varies between models, dependent
on vehicle and engine size. The
Sil control unit receives a
signal from the engine control module (ECM) when the vehi-
cle is in use. As
20% of the programmed fuel volume is con-
sumed, one of the green LEDs will go out. Each successive
20% of fuel consumption will cause the next LED to go out
until
100% of the measured volume has been consumed. At
this point the yellow LED will come on, indicating that service
is due. When
108% of the measured volume has been con-
sumed, the red LED will illuminate, indicating that service is
overdue.
Service Interval Indicator (SII), resetting
After the specified maintenance has been carried out, the Sll
memory should be reset.
NOTE-
For reference, the BMW oil service requirements are approx-
imately equivalent to the maintenance tliat other European
manufacturers specify at intervals with a maximum of every
15.000 miles or I2 months.
Page 59 of 1002

Downloaded from www.Manualslib.com manuals search engine
.-. -
Maintenance
Drive axle joint
(CV joint) boots, inspecting
CVjoint protective boots must be closely inspected forcracks
and any other damage that will allow contaminants to get into
the joint.
If the rubber boots fail, the water and dirt that enter
the joint will quickly damage it.
NOTE-
Replacement of the CVjoint boots and inspection of the
joints are described
in 331 Final Drive.
Exhaust system, inspecting
Exhaust system life varies widely according to driving habits
and environmental conditions. If short-distance driving pre-
dominates, the moisture and condensation in the system will
not fully dry out. This will lead to early corrosion damage and
more frequent replacement.
Scheduled maintenance of the exhaust system is limited to
inspection:
* Check to see that all the hangers (arrow) are in place and
properly supporting the system and that the system does
not strike the body.
Check for restrictions due to dents or
kinlts,
Check for weakness or perforation due to rust.
NOTE-
Alignment of the system and the location of the hangers are
described in
180 Exhaust System.
Fuel filter, replacing
The fuel filter is located beneath the center of the car, approx-
imately under the driver's seat.
A protective cover must be
removed to access the filter.
4 Fuel filter for M62 engine (arrow)
- Disconnect battery negative (-) cable
CAUTIOI\C
Disconnecting the battery cables may erase fault codes
stored
in engine control module memory.
WARNING -
Fuel will be expelled forcibly when the filter is removed. Do
notsmoke or work near heaters orother fire hazards. Keep a
fire extinguisher handy