2001 BMW 330i TOURING height adjustment
[x] Cancel search: height adjustmentPage 46 of 203
46n
For maximum safety when adjusting
the seat position, please observe the
following:
Never try to adjust your seat while
driving the vehicle. The seat could
respond with an unexpected move-
ment, and the ensuing loss of vehicle
control could lead to an accident.
Be sure that the safety belt remains
firmly against your body at all times. In
the event of a frontal impact, a loose lap
belt could slide over the hips, leading to
abdominal injury. In addition, the safety
belt's restraint effectiveness is reduced
if the belt is worn loosely.
While driving, do not recline the back-
rest too far (this applies to the
passenger side especially), because
otherwise there is the danger of sliding
underneath the safety belt during an
accident, thereby negating the safety
belt's protection.<
Correct sitting postureTo reduce strain on the spinal column,
sit all the way back in the seat and rest
your back fully against the backrest.
The ideal sitting posture is when your
head forms a straight line with your
spine.
For long-distance driving, you may wish
to increase the backrest angle slightly
to reduce muscular tension. You should
be able to grasp the steering wheel at
its highest point with your arms slightly
bent.
After a seat adjustment, adjust the
height of the safety belt also. Refer to
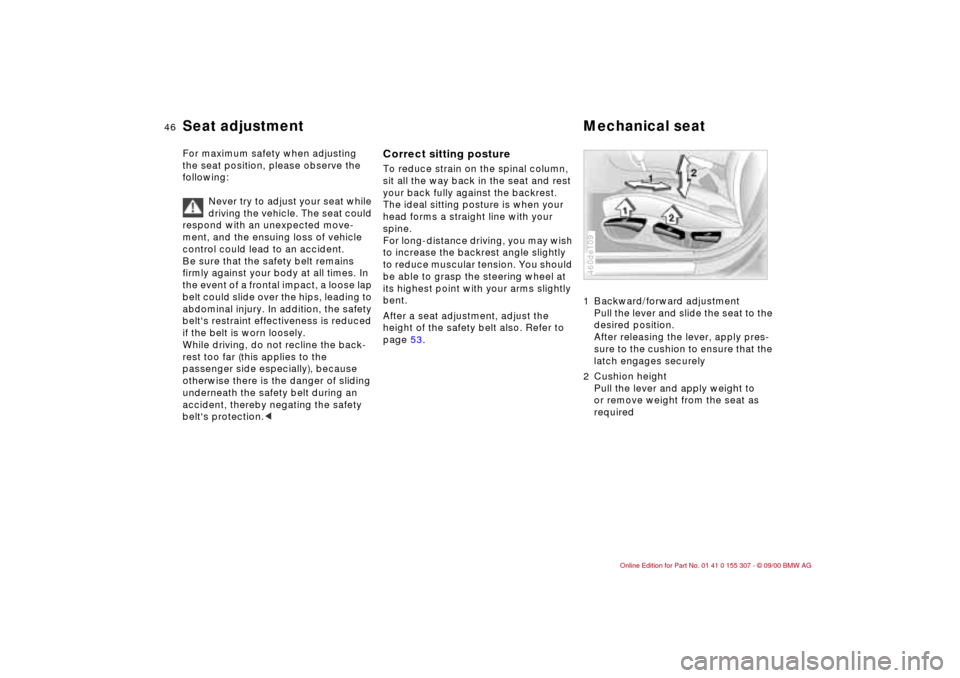
page 53.1 Backward/forward adjustment
Pull the lever and slide the seat to the
desired position.
After releasing the lever, apply pres-
sure to the cushion to ensure that the
latch engages securely
2 Cushion height
Pull the lever and apply weight to
or remove weight from the seat as
required
460de109
Seat adjustment Mechanical seat
Page 47 of 203
47n
IndexDataTechnologyRepairsCar careControlsOverview
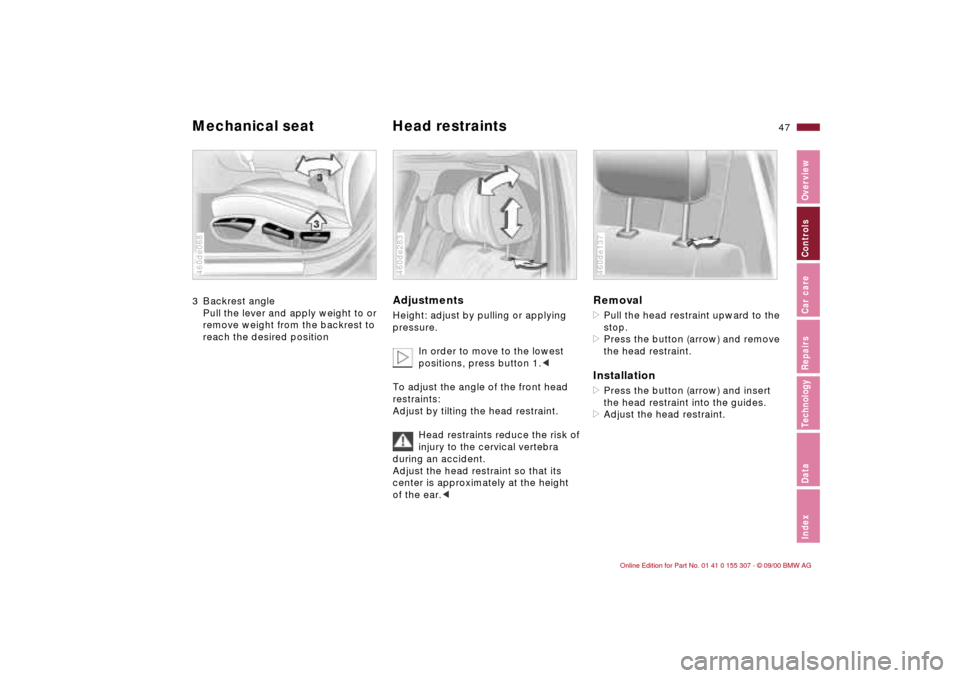
Mechanical seat Head restraints 3 Backrest angle
Pull the lever and apply weight to or
remove weight from the backrest to
reach the desired position460de068
Adjustments Height: adjust by pulling or applying
pressure.
In order to move to the lowest
positions, press button 1.<
To adjust the angle of the front head
restraints:
Adjust by tilting the head restraint.
Head restraints reduce the risk of
injury to the cervical vertebra
during an accident.
Adjust the head restraint so that its
center is approximately at the height
of the ear.<460de283
Removal>Pull the head restraint upward to the
stop.
>Press the button (arrow) and remove
the head restraint.Installation>Press the button (arrow) and insert
the head restraint into the guides.
>Adjust the head restraint.460de137
Page 48 of 203
48n
BMW sports seat
*
Lumbar support
* Power seat
*
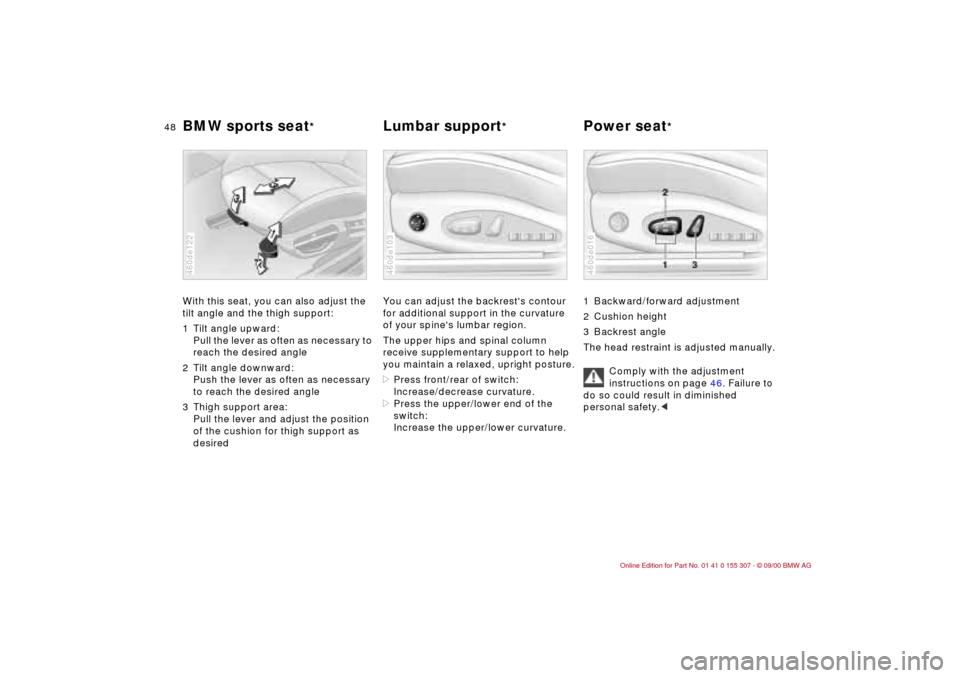
With this seat, you can also adjust the
tilt angle and the thigh support:
1 Tilt angle upward:
Pull the lever as often as necessary to
reach the desired angle
2 Tilt angle downward:
Push the lever as often as necessary
to reach the desired angle
3 Thigh support area:
Pull the lever and adjust the position
of the cushion for thigh support as
desired460de122
You can adjust the backrest's contour
for additional support in the curvature
of your spine's lumbar region.
The upper hips and spinal column
receive supplementary support to help
you maintain a relaxed, upright posture.
>Press front/rear of switch:
Increase/decrease curvature.
>Press the upper/lower end of the
switch:
Increase the upper/lower curvature.460de103
1 Backward/forward adjustment
2 Cushion height
3 Backrest angle
The head restraint is adjusted manually.
Comply with the adjustment
instructions on page 46. Failure to
do so could result in diminished
personal safety.<460de016
Page 49 of 203
49n
IndexDataTechnologyRepairsCar careControlsOverview
Power seat
*
Seat and mirror memory
*
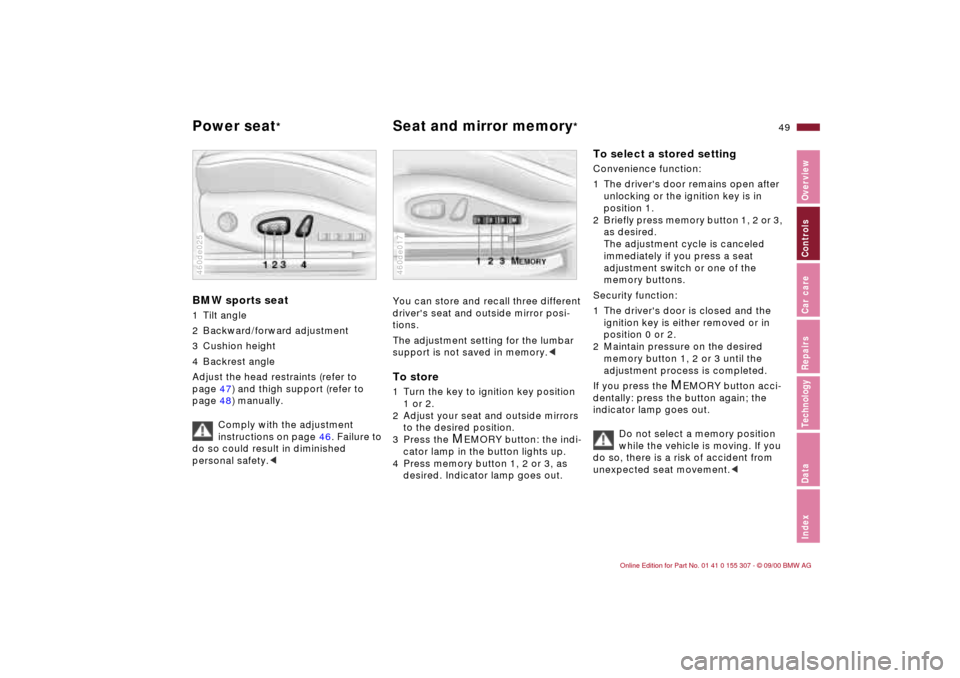
BMW sports seat1 Tilt angle
2 Backward/forward adjustment
3 Cushion height
4 Backrest angle
Adjust the head restraints (refer to
page 47) and thigh support (refer to
page 48) manually.
Comply with the adjustment
instructions on page 46. Failure to
do so could result in diminished
personal safety.<460de025
You can store and recall three different
driver's seat and outside mirror posi-
tions.
The adjustment setting for the lumbar
support is not saved in memory.
2 Adjust your seat and outside mirrors
to the desired position.
3 Press the
M
EMORY button: the indi-
cator lamp in the button lights up.
4 Press memory button 1, 2 or 3, as
desired. Indicator lamp goes out.
460de017
To select a stored settingConvenience function:
1 The driver's door remains open after
unlocking or the ignition key is in
position 1.
2 Briefly press memory button 1, 2 or 3,
as desired.
The adjustment cycle is canceled
immediately if you press a seat
adjustment switch or one of the
memory buttons.
Security function:
1 The driver's door is closed and the
ignition key is either removed or in
position 0 or 2.
2 Maintain pressure on the desired
memory button 1, 2 or 3 until the
adjustment process is completed.
If you press the
M
EMORY button acci-
dentally: press the button again; the
indicator lamp goes out.
Do not select a memory position
while the vehicle is moving. If you
do so, there is a risk of accident from
unexpected seat movement.<
Page 53 of 203
53n
IndexDataTechnologyRepairsCar careControlsOverview
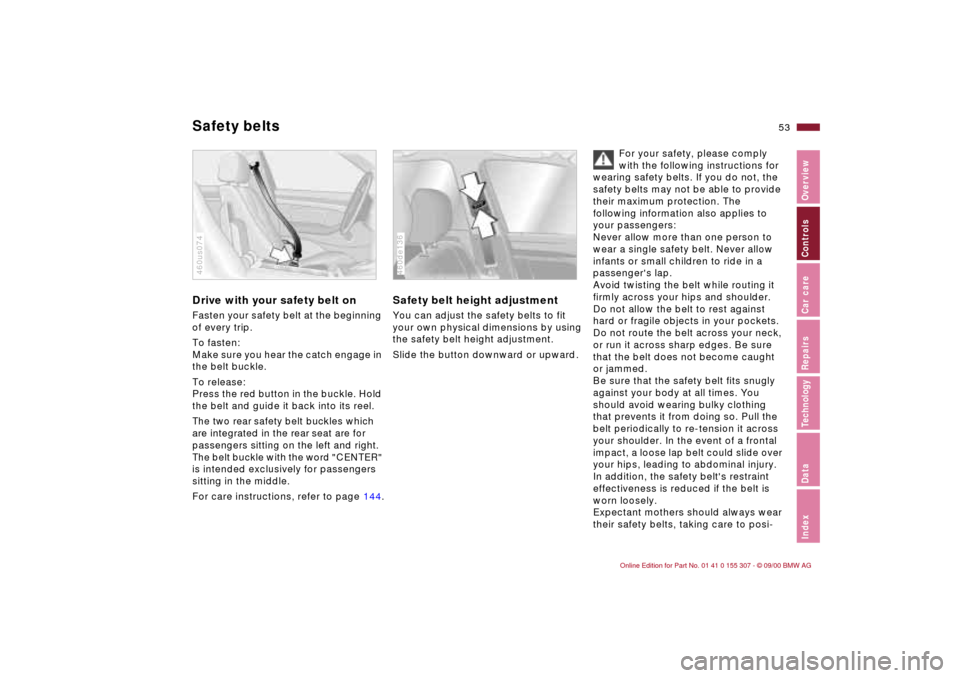
Drive with your safety belt onFasten your safety belt at the beginning
of every trip.
To fasten:
Make sure you hear the catch engage in
the belt buckle.
To release:
Press the red button in the buckle. Hold
the belt and guide it back into its reel.The two rear safety belt buckles which
are integrated in the rear seat are for
passengers sitting on the left and right.
The belt buckle with the word "CENTER"
is intended exclusively for passengers
sitting in the middle.
For care instructions, refer to page 144.
460us074
Safety belt height adjustmentYou can adjust the safety belts to fit
your own physical dimensions by using
the safety belt height adjustment.
Slide the button downward or upward.460de136
For your safety, please comply
with the following instructions for
wearing safety belts. If you do not, the
safety belts may not be able to provide
their maximum protection. The
following information also applies to
your passengers:
Never allow more than one person to
wear a single safety belt. Never allow
infants or small children to ride in a
passenger's lap.
Avoid twisting the belt while routing it
firmly across your hips and shoulder.
Do not allow the belt to rest against
hard or fragile objects in your pockets.
Do not route the belt across your neck,
or run it across sharp edges. Be sure
that the belt does not become caught
or jammed.
Be sure that the safety belt fits snugly
against your body at all times. You
should avoid wearing bulky clothing
that prevents it from doing so. Pull the
belt periodically to re-tension it across
your shoulder. In the event of a frontal
impact, a loose lap belt could slide over
your hips, leading to abdominal injury.
In addition, the safety belt's restraint
effectiveness is reduced if the belt is
worn loosely.
Expectant mothers should always wear
their safety belts, taking care to posi-
Safety belts
Page 194 of 203

Everything from A to ZFolding rear backrest108
Footbrake118
Footwell lamps88
bulb replacement158
Four-wheel drive175
Front fog lamps, bulb
replacement155
Front seat adjustment46
Frost protection,
radiator137
Fuel28
consumption77
consumption display74
gauge74
preparation184
quality28
Fuel filler door
releasing following an
electrical malfunction166
Fuel reserve indicator
lamp74
Fuel tank capacity187
Fuel tank gauge74
Functional status179
Fuses164 G
Gasoline28
Gasoline gauge74
Gasoline quality28
Glove compartment101 Glove compartment lamp,
bulb replacement158
Gross vehicle weight186
H
Handbrake63
Hands-free system103
Hazard warning flashers26
Hazard warning triangle26
Head restraint47
Headlamp covers,
care141,153
Headlamp flasher88
Headlamp washer
system70,134,187
Heated seats100
Heating, rapid94
Heavy loads110
Height185
HiFi system101
High beams23,68,88
bulb replacement153
High Performance Synthetic
Oils136
High-mount brake lamp157
Hood release130
Horn17
Hubcap160
Hydraulic Brake assistant,
refer to DBC118
I
Ice warning76
Icy roads76,121
Identification, tires127
Ignition key32,35
Ignition lock61
Imprint4
Indicator lamps20
Inflation pressure28,124
monitoring85,178
INSPECTION74
Installation child restraint
systems60
Instrument cluster18
Instrument lighting87
Interaxle tire rotation126
Interface socket for Onboard
Diagnostics149
Interference, cellular
phone123
Interior lamps36,88
bulb replacement158
remote control36
Interior motion sensor41
Interior rearview mirror51
automatic dimming
feature52,176
Interlock61
Intermittent wipe68
J
Jack159
Jump-starting167 K
Key32,35
Key Memory52 L
Lamps and bulbs153
Lashing eyes110
LATCH attachment of the
child seat58
Leather care145
Length185
License plate lamp
bulb replacement157
Light switch87
Light-alloy wheels129
Lighter104
Load-securing devices110
Louvers90,96
Low beam headlamps87
bulb replacement153
Lug bolts160
Lug wrench159
Page 196 of 203

Everything from A to ZRemote control35
Removal from service of the
vehicle147
Removing condensation
from the windows94
Reporting safety defects7
Restraint system54
Retaining straps40
Reverse17,64
Roll-up cover107
Roof load capacity186
Roof luggage rack111
Rubber parts121 S
Safety belt height
adjustment53
Safety belt tensioners175
Safety belts53
height adjustment53
Safety defects, reporting7
Safety feature43
Safety lock buttons38
Seat
electric power48
mechanical46
Seat adjustment46
Seat heating100
Seat memory49
Securing cargo110
Securing loads110 Selector lever, automatic
transmission65
Self-defrosting mirrors51
Self-diagnostics179
Service and Warranty
Information Booklet
(US models)140
Service Interval Display74
Setting the temperature98
Shiftlock65
Side airbags58
Side impact Head Protection
System58
Side lamps87
bulb replacement154
Ski bag106
Skid control122
Sliding/tilt sunroof44
close in the event of an
electrical short166
convenience operation34
Slippery roads122
Snow chains121
Socket104
for electrical
appliances104
for flashlights104
for vacuum cleaner104
refer also to power
outlet105
Space-saver spare tire159 Spare key32,35
with radio remote
control32,35
Spare tire159
Spark plugs188
Speaker103
Speed control71
Speedometer18
Sports seat48
Sports steering wheel25
Starting assistance167
Starting
problems115,167
Starting the engine61
Steel wheels129
Steering123
Steering wheel lock61
Steering wheel,
adjusting50
Steptronic65
Stereo system Ð harman
kardon101
Stopping the vehicle62
Storage compartments102
Storing the vehicle147
Stroke184
Summer tires127
Sun visors51
Sunroof44
Switching off the engine62
Symbols4,163 Synthetic oils136
T
Tachometer73
Tail lamps156
bulb replacement156
Tailgate
emergency release166
Tailgate lamp, bulb
replacement157
Tank capacity187
Technical data184
Technical
modifications6,148
Telephone
refer to the separate
Owner's Manual
Telephone hookup103
Temperature adjustment98
Temperature display,
outside temperature76
Temperature gauge, engine
coolant74
Temperature
layering93,100
Thigh support area,
adjusting48
Third brake lamp157
Tilt alarm42
Tilt sensor alarm system36
remote control36
Tire changing159