Page 154 of 203

154n
Lamps and bulbsXenon lamps
*
The service life of these bulbs is very
long and the probability of a failure is
very low, provided that they are not
switched on and off an unusual number
of times. If one of these bulbs should
nevertheless fail, it is possible to con-
tinue driving with great caution using
the fog lamps, provided traffic laws in
your area do not prohibit this.
Because of the extremely high
voltages involved, any work on
the xenon lighting system and bulb
replacement should be performed only
by technicians with the appropriate
qualifications. Failure to comply with
this creates a risk of fatal injury.<
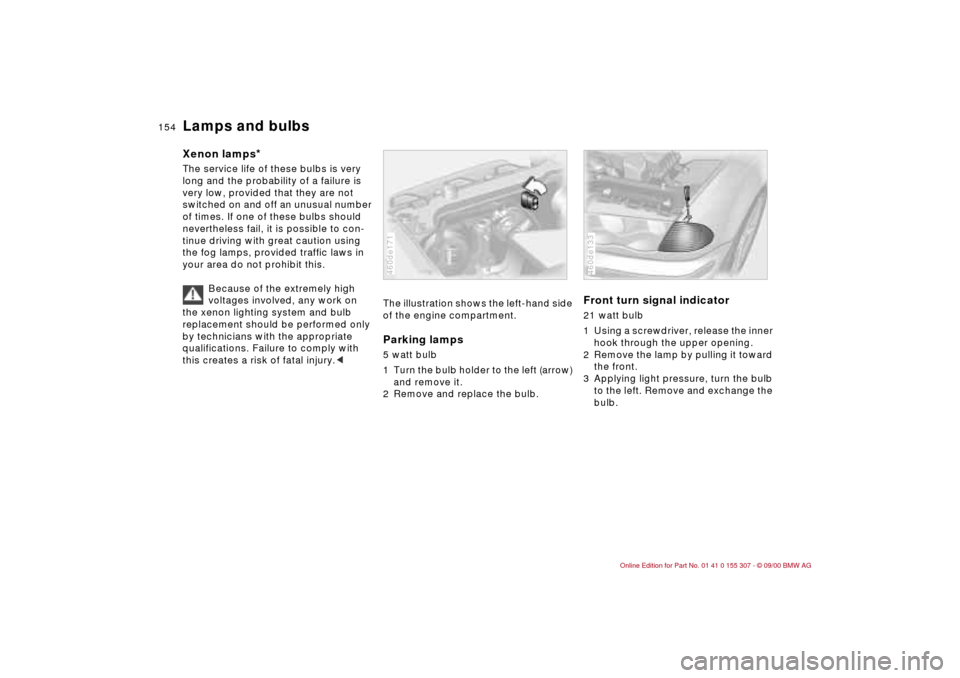
The illustration shows the left-hand side
of the engine compartment.Parking lamps5 watt bulb
1 Turn the bulb holder to the left (arrow)
and remove it.
2 Remove and replace the bulb.460de171
Front turn signal indicator 21 watt bulb
1 Using a screwdriver, release the inner
hook through the upper opening.
2 Remove the lamp by pulling it toward
the front.
3 Applying light pressure, turn the bulb
to the left. Remove and exchange the
bulb.460de133
Page 155 of 203
155n
IndexDataTechnologyRepairsCar careControlsOverview
Lamps and bulbs4 Insert the 2 pins on the lamp into the
guides on the vehicle.
5 Push the lamp in. Carefully apply
pressure until you hear it engage.460de134
Side turn signal indicator5 watt bulb
1 Use finger pressure against the rear
end of the lens (arrow) to press it
forward for removal.
2 Apply gentle pressure to the bulb
while turning it to the left to remove.460de135
Front fog lamps
*
HB4 bulb, 55 watts
The bulb is pressurized. There-
fore, wear safety glasses and
protective gloves. Failure to comply
with this precaution could lead to injury
if the bulb is accidentally damaged
during replacement.<
1 Using a screwdriver, carefully remove
the lamp.
2 Applying light pressure, turn the bulb
to the left. Remove and exchange the
bulb.460de132
Page 156 of 203
156n
Lamps and bulbsTail lamps Tail lamp 4: bulbs 21/4 watts
Remaining bulbs: 21 watts
1 Turn signal indicators yellow
2 Backup lamps white
3 Tail lamps red
4 Tail lamps/brake lamps red463us004
The illustration shows the right-hand
luggage compartment section.
Bulbs in the fender:
All of the bulbs are integrated in a cen-
tral bulb holder.
1 Release and remove the flap from the
respective luggage compartment
side facing.
2 Release the bulb holder (arrow) and
remove.
3 Pull the power supply receptacle off
and set the bulb holder aside (e.g. on
the luggage compartment floor).
4 Applying light pressure, turn the bulb
to the left. Remove and exchange the
bulb.
5 Plug in the power supply receptacle.
6 Press the bulb holder into position
until you hear it engage.463de055
Lamps in the tailgate:
1 Place a screwdriver in the slot and
press downward (arrow) to release.463de53
Page 197 of 203

Everything from A to Z
197n
IndexDataTechnologyRepairsCar careControlsOverview
Tire codes127
Tire damages124
Tire inflation
pressure28,124
Tire Pressure Control
(RDC)85,178
Tire pressure
monitoring85,178
Tire Quality Grading125
Tire replacement125,126
Tire specifications129
Tire tread124
Tools152
Torque184
Tow fittings168
Tow starting168
Towing168
Track185
Traction Control System,
refer to DSC79
Transmission64
Transporting children
safely58
Tread depth, tires124
Trip odometer73
Trunk38
Turn signal
indicator23,68,154
bulb replacement154
Turning radius185
Two-way radios123
U
Uniform Tire Quality
Grading125
Used batteries164 V
Vacuum cleaner,
connecting104
Vanity mirror51
bulb replacement158
Vehicle battery162,188
Vehicle care
exterior142
interior144
Vehicle Identification
Number (VIN)139
Vehicle immobilizer33
Vehicle painting142
Vehicle removal from
service147
Vehicle storage147
Vehicle weight186
Ventilation90,93,96
draft-free93,100
Vinyl upholstery, care144
Voice recognition24,25 W
Warning lamps20
Warning messages75
Warranty and Service Guide
(Canadian models)140 Washer fluids134
Washer nozzles134
Washer reservoir, filling134
Washing your car141
Water on roadways
deep water115
Waxing, paintwork143
Weights186
Wheel changing159
Wheel lug wrench159
Wheel rims127
Wheel stud wrench159
Wheelbase185
Wheels and tires127,129
Width185
Windows, convenience
operation34
Windshield washer nozzle
adjustment134
Windshield washer reservoir,
filling134,187
Windshield wiper68
blade replacement152
Winter operation121
Winter tires127,128
Wiper blade
replacement152
Wiper system68
Work in the engine
compartment130
X
Xenon lamp154,180
Page 199 of 203

Owner service procedures
199n
IndexDataTechnologyRepairsCar careControlsOverview
Luggage compartment
emergency actuation166
Luggage compartment
lamps, bulb
replacement158 M
Maintenance140
Malfunction displays75
Microfilter, change165
Motion sensor, switching
off42 O
Oil
quality136
specifications136
viscosity136
Onboard tool kit152 P
Pressure, tires28 R
Rear hatch lamp
bulb replacement157
Rear lamp156
Release the hood130 Releasing the fuel filler door
after an electrical
defect166
Removing condensation
from the windows94
Replace windshield wiper
blades152
Replacement key32
Replacing lamp bulbs153
Replenish washer
reservoir134
Return used batteries164
S
Side lamps
bulb replacement154
Sliding/tilt sunroof
close in event of electrical
defect166
Space-saver spare tire159
Spare key32
Spare tire159
Spare wheel159
Starting problems115
Switching off tilt alarm/
interior motion sensor42
T
Tail lamps
bulb replacement156
Tailgate lamps
bulb replacement156
Tailgate, emergency lock
operation166
Tilt alarm, switching off42
Tire changing159
Tire damage124
Tools152
Tow fittings168
Tow starting168
Towing168
Turn signals, bulb
replacement154 U
Use antifreeze for
radiator138
Used batteries164
Used engine oil136 V
Vanity mirror lamp, bulb
replacement158
W
Warning lamps20
Warning messages75
Washer fluid, adding134
Washer nozzles,
adjusting134
Washer reservoir, filling134
Wheel changing159
Windshield wiper blades,
replacing152
Working in the engine
compartment130
Page:
< prev 1-8 9-16 17-24