2001 BMW 330i TOURING stop start
[x] Cancel search: stop startPage 122 of 203

122n
Winter operationBrakingWinter road conditions substantially
reduce the amount of traction available
between the tires and the road surface.
Keep this in mind, because the braking
distance increases substantially.
ABS is intended to prevent the wheels
from locking during brake applications,
thus helping to maintain vehicle stability
and steering response.
If the ABS does not respond in a critical
braking situation and the wheels lock:
reduce the pressure on the brake pedal
until the wheels just start to roll again
while still maintaining enough force to
continue braking.
Then increase the pressure, reduce the
pressure when the wheels lock, reapply
pressure etc.
This staggered braking procedure will
reduce braking distances while helping
you maintain steering control.
You can then attempt to steer around
hazards after you have reduced pres-
sure on the brake pedal.Do not shift down on slick road
surfaces Ð if you want to decel-
erate. Doing so could cause the rear
wheels to lose traction and skid, which
could result in the loss of vehicle
control.<
Depress the clutch during hard
braking on road surfaces that
provide only poor or uneven traction.<
Skid control Depress the clutch and release the
accelerator pedal, or place the selector
lever of the automatic transmission into
the "Neutral" position. Countersteer
carefully and attempt to regain control
of the vehicle.
ParkingEngage 1st or reverse gear. If your
vehicle is equipped with an automatic
transmission, place the selector lever in
"Park." On vehicles with manual trans-
mission, also apply the parking brake
when parking on inclined surfaces. In
order to prevent the parking brake pads
from locking due to frost or corrosion,
dry them by gently applying the parking
brake as the vehicle is coming to a
stop. Make sure that following traffic
is not endangered.
The brake lamps do not come
on when the parking brake is
applied.<
Page 143 of 203

143n
IndexDataTechnologyRepairsCar careControlsOverview
Caring for your vehicleCaring for the vehicle finish Regular washing is a preventive
measure against long-term effects from
substances that are harmful to the
vehicle's finish, especially if you drive
your vehicle in areas with high levels of
air pollution or aggressive natural
substances (tree resins, pollen).
Nevertheless, you should immediately
remove especially aggressive
substances. Failure to do so can lead to
changes in the paint's chemical
structure or to discoloration. Gasoline
spilled during refueling, oil, grease and
brake fluid should always be cleaned
away immediately, as should bird
droppings.
Any contamination remaining on the
surface of the vehicle will be especially
conspicuous after washing. Use
cleaning fluid or alcohol with a clean
cloth or cotton pad to remove. Remove
tar spots with tar remover. After clean-
ing, the affected areas should be waxed
to ensure continued protection.
Use the cleaning and car-care
products available at your BMW
center.<
Waxing your vehicle Protect the finish using only carnauba
or synthetic-based waxes.
The best way to determine when the
finish needs to be waxed is by noting
when water stops beading on the
surface.
You can use a glass cleaner to remove
any wax or silicone that may have been
left on the windows during waxing.
Use the cleaning and car-care
products available at your BMW
center.<
Paint damageYou can touch up small areas of paint
damage with a BMW spray paint or a
BMW touchup stick.
The paint color code for your car is
provided on a sticker located on the
righthand side under the hood and on
the first page of your Service and
Warranty Information Booklet
(US models) or Warranty and Service
Guide (Canadian models).
Damage caused by flying stones,
scratches, etc., must be touched up
without delay to prevent rust from
forming.
If corrosion has started to form in an
area with paint damage, remove all rust
and clean the area. Then prime the
area with a BMW Primer Stick. Finally,
apply the finish coat. Wait a few days,
then polish the repaired area. Finish by
applying a wax preservative.
More extensive paint damage should
be repaired professionally in accor-
dance with the manufacturer's instruc-
tions. Your BMW center uses original
BMW finish materials in accordance
with approved repair procedures.
Page 159 of 203

159n
IndexDataTechnologyRepairsCar careControlsOverview
Changing a wheel
Take these precautionary mea-
sures if you have either a flat tire or
are changing a wheel.
Stop the vehicle as far as possible from
passing traffic. Park on a firm, flat
surface. Switch on the hazard warning
flashers. Turn the steering wheel to the
straight-ahead position, remove the key
and engage the steering lock. Shift into
1st gear or reverse (selector lever in
"Park" with automatic transmission)
and engage the parking brake.
All passengers should be outside the
vehicle and well away from your imme-
diate working area (behind a guardrail,
for instance).
If a warning triangle or portable hazard
warning lamp is available, set it up on
the roadside at an appropriate distance
from the rear of the vehicle. Comply with
all safety guidelines and regulations.
Change the wheel only on a level, firm
surface that is not slippery. Avoid jack-
ing the vehicle on a soft or slippery
support surface (snow, ice, loose gravel,
etc.), as it could slide sideways.
Position the jack on a firm support
surface.
Do not place wooden blocks or similar
objects under the jack, otherwise, the
jack might not be able to reach its full
support capacity because of the limited
height.
Do not lie under the vehicle or start the
engine when the vehicle is supported by
the jack. Failure to comply with this
creates a risk of fatal injury.<
Your BMW has either a spare tire or
space-saver tire for temporary use to
ensure your mobility.
To remove the spare wheel, lift out
the floor panel in the luggage
compartment completely (refer to
page 109.<
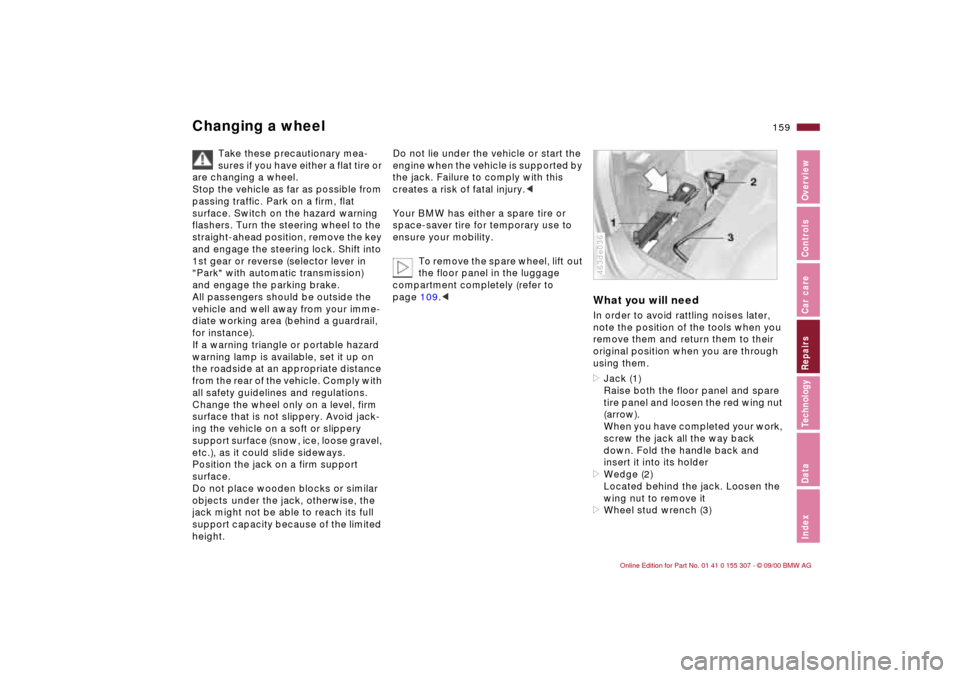
What you will needIn order to avoid rattling noises later,
note the position of the tools when you
remove them and return them to their
original position when you are through
using them.
>Jack (1)
Raise both the floor panel and spare
tire panel and loosen the red wing nut
(arrow).
When you have completed your work,
screw the jack all the way back
down. Fold the handle back and
insert it into its holder
>Wedge (2)
Located behind the jack. Loosen the
wing nut to remove it
>Wheel stud wrench (3) 463de036
Page 196 of 203

Everything from A to ZRemote control35
Removal from service of the
vehicle147
Removing condensation
from the windows94
Reporting safety defects7
Restraint system54
Retaining straps40
Reverse17,64
Roll-up cover107
Roof load capacity186
Roof luggage rack111
Rubber parts121 S
Safety belt height
adjustment53
Safety belt tensioners175
Safety belts53
height adjustment53
Safety defects, reporting7
Safety feature43
Safety lock buttons38
Seat
electric power48
mechanical46
Seat adjustment46
Seat heating100
Seat memory49
Securing cargo110
Securing loads110 Selector lever, automatic
transmission65
Self-defrosting mirrors51
Self-diagnostics179
Service and Warranty
Information Booklet
(US models)140
Service Interval Display74
Setting the temperature98
Shiftlock65
Side airbags58
Side impact Head Protection
System58
Side lamps87
bulb replacement154
Ski bag106
Skid control122
Sliding/tilt sunroof44
close in the event of an
electrical short166
convenience operation34
Slippery roads122
Snow chains121
Socket104
for electrical
appliances104
for flashlights104
for vacuum cleaner104
refer also to power
outlet105
Space-saver spare tire159 Spare key32,35
with radio remote
control32,35
Spare tire159
Spark plugs188
Speaker103
Speed control71
Speedometer18
Sports seat48
Sports steering wheel25
Starting assistance167
Starting
problems115,167
Starting the engine61
Steel wheels129
Steering123
Steering wheel lock61
Steering wheel,
adjusting50
Steptronic65
Stereo system Ð harman
kardon101
Stopping the vehicle62
Storage compartments102
Storing the vehicle147
Stroke184
Summer tires127
Sun visors51
Sunroof44
Switching off the engine62
Symbols4,163 Synthetic oils136
T
Tachometer73
Tail lamps156
bulb replacement156
Tailgate
emergency release166
Tailgate lamp, bulb
replacement157
Tank capacity187
Technical data184
Technical
modifications6,148
Telephone
refer to the separate
Owner's Manual
Telephone hookup103
Temperature adjustment98
Temperature display,
outside temperature76
Temperature gauge, engine
coolant74
Temperature
layering93,100
Thigh support area,
adjusting48
Third brake lamp157
Tilt alarm42
Tilt sensor alarm system36
remote control36
Tire changing159