2001 BMW 330i TOURING ignition
[x] Cancel search: ignitionPage 49 of 203
49n
IndexDataTechnologyRepairsCar careControlsOverview
Power seat
*
Seat and mirror memory
*
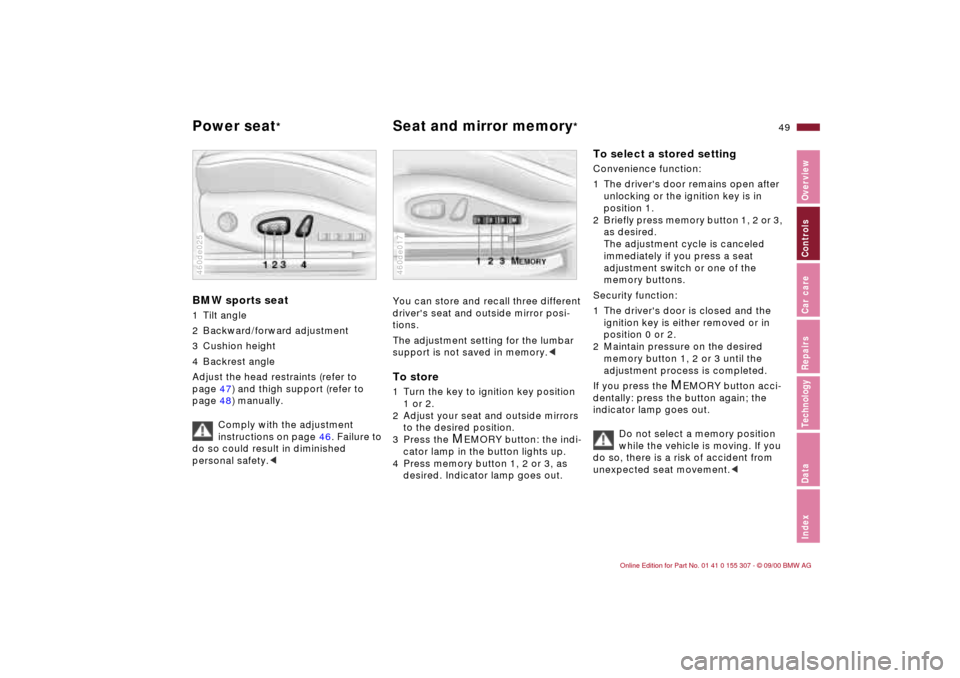
BMW sports seat1 Tilt angle
2 Backward/forward adjustment
3 Cushion height
4 Backrest angle
Adjust the head restraints (refer to
page 47) and thigh support (refer to
page 48) manually.
Comply with the adjustment
instructions on page 46. Failure to
do so could result in diminished
personal safety.<460de025
You can store and recall three different
driver's seat and outside mirror posi-
tions.
The adjustment setting for the lumbar
support is not saved in memory.
2 Adjust your seat and outside mirrors
to the desired position.
3 Press the
M
EMORY button: the indi-
cator lamp in the button lights up.
4 Press memory button 1, 2 or 3, as
desired. Indicator lamp goes out.
460de017
To select a stored settingConvenience function:
1 The driver's door remains open after
unlocking or the ignition key is in
position 1.
2 Briefly press memory button 1, 2 or 3,
as desired.
The adjustment cycle is canceled
immediately if you press a seat
adjustment switch or one of the
memory buttons.
Security function:
1 The driver's door is closed and the
ignition key is either removed or in
position 0 or 2.
2 Maintain pressure on the desired
memory button 1, 2 or 3 until the
adjustment process is completed.
If you press the
M
EMORY button acci-
dentally: press the button again; the
indicator lamp goes out.
Do not select a memory position
while the vehicle is moving. If you
do so, there is a risk of accident from
unexpected seat movement.<
Page 51 of 203
51n
IndexDataTechnologyRepairsCar careControlsOverview
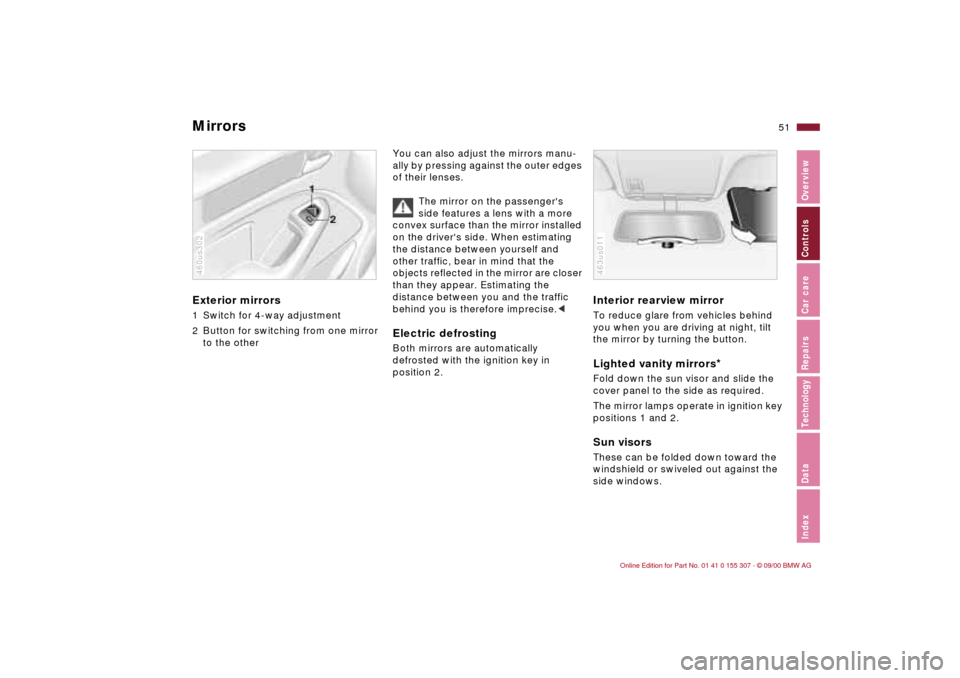
Mirrors Exterior mirrors1 Switch for 4-way adjustment
2 Button for switching from one mirror
to the other460us302
You can also adjust the mirrors manu-
ally by pressing against the outer edges
of their lenses.
The mirror on the passenger's
side features a lens with a more
convex surface than the mirror installed
on the driver's side. When estimating
the distance between yourself and
other traffic, bear in mind that the
objects reflected in the mirror are closer
than they appear. Estimating the
distance between you and the traffic
behind you is therefore imprecise.
position 2.
Interior rearview mirror To reduce glare from vehicles behind
you when you are driving at night, tilt
the mirror by turning the button.Lighted vanity mirrors
*
Fold down the sun visor and slide the
cover panel to the side as required.
The mirror lamps operate in ignition key
positions 1 and 2.Sun visorsThese can be folded down toward the
windshield or swiveled out against the
side windows.463us011
Page 55 of 203
55n
IndexDataTechnologyRepairsCar careControlsOverview
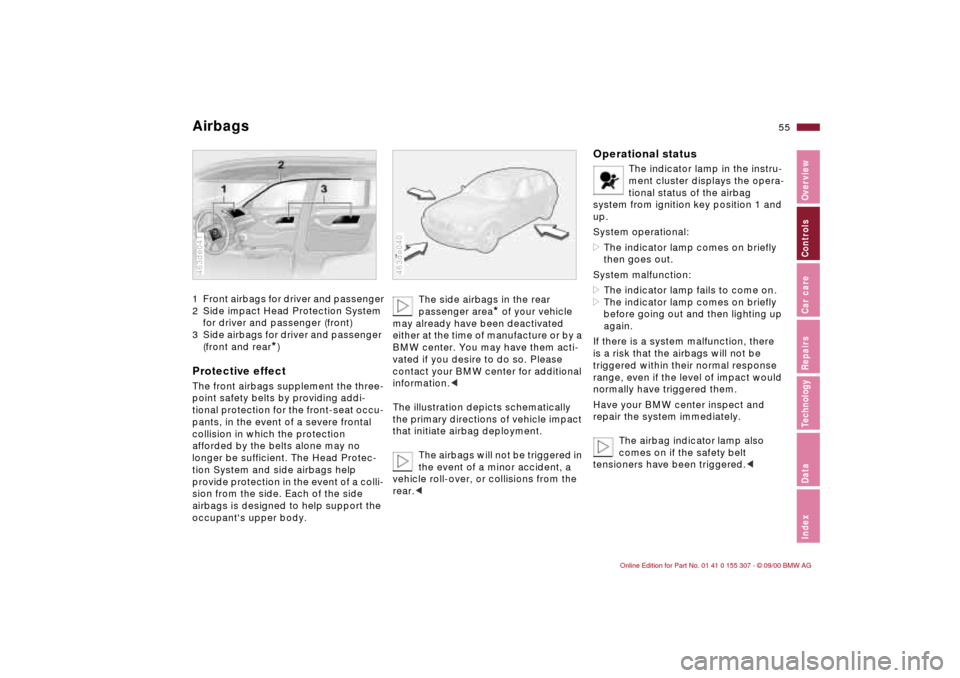
Airbags1 Front airbags for driver and passenger
2 Side impact Head Protection System
for driver and passenger (front)
3 Side airbags for driver and passenger
(front and rear
*)
Protective effectThe front airbags supplement the three-
point safety belts by providing addi-
tional protection for the front-seat occu-
pants, in the event of a severe frontal
collision in which the protection
afforded by the belts alone may no
longer be sufficient. The Head Protec-
tion System and side airbags help
provide protection in the event of a colli-
sion from the side. Each of the side
airbags is designed to help support the
occupant's upper body.463de041
The side airbags in the rear
passenger area
* of your vehicle
may already have been deactivated
either at the time of manufacture or by a
BMW center. You may have them acti-
vated if you desire to do so. Please
contact your BMW center for additional
information.<
The illustration depicts schematically
the primary directions of vehicle impact
that initiate airbag deployment.
The airbags will not be triggered in
the event of a minor accident, a
vehicle roll-over, or collisions from the
rear.c
463de040
Operational status
The indicator lamp in the instru-
ment cluster displays the opera-
tional status of the airbag
system from ignition key position 1 and
up.
System operational:
>The indicator lamp comes on briefly
then goes out.
System malfunction:
>The indicator lamp fails to come on.
>The indicator lamp comes on briefly
before going out and then lighting up
again.
If there is a system malfunction, there
is a risk that the airbags will not be
triggered within their normal response
range, even if the level of impact would
normally have triggered them.
Have your BMW center inspect and
repair the system immediately.
The airbag indicator lamp also
comes on if the safety belt
tensioners have been triggered.<
Page 57 of 203
57n
IndexDataTechnologyRepairsCar careControlsOverview
Airbagscenter. Labels in the rear door opening
should indicate the status of your rear
seat side airbags. If you are uncertain of
their status, or wish to have the airbags
activated or deactivated, please
contact your BMW center.<
Even when all these guidelines are
observed, there is still a small residual
risk of injuries to the face, hands and
arms occurring from airbag deployment
in isolated instances. The ignition and
inflation noise may induce a mild
temporary hearing loss in sensitive
individuals.
For additional information concerning
the airbag system, refer to pages 147
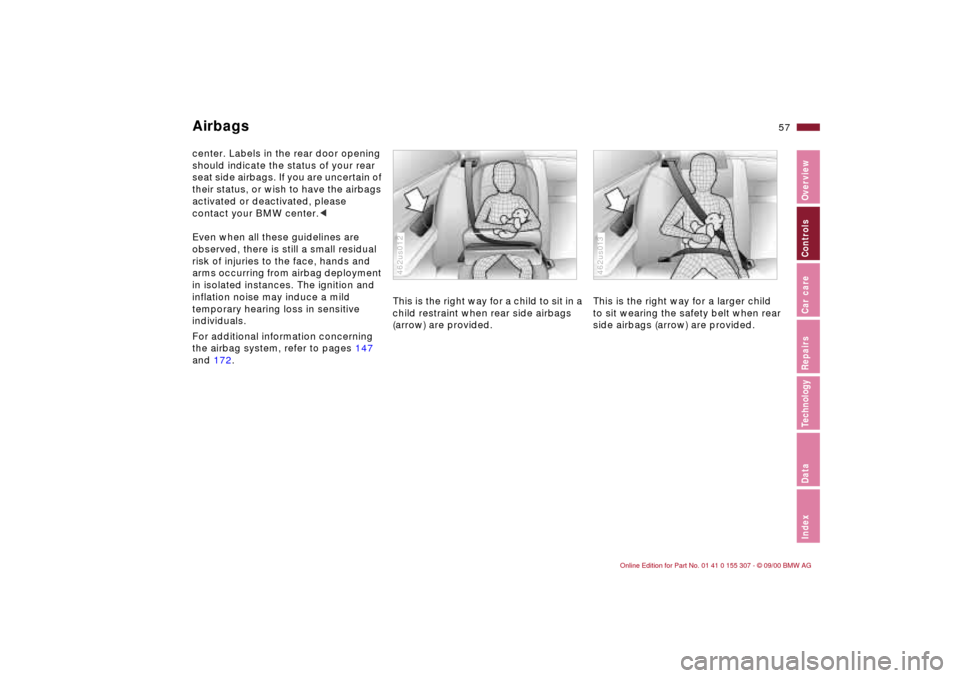
and 172.This is the right way for a child to sit in a
child restraint when rear side airbags
(arrow) are provided.
462us012
This is the right way for a larger child
to sit wearing the safety belt when rear
side airbags (arrow) are provided.462us013
Page 61 of 203
61n
IndexDataTechnologyRepairsCar careControlsOverview
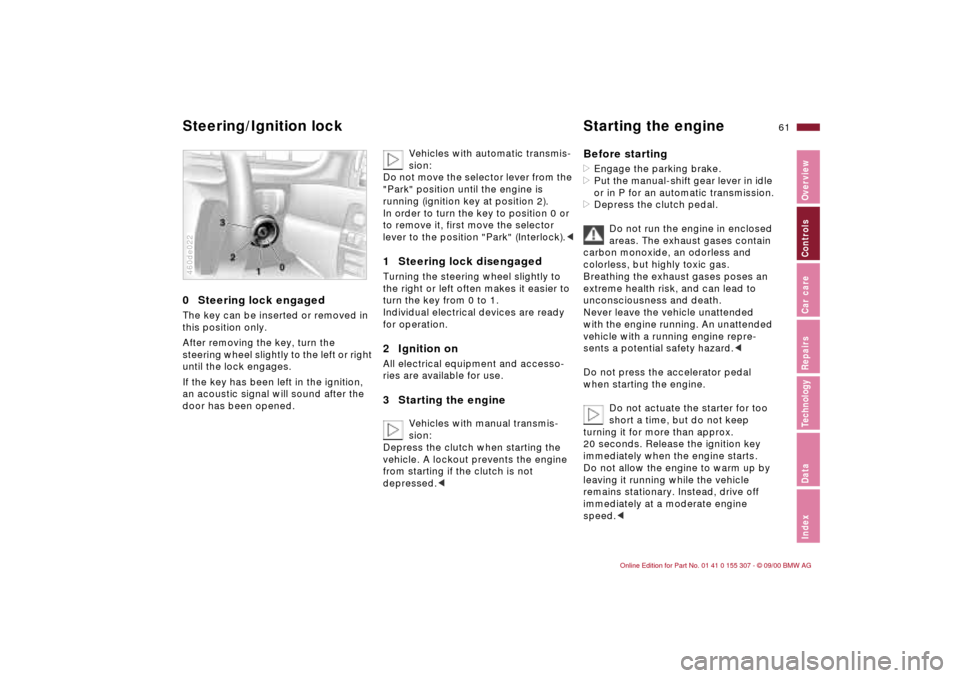
0 Steering lock engaged The key can be inserted or removed in
this position only.
After removing the key, turn the
steering wheel slightly to the left or right
until the lock engages.
If the key has been left in the ignition,
an acoustic signal will sound after the
door has been opened.460de022
Vehicles with automatic transmis-
sion:
Do not move the selector lever from the
"Park" position until the engine is
running (ignition key at position 2).
In order to turn the key to position 0 or
to remove it, first move the selector
lever to the position "Park" (Interlock).<
1 Steering lock disengaged Turning the steering wheel slightly to
the right or left often makes it easier to
turn the key from 0 to 1.
Individual electrical devices are ready
for operation.2 Ignition onAll electrical equipment and accesso-
ries are available for use.3 Starting the engine
Vehicles with manual transmis-
sion:
Depress the clutch when starting the
vehicle. A lockout prevents the engine
from starting if the clutch is not
depressed.<
Before starting>Engage the parking brake.
>Put the manual-shift gear lever in idle
or in P for an automatic transmission.
>Depress the clutch pedal.
Do not run the engine in enclosed
areas. The exhaust gases contain
carbon monoxide, an odorless and
colorless, but highly toxic gas.
Breathing the exhaust gases poses an
extreme health risk, and can lead to
unconsciousness and death.
Never leave the vehicle unattended
with the engine running. An unattended
vehicle with a running engine repre-
sents a potential safety hazard.<
Do not press the accelerator pedal
when starting the engine.
Do not actuate the starter for too
short a time, but do not keep
turning it for more than approx.
20 seconds. Release the ignition key
immediately when the engine starts.
Do not allow the engine to warm up by
leaving it running while the vehicle
remains stationary. Instead, drive off
immediately at a moderate engine
speed.<
Steering/Ignition lock Starting the engine
Page 62 of 203

62n
Starting the engine Switching off the engine If the engine does not start on the first
attempt (if it is very hot or cold, for
instance):
>Press the accelerator pedal halfway
down while engaging the starter.
Cold start at very low temperatures
approx. +5 7 (Ð15 6) at high altitude
over 3,300 ft (1000 m):
>On the first start attempt, engage
the starter for a longer period
(approx. 10 seconds).
>Press the accelerator pedal halfway
down while engaging the starter.
Engine idle speed is controlled by the
engine computer system. Increased
speeds at start-up are normal and
should decrease as the engine warms
up. If engine speed does not decrease,
service is required.
To prevent the battery from dischar-
ging, always switch off electrical
devices which are not in use and the
ignition when the vehicle is not being
driven.Turn the ignition key to position 1 or 0.
Never remove the ignition key
while the vehicle is still moving.
If you did so, the steering lock would
engage when the steering wheel is
turned.
When you leave the vehicle, always
remove the ignition key and engage the
steering lock.
Vehicles with manual transmission:
Always engage the parking brake when
parking on slopes and inclined
surfaces, since placing the lever in
1st gear or reverse may not provide
adequate resistance to rolling.
Vehicles with automatic transmission:
Place the selector lever in "Park."<
Page 63 of 203
63n
IndexDataTechnologyRepairsCar careControlsOverview
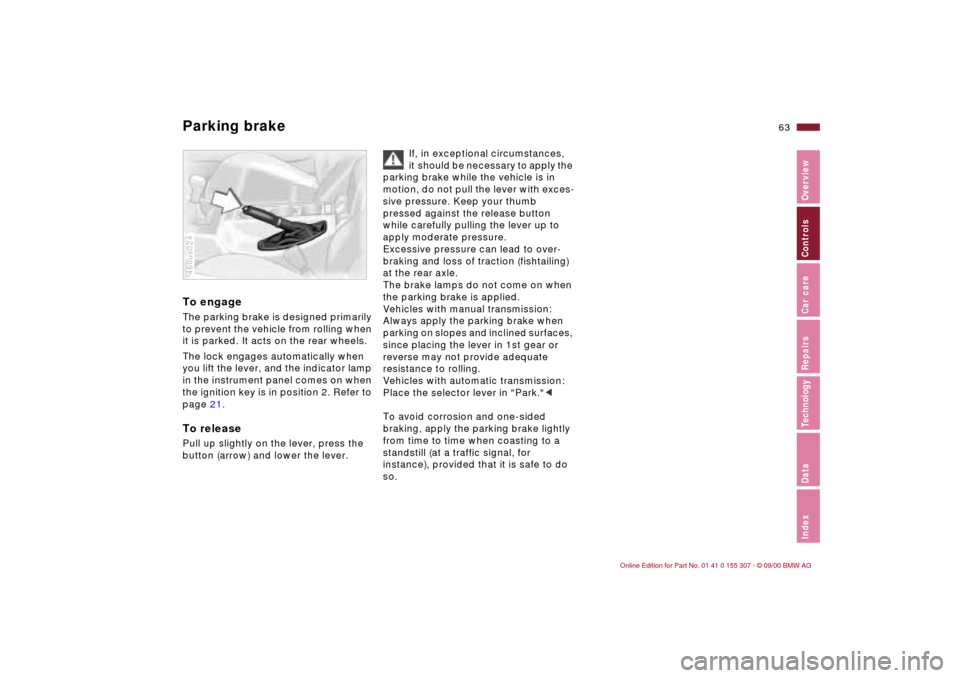
Parking brake To engageThe parking brake is designed primarily
to prevent the vehicle from rolling when
it is parked. It acts on the rear wheels.
The lock engages automatically when
you lift the lever, and the indicator lamp
in the instrument panel comes on when
the ignition key is in position 2. Refer to
page 21.To releasePull up slightly on the lever, press the
button (arrow) and lower the lever.460us024
If, in exceptional circumstances,
it should be necessary to apply the
parking brake while the vehicle is in
motion, do not pull the lever with exces-
sive pressure. Keep your thumb
pressed against the release button
while carefully pulling the lever up to
apply moderate pressure.
Excessive pressure can lead to over-
braking and loss of traction (fishtailing)
at the rear axle.
The brake lamps do not come on when
the parking brake is applied.
Vehicles with manual transmission:
Always apply the parking brake when
parking on slopes and inclined surfaces,
since placing the lever in 1st gear or
reverse may not provide adequate
resistance to rolling.
Vehicles with automatic transmission:
Place the selector lever in "Park."<
To avoid corrosion and one-sided
braking, apply the parking brake lightly
from time to time when coasting to a
standstill (at a traffic signal, for
instance), provided that it is safe to do
so.
Page 64 of 203
64n
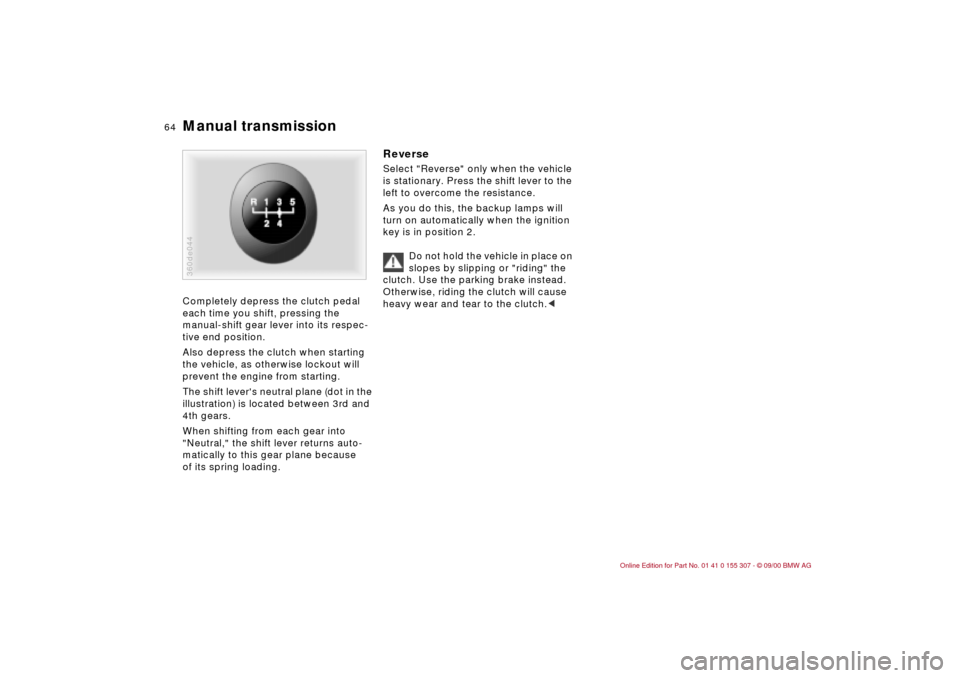
Manual transmission Completely depress the clutch pedal
each time you shift, pressing the
manual-shift gear lever into its respec-
tive end position.
Also depress the clutch when starting
the vehicle, as otherwise lockout will
prevent the engine from starting.
The shift lever's neutral plane (dot in the
illustration) is located between 3rd and
4th gears.
When shifting from each gear into
"Neutral," the shift lever returns auto-
matically to this gear plane because
of its spring loading.360de044
Reverse Select "Reverse" only when the vehicle
is stationary. Press the shift lever to the
left to overcome the resistance.
As you do this, the backup lamps will
turn on automatically when the ignition
key is in position 2.
Do not hold the vehicle in place on
slopes by slipping or "riding" the
clutch. Use the parking brake instead.
Otherwise, riding the clutch will cause
heavy wear and tear to the clutch.<